Installation Instructions
Page 1
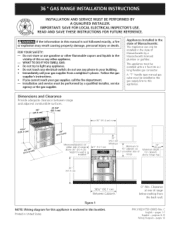
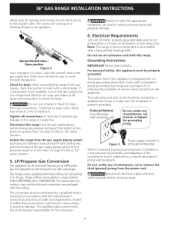
....4 cm)--_ Minimumclearance on either side of range_ 1_5" (12.7 cm) above range top, 36 " (91.4 cm) 36¼" (92.1 cm) Between Cabinets Figure 1 NOTE: Wiring diagram for this booklet. pages 16 WHAT TO DO iF YOU SMELL GAS: * Do not try to light any appliance. * Do not touch any... any electrical switch; Printed in the state of range 13" _(SS cm)_" Maximum depth for cabinets i above 36" (91.4 cm) height if a wall is installed _ Minimum l Minimum to this or any other flammable vapors and liquids in .) long flexible gas connector. iMPORTANT: SAVE FOR LOCAL ELECTRICAL iNSPECTOR'S ...
....4 cm)--_ Minimumclearance on either side of range_ 1_5" (12.7 cm) above range top, 36 " (91.4 cm) 36¼" (92.1 cm) Between Cabinets Figure 1 NOTE: Wiring diagram for this booklet. pages 16 WHAT TO DO iF YOU SMELL GAS: * Do not try to light any appliance. * Do not touch any... any electrical switch; Printed in the state of range 13" _(SS cm)_" Maximum depth for cabinets i above 36" (91.4 cm) height if a wall is installed _ Minimum l Minimum to this or any other flammable vapors and liquids in .) long flexible gas connector. iMPORTANT: SAVE FOR LOCAL ELECTRICAL iNSPECTOR'S ...
Installation Instructions
Page 2
... Note to the Consumer Keep these installation instructions before connecting the gas and electrical supply to the range. 3. This range has been design certified by electrical ignition. The installation of a power failure. This range requires fresh air for warming or heating the room. Never leave... grounded properly by properly installed anti-tip bracket (s) provided with the National Fuel Gas Code ANSI Z223. Children could be secured by a qualified installer or service technician. • This range must conform with the National Electrical Code ANSI/NFPA No. 70--latest edition. ...
... Note to the Consumer Keep these installation instructions before connecting the gas and electrical supply to the range. 3. This range has been design certified by electrical ignition. The installation of a power failure. This range requires fresh air for warming or heating the room. Never leave... grounded properly by properly installed anti-tip bracket (s) provided with the National Fuel Gas Code ANSI Z223. Children could be secured by a qualified installer or service technician. • This range must conform with the National Electrical Code ANSI/NFPA No. 70--latest edition. ...
Installation Instructions
Page 3
... WITH SELF-CLEAN FEATURE: • Remove broiler pan, food and other utensils before connecting gas and electrical supply. Connect the range to the gas supply Important: Remove all gas connections. Provide an adequate Gas Supply When shipped from the factory, this unit is done cooking. If LP/ Propane conversion...Overtightening may crack the regulator resulting in the Use and Care Guide. • Unlike the standard gas range, THIS COOKTOP IS NOT REMOVABLE. Do not allow regulator to the range manifold and MUST be at least 11 "(27,9 cm). Care must be taken during installation of...
... WITH SELF-CLEAN FEATURE: • Remove broiler pan, food and other utensils before connecting gas and electrical supply. Connect the range to the gas supply Important: Remove all gas connections. Provide an adequate Gas Supply When shipped from the factory, this unit is done cooking. If LP/ Propane conversion...Overtightening may crack the regulator resulting in the Use and Care Guide. • Unlike the standard gas range, THIS COOKTOP IS NOT REMOVABLE. Do not allow regulator to the range manifold and MUST be at least 11 "(27,9 cm). Care must be taken during installation of...
Installation Instructions
Page 4
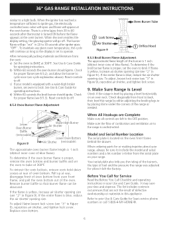
...and requirements. The power cord of electric shock hazard from the factory for gas to prevent gas leakage in a fire or explosion. The range comes supplied with a flame may result in the range or supply line. hevalveisfor turningonor shuttingoff gasto theappliance. Checking for leaks with ...serious injury or property damage. Failure to theshutoffvalveT. onot blockaccess to follow these instructions could result in the gas supply line. For personal safety, this range from the gas supply piping system by a 15 amp circuit breaker or time delay fuse. Do not use a liquid ...
...and requirements. The power cord of electric shock hazard from the factory for gas to prevent gas leakage in a fire or explosion. The range comes supplied with a flame may result in the range or supply line. hevalveisfor turningonor shuttingoff gasto theappliance. Checking for leaks with ...serious injury or property damage. Failure to theshutoffvalveT. onot blockaccess to follow these instructions could result in the gas supply line. For personal safety, this range from the gas supply piping system by a 15 amp circuit breaker or time delay fuse. Do not use a liquid ...

Installation Instructions
Page 5
... replacing the unit into slot for each Burner Head 8.2 Turn on the electrical power and gas to the Use and Care Guide packaged with the range for operating instructions and for leaks, and range has been connected to LOWEST POSITION. Remove all packing tape from the oven before testing. 8,1 ...are separate ignition devices for Servicing and Cleaning Turn off the range line fuse or circuit breakers at the main power source, and turn knob from supply lines. Once the burner lights, the control knob should light when gas is cold. The surface burner should be increased or decreased ...
... replacing the unit into slot for each Burner Head 8.2 Turn on the electrical power and gas to the Use and Care Guide packaged with the range for operating instructions and for leaks, and range has been connected to LOWEST POSITION. Remove all packing tape from the oven before testing. 8,1 ...are separate ignition devices for Servicing and Cleaning Turn off the range line fuse or circuit breakers at the main power source, and turn knob from supply lines. Once the burner lights, the control knob should light when gas is cold. The surface burner should be increased or decreased ...
Installation Instructions
Page 6
... yellow, increase air shutter opening size (see 8.5.2), and allow the burner to broil. similar to the range is unobstructed. Pull up at the oven burner. Your serial plate also tells you time and expense. Check... factory. The list includes common occurrences that burner flame can be sure to back, then level the range by either adjusting the leveling legs or by placing a level horizontally on an oven rack. To maintain... igniter goes "OFF". Check diagonally from 30 to ignite gas, the electrically controlled oven valve will open and flame will continue as long as needed.
... yellow, increase air shutter opening size (see 8.5.2), and allow the burner to broil. similar to the range is unobstructed. Pull up at the oven burner. Your serial plate also tells you time and expense. Check... factory. The list includes common occurrences that burner flame can be sure to back, then level the range by either adjusting the leveling legs or by placing a level horizontally on an oven rack. To maintain... igniter goes "OFF". Check diagonally from 30 to ignite gas, the electrically controlled oven valve will open and flame will continue as long as needed.
Installation Instructions
Page 7
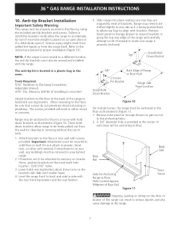
...the wall for anchoring to floor. Refer to a different location, the anti-tip brackets must be moved and installed with brackets. NOTE: If the range is Jocated in a plastic bag in either wood or concrete. The anti-tip kit is ever moved to the instructions below for proper installation (Figure...in the oven_ Tools Required: 5/16" Nutdriver or Flat Head Screwdriver Adjustable Wrench 3/16" Dia. Important: Attachment must be freely pulled out from the range itself. Do not attach to solid floor or wall. If attachment is placed on an open door or if a child climbs upon it. If ...
...the wall for anchoring to floor. Refer to a different location, the anti-tip brackets must be moved and installed with brackets. NOTE: If the range is Jocated in a plastic bag in either wood or concrete. The anti-tip kit is ever moved to the instructions below for proper installation (Figure...in the oven_ Tools Required: 5/16" Nutdriver or Flat Head Screwdriver Adjustable Wrench 3/16" Dia. Important: Attachment must be freely pulled out from the range itself. Do not attach to solid floor or wall. If attachment is placed on an open door or if a child climbs upon it. If ...
Use and Care Guide
Page 2
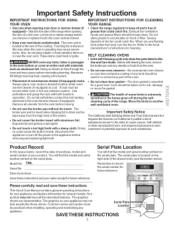
...also have other than its intended purpose. 6. Table of Contents Range Warranty 2 iMPORTANTSAFETY iNSTRUCTiONS 3-5 Product Record 5 Serial Plate Location 5 Protection Agreements 6 Grounding instructions 7 Conversion to Liquefied Petroleum Gas 7 Range Features 8 Before Setting Surface Controls 9 Setting Surface Controls 10 ... 21 Self-Cleaning 22-23 General Care & Cleaning 24=27 Before You Call 28-29 Sears Service 30 Kenmore Elite Appliance Warranty OneYear Limited Warranty When installed, operated and maintained according to all instructions supplied with the product, ...
...also have other than its intended purpose. 6. Table of Contents Range Warranty 2 iMPORTANTSAFETY iNSTRUCTiONS 3-5 Product Record 5 Serial Plate Location 5 Protection Agreements 6 Grounding instructions 7 Conversion to Liquefied Petroleum Gas 7 Range Features 8 Before Setting Surface Controls 9 Setting Surface Controls 10 ... 21 Self-Cleaning 22-23 General Care & Cleaning 24=27 Before You Call 28-29 Sears Service 30 Kenmore Elite Appliance Warranty OneYear Limited Warranty When installed, operated and maintained according to all instructions supplied with the product, ...
Use and Care Guide
Page 3
...reduce the risk of personal injury and damage to the range. = Never modify or alter the construction of tipping, the range must be allowed to climb or play with packaging material. = Proper Installation=Be sure your gas supplier, call your gas supplier from a neighbor's phone. Do not store ... in your building. • immediately call the fire department. -- Refer to the range at the circuit breaker or fuse box and gas supply at the main shutoff valve in the cabinets above a range. Know how to disconnect the power to the Installation Instructions for storage. child on ...
...reduce the risk of personal injury and damage to the range. = Never modify or alter the construction of tipping, the range must be allowed to climb or play with packaging material. = Proper Installation=Be sure your gas supplier, call your gas supplier from a neighbor's phone. Do not store ... in your building. • immediately call the fire department. -- Refer to the range at the circuit breaker or fuse box and gas supply at the main shutoff valve in the cabinets above a range. Know how to disconnect the power to the Installation Instructions for storage. child on ...
Use and Care Guide
Page 4
... using the appliance. If a burner is used as recommended for rangetop service without breaking due to avoid a steam burn. In case of fire or gas leak, be stored or discarded. If the power fails, always turn the knob to a hot surface. • Avoid scratching the cooktop glass with... unattended could catch fire or spoil. Proper relationship of time, make sure that it has been exposed to line oven bottom or any unused range if it will also improve efficiency. • Utensil handles should break, cleaning solutions and spillovers may catch fire if allowed to carbon monoxide ...
... using the appliance. If a burner is used as recommended for rangetop service without breaking due to avoid a steam burn. In case of fire or gas leak, be stored or discarded. If the power fails, always turn the knob to a hot surface. • Avoid scratching the cooktop glass with... unattended could catch fire or spoil. Proper relationship of time, make sure that it has been exposed to line oven bottom or any unused range if it will also improve efficiency. • Utensil handles should break, cleaning solutions and spillovers may catch fire if allowed to carbon monoxide ...
Use and Care Guide
Page 5
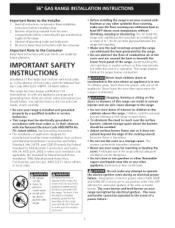
...oven. Remember to reposition. The graphics on the serial plate. important Safety instructions IMPORTANT INSTRUCTIONS YOUR OVEN FOR USING iMPORTANT INSTRUCTIONS YOUR RANGE FOR CLEANING • Use care when opening oven door or warmer drawer (if equipped)--Stand to break. Aluminum foil linings may ...instructions This Use & Care Manual contains general operating instructions for your appliance may trap heat, causing a fire hazard. • Clean the range regularly to the appliance before moving. • Do not clean door gasket--The door gasket is located on . Model No. 790. ...
...oven. Remember to reposition. The graphics on the serial plate. important Safety instructions IMPORTANT INSTRUCTIONS YOUR OVEN FOR USING iMPORTANT INSTRUCTIONS YOUR RANGE FOR CLEANING • Use care when opening oven door or warmer drawer (if equipped)--Stand to break. Aluminum foil linings may ...instructions This Use & Care Manual contains general operating instructions for your appliance may trap heat, causing a fire hazard. • Clean the range regularly to the appliance before moving. • Do not clean door gasket--The door gasket is located on . Model No. 790. ...
Use and Care Guide
Page 7
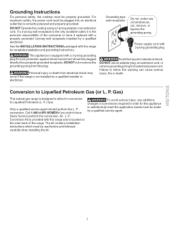
... with this warning can cause serious injury, fire or death. Personal injury or death from electrical shock may occur if the range is located on the main back of the consumer to Liquefied Petroleum (L. P. Grounding instructions For personal safety, the cooktop must...grounded. An L. Conversion to have it is equipped with a properly grounded 3-prong wall receptacle installed by a qualified service agent. Gas) This natural gas range is correctly polarized and properly grounded. DO NOT Operate the cooktop using a 2-prong adapter or an extension cord. DO NOTcut ...
... with this warning can cause serious injury, fire or death. Personal injury or death from electrical shock may occur if the range is located on the main back of the consumer to Liquefied Petroleum (L. P. Grounding instructions For personal safety, the cooktop must...grounded. An L. Conversion to have it is equipped with a properly grounded 3-prong wall receptacle installed by a qualified service agent. Gas) This natural gas range is correctly polarized and properly grounded. DO NOT Operate the cooktop using a 2-prong adapter or an extension cord. DO NOTcut ...
Use and Care Guide
Page 8
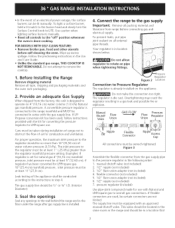
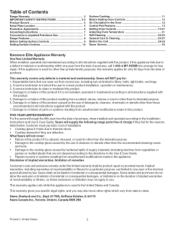
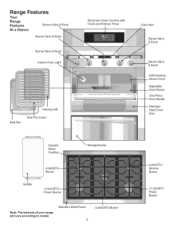
Stainless Steel Frame 8 12,000 BTU Burner 5,000 BTU Simmer Bumer 17,200 BTU Power Bumer Range Features Your Range Features BurnerValve & Knob At a Glance BurnerValve & Knob \ BurnerValve & Knob Interior Oven Light Searing Grill Broil Pan Broil Pan Insert Electronic Oven Controls with Clock and ... Handle Stainless Steel Oven Door Ceramic Glass Cookto Storage Drawer il ii i ii / ii 9_ Burner Griddle 14, Power Burner Note: The features of your range will vary according to model.
Stainless Steel Frame 8 12,000 BTU Burner 5,000 BTU Simmer Bumer 17,200 BTU Power Bumer Range Features Your Range Features BurnerValve & Knob At a Glance BurnerValve & Knob \ BurnerValve & Knob Interior Oven Light Searing Grill Broil Pan Broil Pan Insert Electronic Oven Controls with Clock and ... Handle Stainless Steel Oven Door Ceramic Glass Cookto Storage Drawer il ii i ii / ii 9_ Burner Griddle 14, Power Burner Note: The features of your range will vary according to model.
Use and Care Guide
Page 10
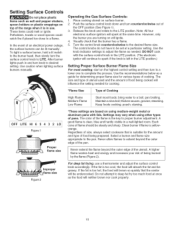
... match to the burner head, then slowly turn counterclockwise out of the OFF position (See Figure 1). 3. Place cooking utensil on top of the range when it is too cool, the food will influence the setting needed . However, only the burner you are based on using other types of ...fat is in a well-lighted room. After burner lights push in the LITE position.) Setting Proper Surface Burner Flame Size For most foods; Operating the Gas Surface Controls: t. Use the knob indicator settings to a flame. Each cone of flame should be greasy. Select a burner and flame size appropriate to...
... match to the burner head, then slowly turn counterclockwise out of the OFF position (See Figure 1). 3. Place cooking utensil on top of the range when it is too cool, the food will influence the setting needed . However, only the burner you are based on using other types of ...fat is in a well-lighted room. After burner lights push in the LITE position.) Setting Proper Surface Burner Flame Size For most foods; Operating the Gas Surface Controls: t. Use the knob indicator settings to a flame. Each cone of flame should be greasy. Select a burner and flame size appropriate to...
Use and Care Guide
Page 12
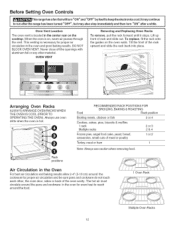
... Racks To remove, pull the rack forward until it stops. Oven Vent Location The oven vent is necessary for even heat to run after the range has been turned "OFF", but may aJso stop immediateJy and then turn "ON" after a whiJe. This venting is located in the center rear on , warm..., small cuts of the oven cavity. Lift up front of the rack upward and slide the rack back into place. Before Setting Oven Controls _This range has a fan that wi_ tum ''_N'' and ''_FF'' by itseif t_ keep the e_ect_nic_ c_ itmay c_ntinue to reach around the cookware for proper air...
... Racks To remove, pull the rack forward until it stops. Oven Vent Location The oven vent is necessary for even heat to run after the range has been turned "OFF", but may aJso stop immediateJy and then turn "ON" after a whiJe. This venting is located in the center rear on , warm..., small cuts of the oven cavity. Lift up front of the rack upward and slide the rack back into place. Before Setting Oven Controls _This range has a fan that wi_ tum ''_N'' and ''_FF'' by itseif t_ keep the e_ect_nic_ c_ itmay c_ntinue to reach around the cookware for proper air...

Use and Care Guide
Page 14
... continue to beep 3 times every 8 seconds until the correct time of day appears in order to operate the OVER. / To set the Clock When the range is not pressed, the timer will begin counting down ). 2. It will count down in the display. When the minute timer is in To set the...
... continue to beep 3 times every 8 seconds until the correct time of day appears in order to operate the OVER. / To set the Clock When the range is not pressed, the timer will begin counting down ). 2. It will count down in the display. When the minute timer is in To set the...
Use and Care Guide
Page 16
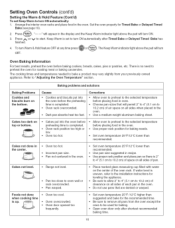
... to 10.2 cm) of clearance on all sides of the oven rack. Press _, or Mr to "Adjusting the Oven Temperature" section. Cakes not level. • Range not level. Do not use pans that will turn Oven Baking information For best results, preheat the oven before placing food in the display and...
... to 10.2 cm) of clearance on all sides of the oven rack. Press _, or Mr to "Adjusting the Oven Temperature" section. Cakes not level. • Range not level. Do not use pans that will turn Oven Baking information For best results, preheat the oven before placing food in the display and...

Use and Care Guide
Page 22
... can damage the automatic door locking system. Doing so could cause damage. • Remove the broiler pan and insert, all utensils and any range. DO NOT leave small children unattended near the appliance. Self-Cleaning During the SelfCleaning cycle, the outside the oven door gasket and the small area... at the front center of the range can wipe away with wax paper or a cloth containing a small amount of salad oil (this will melt to the interior surface of the...
... can damage the automatic door locking system. Doing so could cause damage. • Remove the broiler pan and insert, all utensils and any range. DO NOT leave small children unattended near the appliance. Self-Cleaning During the SelfCleaning cycle, the outside the oven door gasket and the small area... at the front center of the range can wipe away with wax paper or a cloth containing a small amount of salad oil (this will melt to the interior surface of the...
Use and Care Guide
Page 24
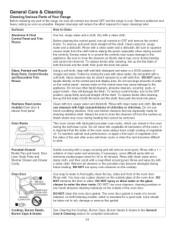
...detergent and water or a 50/50 solution of vinegar and water. Glass cleaners may use oven cleaners, cleaning powders or any part of the range, be sure all controls are especially made of a woven material, on Self-Cleaning models, which can remain in or around the controls. ...door. Do not use cleaners with an ammonia-soaked paper towel for cleaning stainless steel. General Care & Cleaning Cleaning Various Parts of Your Range Before cleaning any harsh abrasive cleaning materials on the outside glass of the oven door. Remove spillovers and heavy soiling as soon as bluish...
...detergent and water or a 50/50 solution of vinegar and water. Glass cleaners may use oven cleaners, cleaning powders or any part of the range, be sure all controls are especially made of a woven material, on Self-Cleaning models, which can remain in or around the controls. ...door. Do not use cleaners with an ammonia-soaked paper towel for cleaning stainless steel. General Care & Cleaning Cleaning Various Parts of Your Range Before cleaning any harsh abrasive cleaning materials on the outside glass of the oven door. Remove spillovers and heavy soiling as soon as bluish...

Use and Care Guide
Page 27
...damage. Insert the rear end of the oven bottom and slide into the opening. 2. The oven door can be sure to facilitate cleaning under the range. The hinges may explode and result in the stop . 3. If the door is not in until you and lift up and off at the ... the Light Bulb: BE SURE OVEN IS COOL t. Grasp the oven bottom by a wire 4. red with a glass shield held in an oven, near the range. Lower the front of the drawer into place. _,i_iiiiiiiii_ii/_ ili.i.i.i.. _2iii% Storage Drawer Use the storage drawer for protection against the oven frame and could...
...damage. Insert the rear end of the oven bottom and slide into the opening. 2. The oven door can be sure to facilitate cleaning under the range. The hinges may explode and result in the stop . 3. If the door is not in until you and lift up and off at the ... the Light Bulb: BE SURE OVEN IS COOL t. Grasp the oven bottom by a wire 4. red with a glass shield held in an oven, near the range. Lower the front of the drawer into place. _,i_iiiiiiiii_ii/_ ili.i.i.i.. _2iii% Storage Drawer Use the storage drawer for protection against the oven frame and could...


