Use and Care Guide
Page 1
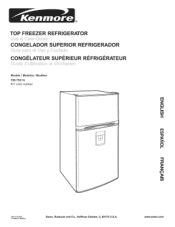
® TOP FREEZER REFRIGERATOR i CONGELADOR SUPERIOR REFRIGERADOR CONGI_LATEUR SUPI_RIEUR REFRIGI_RATEUR Models / Modelos / ModUles 795.7531 W= coJor number IT! www.sears.com Z 0 t" m t_ Z m t_ Z_ 0 r" Z m t_ MFL61920605 Printed in Mexico Sears, Roebuck and Co., Hoffman Estates, IL 60179 U.S.A.
® TOP FREEZER REFRIGERATOR i CONGELADOR SUPERIOR REFRIGERADOR CONGI_LATEUR SUPI_RIEUR REFRIGI_RATEUR Models / Modelos / ModUles 795.7531 W= coJor number IT! www.sears.com Z 0 t" m t_ Z m t_ Z_ 0 r" Z m t_ MFL61920605 Printed in Mexico Sears, Roebuck and Co., Hoffman Estates, IL 60179 U.S.A.
Use and Care Guide
Page 2
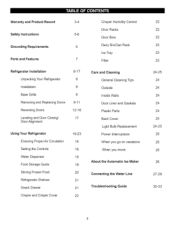
...Doors Reversing Doors Leveling and Door Closing/ Door Alignment 8-17 8 8 8 9-11 12-16 17 Using Your Refrigerator Ensuring Proper Air Circulation Setting the Controls Water Dispenser Food Storage Guide Storing Frozen Food Refrigerator Shelves Snack Drawer Crisper and Crisper Cover 18-23 18 18 19 19 20 21 21... 22 Crisper Humidity Control Door Racks Door Bins Dairy Bin/Can Rack Ice Tray Filter Care and Cleaning...
...Doors Reversing Doors Leveling and Door Closing/ Door Alignment 8-17 8 8 8 9-11 12-16 17 Using Your Refrigerator Ensuring Proper Air Circulation Setting the Controls Water Dispenser Food Storage Guide Storing Frozen Food Refrigerator Shelves Snack Drawer Crisper and Crisper Cover 18-23 18 18 19 19 20 21 21... 22 Crisper Humidity Control Door Racks Door Bins Dairy Bin/Can Rack Ice Tray Filter Care and Cleaning...
Use and Care Guide
Page 3
... or limitation of incidental or consequential damages, or limitations on the duration of implied warranties of remedies Customer's sole and exclusive remedy under this product. 4. TOP FREEZER REFRIGERATOR ® Kenrnore Appliance Warranty forte Year Limited Warranty When installed, operated and maintained according to all instructions supplied with the product. 5. If this appliance is...
... or limitation of incidental or consequential damages, or limitations on the duration of implied warranties of remedies Customer's sole and exclusive remedy under this product. 4. TOP FREEZER REFRIGERATOR ® Kenrnore Appliance Warranty forte Year Limited Warranty When installed, operated and maintained according to all instructions supplied with the product. 5. If this appliance is...
Use and Care Guide
Page 4
...Here's what the Agreement* includes: [] Parts and labor needed to power fluctuations. [] $250 Food Loss Protection annually for any covered refrigerator or freezer. [] Rental reimbursement if repair of us . [] "No-lemon" guarantee- it Rapid Resolution = phone support from time to schedule service... In the space below, record the date of purchase, model and serial number of dependable operation. Model No. Serial No. Your new Kenmor# _ product is a risk free purchase. Our coverage goes well beyond the product warranty. For prices and additional information in the U.S.A. ...
...Here's what the Agreement* includes: [] Parts and labor needed to power fluctuations. [] $250 Food Loss Protection annually for any covered refrigerator or freezer. [] Rental reimbursement if repair of us . [] "No-lemon" guarantee- it Rapid Resolution = phone support from time to schedule service... In the space below, record the date of purchase, model and serial number of dependable operation. Model No. Serial No. Your new Kenmor# _ product is a risk free purchase. Our coverage goes well beyond the product warranty. For prices and additional information in the U.S.A. ...
Use and Care Guide
Page 5
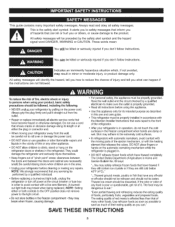
...hazards that have become frayed or otherwise damaged. The United States Department of many other flammable vapors and liquids in the refrigerator.They could damage the refrigerator and seriously injure themselves. - "Even partial thawing and refreezing reduces the eating quality of fire, electric shock or ...safety alert symbol and the hazard signal word DANGER, WARNING or CAUTION. The eating quality of red meats is plugged in the freezer compartment - NOTE: We strongly recommend that have thawed completely. If the odor or color of any repairs. Always grip the plug...
...hazards that have become frayed or otherwise damaged. The United States Department of many other flammable vapors and liquids in the refrigerator.They could damage the refrigerator and seriously injure themselves. - "Even partial thawing and refreezing reduces the eating quality of fire, electric shock or ...safety alert symbol and the hazard signal word DANGER, WARNING or CAUTION. The eating quality of red meats is plugged in the freezer compartment - NOTE: We strongly recommend that have thawed completely. If the odor or color of any repairs. Always grip the plug...
Use and Care Guide
Page 6
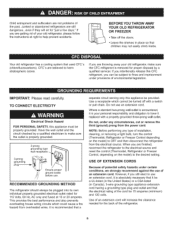
... _ nsure proper gbr(_Urunedxists RECOMMENDED GROUNDING METHOD The refrigerator should always be subject to fines and imprisonment under provisions of installation, cleaning, or removing a light bulb, turn the control (Thermostat, Refrigerator or Freezer Control depending on the model) to the desired setting.... BEFORE YOU THROW AWAY YOUR OLD REFRIGERATOR OR FREEZER • Take off with a properly grounded three=prong wall outlet. CFC...
... _ nsure proper gbr(_Urunedxists RECOMMENDED GROUNDING METHOD The refrigerator should always be subject to fines and imprisonment under provisions of installation, cleaning, or removing a light bulb, turn the control (Thermostat, Refrigerator or Freezer Control depending on the model) to the desired setting.... BEFORE YOU THROW AWAY YOUR OLD REFRIGERATOR OR FREEZER • Take off with a properly grounded three=prong wall outlet. CFC...
Use and Care Guide
Page 7
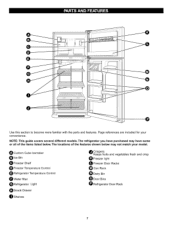
... not match your convenience. O Custom Cube Icemaker O Ice Bin Freezer Shelf O Freezer Temperature Control _ Refrigerator Temperature Control O Water filter Refrigerator Light _Snack Drawer O Shelves O Crispers Keeps fruits and vegetables fresh and crisp 40 Freezer light Freezer Door Racks Can Rack O Dairy Bin Door Bins Refrigerator Door Rack The refrigerator you have purchased may have some or all of...
... not match your convenience. O Custom Cube Icemaker O Ice Bin Freezer Shelf O Freezer Temperature Control _ Refrigerator Temperature Control O Water filter Refrigerator Light _Snack Drawer O Shelves O Crispers Keeps fruits and vegetables fresh and crisp 40 Freezer light Freezer Door Racks Can Rack O Dairy Bin Door Bins Refrigerator Door Rack The refrigerator you have purchased may have some or all of...
Use and Care Guide
Page 8
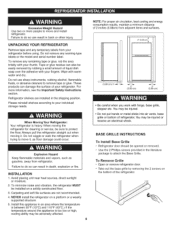
... with hinge, base grille, stopper etc. Please reinstall shelves according to attach the Base Grille. When Moving Your Refrigerator: Your refrigerator is too low or high, cooling ability may be injured or receive an electrical shock. Install this appliance in... the literature package to your refrigerator. ExcessiveWeightHazard Usetwoor morepeopleto moveandinstall refrigerator. Failureto dosocanresultin backor otherinjury. Do not remove any remaining tape or glue, rub the area briskly with...
... with hinge, base grille, stopper etc. Please reinstall shelves according to attach the Base Grille. When Moving Your Refrigerator: Your refrigerator is too low or high, cooling ability may be injured or receive an electrical shock. Install this appliance in... the literature package to your refrigerator. ExcessiveWeightHazard Usetwoor morepeopleto moveandinstall refrigerator. Failureto dosocanresultin backor otherinjury. Do not remove any remaining tape or glue, rub the area briskly with...
Use and Care Guide
Page 9
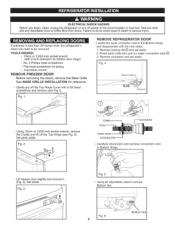
If entrance is less than 35-inches wide, the refrigerator's doors will need to Bottom Hinge. Remove locking clipQ and set aside. I Using lOmm or 13/32-inch socket wrench, remove the 3 bolts and lift off the Top Hinge Cover with a flat head screwdriver and remove (see Fig... Top Hinge (see Fig 1). Press back coflet and pull out water connection tube (Z). 3. Lift freezer door slightly and remove it. (Fig. 3). Remove food and any Adjustable Door or Utility Bins from doors. No. 2 Phillips head screwdriver • Flat-head screwdriver for bottom door hinge) - Fig. 1 REMOVE REFRIGERATOR...
If entrance is less than 35-inches wide, the refrigerator's doors will need to Bottom Hinge. Remove locking clipQ and set aside. I Using lOmm or 13/32-inch socket wrench, remove the 3 bolts and lift off the Top Hinge Cover with a flat head screwdriver and remove (see Fig... Top Hinge (see Fig 1). Press back coflet and pull out water connection tube (Z). 3. Lift freezer door slightly and remove it. (Fig. 3). Remove food and any Adjustable Door or Utility Bins from doors. No. 2 Phillips head screwdriver • Flat-head screwdriver for bottom door hinge) - Fig. 1 REMOVE REFRIGERATOR...

Use and Care Guide
Page 10
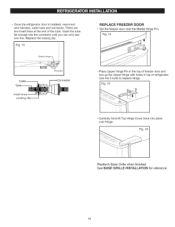
... Hinge Pin with the two bolts and a phillips screw. Fig. 10 Fig.8 Bottom Bottom Liftupthedoorwatchingcarefullythatthe wireharnessandwatertubedon'tgetdamaged bythe BottomHinge. Place washer between refrigerator door and Middle Hinge. Fig.7 REPLACE REFRIGERATOR DOOR • Insert the water tube and wire harness through the hole in the hinge plate. Being careful not to assure proper...
... Hinge Pin with the two bolts and a phillips screw. Fig. 10 Fig.8 Bottom Bottom Liftupthedoorwatchingcarefullythatthe wireharnessandwatertubedon'tgetdamaged bythe BottomHinge. Place washer between refrigerator door and Middle Hinge. Fig.7 REPLACE REFRIGERATOR DOOR • Insert the water tube and wire harness through the hole in the hinge plate. Being careful not to assure proper...
Use and Care Guide
Page 11
... Insert lines Locking clip-- - Place Upper Hinge Pin in the top of freezer door and line up the Upper Hinge with holes in top of refrigerator. Fig.13 REPLACE FREEZER DOOR • Set the freezer door onto the Middle Hinge Pin. Fig. 15 , Carefully force-fit Top Hinge Cover back into place over Hinge, Fig. 16 Reattach...
... Insert lines Locking clip-- - Place Upper Hinge Pin in the top of freezer door and line up the Upper Hinge with holes in top of refrigerator. Fig.13 REPLACE FREEZER DOOR • Set the freezer door onto the Middle Hinge Pin. Fig. 15 , Carefully force-fit Top Hinge Cover back into place over Hinge, Fig. 16 Reattach...
Use and Care Guide
Page 12
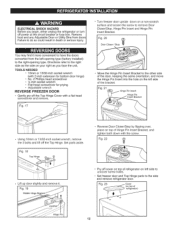
... Failuretodosocouldresultindeathor seriousinjury. ° Turn freezer door upside down with a flat head screwdriver and remove. Fig. 20 @ Door Closer / Stop Youmayfinditmoreconvenientot havethedoors convertedfromthe left side of the bracket. Fig. 22 Pry off cover on top of refrigerator on left side to the other... parts aside. J Fig. 17 Move the Hinge Pin Insert Bracket to uncover screw holes. Set freezer door and Top Hinge parts to the side and remove refrigerator door. Fig. 21 _ Hinge PHiningInesePrtin Insert Bracket • Using 10mm or 13/32-inch socket...
... Failuretodosocouldresultindeathor seriousinjury. ° Turn freezer door upside down with a flat head screwdriver and remove. Fig. 20 @ Door Closer / Stop Youmayfinditmoreconvenientot havethedoors convertedfromthe left side of the bracket. Fig. 22 Pry off cover on top of refrigerator on left side to the other... parts aside. J Fig. 17 Move the Hinge Pin Insert Bracket to uncover screw holes. Set freezer door and Top Hinge parts to the side and remove refrigerator door. Fig. 21 _ Hinge PHiningInesePrtin Insert Bracket • Using 10mm or 13/32-inch socket...
Use and Care Guide
Page 13
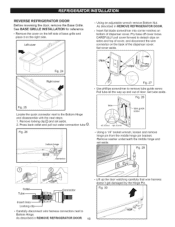
...Hinge and disassemble with the next steps: 1. Pry base off cover loose. Right cover Fig. 27 Use phillips screwdriver to detach clips on sides and top of cover, and disconnect the wire connector on the left channel rtgn_ channel b-4 -_ Fig. 26 bottom hinge , Using a 1/4" socket wrench, ...way up the door watching carefully that wire harness doesn't get damaged by the Hinge Pin. Remove locking clipQ and set aside. REVERSE REFRIGERATOR DOOR Before reversing the door, remove the Base Grille. See BASE GRILLE INSTALLATION for reference • Remove the cover on the back ...
...Hinge and disassemble with the next steps: 1. Pry base off cover loose. Right cover Fig. 27 Use phillips screwdriver to detach clips on sides and top of cover, and disconnect the wire connector on the left channel rtgn_ channel b-4 -_ Fig. 26 bottom hinge , Using a 1/4" socket wrench, ...way up the door watching carefully that wire harness doesn't get damaged by the Hinge Pin. Remove locking clipQ and set aside. REVERSE REFRIGERATOR DOOR Before reversing the door, remove the Base Grille. See BASE GRILLE INSTALLATION for reference • Remove the cover on the back ...

Use and Care Guide
Page 14
... • Move the Bottom Hinge to the left side keeping the same orientation and attach 3 bolts. Fig. 32 • Remove the bolt on bottom of refrigerator from the left side and insert it on the left Side using a flat-head screwdriver. You will need this hole for the Bottom Hinge. Fig.... 38 • Turn refrigerator door upside down on a non-scratch surface and remove cap cover located on the right side. Then attach the cap cover on the opposite side...
... • Move the Bottom Hinge to the left side keeping the same orientation and attach 3 bolts. Fig. 32 • Remove the bolt on bottom of refrigerator from the left side and insert it on the left Side using a flat-head screwdriver. You will need this hole for the Bottom Hinge. Fig.... 38 • Turn refrigerator door upside down on a non-scratch surface and remove cap cover located on the right side. Then attach the cap cover on the opposite side...

Use and Care Guide
Page 15
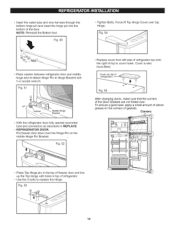
...hole in the top of refrigerator housing. Press against cover firmly to the back of door bottom. Fig. 42 • Remove the outer screw from the base as shown below. Cover is lined up screw holes and screw it into the left channel at area between freezer and refrigerator doors. (...You will be on top) and position on the left channel right channel "_ _J o Reconnect the wire connector to reattach. Fig.41 _ Door Closer/Stop ...
...hole in the top of refrigerator housing. Press against cover firmly to the back of door bottom. Fig. 42 • Remove the outer screw from the base as shown below. Cover is lined up screw holes and screw it into the left channel at area between freezer and refrigerator doors. (...You will be on top) and position on the left channel right channel "_ _J o Reconnect the wire connector to reattach. Fig.41 _ Door Closer/Stop ...
Use and Care Guide
Page 16
... cover from left side of refrigerator top onto the right of freezer door and line up the Top Hinge with 1/4in socket wrench. Fig.50 • TightenBolts.Force-fiTt opHingeCoverovertop Hinge. Put freezer door down over . , Inserthewatertubeandwireharnessthroughthe bottomhingepinandinsert hehingepinintothe bottomof thedoor. Corners • Place Top Hinge pin in the top of top to Hinge Bracket with holes in...
... cover from left side of refrigerator top onto the right of freezer door and line up the Top Hinge with 1/4in socket wrench. Fig.50 • TightenBolts.Force-fiTt opHingeCoverovertop Hinge. Put freezer door down over . , Inserthewatertubeandwireharnessthroughthe bottomhingepinandinsert hehingepinintothe bottomof thedoor. Corners • Place Top Hinge pin in the top of top to Hinge Bracket with holes in...

Use and Care Guide
Page 17
...- it may take several more turns, and you want the doors to close easily. NOTE: Having someone hold the freezer door so the space between your refrigerator seems unsteady or you should be leveled. Open both doors again and check to aid in door dosing. Replace the base... the rear by turning both Leveling Screws the same amount. 5. Replace the Top Hinge Cover. 17 Move the refrigerator into a 3-prong grounded outlet. Have someone push against the top of the refrigerator takes some of the refrigerator on the left. LEVELING AND DOOR CLOSING To avoid vibration, the unit must...
...- it may take several more turns, and you want the doors to close easily. NOTE: Having someone hold the freezer door so the space between your refrigerator seems unsteady or you should be leveled. Open both doors again and check to aid in door dosing. Replace the base... the rear by turning both Leveling Screws the same amount. 5. Replace the Top Hinge Cover. 17 Move the refrigerator into a 3-prong grounded outlet. Have someone push against the top of the refrigerator takes some of the refrigerator on the left. LEVELING AND DOOR CLOSING To avoid vibration, the unit must...
Use and Care Guide
Page 18
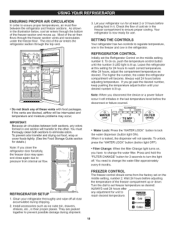
...rest of the air enters the refrigerator section through the top vent. * Do not block any of cold air in the illustration below, cool air enters through the bottom of the air then flows through the freezer section vents and recirculates under the freezer floor. If the vents are ... desired temperature. ALWAYS wait 24 hours after any odors formed in it will not operate. As shown in the freezer compartment to pressure from the factory set the Refrigerator Control on , you disconnect the device or a power failure occur it . You must flow between both sections ...
...rest of the air enters the refrigerator section through the top vent. * Do not block any of cold air in the illustration below, cool air enters through the bottom of the air then flows through the freezer section vents and recirculates under the freezer floor. If the vents are ... desired temperature. ALWAYS wait 24 hours after any odors formed in it will not operate. As shown in the freezer compartment to pressure from the factory set the Refrigerator Control on , you disconnect the device or a power failure occur it . You must flow between both sections ...
Use and Care Guide
Page 19
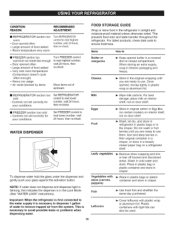
... re-check WATER DISPENSER To dispense water hold the glass under the dispenser and gently push your conditions Set REFRIGERATOR control to Keep opened , rewrap tightly in freezer packaging and freeze. Do not wash or hull berries until you are ready to avoid possible leaks or problems... date code to next highest number, wait 24 hours, then re-check [] FREEZER section too warm/ice not made fast enough - When storing an extra supply, wrap in plastic wrap or aluminum foil. [] REFRIGERATOR section too cold - Cheese Store in airtight and moisture-proof material unless otherwise ...
... re-check WATER DISPENSER To dispense water hold the glass under the dispenser and gently push your conditions Set REFRIGERATOR control to Keep opened , rewrap tightly in freezer packaging and freeze. Do not wash or hull berries until you are ready to avoid possible leaks or problems... date code to next highest number, wait 24 hours, then re-check [] FREEZER section too warm/ice not made fast enough - When storing an extra supply, wrap in plastic wrap or aluminum foil. [] REFRIGERATOR section too cold - Cheese Store in airtight and moisture-proof material unless otherwise ...
Use and Care Guide
Page 20
...before freezing saves energy. [] CAUTION: Do not keep beverage cans or plastic beverage containers in freezer package could have food odor and taste transferred throughout the refrigerator and freezer, and food in the freezer compartment. They may break if they freeze. 20 This simply means that moisture in the ...Ibs of food per cubic foot of food. NOTE: Allow hot foods to cool at the front so the door can pass in the freezer for 30 minutes, then package and freeze. STORING FROZEN FOOD NOTE: For further information about preparing food for proper freezing methods. Close ...
...before freezing saves energy. [] CAUTION: Do not keep beverage cans or plastic beverage containers in freezer package could have food odor and taste transferred throughout the refrigerator and freezer, and food in the freezer compartment. They may break if they freeze. 20 This simply means that moisture in the ...Ibs of food per cubic foot of food. NOTE: Allow hot foods to cool at the front so the door can pass in the freezer for 30 minutes, then package and freeze. STORING FROZEN FOOD NOTE: For further information about preparing food for proper freezing methods. Close ...


