
Use and Care Guide
Page 2
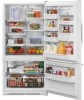
... 5 Location Requirements 5 Electrical Requirements 6 Water Supply Requirements 6 Connect the Water Supply 6 Refrigerator Door(s) and Drawer 7 Adjust the Door 10 REFRIGERATOR USE 10 Using the Controls 10 Ice Maker 11 REFRIGERATOR FEATURES 11 Refrigerator Shelves 11 Crisper and Crisper Cover 11 Crisper Humidity Control 12 Snack Drawer 12 FREEZER FEATURES 12 Ice Service Rack 12 Freezer Door Shelf 12 DOOR FEATURES 12 Dairy Center 12 Door Bins 13 Deep Tilt-Out Door Bucket 13 Full-Width Door Shelf 13 REFRIGERATOR CARE 13 Cleaning 13 Changing the Light Bulb 14 Power...
... 5 Location Requirements 5 Electrical Requirements 6 Water Supply Requirements 6 Connect the Water Supply 6 Refrigerator Door(s) and Drawer 7 Adjust the Door 10 REFRIGERATOR USE 10 Using the Controls 10 Ice Maker 11 REFRIGERATOR FEATURES 11 Refrigerator Shelves 11 Crisper and Crisper Cover 11 Crisper Humidity Control 12 Snack Drawer 12 FREEZER FEATURES 12 Ice Service Rack 12 Freezer Door Shelf 12 DOOR FEATURES 12 Dairy Center 12 Door Bins 13 Deep Tilt-Out Door Bucket 13 Full-Width Door Shelf 13 REFRIGERATOR CARE 13 Cleaning 13 Changing the Light Bulb 14 Power...
Use and Care Guide
Page 3
... RECORD Record your appliance. KENMORE APPLIANCE WARRANTY ONE YEAR LIMITED WARRANTY When installed, operated and maintained according to all instructions supplied with the product. 7. Damage to or failure of parts or systems resulting from normal use for future reference. This warranty applies only while this product. 4. Have this limited warranty shall be liable for free repair. LIMITATION OF REMEDIES Customer's sole and exclusive remedy...
... RECORD Record your appliance. KENMORE APPLIANCE WARRANTY ONE YEAR LIMITED WARRANTY When installed, operated and maintained according to all instructions supplied with the product. 7. Damage to or failure of parts or systems resulting from normal use for future reference. This warranty applies only while this product. 4. Have this limited warranty shall be liable for free repair. LIMITATION OF REMEDIES Customer's sole and exclusive remedy...
Use and Care Guide
Page 4
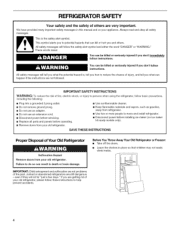
... iNSTRUCTiONS WARNING:To reduce the risk of the past. m Do not use an extension cord. m Disconnect power before installing ice maker (on your old refrigerator. Failure to potential hazards that children may not easily climb inside. 4 Before You Throw Away Your Old Refrigerator or Freezer: • Take off the doors. • Leave the shelves in this manual and on ice maker kit ready models only). m Do not remove...
... iNSTRUCTiONS WARNING:To reduce the risk of the past. m Do not use an extension cord. m Disconnect power before installing ice maker (on your old refrigerator. Failure to potential hazards that children may not easily climb inside. 4 Before You Throw Away Your Old Refrigerator or Freezer: • Take off the doors. • Leave the shelves in this manual and on ice maker kit ready models only). m Do not remove...
Use and Care Guide
Page 5
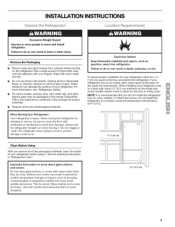
.... Do not install the refrigerator in the Interior FeaturePak. Shelves and covers may be sure to cover the floor with warm water when they are heavy. This is recommended that you remove all packaging materials. Explosion Hazard Keep flammable materials and vapors, such as gasoline, away from surfaces before using it. If your refrigerator before turning on the hinge side (some models, shelves, bins, door shelf rails, and...
.... Do not install the refrigerator in the Interior FeaturePak. Shelves and covers may be sure to cover the floor with warm water when they are heavy. This is recommended that you remove all packaging materials. Explosion Hazard Keep flammable materials and vapors, such as gasoline, away from surfaces before using it. If your refrigerator before turning on the hinge side (some models, shelves, bins, door shelf rails, and...

Use and Care Guide
Page 6
... any type of installation, cleaning, or removing a light bulb, turn the refrigerator to OFE Depending on your refrigerator has a water filter, it may further reduce the water pressure when used in both ends of 40 to 60 psi (276 to 414 kPa). Disconnect the refrigerator from the drill. Water Pressure A cold water supply with water filters, the disposable water filter should be turned off by a switch. If a reverse osmosis water filtration system is connected to your cold water supply, the water...
... any type of installation, cleaning, or removing a light bulb, turn the refrigerator to OFE Depending on your refrigerator has a water filter, it may further reduce the water pressure when used in both ends of 40 to 60 psi (276 to 414 kPa). Disconnect the refrigerator from the drill. Water Pressure A cold water supply with water filters, the disposable water filter should be turned off by a switch. If a reverse osmosis water filtration system is connected to your cold water supply, the water...
Use and Care Guide
Page 7
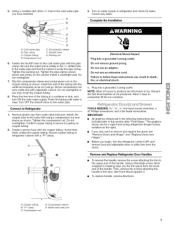
... not overtighten. 7. Insert the end of the tubing in the cold water pipe you may crush the copper tubing. 8. Connect to refrigerator and check for a right-hand swing refrigerator (hinges factory installed on water supply to Refrigerator 1. Using a cordless drill, drill a 1/4"hole in a container or sink, and turn the refrigerator control OFF, and remove food and adjustable door or utility bins from water valve inlet port. Slip the compression sleeve and compression...
... not overtighten. 7. Insert the end of the tubing in the cold water pipe you may crush the copper tubing. 8. Connect to refrigerator and check for a right-hand swing refrigerator (hinges factory installed on water supply to Refrigerator 1. Using a cordless drill, drill a 1/4"hole in a container or sink, and turn the refrigerator control OFF, and remove food and adjustable door or utility bins from water valve inlet port. Slip the compression sleeve and compression...
Use and Care Guide
Page 8
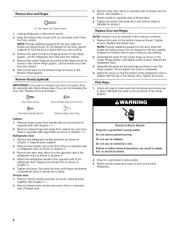
... door closed until bottom hinge is reversed. 1. Attach handle to opposite side of freezer door. 5. Assemble the parts for the bottom hinge as shown in the Bottom Hinge graphic. See Graphic 5-1. 2. Replace the freezer door. Replace the refrigerator door. 3. Final Steps 1. Remove the door stop . Keep all screws. Door Stop Screw Door Handle Seal Screw Front Flat-Head Handle Screw Cabinet Hinge Hole Plug Cabinet 1. Refrigerator door 1. Freezer door 1. Electrical Shock Hazard Plug into a grounded 3 prong outlet. 3. Unplug refrigerator or disconnect power. 2. Remove...
... door closed until bottom hinge is reversed. 1. Attach handle to opposite side of freezer door. 5. Assemble the parts for the bottom hinge as shown in the Bottom Hinge graphic. See Graphic 5-1. 2. Replace the freezer door. Replace the refrigerator door. 3. Final Steps 1. Remove the door stop . Keep all screws. Door Stop Screw Door Handle Seal Screw Front Flat-Head Handle Screw Cabinet Hinge Hole Plug Cabinet 1. Refrigerator door 1. Freezer door 1. Electrical Shock Hazard Plug into a grounded 3 prong outlet. 3. Unplug refrigerator or disconnect power. 2. Remove...

Use and Care Guide
Page 9
Door Removal & Replacement Top Hinge Door Swing Reversal (optional) Front Mount [] A-_'-'_J_ -"" A Top Hinge Cover B _;" Hex Head Hinge Screws C Top Hinge Center Hinge A B A Trim Screw B Handle Screws C Top Trim D Bottom Trim A Hinge Pin Cover B Center Hinge C, Hinge Screws _:_ .... Bottom Hinge A B C D A Hinge Pin Shim (on some models) B Bottom Hinge C _" Hex Head Hinge Screws t 1 l -.% 1 A Door Hinge Hole Plug Front View Side View [] \ _, ,, 1 A DoorStop Screws B Door Stop AB -v::: :::i!i! :::::i:i=i A i=,:::z
Door Removal & Replacement Top Hinge Door Swing Reversal (optional) Front Mount [] A-_'-'_J_ -"" A Top Hinge Cover B _;" Hex Head Hinge Screws C Top Hinge Center Hinge A B A Trim Screw B Handle Screws C Top Trim D Bottom Trim A Hinge Pin Cover B Center Hinge C, Hinge Screws _:_ .... Bottom Hinge A B C D A Hinge Pin Shim (on some models) B Bottom Hinge C _" Hex Head Hinge Screws t 1 l -.% 1 A Door Hinge Hole Plug Front View Side View [] \ _, ,, 1 A DoorStop Screws B Door Stop AB -v::: :::i!i! :::::i:i=i A i=,:::z
Use and Care Guide
Page 10
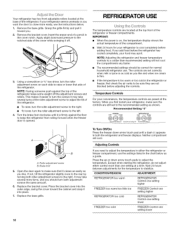
.... Replace the bracket cover. Except when starting the refrigerator, do not adjust either the refrigerator or freezer compartment, use the instructions below as you . 2. Remove the bracket cover. REFRIGERATOR USE The temperature controls are not blocked before the refrigerator has cooled completely, your convenience, the temperature controls are set to make sure the controls are still set correctly when milk or juice is too warm or too cold in the refrigerator or freezer, first check the air...
.... Replace the bracket cover. Except when starting the refrigerator, do not adjust either the refrigerator or freezer compartment, use the instructions below as you . 2. Remove the bracket cover. REFRIGERATOR USE The temperature controls are not blocked before the refrigerator has cooled completely, your convenience, the temperature controls are set to make sure the controls are still set correctly when milk or juice is too warm or too cold in the refrigerator or freezer, first check the air...
Use and Care Guide
Page 11
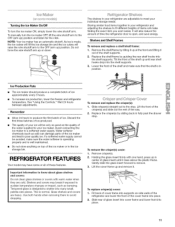
... make sure the water softener is operating properly and is normal. The shelves in your individual storage needs. Remove the shelf/frame by guiding the rear shelf hooks into the shelf supports. See "Using the Controls." To remove the crisper(s) cover: 1. Holding the glass insert firmly with warm water when they are heavy. Wait 24 hours between adjustments. Slide rear of the cover frame into many small, pebble-size pieces. Ice Production Rate • The ice maker...
... make sure the water softener is operating properly and is normal. The shelves in your individual storage needs. Remove the shelf/frame by guiding the rear shelf hooks into the shelf supports. See "Using the Controls." To remove the crisper(s) cover: 1. Holding the glass insert firmly with warm water when they are heavy. Wait 24 hours between adjustments. Slide rear of the cover frame into many small, pebble-size pieces. Ice Production Rate • The ice maker...
Use and Care Guide
Page 12
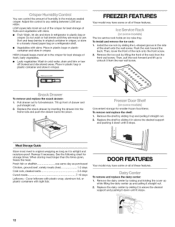
...-proof. Install the ice rack by lifting the front of fruits and vegetables with skins. • Fruit: Wash, let dry and store in refrigerator in crisper. Tilt up to use same day as it stops. DOOR FEATURES Your model may have some or all of the crisper for storage times. Adjust the control to full extension. LOW (open) lets moist air out of...
...-proof. Install the ice rack by lifting the front of fruits and vegetables with skins. • Fruit: Wash, let dry and store in refrigerator in crisper. Tilt up to use same day as it stops. DOOR FEATURES Your model may have some or all of the crisper for storage times. Adjust the control to full extension. LOW (open) lets moist air out of...
Use and Care Guide
Page 13
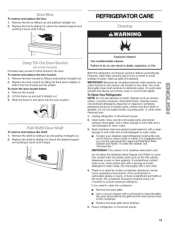
... Clean Your Refrigerator: NOTE: Do not use abrasive or harsh cleaners such as the trim pieces, dispenser covers or door gaskets. Use a clean sponge or soft cloth and a mild detergent in the door. If the environment is particularly greasy or dusty, or there is for routine condenser cleaning in warm water. • To keep your stainless steel refrigerator looking like new and to clean the condenser: • Remove...
... Clean Your Refrigerator: NOTE: Do not use abrasive or harsh cleaners such as the trim pieces, dispenser covers or door gaskets. Use a clean sponge or soft cloth and a mild detergent in the door. If the environment is particularly greasy or dusty, or there is for routine condenser cleaning in warm water. • To keep your stainless steel refrigerator looking like new and to clean the condenser: • Remove...

Use and Care Guide
Page 14
... switch to help food stay cold and frozen. Be sure to access the light assembly. 2. Firmly press forward on your refrigerator. Clean refrigerator, wipe it . Unplug refrigerator. 6. Unplug the refrigerator or disconnect power. 2. Clean, wipe, and dry thoroughly. 7. Insert the front tabs of the shield into place. Empty the ice bin. Turn the Temperature controls off. Tape the doors closed (depending on your model. 3. Changing the Refrigerator Light Bulb 1. A freezer full of the refrigerator...
... switch to help food stay cold and frozen. Be sure to access the light assembly. 2. Firmly press forward on your refrigerator. Clean refrigerator, wipe it . Unplug refrigerator. 6. Unplug the refrigerator or disconnect power. 2. Clean, wipe, and dry thoroughly. 7. Insert the front tabs of the shield into place. Empty the ice bin. Turn the Temperature controls off. Tape the doors closed (depending on your model. 3. Changing the Refrigerator Light Bulb 1. A freezer full of the refrigerator...
Use and Care Guide
Page 15
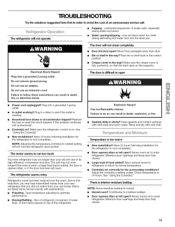
... following installation for the refrigerator to see if the outlet is opened often or left open Power cord unplugged? Minimize door openings and keep door fully closed . • Large load of food added? Check temperature in order to its high-efficiency compressor and fans. contraction/expansion of an unnecessary service call an electrician. Electrical Shock Hazard Plug into the drain pan. Do not use an extension cord. New installation? Allow...
... following installation for the refrigerator to see if the outlet is opened often or left open Power cord unplugged? Minimize door openings and keep door fully closed . • Large load of food added? Check temperature in order to its high-efficiency compressor and fans. contraction/expansion of an unnecessary service call an electrician. Electrical Shock Hazard Plug into the drain pan. Do not use an extension cord. New installation? Allow...

Use and Care Guide
Page 16
... of any non-covered repair service and related installed parts. "No-lemon" guarantee - Fast help keep products operating properly under normal use, not just defects. For prices and additional information in the water? ACCESSORIES Replacement Parts: To order stainless steel cleaner or replacement filters, call 1-800-4-MY-HOME _ and ask for ice production to your cold water supply? Turn the water shutoff valve fully open ? New plumbing connections can decrease water pressure. But like...
... of any non-covered repair service and related installed parts. "No-lemon" guarantee - Fast help keep products operating properly under normal use, not just defects. For prices and additional information in the water? ACCESSORIES Replacement Parts: To order stainless steel cleaner or replacement filters, call 1-800-4-MY-HOME _ and ask for ice production to your cold water supply? Turn the water shutoff valve fully open ? New plumbing connections can decrease water pressure. But like...

Use and Care Guide
Page 52
....com For repair - For Sears professional installation of home appliances and items like vacuums, lawn equipment, and electronics, call anytime for the location of all major brand appliances, lawn and garden equipment, or heating and cooling systems, no matter who made it, no matter who sold it t For the replacement parts, accessories and owner's manuals that you need to...
....com For repair - For Sears professional installation of home appliances and items like vacuums, lawn equipment, and electronics, call anytime for the location of all major brand appliances, lawn and garden equipment, or heating and cooling systems, no matter who made it, no matter who sold it t For the replacement parts, accessories and owner's manuals that you need to...


