Owners Manual
Page 2
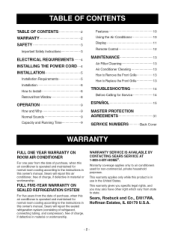
... THE POWER CORD....4 INSTALLATION 5 Installation Requirements 5 installation 6 How to Install 6 Removal from Window 8 OPERATION 9 How and Why 9 Normal Sounds 9 Capacity and Running Time 9 Features 10 Using the Air Conditioner 10 Display 11 Remote Control 12 MAINTENANCE 13 Air Filter Cleaning 13 Air Conditioner Cleaning 13 How to Remove the Front Gdlle 13 How to Replace the Front Grille 13 TROUBLESHOOTING 14 Before Calling for Service 14 ESPANOL 15 MASTER PROTECTION AGREEMENTS 31 SERVICE NUMBERS Back Cover FULL ONE YEAR WARRANTY ON ROOM AIR CONDITIONER...
... THE POWER CORD....4 INSTALLATION 5 Installation Requirements 5 installation 6 How to Install 6 Removal from Window 8 OPERATION 9 How and Why 9 Normal Sounds 9 Capacity and Running Time 9 Features 10 Using the Air Conditioner 10 Display 11 Remote Control 12 MAINTENANCE 13 Air Filter Cleaning 13 Air Conditioner Cleaning 13 How to Remove the Front Gdlle 13 How to Replace the Front Grille 13 TROUBLESHOOTING 14 Before Calling for Service 14 ESPANOL 15 MASTER PROTECTION AGREEMENTS 31 SERVICE NUMBERS Back Cover FULL ONE YEAR WARRANTY ON ROOM AIR CONDITIONER...
Owners Manual
Page 3
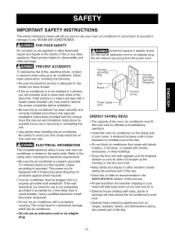
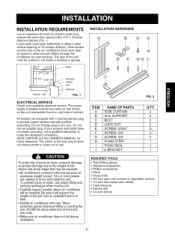
... unit. • Use gloves when handling the air conditioner. Be careful to avoid cuts from the power cord. To minimize shock and fire hazards, proper grounding is properly grounded. Read product labels for efficient and satisfactory operation. • Install the room air conditioner on the serial plate. IMPORTANT SAFETY INSTRUCTIONS The safety instructions below will tell you how to use an extension cord or an adapter plug. Save this manual...
... unit. • Use gloves when handling the air conditioner. Be careful to avoid cuts from the power cord. To minimize shock and fire hazards, proper grounding is properly grounded. Read product labels for efficient and satisfactory operation. • Install the room air conditioner on the serial plate. IMPORTANT SAFETY INSTRUCTIONS The safety instructions below will tell you how to use an extension cord or an adapter plug. Save this manual...
Owners Manual
Page 4
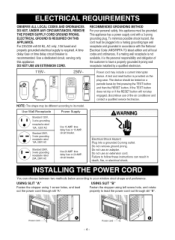
... required.A time delay fuse or time delay circuit breaker is provided on a periodic basis by first pressing the TEST button and then the RESET button. The device should be different according to lead the power cord out through slit "A". time delay fuse or 20 AMP. Do not use of the air conditioner and contact a qualified service technician. Failure to your window stool shape and preference...
... required.A time delay fuse or time delay circuit breaker is provided on a periodic basis by first pressing the TEST button and then the RESET button. The device should be different according to lead the power cord out through slit "A". time delay fuse or 20 AMP. Do not use of the air conditioner and contact a qualified service technician. Failure to your window stool shape and preference...
Owners Manual
Page 5
Side louvers and the rear of the air conditioner must be outdoors, not inside a building or garage. The rear of the unit must have clear air space to allow a clear vertical opening of 27 to allow enough airflow through the condenser for heat removal. INSTALLATION HARDWARE 27"to39"q I _ f" ,.'._"÷i'1;_ inner silll I 1116m" 'n. Lower sash must open sufficiently to 39 inches (686mmto 990mm)(FIG. 1). INSTALLATION REQUIREMENTS Your air conditioner willinstallintostandard double hung windows with actualcleat openingwidths of 16 inches (406mm).
Side louvers and the rear of the air conditioner must be outdoors, not inside a building or garage. The rear of the unit must have clear air space to allow a clear vertical opening of 27 to allow enough airflow through the condenser for heat removal. INSTALLATION HARDWARE 27"to39"q I _ f" ,.'._"÷i'1;_ inner silll I 1116m" 'n. Lower sash must open sufficiently to 39 inches (686mmto 990mm)(FIG. 1). INSTALLATION REQUIREMENTS Your air conditioner willinstallintostandard double hung windows with actualcleat openingwidths of 16 inches (406mm).
Owners Manual
Page 6
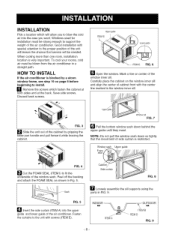
... the sill supports using the parts in a straight path. Window sill FIG. 7 r,_ Pull the bottom window sash down so tightly that service will allow you to install. To cool your rooms, cold air must be needed. NOTE: Do not pull the window sash down behind the upper guide until they meet. Good installation with screws (ITEM E). ,.ooo xo _'_""_ ITEMC -6- When cooling more than one room, installation location is very...
... the sill supports using the parts in a straight path. Window sill FIG. 7 r,_ Pull the bottom window sash down so tightly that service will allow you to install. To cool your rooms, cold air must be needed. NOTE: Do not pull the window sash down behind the upper guide until they meet. Good installation with screws (ITEM E). ,.ooo xo _'_""_ ITEMC -6- When cooling more than one room, installation location is very...
Owners Manual
Page 7
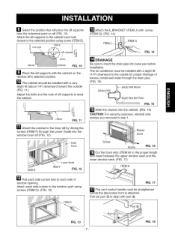
... window opening. The air conditioner must be installed with a very slight tilt (about 1/4") downward toward the outside for proper drainage of sill supports to the inner sill by driving the screws (ITEM F) through the drain pipe. (FIG. 15) "_BASE PANREAR DRAIN _OM FIG. 15 _"'_ Slide the chassis into the cabinet. (FIG. 16) CAUTION: For security purposes, reinstall side screws you removed...
... window opening. The air conditioner must be installed with a very slight tilt (about 1/4") downward toward the outside for proper drainage of sill supports to the inner sill by driving the screws (ITEM F) through the drain pipe. (FIG. 15) "_BASE PANREAR DRAIN _OM FIG. 15 _"'_ Slide the chassis into the cabinet. (FIG. 16) CAUTION: For security purposes, reinstall side screws you removed...
Owners Manual
Page 8
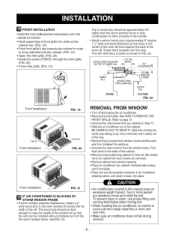
... grille into slots on front and rear coils. • Make sure air conditioner does not fall once screws are needed to move and install the unit. This will raise the L bracket as shown in this strip. WOOD STRIP MOUNTED ON TOP OF INNER SILL 1 1/2" min. (38mm) _"_1 I_" 3/4" j_ "'"-_ _I CLEARANCE T J INNER SILL I / _v _ ILBRACKET/' I WOOD/STRIP STORM _ WINDOW L FRAME I FOR L BRACKET...
... grille into slots on front and rear coils. • Make sure air conditioner does not fall once screws are needed to move and install the unit. This will raise the L bracket as shown in this strip. WOOD STRIP MOUNTED ON TOP OF INNER SILL 1 1/2" min. (38mm) _"_1 I_" 3/4" j_ "'"-_ _I CLEARANCE T J INNER SILL I / _v _ ILBRACKET/' I WOOD/STRIP STORM _ WINDOW L FRAME I FOR L BRACKET...
Owners Manual
Page 9
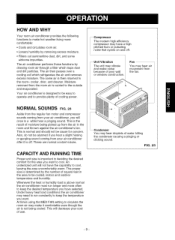
... against the air conditioner's fan. The air then passes over a cooling coil which traps dust and dirt particles. Fan You may need to run longer and more comfortable: • Cools and circulates room air. • Lowers humidity by drawing room air through a filter which refrigerates the air and removes excess moisture. FIG. 23 -9- At times using the MED FAN setting to circulate the room air may hear droplets of water hitting the condenser causing...
... against the air conditioner's fan. The air then passes over a cooling coil which traps dust and dirt particles. Fan You may need to run longer and more comfortable: • Cools and circulates room air. • Lowers humidity by drawing room air through a filter which refrigerates the air and removes excess moisture. FIG. 23 -9- At times using the MED FAN setting to circulate the room air may hear droplets of water hitting the condenser causing...

Owners Manual
Page 10
... 1. Adjust the louvers for air recirculation without cooling when the air conditioner is drawn into the room through your home's normal air passages. • The OPEN or CLOSE position can be used with any fan selection. -10- VENT CONTROL The Vent Control allows the air conditioner to the coolest setting. 4. Upper Guide 15. Vertical Air Direction Louvers 3. Inlet Grille 5. Air Filter 6. Set the TEMP Control to either recirculate inside the compressor to a cooler setting, the unit will shut off , wait...
... 1. Adjust the louvers for air recirculation without cooling when the air conditioner is drawn into the room through your home's normal air passages. • The OPEN or CLOSE position can be used with any fan selection. -10- VENT CONTROL The Vent Control allows the air conditioner to the coolest setting. 4. Upper Guide 15. Vertical Air Direction Louvers 3. Inlet Grille 5. Air Filter 6. Set the TEMP Control to either recirculate inside the compressor to a cooler setting, the unit will shut off , wait...
Owners Manual
Page 11
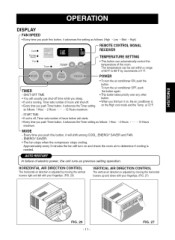
... fan stops when the compressor stops cooling Approximately every 3 minutes the fan will turn it on, the air conditioner is on and check the room air to 86°F by increments of I°F POWER (-TIMER SHUT-OFF TIME • You will usually use shut-off time while you sleep • If unit is adjustedby movingthe horizontal louvers up anddown withyour fingertips. (FIG.27) / FIG. 26 -11 - DISPLAY...
... fan stops when the compressor stops cooling Approximately every 3 minutes the fan will turn it on, the air conditioner is on and check the room air to 86°F by increments of I°F POWER (-TIMER SHUT-OFF TIME • You will usually use shut-off time while you sleep • If unit is adjustedby movingthe horizontal louvers up anddown withyour fingertips. (FIG.27) / FIG. 26 -11 - DISPLAY...
Owners Manual
Page 12
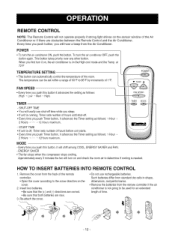
... • If unit is on the sensor window of hours before unit starts. • Every time you push this button, it will turn it advances the Timer setting as follows: 1 Hour 2 Hours * ..... * 12Hoursmaximum. Remove the cover from the Air Conditioner. MODE - The temperature can automatically control the temperature of l°F. Approximately every 3 minutes the fan will shift among COOL, ENERGY SAVER and FAN. - HOW TO INSERT BATTERIES INTO REMOTE CONTROL 1. ENERGY SAVER • The fan stops when the compressor stops cooling.
... • If unit is on the sensor window of hours before unit starts. • Every time you push this button, it will turn it advances the Timer setting as follows: 1 Hour 2 Hours * ..... * 12Hoursmaximum. Remove the cover from the Air Conditioner. MODE - The temperature can automatically control the temperature of l°F. Approximately every 3 minutes the fan will shift among COOL, ENERGY SAVER and FAN. - HOW TO INSERT BATTERIES INTO REMOTE CONTROL 1. ENERGY SAVER • The fan stops when the compressor stops cooling.
Owners Manual
Page 13
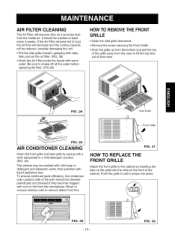
..., possibly damaging the unit. • Pull the inlet grille forward, grasping both tabs, then pull out the air filter. (FIG. 28) • Wash the Air Filter under the faucet with liquid appliance wax. Be sure to shake off all the water before replacing the filter. (FIG.29) HOW TO REMOVE THE FRONT GRILLE • Open the inlet grille downward. • Remove the screw securing...
..., possibly damaging the unit. • Pull the inlet grille forward, grasping both tabs, then pull out the air filter. (FIG. 28) • Wash the Air Filter under the faucet with liquid appliance wax. Be sure to shake off all the water before replacing the filter. (FIG.29) HOW TO REMOVE THE FRONT GRILLE • Open the inlet grille downward. • Remove the screw securing...
Owners Manual
Page 14
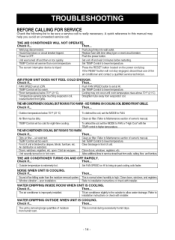
...,wwaterdrainage.Referto WATER DRIPPING OUTSIDE WHEN UNIT IS COOLING. Wall plug disconnected. Clean air filter. Then... Check if... TEMP Control set at LOW. Push FAN SPEED button to FAN. Cleanair filter.Referto Maintenancesectionof owner'smanual. I Set FANSPEEDon HI to FAN or "High Cool" with time delay type or reset circuit breaker. Then... Push the power button. Room temperature below 70°F (21°C) To defrost the coil, set the MODE to set warmer than room temperature. Allowadditionatilmetoremovestoredheatfromwalls,ceilingf...
...,wwaterdrainage.Referto WATER DRIPPING OUTSIDE WHEN UNIT IS COOLING. Wall plug disconnected. Clean air filter. Then... Check if... TEMP Control set at LOW. Push FAN SPEED button to FAN. Cleanair filter.Referto Maintenancesectionof owner'smanual. I Set FANSPEEDon HI to FAN or "High Cool" with time delay type or reset circuit breaker. Then... Push the power button. Room temperature below 70°F (21°C) To defrost the coil, set the MODE to set warmer than room temperature. Allowadditionatilmetoremovestoredheatfromwalls,ceilingf...

Owners Manual
Page 32
... garage door openers and water heaters. 1-800-4-MY-HOME ® (1-800-469-4663) Call anytime, day or night (U.S.A. For Sears professional installation of your home-of Sears, Roebuck and Co. ® Mama Registrada / TM Marca de Fdtbrica / SM Mama de Servicio de Sears, Roebuck and Co. For,the replacement parts accessories and owner s manuals that you need to do...
... garage door openers and water heaters. 1-800-4-MY-HOME ® (1-800-469-4663) Call anytime, day or night (U.S.A. For Sears professional installation of your home-of Sears, Roebuck and Co. ® Mama Registrada / TM Marca de Fdtbrica / SM Mama de Servicio de Sears, Roebuck and Co. For,the replacement parts accessories and owner s manuals that you need to do...


