
Use and Care Guide
Page 1
® TOP FREEZER REFRIGERATOR i CONGELADOR SUPERIOR REFRIGERADOR CONGI_LATEUR SUPI_RIEUR REFRIGI_RATEUR Models / Modelos / Mod_les 795.6997_,795.6991_ 795.7997_,795.7991_ 795.6937_,795.6929_ 795.7937_,795.7929_ = color number, n_mero de colo_ num_ro de couleur tl1 Z O t=, m cn z m Z_ O r=,, "13 Z m MFL61920619 Printed in Mexico Sears, Roebuck and Co., Hoffman Estates, IL 60179 U.S.A. www.sears.cem
® TOP FREEZER REFRIGERATOR i CONGELADOR SUPERIOR REFRIGERADOR CONGI_LATEUR SUPI_RIEUR REFRIGI_RATEUR Models / Modelos / Mod_les 795.6997_,795.6991_ 795.7997_,795.7991_ 795.6937_,795.6929_ 795.7937_,795.7929_ = color number, n_mero de colo_ num_ro de couleur tl1 Z O t=, m cn z m Z_ O r=,, "13 Z m MFL61920619 Printed in Mexico Sears, Roebuck and Co., Hoffman Estates, IL 60179 U.S.A. www.sears.cem
Use and Care Guide
Page 2
...instructions 5-6 Grounding Requirements 6 Parts and Features 7 Refrigerator installation Unpacking Your Refrigerator Installation Base Grill Removing and Replacing Doors Reversing Doors Leveling and Door Closing/ Door Alignment 8-15 8 8 8 9-10 10-15 15 Using Your Refrigerator Ensuring Proper Air Circulation Setting the Controls Adjusting Control... Settings Food Storage Guide Storing Frozen Food Refrigerator Shelves Snack Drawer Crisper and Crisper Cover 16-21 16 16 17 17 18 19-21 19 2O Crisper Humidity Control Door Racks Door Bins Dairy Bin/Can ...
...instructions 5-6 Grounding Requirements 6 Parts and Features 7 Refrigerator installation Unpacking Your Refrigerator Installation Base Grill Removing and Replacing Doors Reversing Doors Leveling and Door Closing/ Door Alignment 8-15 8 8 8 9-10 10-15 15 Using Your Refrigerator Ensuring Proper Air Circulation Setting the Controls Adjusting Control... Settings Food Storage Guide Storing Frozen Food Refrigerator Shelves Snack Drawer Crisper and Crisper Cover 16-21 16 16 17 17 18 19-21 19 2O Crisper Humidity Control Door Racks Door Bins Dairy Bin/Can ...
Use and Care Guide
Page 3
... for free repair. Implied warranties, including warranties of imptied warranties; This warranty applies only while this appliance is used in the United States and Canada. TOP FREEZER REFRIGERATOR ® Kenrnore Appliance Warranty forte Year Limited Warranty When installed, operated and maintained according to all instructions supplied with the product, if this appliance fails...
... for free repair. Implied warranties, including warranties of imptied warranties; This warranty applies only while this appliance is used in the United States and Canada. TOP FREEZER REFRIGERATOR ® Kenrnore Appliance Warranty forte Year Limited Warranty When installed, operated and maintained according to all instructions supplied with the product, if this appliance fails...
Use and Care Guide
Page 4
... and related installed parts. or Canada call is the result of mechanical failure of any covered refrigerator or freezer. [] Rental reimbursement if repair of dependable operation. Your new Kenmor# _ product is a risk free purchase. Think of information available whenever you money and aggravation... of us as you want us , whenever you purchase the Agreement, a simple phone call 1 =800=4=MY=HOME_'. replacement of the refrigerator compartment. Or a prorated refund anytime after the product warranty period expires. Here's what the Agreement* includes: [] Parts and labor needed ...
... and related installed parts. or Canada call is the result of mechanical failure of any covered refrigerator or freezer. [] Rental reimbursement if repair of dependable operation. Your new Kenmor# _ product is a risk free purchase. Think of information available whenever you money and aggravation... of us as you want us , whenever you purchase the Agreement, a simple phone call 1 =800=4=MY=HOME_'. replacement of the refrigerator compartment. Or a prorated refund anytime after the product warranty period expires. Here's what the Agreement* includes: [] Parts and labor needed ...
Use and Care Guide
Page 5
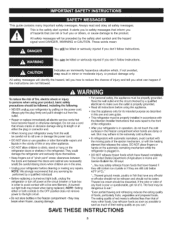
...they may be dangerous to persons when using this appliance. • Use this use and care guide. ° This refrigerator must be properly installed in the freezer compartment - Skin may break when being replaced.) NOTE: Setting either the plug or connector end. ° When moving ...parts of many other appliance. - Before replacing a burned-out light bulb, unplug the refrigerator or turn off -color should not be ...
...they may be dangerous to persons when using this appliance. • Use this use and care guide. ° This refrigerator must be properly installed in the freezer compartment - Skin may break when being replaced.) NOTE: Setting either the plug or connector end. ° When moving ...parts of many other appliance. - Before replacing a burned-out light bulb, unplug the refrigerator or turn off -color should not be ...
Use and Care Guide
Page 6
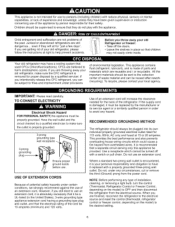
...after rework (recycling). NOTE: Before performing any type of installation, cleaning, or removing a light bulb, turn the control (Thermostat, Refrigerator Control or Freezer Control, depending on the model) to use of an extension cord. If you are throwing away your old...-prong wall outlet is encountered, it must be 15 amperes (minimum) and 120 volts. If you are getting rid of your old Refrigerator or freezer: • Take off with a switch or pull chain. TO CONNECT ELECTRICITY Electrical Shock Hazard FOR PERSONAL SAFETY, this appliance be plugged...
...after rework (recycling). NOTE: Before performing any type of installation, cleaning, or removing a light bulb, turn the control (Thermostat, Refrigerator Control or Freezer Control, depending on the model) to use of an extension cord. If you are throwing away your old...-prong wall outlet is encountered, it must be 15 amperes (minimum) and 120 volts. If you are getting rid of your old Refrigerator or freezer: • Take off with a switch or pull chain. TO CONNECT ELECTRICITY Electrical Shock Hazard FOR PERSONAL SAFETY, this appliance be plugged...

Use and Care Guide
Page 7
...models. Page references are included for your model. The locations of the items listed below. O CustomCube Ice maker * O Ice Bin * Freezer Shelf _ Digital Temperature Control Refrigerator Light _t Snack Drawer Shelves Crispers Keeps fruits and vegetables fresh and crisp OFreezer Door Racks OCan Rack* ODairy Bin O Door Bins... Refrigerator Door Rack *On some or all of the features shown betow may have purchased may not match your convenience. © Use...
...models. Page references are included for your model. The locations of the items listed below. O CustomCube Ice maker * O Ice Bin * Freezer Shelf _ Digital Temperature Control Refrigerator Light _t Snack Drawer Shelves Crispers Keeps fruits and vegetables fresh and crisp OFreezer Door Racks OCan Rack* ODairy Bin O Door Bins... Refrigerator Door Rack *On some or all of the features shown betow may have purchased may not match your convenience. © Use...
Use and Care Guide
Page 8
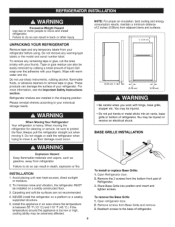
...the adhesive with hinge, base grille, stopper etc. You may be easily removed by rubbing a small amount of 2 inches (5.08cm) from refrigerator. To install or replace Base Grille: 1. Reattach screws to your individual storage needs. ! To remove any remaining tape or glue, rub... INSTALLATION Explosion Hazard Keep flammable materials and vapors, such as floor damage could occur. INSTALLATION 1. To minimize noise and vibration, the refrigerator MUST be injured or receive an electrical shock. Remove the 2 screws from your fingers. When moving it , as gasoline, away from...
...the adhesive with hinge, base grille, stopper etc. You may be easily removed by rubbing a small amount of 2 inches (5.08cm) from refrigerator. To install or replace Base Grille: 1. Reattach screws to your individual storage needs. ! To remove any remaining tape or glue, rub... INSTALLATION Explosion Hazard Keep flammable materials and vapors, such as floor damage could occur. INSTALLATION 1. To minimize noise and vibration, the refrigerator MUST be injured or receive an electrical shock. Remove the 2 screws from your fingers. When moving it , as gasoline, away from...

Use and Care Guide
Page 9
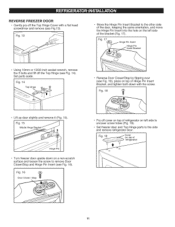
...No.2 Phillipsheadscrewdriver • Flat-headscrewdrivefrorprying REMOVE FREEZER DOOR • Gently pry off the Top Hinge (see Fig 1). Fig. 1 REMOVE REFRIGERATOR DOOR • Loosen and remove the 2 bolts and the phillips head screw to remove the Middle Hinge Bracket from refrigerator housing (Fig. 4 and 5). Using ...10mm or 13/32-inch socket wrench, remove the 3 bolts and lift off the Top Hinge Cover with freezer door. Set aside. If entranceis lessthan35-inchews ide, therefrigerator...
...No.2 Phillipsheadscrewdriver • Flat-headscrewdrivefrorprying REMOVE FREEZER DOOR • Gently pry off the Top Hinge (see Fig 1). Fig. 1 REMOVE REFRIGERATOR DOOR • Loosen and remove the 2 bolts and the phillips head screw to remove the Middle Hinge Bracket from refrigerator housing (Fig. 4 and 5). Using ...10mm or 13/32-inch socket wrench, remove the 3 bolts and lift off the Top Hinge Cover with freezer door. Set aside. If entranceis lessthan35-inchews ide, therefrigerator...
Use and Care Guide
Page 10
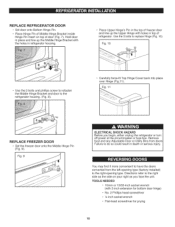
... for prying 10 I Fig. 11 REPLACE FREEZER DOOR • Set the freezer door onto the Middle Hinge Pin (Fig. 9). Remove food and any Adjustable Door or Utility Bins from the left-opening type (factory installed) to do so could result in refrigerator housing. Place Upper Hinge's Pin in top of door (Fig. 7). Directions refer...
... for prying 10 I Fig. 11 REPLACE FREEZER DOOR • Set the freezer door onto the Middle Hinge Pin (Fig. 9). Remove food and any Adjustable Door or Utility Bins from the left-opening type (factory installed) to do so could result in refrigerator housing. Place Upper Hinge's Pin in top of door (Fig. 7). Directions refer...
Use and Care Guide
Page 11
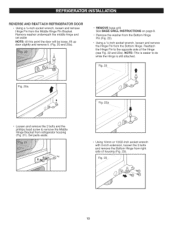
...same orientation, and move the Hinge Pin insert into the hole on top of _ i refrigerator) & 11 Fig. 14 Top Hinge Reverse Door Closer/Stop by flipping over (see Fig. 14). Fi- 1_' Y" _ -- REVERSE FREEZER DOOR ° Gently pry off the Top Hinge Cover with the screw. Fig. 17 i_ Hinge PHiningtnesePrtin insert ...Using 10mm or 13/32-inch socket wrench, remove the 3 bolts and lift off the Top Hinge (see Fig. 18), place on the left side to uncover screw holes (Fig. 19). • Set freezer door and Top Hinge parts to remove Door Closer/Stop and Hinge Pin insert (see Fig.13).
...same orientation, and move the Hinge Pin insert into the hole on top of _ i refrigerator) & 11 Fig. 14 Top Hinge Reverse Door Closer/Stop by flipping over (see Fig. 14). Fi- 1_' Y" _ -- REVERSE FREEZER DOOR ° Gently pry off the Top Hinge Cover with the screw. Fig. 17 i_ Hinge PHiningtnesePrtin insert ...Using 10mm or 13/32-inch socket wrench, remove the 3 bolts and lift off the Top Hinge (see Fig. 18), place on the left side to uncover screw holes (Fig. 19). • Set freezer door and Top Hinge parts to remove Door Closer/Stop and Hinge Pin insert (see Fig.13).
Use and Care Guide
Page 12
... 3 bolts and remove the Bottom Hinge from the Bottom Hinge Pin (Fig. 22). o Using a 1A-inch socket wrench, loosen and remove the Hinge Pin from refrigerator housing (Fig. 21). NOTE: This is easier to remove the Middle Hinge Bracket from the Bottom Hinge. Fig. 22 Fig. 20a 22a Loosen and remove...
... 3 bolts and remove the Bottom Hinge from the Bottom Hinge Pin (Fig. 22). o Using a 1A-inch socket wrench, loosen and remove the Hinge Pin from refrigerator housing (Fig. 21). NOTE: This is easier to remove the Middle Hinge Bracket from the Bottom Hinge. Fig. 22 Fig. 20a 22a Loosen and remove...
Use and Care Guide
Page 13
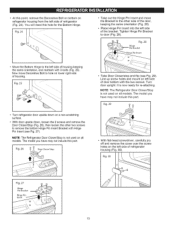
.... The model you have may not include this part. Fig. 28 Hinge Pin Bracket • Move the Bottom Hinge to hole on left side of refrigerator housing (Fig. 30). The model you have may not include this part. Line up screw holes and mount on lower right side of door bottom... Bracket Hinge Pin Insert 13 Tighten Hinge Pin Bracket to remove the bottom Hinge Pin Insert Bracket with the two screws. Fig. 25 • Turn refrigerator door upside down on the left side of housing. Fig. 29 ?? • With flat-head screwdriver, carefully pry off and remove the cover over the...
.... The model you have may not include this part. Fig. 28 Hinge Pin Bracket • Move the Bottom Hinge to hole on left side of refrigerator housing (Fig. 30). The model you have may not include this part. Line up screw holes and mount on lower right side of door bottom... Bracket Hinge Pin Insert 13 Tighten Hinge Pin Bracket to remove the bottom Hinge Pin Insert Bracket with the two screws. Fig. 25 • Turn refrigerator door upside down on the left side of housing. Fig. 29 ?? • With flat-head screwdriver, carefully pry off and remove the cover over the...

Use and Care Guide
Page 14
... Bracket (Flange will now be on top) and position on bottom hinge. (Fig. 32). • Place washer between refrigerator door and middle hinge and re-attach... with two bolts and a Phillips screw. (Fig. 32). • Place refrigerator door down over (see Fig. 38). Fig. 34 14 NOTE: Bracket has... Gaskets are not folded over the Hinge Pin on right side of refrigerator and re-attach with its hexagonal end facing upward (Fig. 32)....the 3 bolts to cover the holes. Force-fit Top Hinge Cover over pin on left side of refrigerator top onto the right of _----_----A_ Place Decorative Screw into...
... Bracket (Flange will now be on top) and position on bottom hinge. (Fig. 32). • Place washer between refrigerator door and middle hinge and re-attach... with two bolts and a Phillips screw. (Fig. 32). • Place refrigerator door down over (see Fig. 38). Fig. 34 14 NOTE: Bracket has... Gaskets are not folded over the Hinge Pin on right side of refrigerator and re-attach with its hexagonal end facing upward (Fig. 32)....the 3 bolts to cover the holes. Force-fit Top Hinge Cover over pin on left side of refrigerator top onto the right of _----_----A_ Place Decorative Screw into...
Use and Care Guide
Page 15
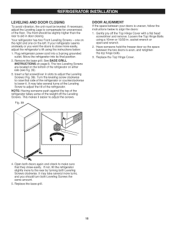
... more turns, and you want the doors to close easily. if your doors is even, and retighten the top hinge bolts. 3. NOTE: Having someone hold the freezer door so the space between your refrigerator seems unsteady or you should be leveled, if necessary, adjust the Leveling Legs to compensate for unevenness of the...
... more turns, and you want the doors to close easily. if your doors is even, and retighten the top hinge bolts. 3. NOTE: Having someone hold the freezer door so the space between your refrigerator seems unsteady or you should be leveled, if necessary, adjust the Leveling Legs to compensate for unevenness of the...
Use and Care Guide
Page 16
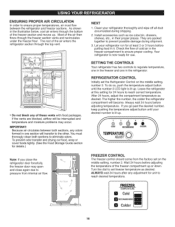
...air then flows through the top vent. • Do not block any of these vents with food packages. If the vents are packed together to prevent possible damage during shipping. 2. Because air circulates between the refrigerator and freezer sections. Clean your desired...as desired. NEXT 1. Check the flow of the freezer compartment up . ® COLDER FREEZER CONTROL The freezer control should come from internal air flow. Wait 24 hours before adjusting temperature. iMPORTANT." REFRIGERATOR CONTROL Initially set freezer temperature as desired. You must flow between both ...
...air then flows through the top vent. • Do not block any of these vents with food packages. If the vents are packed together to prevent possible damage during shipping. 2. Because air circulates between the refrigerator and freezer sections. Clean your desired...as desired. NEXT 1. Check the flow of the freezer compartment up . ® COLDER FREEZER CONTROL The freezer control should come from internal air flow. Wait 24 hours before adjusting temperature. iMPORTANT." REFRIGERATOR CONTROL Initially set freezer temperature as desired. You must flow between both ...
Use and Care Guide
Page 17
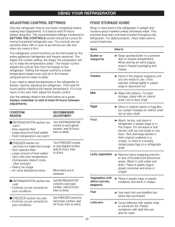
...highest number, wait 24 hours, then re-check Move items out of food added - ADJUSTING CONTROL SETTINGS Give the refrigerator time to cool down completely before checking the freezer temperature. Then wait 24 hours before making final adjustments. If it colder. Once opened butter in airtight and moisture-...on certain models) on interior shelf, not on door shelf. For dated products, check date code to the refrigerator. It is too warm or too cold, then adjust the freezer control. Do not wash or hull berries until you are set correctly when milk or juice is as cold...
...highest number, wait 24 hours, then re-check Move items out of food added - ADJUSTING CONTROL SETTINGS Give the refrigerator time to cool down completely before checking the freezer temperature. Then wait 24 hours before making final adjustments. If it colder. Once opened butter in airtight and moisture-...on certain models) on interior shelf, not on door shelf. For dated products, check date code to the refrigerator. It is too warm or too cold, then adjust the freezer control. Do not wash or hull berries until you are set correctly when milk or juice is as cold...
Use and Care Guide
Page 18
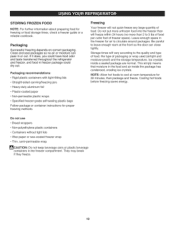
... instructions for freezing or food storage times, check a freezer guide or a reliable cookbook. Leave enough space in or out. This simply means that moisture in freezer package could have food odor and taste transferred throughout the refrigerator and freezer, and food in the food and air inside a ...sealed package are normal. If it does, you could dry out. Freezing Your freezer will freeze within 24 hours (no...
... instructions for freezing or food storage times, check a freezer guide or a reliable cookbook. Leave enough space in or out. This simply means that moisture in freezer package could have food odor and taste transferred throughout the refrigerator and freezer, and food in the food and air inside a ...sealed package are normal. If it does, you could dry out. Freezing Your freezer will freeze within 24 hours (no...
Use and Care Guide
Page 19
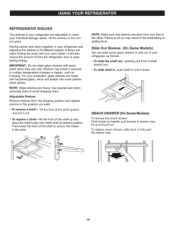
...cold. Then lower the front of shelf toward you want easier; NOTE: Make sure that shelves are adjustable to meet your refrigerator and adjusting the shelves to drawer stop . 19 SNACK DRAWER (On Some Models) To remove the snack drawer: Hold drawer by handle, pull forward to fit different heights ...of time the refrigerator door is open, saving energy. Slide Out Shelves (On Some Models) You can slide some glass shelves in ...
...cold. Then lower the front of shelf toward you want easier; NOTE: Make sure that shelves are adjustable to meet your refrigerator and adjusting the shelves to drawer stop . 19 SNACK DRAWER (On Some Models) To remove the snack drawer: Hold drawer by handle, pull forward to fit different heights ...of time the refrigerator door is open, saving energy. Slide Out Shelves (On Some Models) You can slide some glass shelves in ...
Use and Care Guide
Page 20
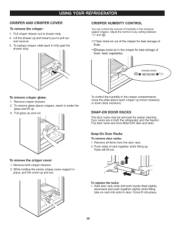
Lift the drawer up and toward you to any setting between _Z_ and Pullcrisper drawer out to drawer stop . \ CRISPER HUMiDiTY CONTROL You can control the amount of humidity in fully past the drawer stop . 2. To replace crisper, slide back in the moisturesealed crispers. Adjust the control to pull out and remove. 3. CRISPER AND CRISPER COVER To remove the crisper: 1.
Lift the drawer up and toward you to any setting between _Z_ and Pullcrisper drawer out to drawer stop . \ CRISPER HUMiDiTY CONTROL You can control the amount of humidity in fully past the drawer stop . 2. To replace crisper, slide back in the moisturesealed crispers. Adjust the control to pull out and remove. 3. CRISPER AND CRISPER COVER To remove the crisper: 1.


