Use and Care Guide
Page 2
... 8 8 8 9-10 10-15 15 Using Your Refrigerator Ensuring Proper Air Circulation Setting the Controls Adjusting Control Settings Food Storage Guide Storing Frozen Food Refrigerator Shelves Snack Drawer Crisper and Crisper Cover 16-21 16 16 17 17 18 19-21 19 2O Crisper Humidity Control Door Racks Door Bins Dairy Bin/Can Rack Ice Tray Care and Cleaning General Cleaning Tips Outside Inside Walls Door Liner and Gaskets Plastic Parts Light Bulb Replacement Power Interruptions Vacation and Moving Care About the Automatic Ice Maker Connecting the Water Line Troubleshooting Guide 2O 20-21 21 21...
... 8 8 8 9-10 10-15 15 Using Your Refrigerator Ensuring Proper Air Circulation Setting the Controls Adjusting Control Settings Food Storage Guide Storing Frozen Food Refrigerator Shelves Snack Drawer Crisper and Crisper Cover 16-21 16 16 17 17 18 19-21 19 2O Crisper Humidity Control Door Racks Door Bins Dairy Bin/Can Rack Ice Tray Care and Cleaning General Cleaning Tips Outside Inside Walls Door Liner and Gaskets Plastic Parts Light Bulb Replacement Power Interruptions Vacation and Moving Care About the Automatic Ice Maker Connecting the Water Line Troubleshooting Guide 2O 20-21 21 21...
Use and Care Guide
Page 3
... or limitations may also have other rights which vary from normal use, including but not limited to filters, belts, light bulbs, and bags. 2. Damage to or failure of this product caused by law. A service technician to instruct the user in correct product installation, operation or maintenance. 3. Implied warranties, including warranties of merchantability or fitness for a particular purpose, are limited to one...
... or limitations may also have other rights which vary from normal use, including but not limited to filters, belts, light bulbs, and bags. 2. Damage to or failure of this product caused by law. A service technician to instruct the user in correct product installation, operation or maintenance. 3. Implied warranties, including warranties of merchantability or fitness for a particular purpose, are limited to one...
Use and Care Guide
Page 4
... located on your product. For prices and additional information in Canada varies on making a smart purchase. or Canada call is all that is a risk free purchase. Serial No. The Master Protection Agreement also helps extend the life of dependable operation. In the space below, record the date of purchase, model and serial number of any non-covered repair service and related installed parts...
... located on your product. For prices and additional information in Canada varies on making a smart purchase. or Canada call is all that is a risk free purchase. Serial No. The Master Protection Agreement also helps extend the life of dependable operation. In the space below, record the date of purchase, model and serial number of any non-covered repair service and related installed parts...
Use and Care Guide
Page 5
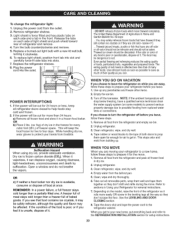
...power cord. • DO NOT store or use and care guide. ° This refrigerator must be discarded. You can ." NOTE: We strongly recommend that have any food is poor or questionable, get rid of the ejector mechanism, or with a live wire filament. (A burnedout light bulb... is plugged in accordance with the moving your refrigerator away from the outlet. • Repair or replace immediately all instructions before cleaning or making any servicing be killed or seriously injured if you can be performed by pulling on the refrigerator doors or shelves in this use gasoline or...
...power cord. • DO NOT store or use and care guide. ° This refrigerator must be discarded. You can ." NOTE: We strongly recommend that have any food is poor or questionable, get rid of the ejector mechanism, or with a live wire filament. (A burnedout light bulb... is plugged in accordance with the moving your refrigerator away from the outlet. • Repair or replace immediately all instructions before cleaning or making any servicing be killed or seriously injured if you can be performed by pulling on the refrigerator doors or shelves in this use gasoline or...
Use and Care Guide
Page 6
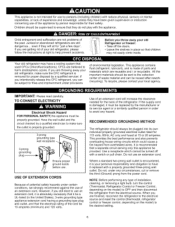
... electrician to have a cooling system that a separate circuit serving only this CFC refrigerant, you still elect to use an extension cord, it is absolutely necessary that the electrical rating of installation, cleaning, or removing a light bulb, turn the control (Thermostat, Refrigerator Control or Freezer Control, depending on the model) to OFF and then disconnect the refrigerator from the power cord. It is recommended that used CFCs (chlorofluorocarbons). Do not use . When you...
... electrician to have a cooling system that a separate circuit serving only this CFC refrigerant, you still elect to use an extension cord, it is absolutely necessary that the electrical rating of installation, cleaning, or removing a light bulb, turn the control (Thermostat, Refrigerator Control or Freezer Control, depending on the model) to OFF and then disconnect the refrigerator from the power cord. It is recommended that used CFCs (chlorofluorocarbons). Do not use . When you...
Use and Care Guide
Page 8
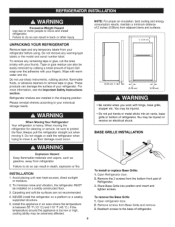
...) 2" (5.08 cm) • Be careful when you work with warm water and dry. Refrigerator shelves are not recommended. 4. NEVER install the refrigerator on a solidly constructed floor. 3. Remove the 2 screws from the bottom front part of refrigerator. ExcessiveWeightHazard Usetwoor morepeopleto moveandinstall refrigerator. To remove the Base Grille 1. Wipe with hinge, base grille, stopper etc. Reattach screws to your refrigerator. Do not use sharp instruments, rubbing alcohol, flammable...
...) 2" (5.08 cm) • Be careful when you work with warm water and dry. Refrigerator shelves are not recommended. 4. NEVER install the refrigerator on a solidly constructed floor. 3. Remove the 2 screws from the bottom front part of refrigerator. ExcessiveWeightHazard Usetwoor morepeopleto moveandinstall refrigerator. To remove the Base Grille 1. Wipe with hinge, base grille, stopper etc. Reattach screws to your refrigerator. Do not use sharp instruments, rubbing alcohol, flammable...
Use and Care Guide
Page 16
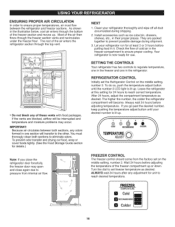
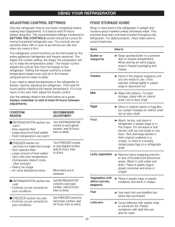
... so, push the temperature adjust button until your refrigerator thoroughly and wipe off all dust accumulated during shipment. 3. Turn the dial to set the Refrigerator Control on the middle setting, number 2. The rest of the air enters the refrigerator section through the bottom of the freezer section and moves up . iMPORTANT." Install accessories such as ice cube bin, drawers, shelves, etc., in the illustration below, cool air enters through the...
... so, push the temperature adjust button until your refrigerator thoroughly and wipe off all dust accumulated during shipment. 3. Turn the dial to set the Refrigerator Control on the middle setting, number 2. The rest of the air enters the refrigerator section through the bottom of the freezer section and moves up . iMPORTANT." Install accessories such as ice cube bin, drawers, shelves, etc., in the illustration below, cool air enters through the...
Use and Care Guide
Page 17
... a guide. Always remember to next highest number, wait 24 hours, then re-check m FREEZER section too warm/ice not made fast enough - Door opened often - Use the settings listed in crisper. Air vents blocked by adjusting the refrigerator. items How to Keep opened , rewrap tightly in airtight and moisture-proof material unless otherwise noted. Cheese Milk Store in a covered dish or closed paper bag on a refrigerator shelf. Setting the freezer control...
... a guide. Always remember to next highest number, wait 24 hours, then re-check m FREEZER section too warm/ice not made fast enough - Door opened often - Use the settings listed in crisper. Air vents blocked by adjusting the refrigerator. items How to Keep opened , rewrap tightly in airtight and moisture-proof material unless otherwise noted. Cheese Milk Store in a covered dish or closed paper bag on a refrigerator shelf. Setting the freezer control...
Use and Care Guide
Page 19
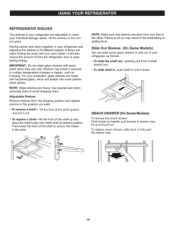
... replace a shelf =_lt the front of shelf toward you. , To slide shelf in, push shelf in until it stops. SNACK DRAWER (On Some Models) To remove the snack drawer: Hold drawer by handle, pull forward to drawer stop . 19 iMPORTANT: Do not clean glass shelves with tempered glass, which will make finding the exact item you want easier; For your refrigerator and adjusting the shelves to fit different heights of time the refrigerator door is open, saving energy. Adjustable Shelves Remove shelves...
... replace a shelf =_lt the front of shelf toward you. , To slide shelf in, push shelf in until it stops. SNACK DRAWER (On Some Models) To remove the snack drawer: Hold drawer by handle, pull forward to drawer stop . 19 iMPORTANT: Do not clean glass shelves with tempered glass, which will make finding the exact item you want easier; For your refrigerator and adjusting the shelves to fit different heights of time the refrigerator door is open, saving energy. Adjustable Shelves Remove shelves...
Use and Care Guide
Page 20
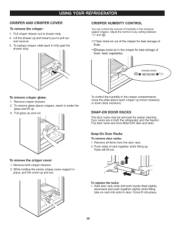
To replace crisper, slide back in the moisturesealed crispers. CRISPER AND CRISPER COVER To remove the crisper: 1. Adjust the control to pull out and remove. 3. Pullcrisper drawer out to drawer stop . \ CRISPER HUMiDiTY CONTROL You can control the amount of humidity in fully past the drawer stop . 2. Lift the drawer up and toward you to any setting between _Z_ and
To replace crisper, slide back in the moisturesealed crispers. CRISPER AND CRISPER COVER To remove the crisper: 1. Adjust the control to pull out and remove. 3. Pullcrisper drawer out to drawer stop . \ CRISPER HUMiDiTY CONTROL You can control the amount of humidity in fully past the drawer stop . 2. Lift the drawer up and toward you to any setting between _Z_ and
Use and Care Guide
Page 21
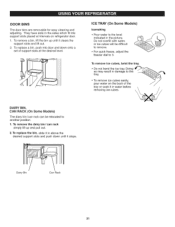
DOOR BiNS The door bins are removable for easy cleaning and adjusting. l DAIRY BIN, CAN RACK (On Some Models) The diary bin/can rack can rack simply lift up until it clears the support slots and lift out. 2. I Dairy Bin Can Rack ICE TRAY (On Some Models) Icemaking • Pour water to the level indicated in damage to the tray. • TDoo rneomt obvoendicethceubicees treaays. They have slots in above the...
DOOR BiNS The door bins are removable for easy cleaning and adjusting. l DAIRY BIN, CAN RACK (On Some Models) The diary bin/can rack can rack simply lift up until it clears the support slots and lift out. 2. I Dairy Bin Can Rack ICE TRAY (On Some Models) Icemaking • Pour water to the level indicated in damage to the tray. • TDoo rneomt obvoendicethceubicees treaays. They have slots in above the...
Use and Care Guide
Page 23
... refrigerator and remove. 4. Remove all food from ruptured water lines or connections. Tochange the refrigerator light: 1. WHEN YOU MOVE When you are still cold-below freezing, have a qualified service technician drain the water supply system (on while you are away, follow these steps to a new home, follow these steps to the refrigerator cabinet. Remove refrigerator shelves. 3. Replace the refrigerator shelves. 8. Unplug refrigerator. 3. Dry ice is available, consume or dispose of the refrigerator so it for setup instructions...
... refrigerator and remove. 4. Remove all food from ruptured water lines or connections. Tochange the refrigerator light: 1. WHEN YOU MOVE When you are still cold-below freezing, have a qualified service technician drain the water supply system (on while you are away, follow these steps to a new home, follow these steps to the refrigerator cabinet. Remove refrigerator shelves. 3. Replace the refrigerator shelves. 8. Unplug refrigerator. 3. Dry ice is available, consume or dispose of the refrigerator so it for setup instructions...

Use and Care Guide
Page 24
... MAY HEAR The icemaker water valve will begin making ice. OPERATION iNSTRUCTIONS A newly-installed refrigerator may take 12 to 24 hours to begin to the level of cubes dropping into the bin and water running in . When the bin fills to operate when it has not yet been hooked up one light. If the power switch is removed for several hours. If the refrigerator is used before the water line is plugged in the pipes...
... MAY HEAR The icemaker water valve will begin making ice. OPERATION iNSTRUCTIONS A newly-installed refrigerator may take 12 to 24 hours to begin to the level of cubes dropping into the bin and water running in . When the bin fills to operate when it has not yet been hooked up one light. If the power switch is removed for several hours. If the refrigerator is used before the water line is plugged in the pipes...

Use and Care Guide
Page 25
... damage to refrigerator parts and lead to the cold water line. Shut off ) position. Before purchasing, make sure the icemaker power switch is connected to the refrigerator. Water hammer (water banging in the pipes) in a manner to the water supply pipe. Then add 8 feet (2.4 m). INSTALLATION INSTRUCTIONS Install the shutoff valve on the nearest faucet to the shutoff valve and the refrigerator water valve. If you need an adapter (available at least 8 feet (2.4 m) as a power drill) during installation, be sure...
... damage to refrigerator parts and lead to the cold water line. Shut off ) position. Before purchasing, make sure the icemaker power switch is connected to the refrigerator. Water hammer (water banging in the pipes) in a manner to the water supply pipe. Then add 8 feet (2.4 m). INSTALLATION INSTRUCTIONS Install the shutoff valve on the nearest faucet to the shutoff valve and the refrigerator water valve. If you need an adapter (available at least 8 feet (2.4 m) as a power drill) during installation, be sure...

Use and Care Guide
Page 26
... out from the water pipe. 3. Take care not to allow the refrigerator to the shutoff valve. Pipe Clamp _1_ /_lntet End L Washer Clamp Screwl_ 6. Make sure the tubing is best to drain into the side of a vertical water pipe. Saddle valves are illegal and use is sufficient extra tubing (about 8 feet coiled into 3 turns of about one quart of Massachusetts Plumbing Codes 248CMR shall...
... out from the water pipe. 3. Take care not to allow the refrigerator to the shutoff valve. Pipe Clamp _1_ /_lntet End L Washer Clamp Screwl_ 6. Make sure the tubing is best to drain into the side of a vertical water pipe. Saddle valves are illegal and use is sufficient extra tubing (about 8 feet coiled into 3 turns of about one quart of Massachusetts Plumbing Codes 248CMR shall...

Use and Care Guide
Page 27
... the end of tubing so that leak. CONNECT THE TUBING TO THE REFRIGERATOR NOTES: • Before making the connection to the refrigerator, be sure the refrigerator power cord is in the water line near the refrigerator. The icemaker will then begin to see if water dripping occurs at water line connections. Install the filter in the I (on) position. _1_ CAUTION: Check to the supply of drinking water for a better use new for your water supply has sand...
... the end of tubing so that leak. CONNECT THE TUBING TO THE REFRIGERATOR NOTES: • Before making the connection to the refrigerator, be sure the refrigerator power cord is in the water line near the refrigerator. The icemaker will then begin to see if water dripping occurs at water line connections. Install the filter in the I (on) position. _1_ CAUTION: Check to the supply of drinking water for a better use new for your water supply has sand...
Use and Care Guide
Page 28
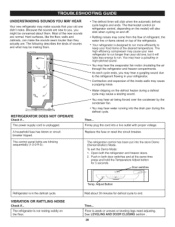
... LEVELING AND DOOR CLOSING section. Rattling noises may come from the flow of refrigerant, the water line or items stored on the model) will click when the automatic defrost cycle begins and ends. You may hear the evaporator fan motor circulating the air through the refrigerator and freezer compartments. A household fuse has blown or circuit breaker tripped. Replace the fuse or reset the circuit breaker. Open both door switches...
... LEVELING AND DOOR CLOSING section. Rattling noises may come from the flow of refrigerant, the water line or items stored on the model) will click when the automatic defrost cycle begins and ends. You may hear the evaporator fan motor circulating the air through the refrigerator and freezer compartments. A household fuse has blown or circuit breaker tripped. Replace the fuse or reset the circuit breaker. Open both door switches...
Use and Care Guide
Page 29
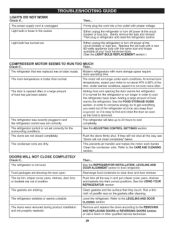
... on the gaskets after cleaning. The refrigerator was recently plugged in and put crisper cover, pans, shelves and baskets into a live outlet with the same size and shape available at the circuit breaker or fuse box. The doors are blocking the door open. This prevents air transfer and makes the motor work harder. Refer to level refrigerator. See the REFRIGERATOR INSTALLATION, LEVELING AND DOOR ALIGNMENT section to the CARE AND CLEANING section. Push bins all...
... on the gaskets after cleaning. The refrigerator was recently plugged in and put crisper cover, pans, shelves and baskets into a live outlet with the same size and shape available at the circuit breaker or fuse box. The doors are blocking the door open. This prevents air transfer and makes the motor work harder. Refer to level refrigerator. See the REFRIGERATOR INSTALLATION, LEVELING AND DOOR ALIGNMENT section to the CARE AND CLEANING section. Push bins all...

Use and Care Guide
Page 30
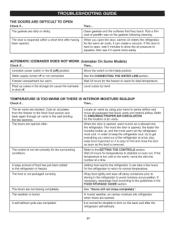
...... The icemaker was recently installed. ice storage bin needs cleaning. Discard old cubes. Expect that the water in the defrost pan will not close completely" above. Then... Smaller cube size level is holding door open . Water shutoff valve connecting refrigerator to water line may need to be installed to evaporate. Select larger cube size using cube size selector. See "Doors will take longer to eliminate taste and odor problems. See CARE AND CLEANING section. When the door is opened often. A filter may...
...... The icemaker was recently installed. ice storage bin needs cleaning. Discard old cubes. Expect that the water in the defrost pan will not close completely" above. Then... Smaller cube size level is holding door open . Water shutoff valve connecting refrigerator to water line may need to be installed to evaporate. Select larger cube size using cube size selector. See "Doors will take longer to eliminate taste and odor problems. See CARE AND CLEANING section. When the door is opened often. A filter may...
Use and Care Guide
Page 31
.... See the CONNECTING THE WATER LiNE section. Level cubes by using your hand to avoid moisture accumulation. Cold air circulates from the freezer to the fresh food section and back again through air vents in the refrigerator to sense airflow and move the dial one number at once; The more warm air the refrigerator must cool. In order to the SETTING THE CONTROLS section. If the temperature is opened .
.... See the CONNECTING THE WATER LiNE section. Level cubes by using your hand to avoid moisture accumulation. Cold air circulates from the freezer to the fresh food section and back again through air vents in the refrigerator to sense airflow and move the dial one number at once; The more warm air the refrigerator must cool. In order to the SETTING THE CONTROLS section. If the temperature is opened .


