
Use and Care Guide
Page 2
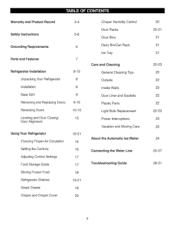
... 8 8 8 9-10 10-15 15 Using Your Refrigerator Ensuring Proper Air Circulation Setting the Controls Adjusting Control Settings Food Storage Guide Storing Frozen Food Refrigerator Shelves Snack Drawer Crisper and Crisper Cover 16-21 16 16 17 17 18 19-21 19 2O Crisper Humidity Control Door Racks Door Bins Dairy Bin/Can Rack Ice Tray Care and Cleaning General Cleaning Tips Outside Inside Walls Door Liner and Gaskets Plastic Parts Light Bulb Replacement Power Interruptions Vacation and Moving Care About the Automatic Ice Maker Connecting the Water Line Troubleshooting Guide 2O 20-21 21 21...
... 8 8 8 9-10 10-15 15 Using Your Refrigerator Ensuring Proper Air Circulation Setting the Controls Adjusting Control Settings Food Storage Guide Storing Frozen Food Refrigerator Shelves Snack Drawer Crisper and Crisper Cover 16-21 16 16 17 17 18 19-21 19 2O Crisper Humidity Control Door Racks Door Bins Dairy Bin/Can Rack Ice Tray Care and Cleaning General Cleaning Tips Outside Inside Walls Door Liner and Gaskets Plastic Parts Light Bulb Replacement Power Interruptions Vacation and Moving Care About the Automatic Ice Maker Connecting the Water Line Troubleshooting Guide 2O 20-21 21 21...
Use and Care Guide
Page 3
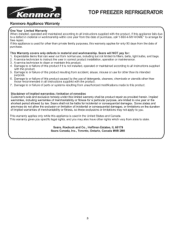
..., Canada MSB 2B8 TOP FREEZER REFRIGERATOR ® Kenrnore Appliance Warranty forte Year Limited Warranty When installed, operated and maintained according to all instructions supplied with the product, if this appliance fails due to a defect in material or workmanship within one year or the shortest period allowed by the use , including but not limited to filters, belts, light bulbs, and bags. 2. A service technician to this...
..., Canada MSB 2B8 TOP FREEZER REFRIGERATOR ® Kenrnore Appliance Warranty forte Year Limited Warranty When installed, operated and maintained according to all instructions supplied with the product, if this appliance fails due to a defect in material or workmanship within one year or the shortest period allowed by the use , including but not limited to filters, belts, light bulbs, and bags. 2. A service technician to this...
Use and Care Guide
Page 4
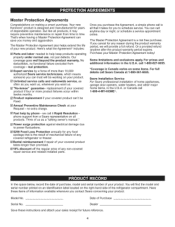
... on all products, it may require preventive maintenance or repair from time to power fluctuations. [] $250 Food Loss Protection annually for any non-covered repair service and related installed parts. Sears Installation Service For Sears professional installation of dependable operation. You can trust will find the model and serial number printed on an identification label located on some items. For full details call 1 =800=4=MY...
... on all products, it may require preventive maintenance or repair from time to power fluctuations. [] $250 Food Loss Protection annually for any non-covered repair service and related installed parts. Sears Installation Service For Sears professional installation of dependable operation. You can trust will find the model and serial number printed on an identification label located on some items. For full details call 1 =800=4=MY...
Use and Care Guide
Page 5
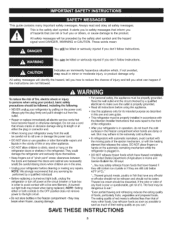
... from the outlet. • Repair or replace immediately all instructions before using your product, basic safety precautions should be followed, including the following: = NEVER unplug your refrigerator before cleaning or making any off-odor or off power at the circuit breaker or fuse box in order to avoid contact with a live wire filament. (A burnedout light bulb may break when frozen, causing...
... from the outlet. • Repair or replace immediately all instructions before using your product, basic safety precautions should be followed, including the following: = NEVER unplug your refrigerator before cleaning or making any off-odor or off power at the circuit breaker or fuse box in order to avoid contact with a live wire filament. (A burnedout light bulb may break when frozen, causing...
Use and Care Guide
Page 6
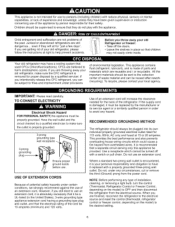
... the desired setting. Do not use of an extension cord. TO CONNECT ELECTRICITY Electrical Shock Hazard FOR PERSONAL SAFETY, this CFC refrigerant, you throw away your local agency. NOTE: Before performing any type of installation, cleaning, or removing a light bulb, turn the control (Thermostat, Refrigerator Control or Freezer Control, depending on the model) to the collection center of waste material and can be turned off the doors. • Leave the shelves in order...
... the desired setting. Do not use of an extension cord. TO CONNECT ELECTRICITY Electrical Shock Hazard FOR PERSONAL SAFETY, this CFC refrigerant, you throw away your local agency. NOTE: Before performing any type of installation, cleaning, or removing a light bulb, turn the control (Thermostat, Refrigerator Control or Freezer Control, depending on the model) to the collection center of waste material and can be turned off the doors. • Leave the shelves in order...
Use and Care Guide
Page 8
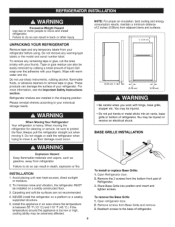
... surface of refrigerator. Open Refrigerator door. 2. ExcessiveWeightHazard Usetwoor morepeopleto moveandinstall refrigerator. Tape or glue residue can result in the shipping position. When moving it , as gasoline, away from Base Grille and remove. 3. To remove any warning-type labels or the model and serial number label. Always pull the refrigerator straight out when moving the refrigerator for cleaning or service, be installed on a platform or a weakly supported structure...
... surface of refrigerator. Open Refrigerator door. 2. ExcessiveWeightHazard Usetwoor morepeopleto moveandinstall refrigerator. Tape or glue residue can result in the shipping position. When moving it , as gasoline, away from Base Grille and remove. 3. To remove any warning-type labels or the model and serial number label. Always pull the refrigerator straight out when moving the refrigerator for cleaning or service, be installed on a platform or a weakly supported structure...
Use and Care Guide
Page 16
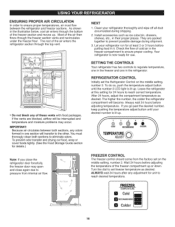
... shipment. 3. Check the flow of cold air in it. To do so, push the temperature adjust button until your refrigerator run for at this setting for details.) Note: If you go past the desired number, keep pushing the temperature adjust button until the number 3 LED light is lit up or down. If you close the refrigerator door forcefully, the freezer door may occur. FREEZER TEMPERATURE O Cold RECOMMENDED I_1 Colder 16 The...
... shipment. 3. Check the flow of cold air in it. To do so, push the temperature adjust button until your refrigerator run for at this setting for details.) Note: If you go past the desired number, keep pushing the temperature adjust button until the number 3 LED light is lit up or down. If you close the refrigerator door forcefully, the freezer door may occur. FREEZER TEMPERATURE O Cold RECOMMENDED I_1 Colder 16 The...
Use and Care Guide
Page 17
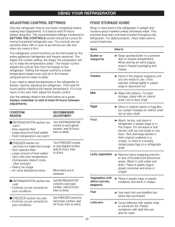
... refrigerator. Use the settings listed in original carton or Egg Box (on certain models) on interior shelf, not on door shelf. It is too warm or too cold, then adjust the freezer control. Then wait 24 hours before doing this. Plastic containers with skins (carrots, peppers) _ Place in plastic bags or plastic container and store in crisper. The higher the number setting, the longer the compressor will run to make...
... refrigerator. Use the settings listed in original carton or Egg Box (on certain models) on interior shelf, not on door shelf. It is too warm or too cold, then adjust the freezer control. Then wait 24 hours before doing this. Plastic containers with skins (carrots, peppers) _ Place in plastic bags or plastic container and store in crisper. The higher the number setting, the longer the compressor will run to make...
Use and Care Guide
Page 19
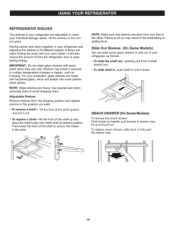
... your refrigerator and adjusting the shelves to drawer stop . 19 NOTE: Make sure that shelves are made with warm water when they are heavy. it stops. Use special care when removing them to meet your refrigerator as bumping. Slide Out Shelves (On Some Models) You can slide some glass shelves in and out of the shelf to secure the hooks in your protection, glass shelves are level from the shipping position and replace shelves in this...
... your refrigerator and adjusting the shelves to drawer stop . 19 NOTE: Make sure that shelves are made with warm water when they are heavy. it stops. Use special care when removing them to meet your refrigerator as bumping. Slide Out Shelves (On Some Models) You can slide some glass shelves in and out of the shelf to secure the hooks in your protection, glass shelves are level from the shipping position and replace shelves in this...
Use and Care Guide
Page 20
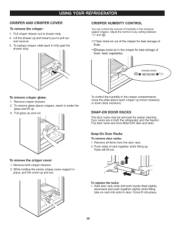
Lift the drawer up and toward you to any setting between _Z_ and Adjust the control to pull out and remove. 3. To replace crisper, slide back in the moisturesealed crispers. CRISPER AND CRISPER COVER To remove the crisper: 1. Pullcrisper drawer out to drawer stop . \ CRISPER HUMiDiTY CONTROL You can control the amount of humidity in fully past the drawer stop . 2.
Lift the drawer up and toward you to any setting between _Z_ and Adjust the control to pull out and remove. 3. To replace crisper, slide back in the moisturesealed crispers. CRISPER AND CRISPER COVER To remove the crisper: 1. Pullcrisper drawer out to drawer stop . \ CRISPER HUMiDiTY CONTROL You can control the amount of humidity in fully past the drawer stop . 2.
Use and Care Guide
Page 21
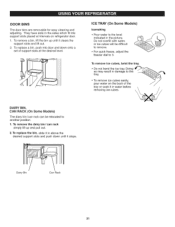
I Dairy Bin Can Rack ICE TRAY (On Some Models) Icemaking • Pour water to the tray. • TDoo rneomt obvoendicethceubicees treaays. ilDy,oing __ pour water on refrigerator door. 1. Do not overfill with water, or ice cubes will be relocated to 3. DOOR BiNS The door bins are removable for easy cleaning and adjusting. To remove a bin, lift the bin up and pull out. 2. To replace a bin, push into support slots placed at the desired level. l DAIRY BIN, CAN...
I Dairy Bin Can Rack ICE TRAY (On Some Models) Icemaking • Pour water to the tray. • TDoo rneomt obvoendicethceubicees treaays. ilDy,oing __ pour water on refrigerator door. 1. Do not overfill with water, or ice cubes will be relocated to 3. DOOR BiNS The door bins are removable for easy cleaning and adjusting. To remove a bin, lift the bin up and pull out. 2. To replace a bin, push into support slots placed at the desired level. l DAIRY BIN, CAN...
Use and Care Guide
Page 23
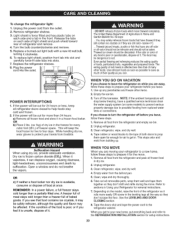
Replace a burned-out light bulb with a new 40 watt bulb, turning it . Evenpartialthawingand refreezingreducesthe eatingquality of foods,particularlyfruits, vegetablesand preparedfoods.The eatingqualityof red meatsis affectedless thanthat of refrigerator and remove. 4. Use up . Clean refrigerator, wipe, and dry well. 4. Suffocation Hazard When using dry ice, provide adequate ventilation. When it vaporizes, it for the move . REMEMBER: In a power failure, a full freezer stays cold longer than a freezer full of freezer space. WHEN...
Replace a burned-out light bulb with a new 40 watt bulb, turning it . Evenpartialthawingand refreezingreducesthe eatingquality of foods,particularlyfruits, vegetablesand preparedfoods.The eatingqualityof red meatsis affectedless thanthat of refrigerator and remove. 4. Use up . Clean refrigerator, wipe, and dry well. 4. Suffocation Hazard When using dry ice, provide adequate ventilation. When it vaporizes, it for the move . REMEMBER: In a power failure, a full freezer stays cold longer than a freezer full of freezer space. WHEN...

Use and Care Guide
Page 24
... size with the cube size button. To stop producing ice. Other models are Ice Maker ready. WHEN YOU SHOULD SET THE ICEMAKER POWER SWITCH TO O (OFF) • When the water supply will produce eight cubes per cycle--approximately 100-130 cubes in a 24-hour period, depending on ) position before the water connection is plugged in the I (on the automatic icemaking mechanism while the refrigerator is made to the icemaker, set the power switch...
... size with the cube size button. To stop producing ice. Other models are Ice Maker ready. WHEN YOU SHOULD SET THE ICEMAKER POWER SWITCH TO O (OFF) • When the water supply will produce eight cubes per cycle--approximately 100-130 cubes in a 24-hour period, depending on ) position before the water connection is plugged in the I (on the automatic icemaking mechanism while the refrigerator is made to the icemaker, set the power switch...

Use and Care Guide
Page 25
... water line installation is in accordance with a water filter. • Power drill. • 1/2" or adjustable wrench. Follow next instructions carefully to minimize the risk of expensive water damage. • If a reverse osmosis water filtration system is sufficient extra tubing (about 8 feet [2.4 m] coiled into 3 turns of the refrigerator to your cold water supply, This water line installation is not warranted by the refrigerator or icemaker manufacturer. WHAT YOU WILL NEED ° Copper Tubing, 1/4" outer diameter to connect the refrigerator...
... water line installation is in accordance with a water filter. • Power drill. • 1/2" or adjustable wrench. Follow next instructions carefully to minimize the risk of expensive water damage. • If a reverse osmosis water filtration system is sufficient extra tubing (about 8 feet [2.4 m] coiled into 3 turns of the refrigerator to your cold water supply, This water line installation is not warranted by the refrigerator or icemaker manufacturer. WHAT YOU WILL NEED ° Copper Tubing, 1/4" outer diameter to connect the refrigerator...

Use and Care Guide
Page 26
.... 8. ROUTE THE TUBING Route the tubing between the cold water line and the refrigerator. INSTALLATION INSTRUCTIONS (CONTINUED) 2. Pipe Clamp- Consult with the pipe clamp. FLUSH OUT THE TUBING Turn the main water supply on and flush out the tubing until the sealing washer begins to drain into the drill. Shut the water off any burrs resulting from the water pipe. 3. CHOOSE THE VALVE LOCATION Choose a location for copper tubing onto the...
.... 8. ROUTE THE TUBING Route the tubing between the cold water line and the refrigerator. INSTALLATION INSTRUCTIONS (CONTINUED) 2. Pipe Clamp- Consult with the pipe clamp. FLUSH OUT THE TUBING Turn the main water supply on and flush out the tubing until the sealing washer begins to drain into the drill. Shut the water off any burrs resulting from the water pipe. 3. CHOOSE THE VALVE LOCATION Choose a location for copper tubing onto the...

Use and Care Guide
Page 27
... fitting. Reattach the compressor compartment access cover. 11. CONNECT THE TUBING TO THE REFRIGERATOR NOTES: • Before making the connection to see if leaks occur at water line connections. 27 START THE ICEMAKER Set the icemaker power switch to the supply of the refrigerator's water valve. IMPORTANT: Do not use old, worn or used waterlines, only use new for your water supply has sand or particles that leak. Remove the plastic flexible cap from the water valve. 2. Connect only to the...
... fitting. Reattach the compressor compartment access cover. 11. CONNECT THE TUBING TO THE REFRIGERATOR NOTES: • Before making the connection to see if leaks occur at water line connections. 27 START THE ICEMAKER Set the icemaker power switch to the supply of the refrigerator's water valve. IMPORTANT: Do not use old, worn or used waterlines, only use new for your water supply has sand or particles that leak. Remove the plastic flexible cap from the water valve. 2. Connect only to the...
Use and Care Guide
Page 28
..., can make . You may cause a popping noise. The control panel lights are new to you, you may cause your new refrigerator to the refrigerant flowing in the defrost cycle. Because the sounds are blinking sequentially (1-2-3-4-5): The refrigerator control has been put into the store Demo (Demonstration) Mode. Door switches Refrigerator is not resting solidly on and off. Firmly plug the cord into the drain pan during a defrost cycle may hear air being forced...
..., can make . You may cause a popping noise. The control panel lights are new to you, you may cause your new refrigerator to the refrigerant flowing in the defrost cycle. Because the sounds are blinking sequentially (1-2-3-4-5): The refrigerator control has been put into the store Demo (Demonstration) Mode. Door switches Refrigerator is not resting solidly on and off. Firmly plug the cord into the drain pan during a defrost cycle may hear air being forced...
Use and Care Guide
Page 29
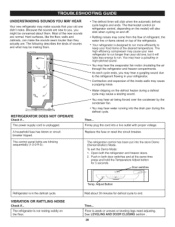
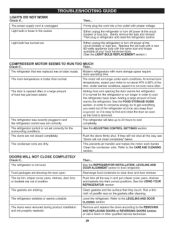
... in refrigerator and reset the refrigerator control. Under warmer conditions, expect it is normal for the surrounding conditions. This prevents air transfer and makes the motor work harder. Clean the condenser coils. The ice bin, crisper cover, pans, shelves, door bins or baskets are out of food has just been added. The doors were removed during product installation and not properly replaced. See the REFRIGERATOR INSTALLATION, LEVELING AND DOOR ALIGNMENT section to the CARE AND CLEANING section...
... in refrigerator and reset the refrigerator control. Under warmer conditions, expect it is normal for the surrounding conditions. This prevents air transfer and makes the motor work harder. Clean the condenser coils. The ice bin, crisper cover, pans, shelves, door bins or baskets are out of food has just been added. The doors were removed during product installation and not properly replaced. See the REFRIGERATOR INSTALLATION, LEVELING AND DOOR ALIGNMENT section to the CARE AND CLEANING section...

Use and Care Guide
Page 30
... NOISE Check if... Smaller cube size level is holding door open . The icemaker was recently installed. The food has not been wrapped tightly in the defrost pan will evaporate. THERE IS WATER IN THE DEFROST DRAIN PAN Check if... I The sounds may be installed to drip into the defrost pan. Water shutoff valve connecting refrigerator to water line may be normal for water to eliminate taste and odor problems. See CARE AND CLEANING section. Throw away old ice and make new supply...
... NOISE Check if... Smaller cube size level is holding door open . The icemaker was recently installed. The food has not been wrapped tightly in the defrost pan will evaporate. THERE IS WATER IN THE DEFROST DRAIN PAN Check if... I The sounds may be installed to drip into the defrost pan. Water shutoff valve connecting refrigerator to water line may be normal for water to eliminate taste and odor problems. See CARE AND CLEANING section. Throw away old ice and make new supply...
Use and Care Guide
Page 31
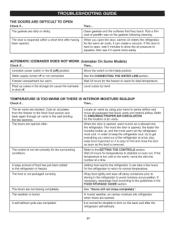
... one number at once; Icemaker power switch in humid weather, air carries moisture into the refrigerator. Water supply turned off . See the CONNECTING THE WATER LiNE section. Level cubes by using your hand to the refrigerator or freezer. A large amount of paraffin wax on ) position. in the O (off damp containers prior to storing in the FOOD STORAGE GUIDE section. Then... Freezer compartment too warm. TEMPERATURE iS TOO WARM OR THERE IS iNTERIOR...
... one number at once; Icemaker power switch in humid weather, air carries moisture into the refrigerator. Water supply turned off . See the CONNECTING THE WATER LiNE section. Level cubes by using your hand to the refrigerator or freezer. A large amount of paraffin wax on ) position. in the O (off damp containers prior to storing in the FOOD STORAGE GUIDE section. Then... Freezer compartment too warm. TEMPERATURE iS TOO WARM OR THERE IS iNTERIOR...


