Installation Instructions
Page 1
... la instalacion ...23 NUMEROS DE SERVICIO ...CONTRAPORTADA SERVICE NUMBERS ...BACK COVER DRYER SAFETY Your safety and the safety of Contents / Indice DRYER SAFETY ...INSTALLATION INSTRUCTIONS ...Tools and Parts ...Location Requirements ...Electrical Requirements ...Electrical Connection ...Venting Requirements ...Plan Vent System ...Install Vent System ...Install Leveling... injury, and tell you and others are not followed. 3979976 27 IN. (69 CM) ELECTRIC DRYER INSTALLATION INSTRUCTIONS INSTRUCCIONES DE INSTALACION PARA LA SECADORA ELECTRICA DE 27 PULG. (69 CM) Table of others .
... la instalacion ...23 NUMEROS DE SERVICIO ...CONTRAPORTADA SERVICE NUMBERS ...BACK COVER DRYER SAFETY Your safety and the safety of Contents / Indice DRYER SAFETY ...INSTALLATION INSTRUCTIONS ...Tools and Parts ...Location Requirements ...Electrical Requirements ...Electrical Connection ...Venting Requirements ...Plan Vent System ...Install Vent System ...Install Leveling... injury, and tell you and others are not followed. 3979976 27 IN. (69 CM) ELECTRIC DRYER INSTALLATION INSTRUCTIONS INSTRUCCIONES DE INSTALACION PARA LA SECADORA ELECTRICA DE 27 PULG. (69 CM) Table of others .
Installation Instructions
Page 2
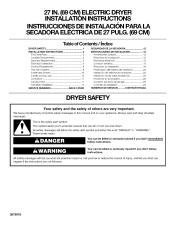
... needed: Check local codes. See "Venting Requirements." Louvered doors with elbow. Check code requirements. See "Venting Requirements." INSTALLATION INSTRUCTIONS • • A grounded electrical outlet located within 2 ft (61 cm) of either side of the dryer in garages, closets, mobile homes, or sleeping quarters. Check that all sides of installation and servicing. Check existing...
... needed: Check local codes. See "Venting Requirements." Louvered doors with elbow. Check code requirements. See "Venting Requirements." INSTALLATION INSTRUCTIONS • • A grounded electrical outlet located within 2 ft (61 cm) of either side of the dryer in garages, closets, mobile homes, or sleeping quarters. Check that all sides of installation and servicing. Check existing...
Installation Instructions
Page 3
... Type 10-30R. It is manufactured with the National Electrical Code, ANSl/NFPA 70-latest edition and all Iocal codes and ordinances. [] For a permanently connected dryer: This dryer must be connected to the NEUTRAL (white or center wire) of the wiring harness at least 4 ft (1.22 m) long, must be obtained from: National Fire Protection...
... Type 10-30R. It is manufactured with the National Electrical Code, ANSl/NFPA 70-latest edition and all Iocal codes and ordinances. [] For a permanently connected dryer: This dryer must be connected to the NEUTRAL (white or center wire) of the wiring harness at least 4 ft (1.22 m) long, must be obtained from: National Fire Protection...
Installation Instructions
Page 4
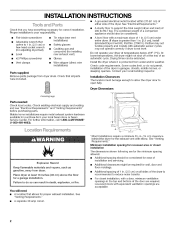
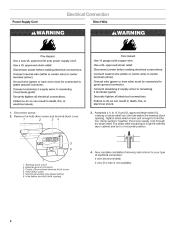
Ground wire (green or bare wire) must be in a horizontal position. 5 6 Now complete installation following instructions of electrical connection: 4-wire (recommended) !. 2. 3. 4. 5. 6. Assemble a 3/, in death, fire, or electrica_ shock. 3. Terminal block cover External ground connector Center...the terminal block opening for your type 3-wire (if 4-wire is not available) The strain relief should have a tight fit with the dryer cabinet and be connected green ground connector, Connect remaining 2 terminals (gold)= Securely tighten 2 suppmy wires to remaining to center terminal (...
Ground wire (green or bare wire) must be in a horizontal position. 5 6 Now complete installation following instructions of electrical connection: 4-wire (recommended) !. 2. 3. 4. 5. 6. Assemble a 3/, in death, fire, or electrica_ shock. 3. Terminal block cover External ground connector Center...the terminal block opening for your type 3-wire (if 4-wire is not available) The strain relief should have a tight fit with the dryer cabinet and be connected green ground connector, Connect remaining 2 terminals (gold)= Securely tighten 2 suppmy wires to remaining to center terminal (...
Installation Instructions
Page 5
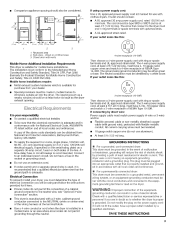
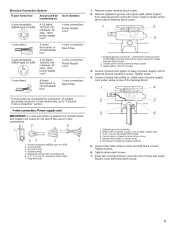
...in . (1.9 cm) UL approved strain relief 7. Neutral grounding wire (green/yellow) 5. 6. 7. Electrical Connection Options If your home has: And you will be connecting to: A UL listed, 120/240 volt amp., dryer power supply minimum, 30 cord* A fused disconnect or circuit breaker box* A UL listed, 120... upturned ends 6. _ in . (1.9 cm) UL-listed strain relief 4. Tighten screws. Tighten screw. Tighten strain relief screws. wire of dryer rear panel. Connect neutral wire (white or center wire) of power supply cord under center, silver-colored terminal block screw. 4-wire receptacle ...
...in . (1.9 cm) UL approved strain relief 7. Neutral grounding wire (green/yellow) 5. 6. 7. Electrical Connection Options If your home has: And you will be connecting to: A UL listed, 120/240 volt amp., dryer power supply minimum, 30 cord* A fused disconnect or circuit breaker box* A UL listed, 120... upturned ends 6. _ in . (1.9 cm) UL-listed strain relief 4. Tighten screws. Tighten screw. Tighten strain relief screws. wire of dryer rear panel. Connect neutral wire (white or center wire) of power supply cord under center, silver-colored terminal block screw. 4-wire receptacle ...
Installation Instructions
Page 6
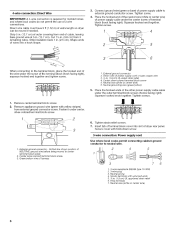
...cover into a hook shape. Remove center terminal block screw. Center silver-colored terminal block screw 3. Ring terminals 7. Direct wire cable must have 5 ft (1.52 m) of harness 2 4 5 7 1.3-wire receptacle (NEMA type 10-30R) 2. 3-wire plug 3. Shape ends of wires into slot of... leaving bare ground wire at 5 in . (1.9 cm) UL approved strain relief 6. Strip 5 in. (12.7 cm) of outer covering from end of dryer rear panel. Tighten screw. Neutral prong 4. Tighten screws. 1. 2. Remove appliance ground wire (green with yellow stripes) from 3 remaining wires. 3= 4-wire ...
...cover into a hook shape. Remove center terminal block screw. Center silver-colored terminal block screw 3. Ring terminals 7. Direct wire cable must have 5 ft (1.52 m) of harness 2 4 5 7 1.3-wire receptacle (NEMA type 10-30R) 2. 3-wire plug 3. Shape ends of wires into slot of... leaving bare ground wire at 5 in . (1.9 cm) UL approved strain relief 6. Strip 5 in. (12.7 cm) of outer covering from end of dryer rear panel. Tighten screw. Neutral prong 4. Tighten screws. 1. 2. Remove appliance ground wire (green with yellow stripes) from 3 remaining wires. 3= 4-wire ...

Installation Instructions
Page 7
... relief 3. 4. 5. Remove center terminal block screw. Squeeze hooked ends together. Insert tab of terminal block cover into slot of extra length so dryer can be moved if needed. Connect appliance ground wire and the neutral wire (white or center wire) of terminal block cover into a hook shape... outer covering. Tighten strain relief screws. Center sliver-colored terminal block screw 4. Tighten screws. !! !! Direct wire cable must have 5 ft (1.52 m) of dryer rear panel. If using 3-wire cable with ground wire, cut bare wire even with yellow stripes) from end of the terminal block (...
... relief 3. 4. 5. Remove center terminal block screw. Squeeze hooked ends together. Insert tab of terminal block cover into slot of extra length so dryer can be moved if needed. Connect appliance ground wire and the neutral wire (white or center wire) of terminal block cover into a hook shape... outer covering. Tighten strain relief screws. Center sliver-colored terminal block screw 4. Tighten screws. !! !! Direct wire cable must have 5 ft (1.52 m) of dryer rear panel. If using 3-wire cable with ground wire, cut bare wire even with yellow stripes) from end of the terminal block (...
Installation Instructions
Page 8
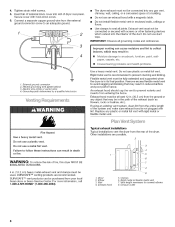
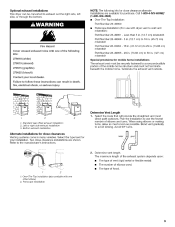
...any object that may result in reduced airflow and poor performance. Flexible metal vent must be fully extended and supported when the dryer is recommended to prevent crushing and kinking. If using an existing vent system, clean lint from the external ground connector screw...2 IMPORTANT: Observe all joints. DURASAFE TM venting products are possible. 2 WARNING; Connect a separate copper ground wire from the entire length of the dryer. Housecleaning furniture, paint, wall- Replace any gas vent, chimney, wall, ceiling, or a concealed space of the duct. Clamps Rigid metal or ...
...any object that may result in reduced airflow and poor performance. Flexible metal vent must be fully extended and supported when the dryer is recommended to prevent crushing and kinking. If using an existing vent system, clean lint from the external ground connector screw...2 IMPORTANT: Observe all joints. DURASAFE TM venting products are possible. 2 WARNING; Connect a separate copper ground wire from the entire length of the dryer. Housecleaning furniture, paint, wall- Replace any gas vent, chimney, wall, ceiling, or a concealed space of the duct. Clamps Rigid metal or ...
Installation Instructions
Page 9
... much room as possible. Select the type best for mobile home installations The exhaust vent must be converted to use with dryer vent to a noncombustible portion of elbows and turns. Over-The-Top installation (also available with one offset elbow) 2. Optional exhaust installations ...This dryer can result in death, fire, eiectrica_ shock, or serious injury. 1 2 3 1. Plan the installation to exhaust out the right side, left side,...
... much room as possible. Select the type best for mobile home installations The exhaust vent must be converted to use with dryer vent to a noncombustible portion of elbows and turns. Over-The-Top installation (also available with one offset elbow) 2. Optional exhaust installations ...This dryer can result in death, fire, eiectrica_ shock, or serious injury. 1 2 3 1. Plan the installation to exhaust out the right side, left side,...
Installation Instructions
Page 10
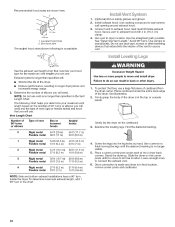
... of vent Box or Iouvered hoods 64 ft (20 m) 36 ft (11 m) 54 ft (16.5 m) 31 ft (9.4 m) 44 ft (13.4 m) 27 ft (8.2 m) 35 ft (10.7 m) 25 ft (7.6 m) 27 ft (8.2 m) 23 ft (7 m) Angled hoods 3. 58 ft (17.7 m) 28 ft (8.5 m) 48 ft (14.6 m) 23 ft (7 m) 38 ft (11.6 m) 19 ft (5.8 m) 29 ft (8.8 m) 17 ft (5.2 m) 6. 4 Rigid metal Flexible metal 21 ft (6.4 m) 15 ft (4.6 m) Gently lay the dryer on the corner posts until the diamond...
... of vent Box or Iouvered hoods 64 ft (20 m) 36 ft (11 m) 54 ft (16.5 m) 31 ft (9.4 m) 44 ft (13.4 m) 27 ft (8.2 m) 35 ft (10.7 m) 25 ft (7.6 m) 27 ft (8.2 m) 23 ft (7 m) Angled hoods 3. 58 ft (17.7 m) 28 ft (8.5 m) 48 ft (14.6 m) 23 ft (7 m) 38 ft (11.6 m) 19 ft (5.8 m) 29 ft (8.8 m) 17 ft (5.2 m) 6. 4 Rigid metal Flexible metal 21 ft (6.4 m) 15 ft (4.6 m) Gently lay the dryer on the corner posts until the diamond...
Installation Instructions
Page 11
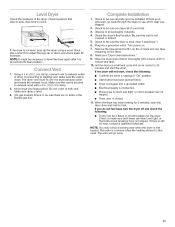
...odor when the dryer is secured to remove any tape remaining on the dryer. 2. 3. 4. 5. 6. If the dryer will go back through the steps to adjust the legs up the dryer using a wood block. Electrical supply is not crushed or kinked. The dryer vent must fit over the dryer exhaust outlet and... inside the exhaust hood. Move dryer into a grounded outlet. When the dryer has been running or "On" position. NOTE...
...odor when the dryer is secured to remove any tape remaining on the dryer. 2. 3. 4. 5. 6. If the dryer will go back through the steps to adjust the legs up the dryer using a wood block. Electrical supply is not crushed or kinked. The dryer vent must fit over the dryer exhaust outlet and... inside the exhaust hood. Move dryer into a grounded outlet. When the dryer has been running or "On" position. NOTE...


