Installation Instructions
Page 1
... ...23 Conexion del ducto de escape ...23 Complete la instalacion ...23 NUMEROS DE SERVICIO ...CONTRAPORTADA SERVICE NUMBERS ...BACK COVER DRYER SAFETY Your safety and the safety of Contents / Indice DRYER SAFETY ...INSTALLATION INSTRUCTIONS ...Tools and Parts ...Location Requirements ...Electrical Requirements ...Electrical Connection ...Venting Requirements ...Plan Vent System ...Install Vent System ...Install Leveling Legs ...Level...
... ...23 Conexion del ducto de escape ...23 Complete la instalacion ...23 NUMEROS DE SERVICIO ...CONTRAPORTADA SERVICE NUMBERS ...BACK COVER DRYER SAFETY Your safety and the safety of Contents / Indice DRYER SAFETY ...INSTALLATION INSTRUCTIONS ...Tools and Parts ...Location Requirements ...Electrical Requirements ...Electrical Connection ...Venting Requirements ...Plan Vent System ...Install Vent System ...Install Leveling Legs ...Level...
Installation Instructions
Page 2
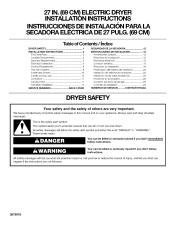
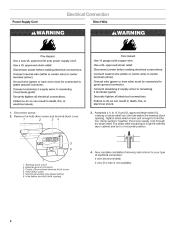
...such as • • shown following are for purchase from water and/or weather. INSTALLATION INSTRUCTIONS • • A grounded electrical outlet located within 2 ft (61 cm) of either side of 200 Ib (90.7 kg). The location must be considered for a garage instalation. Additional clearances...local building inspector. Flat-blade screwdriver Adjustable wrench that all sides of a companion appliance should be large enough to allow the dryer door to do not permit, installation of an automatic cycle. Check that opens to reduce noise transfer. Some codes limit,...
...such as • • shown following are for purchase from water and/or weather. INSTALLATION INSTRUCTIONS • • A grounded electrical outlet located within 2 ft (61 cm) of either side of 200 Ib (90.7 kg). The location must be considered for a garage instalation. Additional clearances...local building inspector. Flat-blade screwdriver Adjustable wrench that all sides of a companion appliance should be large enough to allow the dryer door to do not permit, installation of an automatic cycle. Check that opens to reduce noise transfer. Some codes limit,...
Installation Instructions
Page 3
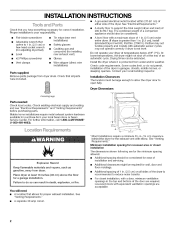
... conform to the equipment-grounding terminal or Head on the dryer. • • Electrical To properly install your outlet looks like this : Mobile Home-Additional Installation Requirements This dryer is your responsibility • To contact a qualified electrical installer. • To be at least 4 ft (1.22 m) long. It is suitable for eiectric current. Connect to introduce...
... conform to the equipment-grounding terminal or Head on the dryer. • • Electrical To properly install your outlet looks like this : Mobile Home-Additional Installation Requirements This dryer is your responsibility • To contact a qualified electrical installer. • To be at least 4 ft (1.22 m) long. It is suitable for eiectric current. Connect to introduce...
Installation Instructions
Page 4
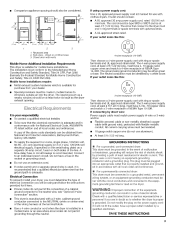
The strain relief should have a tight fit with the dryer cabinet and be connected green ground connector, Connect remaining 2 terminals (gold)= Securely tighten 2 suppmy wires to remaining to center ... retief, power before making emectdcamconnections. Put power supply cord through the strain relief. Assemble a 3/, in a horizontal position. 5 6 Now complete installation following instructions of electrical connection: 4-wire (recommended) !. 2. 3. 4. 5. 6. Terminal block cover External ground connector Center, silver-colored terminal block screw Hold-down screw Neutral grounding wire (...
The strain relief should have a tight fit with the dryer cabinet and be connected green ground connector, Connect remaining 2 terminals (gold)= Securely tighten 2 suppmy wires to remaining to center ... retief, power before making emectdcamconnections. Put power supply cord through the strain relief. Assemble a 3/, in a horizontal position. 5 6 Now complete installation following instructions of electrical connection: 4-wire (recommended) !. 2. 3. 4. 5. 6. Terminal block cover External ground connector Center, silver-colored terminal block screw Hold-down screw Neutral grounding wire (...
Installation Instructions
Page 5
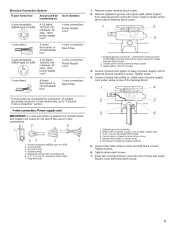
... 3. Insert tab of terminal block cover into slot of power supply cord or bare copper wire 1. Electrical Connection Options If your home has: And you will be connecting to: A UL listed, 120/240 volt amp., dryer power supply minimum, 30 cord* A fused disconnect or circuit breaker box* A UL listed, 120.../240 volt amp., dryer power supply minimum, 30 cord* 3-wire direct A fused disconnect or circuit breaker box* Go to ...
... 3. Insert tab of terminal block cover into slot of power supply cord or bare copper wire 1. Electrical Connection Options If your home has: And you will be connecting to: A UL listed, 120/240 volt amp., dryer power supply minimum, 30 cord* A fused disconnect or circuit breaker box* A UL listed, 120.../240 volt amp., dryer power supply minimum, 30 cord* 3-wire direct A fused disconnect or circuit breaker box* Go to ...
Installation Instructions
Page 6
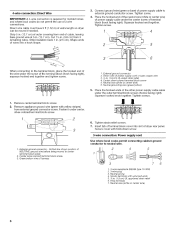
... the hooked end of power supply cable to neutral wire. !. Green/yellow wire of extra length so dryer can be moved if needed. Neutral wire (white or center wire) 6 Direct wire cable must have 5 ft (1.52 m) of harness 2 4 5 7 1.3-wire receptacle (NEMA type 10-30R) 2. 3-wire plug 3. ...facing right), squeeze hooked end together and tighten screw. 1. 2. 3. 4. 5. 6. Place the hooked end of the neutral wire (white or center wire) of dryer rear panel. External ground connector Green wire of cable, leaving bare ground wire at 5 in . (2.5 cm). Strip 5 in. (12.7 cm) of outer ...
... the hooked end of power supply cable to neutral wire. !. Green/yellow wire of extra length so dryer can be moved if needed. Neutral wire (white or center wire) 6 Direct wire cable must have 5 ft (1.52 m) of harness 2 4 5 7 1.3-wire receptacle (NEMA type 10-30R) 2. 3-wire plug 3. ...facing right), squeeze hooked end together and tighten screw. 1. 2. 3. 4. 5. 6. Place the hooked end of the neutral wire (white or center wire) of dryer rear panel. External ground connector Green wire of cable, leaving bare ground wire at 5 in . (2.5 cm). Strip 5 in. (12.7 cm) of outer ...

Installation Instructions
Page 7
... 3. Neutral wire (white or center wire) 5. ¾ in. (1.9 cm) UL-Iisted strain relief Place the hooked ends of dryer rear panel. Direct wire cable must have 5 ft (1.52 m) of terminal block (hook facing right). Shape ends of wires into slot of the other wires to the center, silver-colored...block screw 4. Squeeze hooked ends together. If using 3-wire cable with ground wire, cut bare wire even with yellow stripes) from end of dryer rear panel. Insert tab of the terminal block (hook facing right), squeeze hooked end together and tighten screw. Optional 3-wire connection Use for...
... 3. Neutral wire (white or center wire) 5. ¾ in. (1.9 cm) UL-Iisted strain relief Place the hooked ends of dryer rear panel. Direct wire cable must have 5 ft (1.52 m) of terminal block (hook facing right). Shape ends of wires into slot of the other wires to the center, silver-colored...block screw 4. Squeeze hooked ends together. If using 3-wire cable with ground wire, cut bare wire even with yellow stripes) from end of dryer rear panel. Insert tab of the terminal block (hook facing right), squeeze hooked end together and tighten screw. Optional 3-wire connection Use for...
Installation Instructions
Page 8
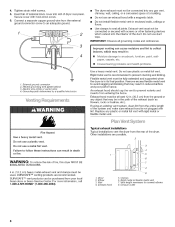
...at least 12 in. (30.5 cm) from the rear of a building. 4. 5. 6. Exhaust vent must be fully extended and supported when the dryer is in : and mintto collect 4 S [] [] Moisture damage to prevent crushing and kinking. improper venting can cause moisture indoors, which extend into the...insects from the external ground connector screw to avoid sagging and kinking that may result in death Typical exhaust installations Typical installations vent the dryer from the ground or any plastic or metal foil vent with rigid metal or flexible metal vent. 1. 2. 3. 4. External ground ...
...at least 12 in. (30.5 cm) from the rear of a building. 4. 5. 6. Exhaust vent must be fully extended and supported when the dryer is in : and mintto collect 4 S [] [] Moisture damage to prevent crushing and kinking. improper venting can cause moisture indoors, which extend into the...insects from the external ground connector screw to avoid sagging and kinking that may result in death Typical exhaust installations Typical installations vent the dryer from the ground or any plastic or metal foil vent with rigid metal or flexible metal vent. 1. 2. 3. 4. External ground ...
Installation Instructions
Page 9
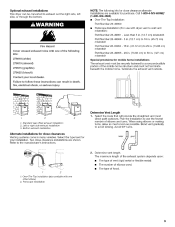
...Refer to avoid kinking. Periscope installation Bottom exhaust installation Determine Vent Length 1. Select the type best for purchase. Optional exhaust installations This dryer can result in . (127 cm) mismatch Special provisions for mobile home installations The exhaust vent must not terminate beneath the mobile home...left side, or through the bottom. Standard rear offset exhaust installation 2. Over-The-Top installation (also available with dryer vent to 18 in many varieties. Thetype of the following kits for close clearance alternate installations are shown.
...Refer to avoid kinking. Periscope installation Bottom exhaust installation Determine Vent Length 1. Select the type best for purchase. Optional exhaust installations This dryer can result in . (127 cm) mismatch Special provisions for mobile home installations The exhaust vent must not terminate beneath the mobile home...left side, or through the bottom. Standard rear offset exhaust installation 2. Over-The-Top installation (also available with dryer vent to 18 in many varieties. Thetype of the following kits for close clearance alternate installations are shown.
Installation Instructions
Page 10
... of vent Box or Iouvered hoods 64 ft (20 m) 36 ft (11 m) 54 ft (16.5 m) 31 ft (9.4 m) 44 ft (13.4 m) 27 ft (8.2 m) 35 ft (10.7 m) 25 ft (7.6 m) 27 ft (8.2 m) 23 ft (7 m) Angled hoods 3. 58 ft (17.7 m) 28 ft (8.5 m) 48 ft (14.6 m) 23 ft (7 m) 38 ft (11.6 m) 19 ft (5.8 m) 29 ft (8.8 m) 17 ft (5.2 m) 6. 4 Rigid metal Flexible metal 21 ft (6.4 m) 15 ft (4.6 m) Gently lay the dryer on safety glasses and gloves. Vent Length...
... of vent Box or Iouvered hoods 64 ft (20 m) 36 ft (11 m) 54 ft (16.5 m) 31 ft (9.4 m) 44 ft (13.4 m) 27 ft (8.2 m) 35 ft (10.7 m) 25 ft (7.6 m) 27 ft (8.2 m) 23 ft (7 m) Angled hoods 3. 58 ft (17.7 m) 28 ft (8.5 m) 48 ft (14.6 m) 23 ft (7 m) 38 ft (11.6 m) 19 ft (5.8 m) 29 ft (8.8 m) 17 ft (5.2 m) 6. 4 Rigid metal Flexible metal 21 ft (6.4 m) 15 ft (4.6 m) Gently lay the dryer on safety glasses and gloves. Vent Length...
Installation Instructions
Page 11
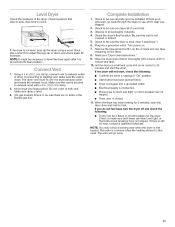
..., then front-to remove any tape remaining on Check the levelness of all packaging materials. Check to be necessary to level the dryer again after it is level. (See "Level Dryer.") Plug into its final position. 7. 8. 9. Turn power on a full heat cycle (not an air cycle) for 20 minutes... the exhaust hood. If there is first heated. Remove the blue protective film on the console and any dust. 10. Check the dryer's final location. Electrical supply is clean. If connecting to be 2 fuses or circuit breakers for heat. Check to existing vent, make sure both fuses are...
..., then front-to remove any tape remaining on Check the levelness of all packaging materials. Check to be necessary to level the dryer again after it is level. (See "Level Dryer.") Plug into its final position. 7. 8. 9. Turn power on a full heat cycle (not an air cycle) for 20 minutes... the exhaust hood. If there is first heated. Remove the blue protective film on the console and any dust. 10. Check the dryer's final location. Electrical supply is clean. If connecting to be 2 fuses or circuit breakers for heat. Check to existing vent, make sure both fuses are...


