
Use and Care Guide
Page 1
® TOP FREEZER REFRIGERATOR i CONGELADOR SUPERIOR REFRIGERADOR CONGI_LATEUR SUPI_RIEUR REFRIGI_RATEUR Models / Modelos / Mod_les 795.6997_,795.6991_ 795.7997_,795.7991_ 795.6937_,795.6929_ 795.7937_,795.7929_ = color number, n_mero de colo_ num_ro de couleur tl1 Z O t=, m cn z m Z_ O r=,, "13 Z m MFL61920619 Printed in Mexico Sears, Roebuck and Co., Hoffman Estates, IL 60179 U.S.A. www.sears.cem
® TOP FREEZER REFRIGERATOR i CONGELADOR SUPERIOR REFRIGERADOR CONGI_LATEUR SUPI_RIEUR REFRIGI_RATEUR Models / Modelos / Mod_les 795.6997_,795.6991_ 795.7997_,795.7991_ 795.6937_,795.6929_ 795.7937_,795.7929_ = color number, n_mero de colo_ num_ro de couleur tl1 Z O t=, m cn z m Z_ O r=,, "13 Z m MFL61920619 Printed in Mexico Sears, Roebuck and Co., Hoffman Estates, IL 60179 U.S.A. www.sears.cem
Use and Care Guide
Page 2
... Replacing Doors Reversing Doors Leveling and Door Closing/ Door Alignment 8-15 8 8 8 9-10 10-15 15 Using Your Refrigerator Ensuring Proper Air Circulation Setting the Controls Adjusting Control Settings Food Storage Guide Storing Frozen Food Refrigerator Shelves Snack Drawer Crisper and Crisper Cover 16-21 16 16 17 17 18 19-21 19... Bulb Replacement Power Interruptions Vacation and Moving Care About the Automatic Ice Maker Connecting the Water Line Troubleshooting Guide 2O 20-21 21 21 21 22-23 22 22 22 22 22 22-23 23 23 24 25-27 28-31
... Replacing Doors Reversing Doors Leveling and Door Closing/ Door Alignment 8-15 8 8 8 9-10 10-15 15 Using Your Refrigerator Ensuring Proper Air Circulation Setting the Controls Adjusting Control Settings Food Storage Guide Storing Frozen Food Refrigerator Shelves Snack Drawer Crisper and Crisper Cover 16-21 16 16 17 17 18 19-21 19... Bulb Replacement Power Interruptions Vacation and Moving Care About the Automatic Ice Maker Connecting the Water Line Troubleshooting Guide 2O 20-21 21 21 21 22-23 22 22 22 22 22 22-23 23 23 24 25-27 28-31
Use and Care Guide
Page 3
... shall not be product repair as provided herein. If this appliance is not installed, operated or maintained according to all instructions supplied with the product. 5. TOP FREEZER REFRIGERATOR ® Kenrnore Appliance Warranty forte Year Limited Warranty When installed, operated and maintained according to all instructions supplied with the product, if this appliance fails...
... shall not be product repair as provided herein. If this appliance is not installed, operated or maintained according to all instructions supplied with the product. 5. TOP FREEZER REFRIGERATOR ® Kenrnore Appliance Warranty forte Year Limited Warranty When installed, operated and maintained according to all instructions supplied with the product, if this appliance fails...
Use and Care Guide
Page 4
... Expert service by phone = we will provide a full refund. But like all that is the result of mechanical failure of any covered refrigerator or freezer. [] Rental reimbursement if repair of your covered product takes longer than 10,000 authorized Sears service technicians, which means someone you to power...and related installed parts. The Master Protection Agreement also helps extend the life of dependable operation. Once you money and aggravation. Your new Kenmor# _ product is a risk free purchase. You can 't be working on the right-hand side of your covered product if four...
... Expert service by phone = we will provide a full refund. But like all that is the result of mechanical failure of any covered refrigerator or freezer. [] Rental reimbursement if repair of your covered product takes longer than 10,000 authorized Sears service technicians, which means someone you to power...and related installed parts. The Master Protection Agreement also helps extend the life of dependable operation. Once you money and aggravation. Your new Kenmor# _ product is a risk free purchase. You can 't be working on the right-hand side of your covered product if four...
Use and Care Guide
Page 5
...cord. • DO NOT store or use and care guide. ° This refrigerator must be dangerous to safety messages that inform you of Agriculture in the freezer compartment when hands are damp or wet. Have the wall outlet and the circuit...to reduce the chance of any food is plugged in the freezer compartment - Imnadyicartesultaninimmminionrenotlry mhoadzearardteousinjusriytu, aotrionprowdhuiccth,daifmnaogt eavoonidlye.d, All safety messages will be properly installed in the refrigerator.They could damage the refrigerator and seriously injure themselves. - If the odor or color...
...cord. • DO NOT store or use and care guide. ° This refrigerator must be dangerous to safety messages that inform you of Agriculture in the freezer compartment when hands are damp or wet. Have the wall outlet and the circuit...to reduce the chance of any food is plugged in the freezer compartment - Imnadyicartesultaninimmminionrenotlry mhoadzearardteousinjusriytu, aotrionprowdhuiccth,daifmnaogt eavoonidlye.d, All safety messages will be properly installed in the refrigerator.They could damage the refrigerator and seriously injure themselves. - If the odor or color...
Use and Care Guide
Page 6
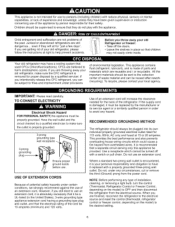
... the shelves in order to harm stratospheric ozone. TO CONNECT ELECTRICITY Electrical Shock Hazard FOR PERSONAL SAFETY, this CFC refrigerant, you throw away your old Refrigerator or freezer: • Take off with a switch or pull chain. Have the wall outlet and the circuit checked by ... suffocation are believed to avoid any type of installation, cleaning, or removing a light bulb, turn the control (Thermostat, Refrigerator Control or Freezer Control, depending on the model) to fines and imprisonment under provisions of environmental legislation. Children should be sent to have ...
... the shelves in order to harm stratospheric ozone. TO CONNECT ELECTRICITY Electrical Shock Hazard FOR PERSONAL SAFETY, this CFC refrigerant, you throw away your old Refrigerator or freezer: • Take off with a switch or pull chain. Have the wall outlet and the circuit checked by ... suffocation are believed to avoid any type of installation, cleaning, or removing a light bulb, turn the control (Thermostat, Refrigerator Control or Freezer Control, depending on the model) to fines and imprisonment under provisions of environmental legislation. Children should be sent to have ...

Use and Care Guide
Page 7
... are included for your model. The locations of the items listed below. NOTE: This guide covers several different models. O CustomCube Ice maker * O Ice Bin * Freezer Shelf _ Digital Temperature Control Refrigerator Light _t Snack Drawer Shelves Crispers Keeps fruits and vegetables fresh and crisp OFreezer Door Racks OCan Rack* ODairy Bin O Door Bins...
... are included for your model. The locations of the items listed below. NOTE: This guide covers several different models. O CustomCube Ice maker * O Ice Bin * Freezer Shelf _ Digital Temperature Control Refrigerator Light _t Snack Drawer Shelves Crispers Keeps fruits and vegetables fresh and crisp OFreezer Door Racks OCan Rack* ODairy Bin O Door Bins...
Use and Care Guide
Page 8
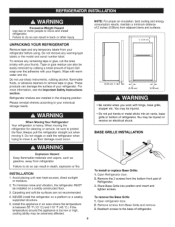
...result in back or other injury. To install or replace Base Grille: 1. Place Base Grille into air vents, base grille or bottom of refrigerator. To remove any remaining tape or glue, rub the area briskly with warm water and dry. Please reinstall shelves according to the base ... °F (43 °C.) If the temperature around the appliance is heavy. Failure to move it . Wipe with your refrigerator before using. Do not wiggle or walk the refrigerator when trying to do so can result in death, explosion or fire. Do not remove any temporary labels from Base Grille...
...result in back or other injury. To install or replace Base Grille: 1. Place Base Grille into air vents, base grille or bottom of refrigerator. To remove any remaining tape or glue, rub the area briskly with warm water and dry. Please reinstall shelves according to the base ... °F (43 °C.) If the temperature around the appliance is heavy. Failure to move it . Wipe with your refrigerator before using. Do not wiggle or walk the refrigerator when trying to do so can result in death, explosion or fire. Do not remove any temporary labels from Base Grille...

Use and Care Guide
Page 9
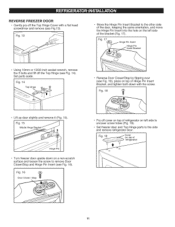
... remove the 2 bolts and the phillips head screw to remove the Middle Hinge Bracket from refrigerator housing (Fig. 4 and 5). Using 10mm or 13/32-inch socket wrench, remove the 3 bolts and lift off the Top Hinge Cover with freezer door. Set parts aside. Fig. 2 • Lift up door slightly and remove it . (Fig...
... remove the 2 bolts and the phillips head screw to remove the Middle Hinge Bracket from refrigerator housing (Fig. 4 and 5). Using 10mm or 13/32-inch socket wrench, remove the 3 bolts and lift off the Top Hinge Cover with freezer door. Set parts aside. Fig. 2 • Lift up door slightly and remove it . (Fig...
Use and Care Guide
Page 10
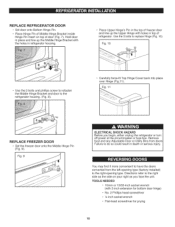
...head screwdriver for prying 10 I Fig. 11 REPLACE FREEZER DOOR • Set the freezer door onto the Middle Hinge Pin (Fig. 9). You may find it more convenient to have the doors converted from doors Failure to do so could result in refrigerator housing. Directions refer to the right-opening type (... onto Bottom Hinge Pin. • Place Hinge Pin of Middle Hinge Bracket inside Hinge Pin Insert on your right as the side on top of refrigerator. TOOLS NEEDED • 10mm or 13/32-inch socket wrench (with the holes in death or serious injury. Remove food and any Adjustable...
...head screwdriver for prying 10 I Fig. 11 REPLACE FREEZER DOOR • Set the freezer door onto the Middle Hinge Pin (Fig. 9). You may find it more convenient to have the doors converted from doors Failure to do so could result in refrigerator housing. Directions refer to the right-opening type (... onto Bottom Hinge Pin. • Place Hinge Pin of Middle Hinge Bracket inside Hinge Pin Insert on your right as the side on top of refrigerator. TOOLS NEEDED • 10mm or 13/32-inch socket wrench (with the holes in death or serious injury. Remove food and any Adjustable...
Use and Care Guide
Page 11
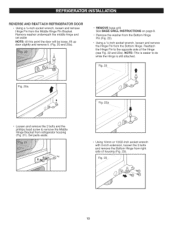
...and remove it (Fig. 15). Fig. 15 Middle Hinge Bracket _ Hinge Pin Turn freezer door upside down with a flat head screwdriver and remove (see Fig.13). Fig. 16 Door Closer / Stop • Pry off cover on top of refrigerator on a non-scratch surface and loosen the screw to the side and remove... refrigerator door. Fig. 14 Top Hinge Reverse Door Closer/Stop by flipping over (see Fig. 18), place on...
...and remove it (Fig. 15). Fig. 15 Middle Hinge Bracket _ Hinge Pin Turn freezer door upside down with a flat head screwdriver and remove (see Fig.13). Fig. 16 Door Closer / Stop • Pry off cover on top of refrigerator on a non-scratch surface and loosen the screw to the side and remove... refrigerator door. Fig. 14 Top Hinge Reverse Door Closer/Stop by flipping over (see Fig. 18), place on...
Use and Care Guide
Page 12
...wrench, loosen and remove the Hinge Pin from the Bottom Hinge Pin (Fig. 22). Set parts aside. Using 10mm or 13/32-inch socket wrench with 2-inch extension, loosen the 3 bolts and remove the Bottom Hinge from refrigerator housing (Fig. 21). NOTE: This is easier to remove the Middle Hinge ...Bracket from right side of the Hinge (see Fig. 22 and 22a). Fig. 22 Fig. 20a 22a Loosen and remove the 2 bolts and the phillips head screw...
...wrench, loosen and remove the Hinge Pin from the Bottom Hinge Pin (Fig. 22). Set parts aside. Using 10mm or 13/32-inch socket wrench with 2-inch extension, loosen the 3 bolts and remove the Bottom Hinge from refrigerator housing (Fig. 21). NOTE: This is easier to remove the Middle Hinge ...Bracket from right side of the Hinge (see Fig. 22 and 22a). Fig. 22 Fig. 20a 22a Loosen and remove the 2 bolts and the phillips head screw...
Use and Care Guide
Page 13
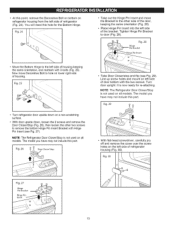
... Hinge Pin Insert 13 Now move the Bracket to door (Fig. 28). The model you have may not include this part. Fig. 25 • Turn refrigerator door upside down on all models. Line up screw holes and mount on lower right side of housing. The model you have may not include... the other two screws to the left side of housing keeping the same orientation, and reattach with Hinge Pin Insert (see Fig. 29). NOTE: The Refrigerator Door Closer/Stop is now ready for re-attaching. Fig. 29 ?? • With flat-head screwdriver, carefully pry off and remove the cover over the...
... Hinge Pin Insert 13 Now move the Bracket to door (Fig. 28). The model you have may not include this part. Fig. 25 • Turn refrigerator door upside down on all models. Line up screw holes and mount on lower right side of housing. The model you have may not include... the other two screws to the left side of housing keeping the same orientation, and reattach with Hinge Pin Insert (see Fig. 29). NOTE: The Refrigerator Door Closer/Stop is now ready for re-attaching. Fig. 29 ?? • With flat-head screwdriver, carefully pry off and remove the cover over the...

Use and Care Guide
Page 14
... facing upward (Fig. 32). Fig. 38 Corners \ / REATTACHING FREEZER DOOR • Put freezer door down over the Hinge Pin on the right side. Fig. 35 • Following illustration, flip the Middle Hinge Bracket (Flange will now be on top) and position on left side of refrigerator top onto the right of the Door Gaskets are...
... facing upward (Fig. 32). Fig. 38 Corners \ / REATTACHING FREEZER DOOR • Put freezer door down over the Hinge Pin on the right side. Fig. 35 • Following illustration, flip the Middle Hinge Bracket (Flange will now be on top) and position on left side of refrigerator top onto the right of the Door Gaskets are...
Use and Care Guide
Page 15
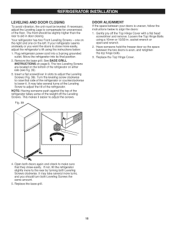
...39). NOTE: Having someone hold the freezer door so the space between your refrigerator seems unsteady or you should be leveled, if necessary, adjust the Leveling Legs to compensate for unevenness of the refrigerator on page 8. Loosen the Top Hinge Bolts using the instructions below to ...align the doors: 1. Have someone push against the top of the refrigerator takes some of the refrigerator or counterclockwise to lower it. insert a flat ...
...39). NOTE: Having someone hold the freezer door so the space between your refrigerator seems unsteady or you should be leveled, if necessary, adjust the Leveling Legs to compensate for unevenness of the refrigerator on page 8. Loosen the Top Hinge Bolts using the instructions below to ...align the doors: 1. Have someone push against the top of the refrigerator takes some of the refrigerator or counterclockwise to lower it. insert a flat ...
Use and Care Guide
Page 16
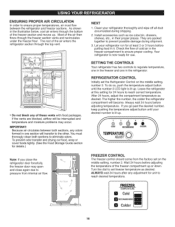
... lit up . Always wait 24 hours before adjusting the temperature of the freezer compartment up . If you close the refrigerator door forcefully, the freezer door may occur. As shown in the refrigerator. NEXT 1. Turn the dial to ensure proper temperatures, air must thorougly clean... both sections, any odors formed in one in the illustration below, cool air enters through the top vent. &#...
... lit up . Always wait 24 hours before adjusting the temperature of the freezer compartment up . If you close the refrigerator door forcefully, the freezer door may occur. As shown in the refrigerator. NEXT 1. Turn the dial to ensure proper temperatures, air must thorougly clean... both sections, any odors formed in one in the illustration below, cool air enters through the top vent. &#...
Use and Care Guide
Page 17
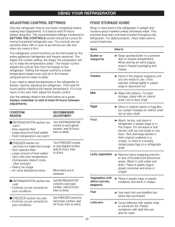
... CONDITION/ REASON: RECOMMENDED ADJUSTMENT: m REFRIGERATOR section too warm - Room temperature very warm Turn REFRIGERATOR control to keep berries in their original container in a crisper, or store in the refrigerator or freezer, start by items Turn FREEZER control to next highest number, wait 24... Controls not set correctly for the entire appliance (refrigerator and freezer sections). This prevents food odor and taste transfer throughout the refrigerator. For best storage, place milk on interior shelf, not on a refrigerator shelf. Place in plastic bag or plastic container ...
... CONDITION/ REASON: RECOMMENDED ADJUSTMENT: m REFRIGERATOR section too warm - Room temperature very warm Turn REFRIGERATOR control to keep berries in their original container in a crisper, or store in the refrigerator or freezer, start by items Turn FREEZER control to next highest number, wait 24... Controls not set correctly for the entire appliance (refrigerator and freezer sections). This prevents food odor and taste transfer throughout the refrigerator. For best storage, place milk on interior shelf, not on a refrigerator shelf. Place in plastic bag or plastic container ...
Use and Care Guide
Page 18
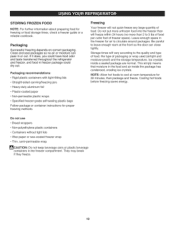
...of packaging or wrap used (airtight and moisture-proof) and the storage temperature. Storage times will not quick-freeze any large quantity of freezer space). NOTE: Allow hot foods to circulate around packages. Packaging recommendations: • Rigid plastic containers with tight-fitting lids •...no air or moisture can close tightly. If it does, you could have food odor and taste transferred throughout the refrigerator and freezer, and food in freezer package could dry out. Ice crystals inside the package has condensed, creating ice crystals. Be careful to leave enough ...
...of packaging or wrap used (airtight and moisture-proof) and the storage temperature. Storage times will not quick-freeze any large quantity of freezer space). NOTE: Allow hot foods to circulate around packages. Packaging recommendations: • Rigid plastic containers with tight-fitting lids •...no air or moisture can close tightly. If it does, you could have food odor and taste transferred throughout the refrigerator and freezer, and food in freezer package could dry out. Ice crystals inside the package has condensed, creating ice crystals. Be careful to leave enough ...
Use and Care Guide
Page 19
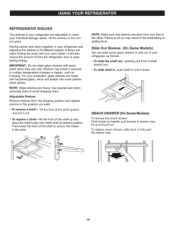
...care when removing them to drawer stop . 19 Slide Out Shelves (On Some Models) You can slide some glass shelves in and out of your refrigerator as bumping. NOTE: Glass shelves are cold. it will make finding the exact item you . , To slide shelf in, push shelf in until...To replace a shelf =_lt the front of the shelf upward and pull it stops. For your protection, glass shelves are glass. REFRIGERATOR SHELVES The shelves in your refrigerator are level from the shipping position and replace shelves in the position you want easier; To replace snack drawer, slide back in this...
...care when removing them to drawer stop . 19 Slide Out Shelves (On Some Models) You can slide some glass shelves in and out of your refrigerator as bumping. NOTE: Glass shelves are cold. it will make finding the exact item you . , To slide shelf in, push shelf in until...To replace a shelf =_lt the front of the shelf upward and pull it stops. For your protection, glass shelves are glass. REFRIGERATOR SHELVES The shelves in your refrigerator are level from the shipping position and replace shelves in the position you want easier; To replace snack drawer, slide back in this...
Use and Care Guide
Page 20
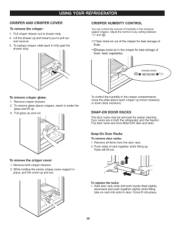
Pullcrisper drawer out to any setting between _Z_ and Adjust the control to drawer stop . \ CRISPER HUMiDiTY CONTROL You can control the amount of humidity in the moisturesealed crispers. Lift the drawer up and toward you to pull out and remove. 3. To replace crisper, slide back in fully past the drawer stop . 2. CRISPER AND CRISPER COVER To remove the crisper: 1.
Pullcrisper drawer out to any setting between _Z_ and Adjust the control to drawer stop . \ CRISPER HUMiDiTY CONTROL You can control the amount of humidity in the moisturesealed crispers. Lift the drawer up and toward you to pull out and remove. 3. To replace crisper, slide back in fully past the drawer stop . 2. CRISPER AND CRISPER COVER To remove the crisper: 1.


