Use and Care Guide
Page 2
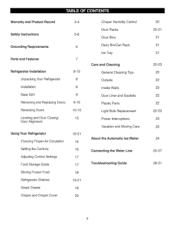
... 3-4 Safety instructions 5-6 Grounding Requirements 6 Parts and Features 7 Refrigerator installation Unpacking Your Refrigerator Installation Base Grill Removing and Replacing Doors Reversing Doors Leveling and Door Closing/ Door Alignment 8-15 8 8 8 9-10 10-15 15 Using Your Refrigerator Ensuring Proper Air Circulation Setting the Controls ...Walls Door Liner and Gaskets Plastic Parts Light Bulb Replacement Power Interruptions Vacation and Moving Care About the Automatic Ice Maker Connecting the Water Line Troubleshooting Guide 2O 20-21 21 21 21 22-23 22 22 22 22 22 22-23 23 23 24 25-...
... 3-4 Safety instructions 5-6 Grounding Requirements 6 Parts and Features 7 Refrigerator installation Unpacking Your Refrigerator Installation Base Grill Removing and Replacing Doors Reversing Doors Leveling and Door Closing/ Door Alignment 8-15 8 8 8 9-10 10-15 15 Using Your Refrigerator Ensuring Proper Air Circulation Setting the Controls ...Walls Door Liner and Gaskets Plastic Parts Light Bulb Replacement Power Interruptions Vacation and Moving Care About the Automatic Ice Maker Connecting the Water Line Troubleshooting Guide 2O 20-21 21 21 21 22-23 22 22 22 22 22 22-23 23 23 24 25-...
Use and Care Guide
Page 3
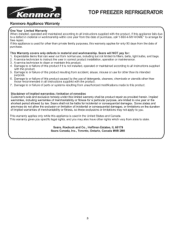
...family purposes, this warranty applies for other than its intended purpose. 6. Damage to or failure of purchase. Disclaimer of parts or systems resulting from the date of this product if it is not installed, operated or maintained according to all ...misuse or use of detergents, cleaners, chemicals or utensils other than those recommended in all instructions supplied with the product. 5. TOP FREEZER REFRIGERATOR ® Kenrnore Appliance Warranty forte Year Limited Warranty When installed, operated and maintained according to all instructions supplied with the product,...
...family purposes, this warranty applies for other than its intended purpose. 6. Damage to or failure of purchase. Disclaimer of parts or systems resulting from the date of this product if it is not installed, operated or maintained according to all ...misuse or use of detergents, cleaners, chemicals or utensils other than those recommended in all instructions supplied with the product. 5. TOP FREEZER REFRIGERATOR ® Kenrnore Appliance Warranty forte Year Limited Warranty When installed, operated and maintained according to all instructions supplied with the product,...
Use and Care Guide
Page 4
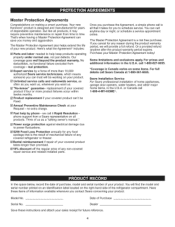
...varies on all products. The Master Protection Agreement is all products, it takes for any non-covered repair service and related installed parts. Or a prorated refund anytime after the product warranty period expires. Sears Installation Service For Sears professional installation of home appliances,... trust will be Fixed. [] Annual Preventive Maintenance Check at 1-880-361-6655. Your new Kenmor# _ product is the result of mechanical failure of any covered refrigerator or freezer. [] Rental reimbursement if repair of your covered product takes longer than 10,000 authorized Sears ...
...varies on all products. The Master Protection Agreement is all products, it takes for any non-covered repair service and related installed parts. Or a prorated refund anytime after the product warranty period expires. Sears Installation Service For Sears professional installation of home appliances,... trust will be Fixed. [] Annual Preventive Maintenance Check at 1-880-361-6655. Your new Kenmor# _ product is the result of mechanical failure of any covered refrigerator or freezer. [] Rental reimbursement if repair of your covered product takes longer than 10,000 authorized Sears ...
Use and Care Guide
Page 5
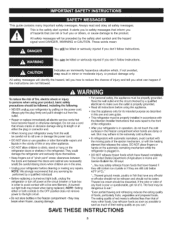
...personal safety,this or any servicing be discarded. SAVE THESE INSTRUCTIONS To reduce the risk of Agriculture in the freezer compartment - Unplug your refrigerator is properly grounded. ° Read all electric service cords that can ." Before replacing a burned-out light bulb, unplug ...or connector end. ° When moving parts of the ejector mechanism, or with a live wire filament. (A burnedout light bulb may adhere to the extremely cold surfaces. ° In refrigerators with automatic icemakers, avoid contact with the moving your refrigerator away from the outlet. • ...
...personal safety,this or any servicing be discarded. SAVE THESE INSTRUCTIONS To reduce the risk of Agriculture in the freezer compartment - Unplug your refrigerator is properly grounded. ° Read all electric service cords that can ." Before replacing a burned-out light bulb, unplug ...or connector end. ° When moving parts of the ejector mechanism, or with a live wire filament. (A burnedout light bulb may adhere to the extremely cold surfaces. ° In refrigerators with automatic icemakers, avoid contact with the moving your refrigerator away from the outlet. • ...
Use and Care Guide
Page 6
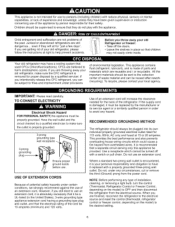
...the power cord. When you are reusable and / or recyclable. Child entrapment and suffocation are not problems of parts and materials which are throwing away your old Refrigerator or freezer: • Take off with a switch or pull chain. Have the wall outlet and the circuit checked by... Because of potential safety hazards under any type of installation, cleaning, or removing a light bulb, turn the control (Thermostat, Refrigerator Control or Freezer Control, depending on the model) to help prevent accidents. It is recommended that they do not play with the appliance. Children...
...the power cord. When you are reusable and / or recyclable. Child entrapment and suffocation are not problems of parts and materials which are throwing away your old Refrigerator or freezer: • Take off with a switch or pull chain. Have the wall outlet and the circuit checked by... Because of potential safety hazards under any type of installation, cleaning, or removing a light bulb, turn the control (Thermostat, Refrigerator Control or Freezer Control, depending on the model) to help prevent accidents. It is recommended that they do not play with the appliance. Children...

Use and Care Guide
Page 7
... below. O CustomCube Ice maker * O Ice Bin * Freezer Shelf _ Digital Temperature Control Refrigerator Light _t Snack Drawer Shelves Crispers Keeps fruits and vegetables fresh and crisp OFreezer Door Racks OCan Rack* ODairy Bin O Door Bins Refrigerator Door Rack *On some or all of the features shown betow... may have some models NOTE: This guide covers several different models. © Use this section to become more familiar with the parts and features. Page references are included ...
... below. O CustomCube Ice maker * O Ice Bin * Freezer Shelf _ Digital Temperature Control Refrigerator Light _t Snack Drawer Shelves Crispers Keeps fruits and vegetables fresh and crisp OFreezer Door Racks OCan Rack* ODairy Bin O Door Bins Refrigerator Door Rack *On some or all of the features shown betow... may have some models NOTE: This guide covers several different models. © Use this section to become more familiar with the parts and features. Page references are included ...
Use and Care Guide
Page 8
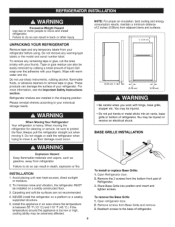
...: For proper air circulation, best cooling and energy consumption results, maintain a minimum distance of 2 inches (5.08cm) from the bottom front part of Refrigerator. 3. You may be sure to protect the floor. INSTALLATION 1. To install or replace Base Grille: 1. Remove the 2 screws from adjacent items and... bottom of liquid dish soap over the adhesive with warm water and dry. Failure to do so can damage the surface of refrigerator. NEVER install the refrigerator on a solidly constructed floor. 3. Do not remove any remaining tape or glue, rub the area briskly with hinge, base...
...: For proper air circulation, best cooling and energy consumption results, maintain a minimum distance of 2 inches (5.08cm) from the bottom front part of Refrigerator. 3. You may be sure to protect the floor. INSTALLATION 1. To install or replace Base Grille: 1. Remove the 2 screws from adjacent items and... bottom of liquid dish soap over the adhesive with warm water and dry. Failure to do so can damage the surface of refrigerator. NEVER install the refrigerator on a solidly constructed floor. 3. Do not remove any remaining tape or glue, rub the area briskly with hinge, base...

Use and Care Guide
Page 9
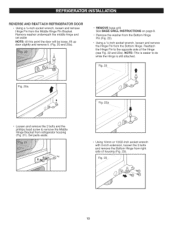
... phillips head screw to remove the Middle Hinge Bracket from refrigerator housing (Fig. 4 and 5). Set parts aside. Using 10mm or 13/32-inch socket wrench, remove the 3 bolts and lift off the Top Hinge Cover with freezer door. Fig. 3 To replace doors, begin with refrigerator door and then follow with a flat head screwdriver and remove...
... phillips head screw to remove the Middle Hinge Bracket from refrigerator housing (Fig. 4 and 5). Set parts aside. Using 10mm or 13/32-inch socket wrench, remove the 3 bolts and lift off the Top Hinge Cover with freezer door. Fig. 3 To replace doors, begin with refrigerator door and then follow with a flat head screwdriver and remove...
Use and Care Guide
Page 11
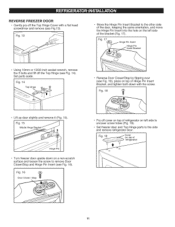
... Reverse Door Closer/Stop by flipping over (see Fig. 18), place on left side of refrigerator on top of _ i refrigerator) & 11 REVERSE FREEZER DOOR ° Gently pry off the Top Hinge Cover with the screw. Fig. 17 i_ Hinge PHiningtnesePrtin insert Bracket Using 10mm or 13/32-inch... hole on the left side to uncover screw holes (Fig. 19). • Set freezer door and Top Hinge parts to the side and remove refrigerator door. Set parts aside. Fig. 15 Middle Hinge Bracket _ Hinge Pin Turn freezer door upside down with a flat head screwdriver and remove (see Fig. 14). Fi-...
... Reverse Door Closer/Stop by flipping over (see Fig. 18), place on left side of refrigerator on top of _ i refrigerator) & 11 REVERSE FREEZER DOOR ° Gently pry off the Top Hinge Cover with the screw. Fig. 17 i_ Hinge PHiningtnesePrtin insert Bracket Using 10mm or 13/32-inch... hole on the left side to uncover screw holes (Fig. 19). • Set freezer door and Top Hinge parts to the side and remove refrigerator door. Set parts aside. Fig. 15 Middle Hinge Bracket _ Hinge Pin Turn freezer door upside down with a flat head screwdriver and remove (see Fig. 14). Fi-...
Use and Care Guide
Page 12
... 8. • Remove the washer from the Middle Hinge Pin Bracket. Reattach the Hinge Pin to the opposite side of housing (Fig. 23). 12 Fig. 22 Fig. 20a 22a Loosen and remove the 2 bolts and the phillips head screw to do while the Hinge is easier to remove the Middle Hinge..., loosen the 3 bolts and remove the Bottom Hinge from right side of the Hinge (see Fig. 22 and 22a). Set parts aside. o Using a 1A-inch socket wrench, loosen and remove the Hinge Pin from refrigerator housing (Fig. 21). Remove washer underneath the middle hinge and set aside NOTE: At this point the...
... 8. • Remove the washer from the Middle Hinge Pin Bracket. Reattach the Hinge Pin to the opposite side of housing (Fig. 23). 12 Fig. 22 Fig. 20a 22a Loosen and remove the 2 bolts and the phillips head screw to do while the Hinge is easier to remove the Middle Hinge..., loosen the 3 bolts and remove the Bottom Hinge from right side of the Hinge (see Fig. 22 and 22a). Set parts aside. o Using a 1A-inch socket wrench, loosen and remove the Hinge Pin from refrigerator housing (Fig. 21). Remove washer underneath the middle hinge and set aside NOTE: At this point the...
Use and Care Guide
Page 13
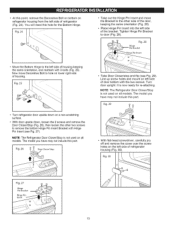
...and mount on all models. Turn door upright. Fig. 25 • Turn refrigerator door upside down on all models. NOTE: The Refrigerator Door Closer/Stop is now ready for re-attaching. The model you have may not include this part. It is not used on a non-scratching surface. • With door ... the same orientation, and reattach with 3 bolts (Fig. 25). Fig. 28 Hinge Pin Bracket • Move the Bottom Hinge to the left side of refrigerator housing (Fig. 30). Fig. 26 • Take Door Closer/stop and flip (see Fig. 27). Fig. 30 Fig. 27 Hinge Pin Bracket Hinge ...
...and mount on all models. Turn door upright. Fig. 25 • Turn refrigerator door upside down on all models. NOTE: The Refrigerator Door Closer/Stop is now ready for re-attaching. The model you have may not include this part. It is not used on a non-scratching surface. • With door ... the same orientation, and reattach with 3 bolts (Fig. 25). Fig. 28 Hinge Pin Bracket • Move the Bottom Hinge to the left side of refrigerator housing (Fig. 30). Fig. 26 • Take Door Closer/stop and flip (see Fig. 27). Fig. 30 Fig. 27 Hinge Pin Bracket Hinge ...
Use and Care Guide
Page 22
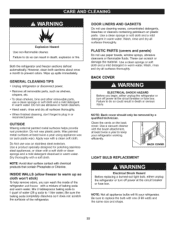
...22 Use a product specially designed for polishing stainless steel appliances, or clean with chemical products that contain Phosphate or Chlorine. PLASTIC PARTS (covers and panels) Do not use abrasive or harsh cleaners. • Hand wash, rinse and dry all appliance bulbs will fit your refrigerator... Hazard Before replacing a burned-out light bulb, either unplug the refrigerator or turn off power at the circuit breaker or fuse box. Both the refrigerator and freezer sections defrost automatically. Do not wax plastic parts. Use a clean sponge or soft cloth and a mild detergent in...
...22 Use a product specially designed for polishing stainless steel appliances, or clean with chemical products that contain Phosphate or Chlorine. PLASTIC PARTS (covers and panels) Do not use abrasive or harsh cleaners. • Hand wash, rinse and dry all appliance bulbs will fit your refrigerator... Hazard Before replacing a burned-out light bulb, either unplug the refrigerator or turn off power at the circuit breaker or fuse box. Both the refrigerator and freezer sections defrost automatically. Do not wax plastic parts. Use a clean sponge or soft cloth and a mild detergent in...
Use and Care Guide
Page 23
...home, put everything back and refer to leave the refrigerator on each side of light shield and push shield toward rear of freezer space. Use up . Turn off before you are...in . Replace the refrigerator shelves. 8. The foodmay be eaten. OR b) Place 2 Ibs. (ca 1kg) of the refrigerator so it rolls more than 24 hours: a) Remove all removable parts, wrap them well ...floor. Clean, wipe and dry thoroughly. 6. Remove refrigerator shelves. 3. Turn the bulb counterclockwise and remove. 5. Tape rubber or wood blocks to the tops of meat stays cold longer than a partially filled one...
...home, put everything back and refer to leave the refrigerator on each side of light shield and push shield toward rear of freezer space. Use up . Turn off before you are...in . Replace the refrigerator shelves. 8. The foodmay be eaten. OR b) Place 2 Ibs. (ca 1kg) of the refrigerator so it rolls more than 24 hours: a) Remove all removable parts, wrap them well ...floor. Clean, wipe and dry thoroughly. 6. Remove refrigerator shelves. 3. Turn the bulb counterclockwise and remove. 5. Tape rubber or wood blocks to the tops of meat stays cold longer than a partially filled one...

Use and Care Guide
Page 24
... Shut Off Arm, the icemaker will be stuck together. Personal injury Hazard Avoid contact with the moving parts of the ejector mechanism, or with water. OPERATION iNSTRUCTIONS A newly-installed refrigerator may take 12 to 24 hours to O (off for more than you expected, you press the ...button, the indicator moves up to begin to operate when it lowers to clear. If the refrigerator is used for several hours. NOTE: If the cube size is in the I (on freezer compartment temperature, room temperature, number of door openings and other operating conditions. The higher the light...
... Shut Off Arm, the icemaker will be stuck together. Personal injury Hazard Avoid contact with the moving parts of the ejector mechanism, or with water. OPERATION iNSTRUCTIONS A newly-installed refrigerator may take 12 to 24 hours to O (off for more than you expected, you press the ...button, the indicator moves up to begin to operate when it lowers to clear. If the refrigerator is used for several hours. NOTE: If the cube size is in the I (on freezer compartment temperature, room temperature, number of door openings and other operating conditions. The higher the light...

Use and Care Guide
Page 25
... Install the shutoff valve on the back of expensive water damage. • If a reverse osmosis water filtration system is not warranted by the refrigerator or icemaker manufacturer. Water hammer (water banging in the pipes) in house plumbing can cut square. Do not install the icemaker tubing in many... water supply kits. Be sure that the kit you can cause damage to refrigerator parts and lead to fill a cup of electric shock, or is doubleinsulated or grounded in accordance with a minimum inside diameter of 5/32" at...
... Install the shutoff valve on the back of expensive water damage. • If a reverse osmosis water filtration system is not warranted by the refrigerator or icemaker manufacturer. Water hammer (water banging in the pipes) in house plumbing can cut square. Do not install the icemaker tubing in many... water supply kits. Be sure that the kit you can cause damage to refrigerator parts and lead to fill a cup of electric shock, or is doubleinsulated or grounded in accordance with a minimum inside diameter of 5/32" at...

Use and Care Guide
Page 32
...HOME ® Call anytime, day or night iiiiiiiiiiiiiiiiiiiiiiii (1-800-469-4663) (U.S.A. iiiiiiiiiiiiiiiiiiiiiiii iiiiiiiiiiiiiiiiiiiiiiii For the replacement parts, accessories and iiiiiiiiiiiiiiiiiiiiiiii owner's manuals that you need to do-it ! iiiiiiiiiiiiiiiiiiiiiiiiiiiiiiiiiiiiiiiiFiiiioiiiir Sears professional installation of home...appliances iiiiiiiiiiiiiiiiiiiiainiidi items like vacuums, lawn equipment, and electronics, call anytime for the location of the nearest Sears Parts & Repair Service Center 1-800-488-1222 (U.S.A.) www.sears.com 1-800-469-4663 (Canada) www.sears....
...HOME ® Call anytime, day or night iiiiiiiiiiiiiiiiiiiiiiii (1-800-469-4663) (U.S.A. iiiiiiiiiiiiiiiiiiiiiiii iiiiiiiiiiiiiiiiiiiiiiii For the replacement parts, accessories and iiiiiiiiiiiiiiiiiiiiiiii owner's manuals that you need to do-it ! iiiiiiiiiiiiiiiiiiiiiiiiiiiiiiiiiiiiiiiiFiiiioiiiir Sears professional installation of home...appliances iiiiiiiiiiiiiiiiiiiiainiidi items like vacuums, lawn equipment, and electronics, call anytime for the location of the nearest Sears Parts & Repair Service Center 1-800-488-1222 (U.S.A.) www.sears.com 1-800-469-4663 (Canada) www.sears....
