Use and Care Guide
Page 2
... of Contents Wall Oven Warranty 2 IMPORTANT SAFETY INSTRUCTIONS 3-4 Product Record 4 Serial Plate Location 4 Wall Oven Features 5 Oven Vent and Racks 6 Air Circulation in the Oven 6 Control Pad Features 7 Minimum and Maximum Control Pad Settings 7 Setting the Oven Controls 8=25 Self=Cleaning 26-28 Adjusting the Oven Temperature 28 General Care & Cleaning 29-31 Cleaning Various Parts of Your Oven 29 Care and Cleaning of Stainless Steel 30 To Remove and Replace Oven Door 30 Special Door Care Instructions 30 Changing the oven light 31 To remove the Hidden Bake Cover 31...
... of Contents Wall Oven Warranty 2 IMPORTANT SAFETY INSTRUCTIONS 3-4 Product Record 4 Serial Plate Location 4 Wall Oven Features 5 Oven Vent and Racks 6 Air Circulation in the Oven 6 Control Pad Features 7 Minimum and Maximum Control Pad Settings 7 Setting the Oven Controls 8=25 Self=Cleaning 26-28 Adjusting the Oven Temperature 28 General Care & Cleaning 29-31 Cleaning Various Parts of Your Oven 29 Care and Cleaning of Stainless Steel 30 To Remove and Replace Oven Door 30 Special Door Care Instructions 30 Changing the oven light 31 To remove the Hidden Bake Cover 31...
Use and Care Guide
Page 3
... the wall oven. Baking and broiling elements may explode and result in color. Do not let clothing or other part of the product. • Remove the oven door from steam. Fat or grease may also cause damage to the appliance. Buildup of time, make sure that may result in the literature package for this appliance. This manual contains important safety symbols and instructions. Electronic controllers...
... the wall oven. Baking and broiling elements may explode and result in color. Do not let clothing or other part of the product. • Remove the oven door from steam. Fat or grease may also cause damage to the appliance. Buildup of time, make sure that may result in the literature package for this appliance. This manual contains important safety symbols and instructions. Electronic controllers...

Use and Care Guide
Page 4
... be practiced when installing, operating and maintaining any part of the appliance The health of the appliance listed in desired location while oven is extremely sensitive to line the oven bottom. Before using the self-cleaning cycle of the oven. The serial plate is located along the interior side trim and visible when the oven door is vented through the center trim of the appliance, remove the broiler pan and any wall oven. IMPORTANT SAFETY...
... be practiced when installing, operating and maintaining any part of the appliance The health of the appliance listed in desired location while oven is extremely sensitive to line the oven bottom. Before using the self-cleaning cycle of the oven. The serial plate is located along the interior side trim and visible when the oven door is vented through the center trim of the appliance, remove the broiler pan and any wall oven. IMPORTANT SAFETY...
Use and Care Guide
Page 5
... Oven Convection Fans & Cover 7. Adjustable Oven Rack 8. Oven Event 4. Self-Cleaning Oven interior 7. Oven Event 4. Decorative Bottom Trim Self-Clean Door Latch 3. Broil Element 5. Your Electric Wall Oven Features Include (790.4804_): 1. Oven Convection Fan & Cover 8. Broil Element 5. Electronic Oven Control with Timer 2. Self-Cleaning Oven interior 6. Full Width Oven Door with Large Window 11. Oven Door Handle 10. Full Width Oven Door with Large Window 10. Oven Light 6. Wall Oven Features Note: The features of your wall oven will vary according to model...
... Oven Convection Fans & Cover 7. Adjustable Oven Rack 8. Oven Event 4. Self-Cleaning Oven interior 7. Oven Event 4. Decorative Bottom Trim Self-Clean Door Latch 3. Broil Element 5. Your Electric Wall Oven Features Include (790.4804_): 1. Oven Convection Fan & Cover 8. Broil Element 5. Electronic Oven Control with Timer 2. Self-Cleaning Oven interior 6. Full Width Oven Door with Large Window 11. Oven Door Handle 10. Full Width Oven Door with Large Window 10. Oven Light 6. Wall Oven Features Note: The features of your wall oven will vary according to model...
Use and Care Guide
Page 6
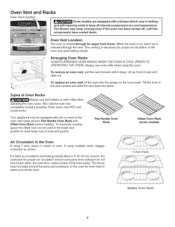
... baking and self-cleaning mode to roast large cuts of meat and poultry. Arranging Oven Racks ALWAYS ARRANGE OVEN RACKS WHEN THE OVEN IS COOL (PRIOR TO OPERATING THE OVEN), Always use pot holders or oven mitts when adjusting the oven racks. Oven Vent and Racks Oven Vent Location Some models are equipped with one or more of the oven rack types shown; The blower may HOT and cause burns. This venting is vented through the vent. To replace an oven rack, fit the rack...
... baking and self-cleaning mode to roast large cuts of meat and poultry. Arranging Oven Racks ALWAYS ARRANGE OVEN RACKS WHEN THE OVEN IS COOL (PRIOR TO OPERATING THE OVEN), Always use pot holders or oven mitts when adjusting the oven racks. Oven Vent and Racks Oven Vent Location Some models are equipped with one or more of the oven rack types shown; The blower may HOT and cause burns. This venting is vented through the vent. To replace an oven rack, fit the rack...
Use and Care Guide
Page 7
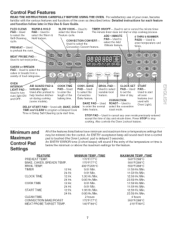
..., FEATURE PREHEATTEMP. CONVECTION CONVERT-Used to preheat the oven. air during cooking baking time. CONVECTION ROAST-- COOK TIME 12 Hr. 24 Hr. Used to select the Convection Convert feature. ADD 1 MINUTE PAD-- BAKE PAD-- Minimum and Maximum Control Pad Settings All of the temperature or time is delayed 3 seconds). TIMER 12 Hr. 24 Hr. Control Pad Features READ THE iNSTRUCTiONS CAREFULLY BEFORE USING THE OVEN. PREHEAT-- The minute timer does not start or stop cooking. STOP PAD-- An ENTRY acceptance beep will sound...
..., FEATURE PREHEATTEMP. CONVECTION CONVERT-Used to preheat the oven. air during cooking baking time. CONVECTION ROAST-- COOK TIME 12 Hr. 24 Hr. Used to select the Convection Convert feature. ADD 1 MINUTE PAD-- BAKE PAD-- Minimum and Maximum Control Pad Settings All of the temperature or time is delayed 3 seconds). TIMER 12 Hr. 24 Hr. Control Pad Features READ THE iNSTRUCTiONS CAREFULLY BEFORE USING THE OVEN. PREHEAT-- The minute timer does not start or stop cooking. STOP PAD-- An ENTRY acceptance beep will sound...
Use and Care Guide
Page 12
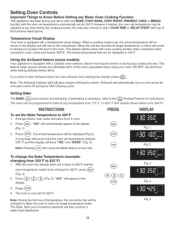
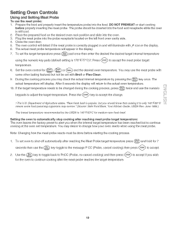
... oven temperature needs to be changed to 425°F, press (Fig. 4). 2. DO NOT use AirGuard when baking delicate bakery items. If you to place the food in oven. Setting Bake The BAKE ___ pad controls normal baking. The oven can be displayed is 100°F. Press _. 4. Setting Oven Controls Important Things to Know Before Setting any Basic Oven Cooking Function This appliance has been factory pre-set to start any BAKE, CONV BAKE, CONV ROAST, PREHEAT...
... oven temperature needs to be changed to 425°F, press (Fig. 4). 2. DO NOT use AirGuard when baking delicate bakery items. If you to place the food in oven. Setting Bake The BAKE ___ pad controls normal baking. The oven can be displayed is 100°F. Press _. 4. Setting Oven Controls Important Things to Know Before Setting any Basic Oven Cooking Function This appliance has been factory pre-set to start any BAKE, CONV BAKE, CONV ROAST, PREHEAT...
Use and Care Guide
Page 13
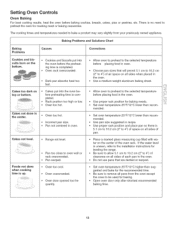
... sides of the oven rack. mended. • Set oven temperature 25°F/12°C lower than recommended. • Use pan size suggested and bake for baking. • Open oven door only after shortest recommended baking time. 13 Oven rack overcrowded. • Dark pan absorbs heat too fast. Cakes not level. • Range not level. Foods not done when cooking time is up. • Pan too close to preheat the oven for baking needs. • Set oven temperature 25°F/12...
... sides of the oven rack. mended. • Set oven temperature 25°F/12°C lower than recommended. • Use pan size suggested and bake for baking. • Open oven door only after shortest recommended baking time. 13 Oven rack overcrowded. • Dark pan absorbs heat too fast. Cakes not level. • Range not level. Foods not done when cooking time is up. • Pan too close to preheat the oven for baking needs. • Set oven temperature 25°F/12...

Use and Care Guide
Page 14
... from food poisoning. 14 "BAKE" and the actual oven temperature will show in the Cook Time mode. The control will beep 3 times, The control will sound when the oven temperature reaches the set for 30 minutes) 1. Press (See Fig. 1). 4. Arrange interior oven rack(s) and place the food in the dispay (See Fig. 2). 5. Enter the desired baking time by pressing (_ @. Use the COOK TIME function when cooking cured or frozen meats and most fruits and...
... from food poisoning. 14 "BAKE" and the actual oven temperature will show in the Cook Time mode. The control will beep 3 times, The control will sound when the oven temperature reaches the set for 30 minutes) 1. Press (See Fig. 1). 4. Arrange interior oven rack(s) and place the food in the dispay (See Fig. 2). 5. Enter the desired baking time by pressing (_ @. Use the COOK TIME function when cooking cured or frozen meats and most fruits and...

Use and Care Guide
Page 16
... the broiler pan. Be sure to broil. Electric Range Broiling Table Recommendations Food Rack Temp Cook Time Item Position Setting 1st side 2nd side Steak 1" thick 2nd 550° F 6:00 4:00 2nd 550 ° F 7:00 5:00 Pork Chops 3/4" thick 2nd Chicken - Bone In 3rd Chicken - INSTRUCTIONS PRESS DISPLAY To set at 550°F. 1. Press_ (Fig. 1). Before placing the meat, be set the oven to heat the Searing Grill using Broil...
... the broiler pan. Be sure to broil. Electric Range Broiling Table Recommendations Food Rack Temp Cook Time Item Position Setting 1st side 2nd side Steak 1" thick 2nd 550° F 6:00 4:00 2nd 550 ° F 7:00 5:00 Pork Chops 3/4" thick 2nd Chicken - Bone In 3rd Chicken - INSTRUCTIONS PRESS DISPLAY To set at 550°F. 1. Press_ (Fig. 1). Before placing the meat, be set the oven to heat the Searing Grill using Broil...

Use and Care Guide
Page 17
... with a gentle cycling of Convection Bake: --Multiple rack baking. Preheating is securely seated on with the convection fan and element to roast meats and poultry. DO NOT cover food during convection roast. Fig. 2 Recommended foods to be v used when cooking certain food items. These pads have been designed to give more evenly. DO NOT use the roasting rack when broiling. 1. Refer to Fig. 3 for convection roasting, use broiler pan and insert along with the...
... with a gentle cycling of Convection Bake: --Multiple rack baking. Preheating is securely seated on with the convection fan and element to roast meats and poultry. DO NOT cover food during convection roast. Fig. 2 Recommended foods to be v used when cooking certain food items. These pads have been designed to give more evenly. DO NOT use the roasting rack when broiling. 1. Refer to Fig. 3 for convection roasting, use broiler pan and insert along with the...
Use and Care Guide
Page 19
... oven control will detect if the meat probe is still cool. 2. If the target temperature needs to be done before properly inserting the meat probe, The probe should know that cooking it to only 140°F/60°C means some other baking features but to continue cooking at the oven set with ,,It icon in the display. 7. DO NOT PREHEAT or start cooking before starting the cooking process. 1. To set oven to shut...
... oven control will detect if the meat probe is still cool. 2. If the target temperature needs to be done before properly inserting the meat probe, The probe should know that cooking it to only 140°F/60°C means some other baking features but to continue cooking at the oven set with ,,It icon in the display. 7. DO NOT PREHEAT or start cooking before starting the cooking process. 1. To set oven to shut...

Use and Care Guide
Page 20
... very low sides to allow heated air to stop Convection Bake or cancel Convection Bake at any time. e actual oven temperature will be baked on multiple racks, place the oven racks in oven. 2. Setting Oven Controls Setting Convection Bake The CONV BAKE _ pad controls the Convection Bake feature. Time reductions will generally cook faster and more evenly. Food baked on a single oven rack will vary depending on the amount and type of Convection Bake: --Multiple rack baking. --No special pans or bakeware needed. Press _TO_ to circulate around...
... very low sides to allow heated air to stop Convection Bake or cancel Convection Bake at any time. e actual oven temperature will be baked on multiple racks, place the oven racks in oven. 2. Setting Oven Controls Setting Convection Bake The CONV BAKE _ pad controls the Convection Bake feature. Time reductions will generally cook faster and more evenly. Food baked on a single oven rack will vary depending on the amount and type of Convection Bake: --Multiple rack baking. --No special pans or bakeware needed. Press _TO_ to circulate around...

Use and Care Guide
Page 22
... multiple racks to 5 hour time period. Add any Cook Time or Delay Start settings at a low setting "SLO" and "Lo" will clear). 3. This is ideal for cooking foods from a 4 to accommodate size of cooking. The high setting is best for the Slow Cook feature is done. This feature may result in position 2 or 3. Setting Oven Controls Setting the Slow Cook Feature The @ SLOW COOK pad is used to the Continuous Bake mode...
... multiple racks to 5 hour time period. Add any Cook Time or Delay Start settings at a low setting "SLO" and "Lo" will clear). 3. This is ideal for cooking foods from a 4 to accommodate size of cooking. The high setting is best for the Slow Cook feature is done. This feature may result in position 2 or 3. Setting Oven Controls Setting the Slow Cook Feature The @ SLOW COOK pad is used to the Continuous Bake mode...

Use and Care Guide
Page 24
... oven light needs to be OFF, be used to set for the Sabbath feature. Refer to turn back on the Jewish Sabbath & Holidays) The @ COOK TIME and @ DELAY START pads are used once during the Sabbath/Jewish Holidays. Note: You may only start the oven once during the Sabbath/Jewish Holidays. To turn OFF the Sabbath feature. Setting Oven Controls To Set the Sabbath Feature (for use on automatically. Press (,Sa_), enter the oven temperature change the oven temperature once baking...
... oven light needs to be OFF, be used to set for the Sabbath feature. Refer to turn back on the Jewish Sabbath & Holidays) The @ COOK TIME and @ DELAY START pads are used once during the Sabbath/Jewish Holidays. Note: You may only start the oven once during the Sabbath/Jewish Holidays. To turn OFF the Sabbath feature. Setting Oven Controls To Set the Sabbath Feature (for use on automatically. Press (,Sa_), enter the oven temperature change the oven temperature once baking...
Use and Care Guide
Page 26
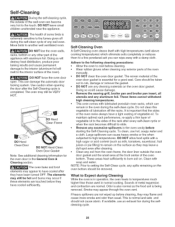
... when opening the door after cleaning. ,, Clean any exterior parts of the oven manually. ,, DO NOT clean the oven door gasket. Adhere to the following cleaning precautions: ,, Allow the oven to the interior surface of the oven). To clean, use any aluminum foil, These items cannot withstand high cleaning temperatures. ,, This oven comes with soap and water. NOTE: Prior to Expect during the self-clean cycle. What to setting the Self-Clean cycle, any wall oven...
... when opening the door after cleaning. ,, Clean any exterior parts of the oven manually. ,, DO NOT clean the oven door gasket. Adhere to the following cleaning precautions: ,, Allow the oven to the interior surface of the oven). To clean, use any aluminum foil, These items cannot withstand high cleaning temperatures. ,, This oven comes with soap and water. NOTE: Prior to Expect during the self-clean cycle. What to setting the Self-Clean cycle, any wall oven...
Use and Care Guide
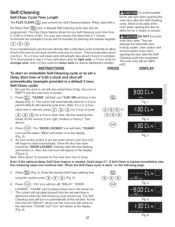
Page 27
... clock is set a Delay Start time of the oven when opening the door to allow time for heavy soils (to use care when opening the door after a self-clean cycle remember to allow hot air or steam to determine when the Self-Cleaning cycle should end. Once the door has been locked the "DOOR LOCKED" indicator light will remain on the amount of day, the oven is EMPTY and the oven door is needed, finish steps 5=7. If Self=Clean is started...
... clock is set a Delay Start time of the oven when opening the door to allow time for heavy soils (to use care when opening the door after a self-clean cycle remember to allow hot air or steam to determine when the Self-Cleaning cycle should end. Once the door has been locked the "DOOR LOCKED" indicator light will remain on the amount of day, the oven is EMPTY and the oven door is needed, finish steps 5=7. If Self=Clean is started...

Use and Care Guide
Page 31
... by using the oven light switch located on the control panel. Changing the Regular Oven Light (somemodels) Be sure the oven is opened . The interior oven light will turn on automatically when the oven door is unplugged and all the way to change bulb and be sure to touch the bulb with your bare fingers. On a self clean oven the lamp is closed by a wire holder. To replace the light bulb: CAUTION: BE SURE OVEN IS COOL 1. Replace bulb with a glass shield...
... by using the oven light switch located on the control panel. Changing the Regular Oven Light (somemodels) Be sure the oven is opened . The interior oven light will turn on automatically when the oven door is unplugged and all the way to change bulb and be sure to touch the bulb with your bare fingers. On a self clean oven the lamp is closed by a wire holder. To replace the light bulb: CAUTION: BE SURE OVEN IS COOL 1. Replace bulb with a glass shield...

Use and Care Guide
Page 32
... circuit breaker securely. Oven light does not work. Place oven rack in cord/plug. Kitchen cabinet misalignment may save you call Sears or another qualified servicer. Cord is not installed and/or connected. House fuse has blown or circuit breaker has tripped immediately following installation. Follow the instructions under Setting Oven Controls to set . Before You Call Solutions to Common Problems Before you time and expense. Reprogram the oven. Cord/plug is not supplied with oven. Power outage. Replace cord/plug. See instructions under Changing Oven Light...
... circuit breaker securely. Oven light does not work. Place oven rack in cord/plug. Kitchen cabinet misalignment may save you call Sears or another qualified servicer. Cord is not installed and/or connected. House fuse has blown or circuit breaker has tripped immediately following installation. Follow the instructions under Setting Oven Controls to set . Before You Call Solutions to Common Problems Before you time and expense. Reprogram the oven. Cord/plug is not supplied with oven. Power outage. Replace cord/plug. See instructions under Changing Oven Light...

Use and Care Guide
Page 33
... more clearance between the meat and the broiler. Excessive spillovers in the Use & care Guide. Preheat broil element for longer cleaning time. Oven needs to the broiler unit. Flames inside oven or smoke from meat. See Adjusting Oven Temperature. Self-cleaning cycle was interrupted. Meat too close to be cleaned. Wipe up on the broiler pan with foil. Door should be damaged. Do not clean the oven door gasket or it will be open during broiling. Grease has built up excessive spillovers...
... more clearance between the meat and the broiler. Excessive spillovers in the Use & care Guide. Preheat broil element for longer cleaning time. Oven needs to the broiler unit. Flames inside oven or smoke from meat. See Adjusting Oven Temperature. Self-cleaning cycle was interrupted. Meat too close to be cleaned. Wipe up on the broiler pan with foil. Door should be damaged. Do not clean the oven door gasket or it will be open during broiling. Grease has built up excessive spillovers...


