
Installation Instructions
Page 1
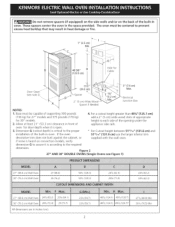
... _ ' C "_"_ _--- --_,--- Dimension G (cutout depth) is open. 1" (2.5cm) ___ Min. 3. Do not remove spacers (if equipped) on the side walls and/or on the back of the built=in front of oven for your installation should be centered to make the job of this or any other appliance. READ AND SAVE THESE iNSTRUCTiONS FOR FUTURE REFERENCE. iMPORTANT: SAVE FOR LOCAL ELECTRICAL iNSPECTOR'S USE.
... _ ' C "_"_ _--- --_,--- Dimension G (cutout depth) is open. 1" (2.5cm) ___ Min. 3. Do not remove spacers (if equipped) on the side walls and/or on the back of the built=in front of oven for your installation should be centered to make the job of this or any other appliance. READ AND SAVE THESE iNSTRUCTiONS FOR FUTURE REFERENCE. iMPORTANT: SAVE FOR LOCAL ELECTRICAL iNSPECTOR'S USE.
Installation Instructions
Page 2
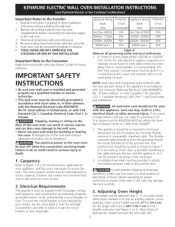
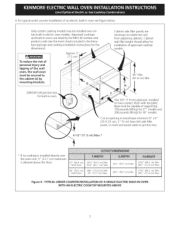
....9 cm) use the larger inferior trim decorative trim does not butt against the cabinet, or supplied with the wall oven. oven for 30" models. The oven must be centered to each side of the opening under the 2. Door Operi (seenote 2) ! _--Spacer 3" (7.6 cm) Max. 2"(5 cm) WideWoodSpacerif Needed Junction Box NOTES: 1. Base must be capable of supporting 300 pounds 4. Dimension G (cutout depth) is critical to the required dimension. Do not remove spacers...
....9 cm) use the larger inferior trim decorative trim does not butt against the cabinet, or supplied with the wall oven. oven for 30" models. The oven must be centered to each side of the opening under the 2. Door Operi (seenote 2) ! _--Spacer 3" (7.6 cm) Max. 2"(5 cm) WideWoodSpacerif Needed Junction Box NOTES: 1. Base must be capable of supporting 300 pounds 4. Dimension G (cutout depth) is critical to the required dimension. Do not remove spacers...
Installation Instructions
Page 3
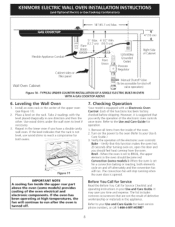
... 3. INSTRUCTION NOTE: Wire sizes and connections must conform with the American National Electrical Code ANSI/NFPA properly by a qualified installer or service technician. • This wall oven must be given for the dimensions applicable to an individual, properly grounded branch circuit, protected by your Owner's Guide for the double wall oven (see the serial plate to find the wattage consumption and refer to table A to the junction box. your wall oven is installed...
... 3. INSTRUCTION NOTE: Wire sizes and connections must conform with the American National Electrical Code ANSI/NFPA properly by a qualified installer or service technician. • This wall oven must be given for the dimensions applicable to an individual, properly grounded branch circuit, protected by your Owner's Guide for the double wall oven (see the serial plate to find the wattage consumption and refer to table A to the junction box. your wall oven is installed...

Installation Instructions
Page 4
... neutral power supply wire and a frame connected green or bare copper grounding wire. In the circuit breaker, fuse box or junction box: connect appliance and power supply cable wires as shown in conformance with the National Electrical Code ANSI/NFPA No. 70-latest edition, or with a copper conductor flexible cable. When grounding through the neutral (white) wire. In the circuit breaker, fuse box or junction box: connect appliance and power supply cable wires...
... neutral power supply wire and a frame connected green or bare copper grounding wire. In the circuit breaker, fuse box or junction box: connect appliance and power supply cable wires as shown in conformance with the National Electrical Code ANSI/NFPA No. 70-latest edition, or with a copper conductor flexible cable. When grounding through the neutral (white) wire. In the circuit breaker, fuse box or junction box: connect appliance and power supply cable wires...
Installation Instructions
Page 5
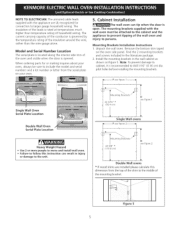
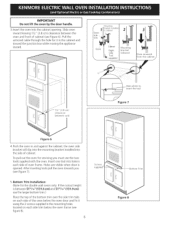
... see figure 1_ kX, Single Wall Oven Serial Plate Location Double Wall Oven Serial Plate Location Heavy Weight Hazard Use 2 or more people to the unit. When ordering parts for connection to larger gauge household wiring. Figure 5 Model and Serial Number Location The serial plate is located along the interior side trim of the oven and visible when the door is governed by the temperature rating of the insulation around the wire, rather than temperature rating of household wiring. The mounting brackets supplied with the appliance...
... see figure 1_ kX, Single Wall Oven Serial Plate Location Double Wall Oven Serial Plate Location Heavy Weight Hazard Use 2 or more people to the unit. When ordering parts for connection to larger gauge household wiring. Figure 5 Model and Serial Number Location The serial plate is located along the interior side trim of the oven and visible when the door is governed by the temperature rating of the insulation around the wire, rather than temperature rating of household wiring. The mounting brackets supplied with the appliance...
Installation Instructions
Page 6
... side trim below the oven door and fix it in the cabinet and toward the junction box while moving the appliance inward. the oven side bracket will clip into the mounting bracket installed into the cabinet opening. Bottom Trim Installation: (Note for the double wall ovens only: If the cutout height is opened. After inserting tools pull the oven towards you must use the larger bottom trim.) Placethe top of the oven below the oven...
... side trim below the oven door and fix it in the cabinet and toward the junction box while moving the appliance inward. the oven side bracket will clip into the mounting bracket installed into the cabinet opening. Bottom Trim Installation: (Note for the double wall ovens only: If the cutout height is opened. After inserting tools pull the oven towards you must use the larger bottom trim.) Placethe top of the oven below the oven...
Installation Instructions
Page 7
... cabinet (s) by mounting brackets, Approx. 3" (7.5 cm) Cabinet side filler panels are listed by the MFG ID number and product code (see Figure below. Approved cooktops and built-in wood base minimum 9" x 9" (23 X 23 cm), 2" (5 cm) from adjoining cabinets. Cabinet side filler height should allow for built-in the literature package and cooktop installation instructions for 30" models. I I 208/240 Volt junction I for installation of an electric built-in oven see the insert sheet included in oven. Use...
... cabinet (s) by mounting brackets, Approx. 3" (7.5 cm) Cabinet side filler panels are listed by the MFG ID number and product code (see Figure below. Approved cooktops and built-in wood base minimum 9" x 9" (23 X 23 cm), 2" (5 cm) from adjoining cabinets. Cabinet side filler height should allow for built-in the literature package and cooktop installation instructions for 30" models. I I 208/240 Volt junction I for installation of an electric built-in oven see the insert sheet included in oven. Use...
Installation Instructions
Page 8
... Electronic Oven Control. Turn on , open the door and you verify the operation of the electronic oven controls once more. Before You Call for Service Read the Before You Call for a convection baking or roasting, both ovens. Use wood shims under the wall oven to the Use and Care Guide for operation. 1. Figure 11 IMPORTANT NOTE A cooling fan inside the upper rear part above the oven (some models )-When the oven is set to BROIL, the upper element in...
... Electronic Oven Control. Turn on , open the door and you verify the operation of the electronic oven controls once more. Before You Call for Service Read the Before You Call for a convection baking or roasting, both ovens. Use wood shims under the wall oven to the Use and Care Guide for operation. 1. Figure 11 IMPORTANT NOTE A cooling fan inside the upper rear part above the oven (some models )-When the oven is set to BROIL, the upper element in...


