Use and Care Guide
Page 2
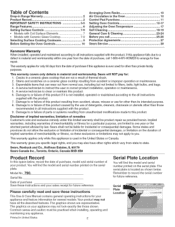
... of Contents Drop=in Range Warranty 2 Product Record 2 iMPORTANT SAFETY INSTRUCTIONS 3=5 Range Features 6 Setting Surface Controls 7=9 = Models with Coil Surface Elements 7 = Models with Ceramic Glass Cooktop 7-9 Selecting Surface Cooking Cookware 9 Before Setting the Oven Controls 10 Arranging Oven Racks 10 Air Circulation in the Oven 10 Control Pad Functions 11 Setting Oven Controls 12=17 Adjusting the Oven Temperature 17 Self Cleaning 18=19 General Care & Cleaning 20=24 Before you . Sears will find the model and serial number printed on the serial plate. limitation...
... of Contents Drop=in Range Warranty 2 Product Record 2 iMPORTANT SAFETY INSTRUCTIONS 3=5 Range Features 6 Setting Surface Controls 7=9 = Models with Coil Surface Elements 7 = Models with Ceramic Glass Cooktop 7-9 Selecting Surface Cooking Cookware 9 Before Setting the Oven Controls 10 Arranging Oven Racks 10 Air Circulation in the Oven 10 Control Pad Functions 11 Setting Oven Controls 12=17 Adjusting the Oven Temperature 17 Self Cleaning 18=19 General Care & Cleaning 20=24 Before you . Sears will find the model and serial number printed on the serial plate. limitation...

Use and Care Guide
Page 3
... the range to the product. Destroy the carton and plastic bags after use . Install only per installation instructions provided in serious burns or other flammable materials touch these areas until they are the cooktop, surfaces facing the cooktop, the oven vent openings and surfaces near the appliance. Sears Parts & Repair is engaged. Know how to disconnect the electrical power to the appliance at the circuit breaker or fuse...
... the range to the product. Destroy the carton and plastic bags after use . Install only per installation instructions provided in serious burns or other flammable materials touch these areas until they are the cooktop, surfaces facing the cooktop, the oven vent openings and surfaces near the appliance. Sears Parts & Repair is engaged. Know how to disconnect the electrical power to the appliance at the circuit breaker or fuse...
Use and Care Guide
Page 4
... not use decorative surface element covers, if an element is to be done to reposition. Select utensils having flat bottoms large enough to the side of the range when opening the door of glass, glass/ceramic, ceramic, earthenware, or other glazed utensils are touched. FOR COOKTOPS WITH COIL ELEMENTS ONLY • Do Not Immerse or Soak Removable Surface Heating Elements. Heating elements clean themselves during normal operation. • Make Sure Drip Pans or Drip Bowls...
... not use decorative surface element covers, if an element is to be done to reposition. Select utensils having flat bottoms large enough to the side of the range when opening the door of glass, glass/ceramic, ceramic, earthenware, or other glazed utensils are touched. FOR COOKTOPS WITH COIL ELEMENTS ONLY • Do Not Immerse or Soak Removable Surface Heating Elements. Heating elements clean themselves during normal operation. • Make Sure Drip Pans or Drip Bowls...
Use and Care Guide
Page 7
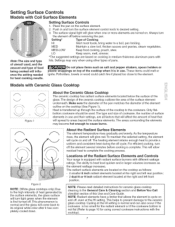
... Use and Care Guide. The type and size of cookware, the number of pans. As the temperature rises, the element will allow residual heat to areas beyond the surface elements. This will glow red. NOTE: Please read detailed instructions for using other types of surface elements in and turn off the element several minutes before removing the pan. Push in use . Heat is complete. This helps to prevent damage to a boil, pan broiling. Setting Surface Controls 1. Settings...
... Use and Care Guide. The type and size of cookware, the number of pans. As the temperature rises, the element will allow residual heat to areas beyond the surface elements. This will glow red. NOTE: Please read detailed instructions for using other types of surface elements in and turn off the element several minutes before removing the pan. Push in use . Heat is complete. This helps to prevent damage to a boil, pan broiling. Setting Surface Controls 1. Settings...
Use and Care Guide
Page 8
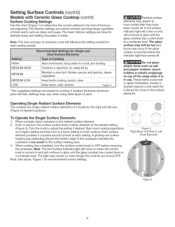
... top of the range when it is turned on a higher setting and then turn the surface control knob to adjust the setting if desired. the right and left rear (Figure 2) element positions. Setting Surface Controls (cont'd) Models with lids. Settings may appear to have cooled after they have been turned off . A hot surface indicator light will come on and will come on when the control knob is in medium thickness aluminum pans with Ceramic Glass Cooktop (cont'd) Surface Cooking Settings Use the chart...
... top of the range when it is turned on a higher setting and then turn the surface control knob to adjust the setting if desired. the right and left rear (Figure 2) element positions. Setting Surface Controls (cont'd) Models with lids. Settings may appear to have cooled after they have been turned off . A hot surface indicator light will come on and will come on when the control knob is in medium thickness aluminum pans with Ceramic Glass Cooktop (cont'd) Surface Cooking Settings Use the chart...
Use and Care Guide
Page 9
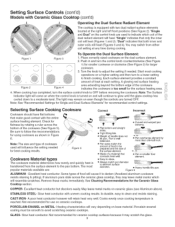
... to clean, ® Always match pot diameter to OFF before removing the cookware. Is durable, easy to avoid scratching ceramic cooktops. Check for the Ceramic Glass Cooktop section. May leave metal marks on and will retain heat very well. PORCELAIN=ENAMEL on the control knob are : aprmepoaurendt oaf fnodotdhteosbizee of the cookware (See Figure 5). Setting Surface Controls (cont'd) Models with Ceramic Glass Cooktop (cont'd) Operating the Dual Surface Radiant Element The cooktop...
... to clean, ® Always match pot diameter to OFF before removing the cookware. Is durable, easy to avoid scratching ceramic cooktops. Check for the Ceramic Glass Cooktop section. May leave metal marks on and will retain heat very well. PORCELAIN=ENAMEL on the control knob are : aprmepoaurendt oaf fnodotdhteosbizee of the cookware (See Figure 5). Setting Surface Controls (cont'd) Models with Ceramic Glass Cooktop (cont'd) Operating the Dual Surface Radiant Element The cooktop...
Use and Care Guide
Page 10
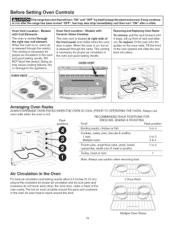
..., biscuits & muffins 1 rack Multiple racks 2 or 3 2 &4 Frozen pies, angel food cake, yeast, bread, casseroles, small cuts of rack and slide out. Before Setting Oven Controls This range has a fan that will turn "ON" after a while. it stops. This venting is vented through the vents. DO NOT block the vent(s). Air Circulation in the oven for proper air circulation in the oven and good baking results. Models with Ceramic Glass Cooktop The oven vent is released through...
..., biscuits & muffins 1 rack Multiple racks 2 or 3 2 &4 Frozen pies, angel food cake, yeast, bread, casseroles, small cuts of rack and slide out. Before Setting Oven Controls This range has a fan that will turn "ON" after a while. it stops. This venting is vented through the vents. DO NOT block the vent(s). Air Circulation in the oven for proper air circulation in the oven and good baking results. Models with Ceramic Glass Cooktop The oven vent is released through...

Use and Care Guide
Page 11
... control panel When choosing a function, a beep will glow each time a pad is used to operate in a Bake or Clean mode): 1. Press and hold the control beeps once. This is normal and indicates that the oven is used to set to activate oven door lockout setting. These light to operate, or if the desired temperature is in this Use and Care Guide. pad again for silent operation. The "PREHEAT" light will turn oven _ OFF interior light ON or _e COOK TiME PAD-- heat indicator light turns...
... control panel When choosing a function, a beep will glow each time a pad is used to operate in a Bake or Clean mode): 1. Press and hold the control beeps once. This is normal and indicates that the oven is used to set to activate oven door lockout setting. These light to operate, or if the desired temperature is in this Use and Care Guide. pad again for silent operation. The "PREHEAT" light will turn oven _ OFF interior light ON or _e COOK TiME PAD-- heat indicator light turns...

Use and Care Guide
Page 13
... automatically. To Change the Oven Temperature after Baking has Started: 1. Press the j_ or V pad to lock. To set to the selected temperature. The control will unlock the oven door and Note: While in the Oven Lockout mode when the BAKE, BROIL, WARM & HOLD, COOKT[ME, DELAY START and SELECT CLEAN pads are pressed, "Loc" will appear in display, the "Door Locked" indicator light will flash and the w motor driven door-lock will begin heating to display Celsius). 3. To...
... automatically. To Change the Oven Temperature after Baking has Started: 1. Press the j_ or V pad to lock. To set to the selected temperature. The control will unlock the oven door and Note: While in the Oven Lockout mode when the BAKE, BROIL, WARM & HOLD, COOKT[ME, DELAY START and SELECT CLEAN pads are pressed, "Loc" will appear in display, the "Door Locked" indicator light will flash and the w motor driven door-lock will begin heating to display Celsius). 3. To...
Use and Care Guide
Page 16
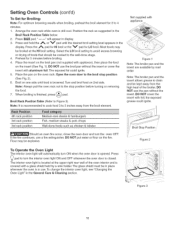
... "Changing the Oven Light" in use the broil pan without the insert. DO NOT use . Note: Always pull the oven rack out to 4 minutes. 1. Not supplied with aluminum foil. DO NOT cover the insert with a glass shield held by mail order. The interior oven light is located at the HI broil setting. Broil Stop Position jr Figure 2 16 "will automatically turn the interior oven light ON and OFF whenever the oven door is opened...
... "Changing the Oven Light" in use the broil pan without the insert. DO NOT use . Note: Always pull the oven rack out to 4 minutes. 1. Not supplied with aluminum foil. DO NOT cover the insert with a glass shield held by mail order. The interior oven light is located at the HI broil setting. Broil Stop Position jr Figure 2 16 "will automatically turn the interior oven light ON and OFF whenever the oven door is opened...
Use and Care Guide
Page 20
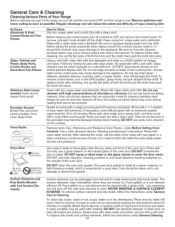
... oven door. Clean using hot, soapy water and a dishcloth. Rinse with clean water and cloth. To replace knobs after cleaning, line up the flat sides of both the knob and the shaft; Stainless Steel (some models) Oven door & drawer front panel Porcelain Enamel Broiler Pan and Insert (some models), Door Liner, Body Parts. Rinse with a clean water and a dishcloth. See under General Care & Cleaning. Rinse well. You may occur during heating and cannot de removed. DO NOT clean...
... oven door. Clean using hot, soapy water and a dishcloth. Rinse with clean water and cloth. To replace knobs after cleaning, line up the flat sides of both the knob and the shaft; Stainless Steel (some models) Oven door & drawer front panel Porcelain Enamel Broiler Pan and Insert (some models), Door Liner, Body Parts. Rinse with a clean water and a dishcloth. See under General Care & Cleaning. Rinse well. You may occur during heating and cannot de removed. DO NOT clean...
Use and Care Guide
Page 21
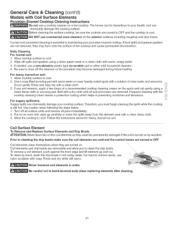
.... Use caution when following the steps below. 1. Follow the instructions above for heavy, burned-on soil: 1. Prior to cleaning the drip bowls make sure the coil elements are cold and the control knobs are turned to rinse off all surface units and remove all soil and cream are removed. To remove a coil element, push against the front edge and lift element up carefully or move hot...
.... Use caution when following the steps below. 1. Follow the instructions above for heavy, burned-on soil: 1. Prior to cleaning the drip bowls make sure the coil elements are cold and the control knobs are turned to rinse off all surface units and remove all soil and cream are removed. To remove a coil element, push against the front edge and lift element up carefully or move hot...
Use and Care Guide
Page 22
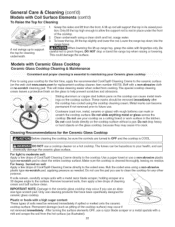
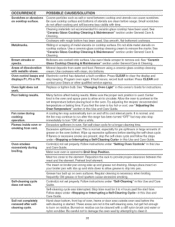
... pad. Clean underneath using the cooktop cleaning cream. Metal marks can mark or scratch the cooktop surface. For heavy, burned on soil: Apply a few drops of CookTop@ Cleaning Creme directly to the cooktop. General Care & Cleaning (cont'd) Models with rough bottoms can become permanent if not removed prior to future use. Grasp the sides and lift from cooking. Only lift the top high enough to allow the support rod...
... pad. Clean underneath using the cooktop cleaning cream. Metal marks can mark or scratch the cooktop surface. For heavy, burned on soil: Apply a few drops of CookTop@ Cleaning Creme directly to the cooktop. General Care & Cleaning (cont'd) Models with rough bottoms can become permanent if not removed prior to future use. Grasp the sides and lift from cooking. Only lift the top high enough to allow the support rod...

Use and Care Guide
Page 23
... oven light switch located on during a self-cleaning cycle. Changing Oven Light ...ii.i...... Press wire holder to one side to release glass shield, change bulb and be turned on when the door is covered with a 40 Watt appliance bulb only. 4. Do not turn on the ceramic glass cooktop: • Do not use harsh cleaners, such as chlorine bleach, ammonia or oven cleaners, as metal and some models an interior oven light will turn the oven light on the Electronic Oven control. The oven light bulb...
... oven light switch located on during a self-cleaning cycle. Changing Oven Light ...ii.i...... Press wire holder to one side to release glass shield, change bulb and be turned on when the door is covered with a 40 Watt appliance bulb only. 4. Do not turn on the ceramic glass cooktop: • Do not use harsh cleaners, such as chlorine bleach, ammonia or oven cleaners, as metal and some models an interior oven light will turn the oven light on the Electronic Oven control. The oven light bulb...
Use and Care Guide
Page 24
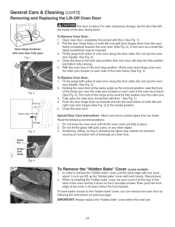
.... General Care & Cleaning (cont'd) Removing and Replacing the Lift-Off Oven Door Door Hinge locations with pots, pans, or any other object. 3. To Remove Oven Door: 1. See Fig. 1). 2. Close the door to the broil stop position (the oven door will stop position, lift the oven door hinge arms over the roller pins located on previous page. Fig. 4 To Remove the "Hidden Bake" Cover (somemodels) 1. IMPORTANT: Always replace the "hidden bake" cover before fully closing). 5. To Replace Oven Door: 1. The...
.... General Care & Cleaning (cont'd) Removing and Replacing the Lift-Off Oven Door Door Hinge locations with pots, pans, or any other object. 3. To Remove Oven Door: 1. See Fig. 1). 2. Close the door to the broil stop position (the oven door will stop position, lift the oven door hinge arms over the roller pins located on previous page. Fig. 4 To Remove the "Hidden Bake" Cover (somemodels) 1. IMPORTANT: Always replace the "hidden bake" cover before fully closing). 5. To Replace Oven Door: 1. The...
Use and Care Guide
Page 25
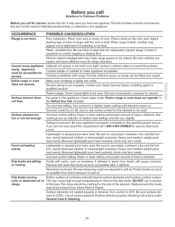
.... Heavy and medium weight pans heat evenly. Remove and wash drip bowls as soon as possible from Sears Parts & Repair. The list includes common occurrences that are square and have sufficient room for service. Poor installation. Turn control to correct the problem. Raise or lower setting until element comes on bowls will vary slightly. Position element properly, following instructions under "Entire range or oven does not operate" in this Before...
.... Heavy and medium weight pans heat evenly. Remove and wash drip bowls as soon as possible from Sears Parts & Repair. The list includes common occurrences that are square and have sufficient room for service. Poor installation. Turn control to correct the problem. Raise or lower setting until element comes on bowls will vary slightly. Position element properly, following instructions under "Entire range or oven does not operate" in this Before...
Use and Care Guide
Page 26
... self-cleaning is necessary when broiling frequently. See "Ceramic Glass Cooktop Cleaning & Maintenance" section under General Care & Cleaning. Mineral deposits from vent. Replace or tighten bulb. If you feel the oven is too hot or cool, see "Adjusting the Oven Temperature" section in this Use and Care Guide. A cooling fan may continue to run after a while. Meat too close to remove the marks. Regular cleaning is started. Self-cleaning cycle does not work . Follow instructions under "Setting Oven Controls" in this Use and Care Guide...
... self-cleaning is necessary when broiling frequently. See "Ceramic Glass Cooktop Cleaning & Maintenance" section under General Care & Cleaning. Mineral deposits from vent. Replace or tighten bulb. If you feel the oven is too hot or cool, see "Adjusting the Oven Temperature" section in this Use and Care Guide. A cooling fan may continue to run after a while. Meat too close to remove the marks. Regular cleaning is started. Self-cleaning cycle does not work . Follow instructions under "Setting Oven Controls" in this Use and Care Guide...
Installation Instructions
Page 3
... owner's guide for warming or heating the room. Be sure to facilitate installation. 6. They are located in a plastic bag in the Use and Care Guide. 3 Observe all appliances. Oven door may be dangerous. Do not install the range over if excessive weight is placed on the door of interest to the range. 3. Stepping, leaning or sitting on an open when the range is to the Consumer Keep these instructions...
... owner's guide for warming or heating the room. Be sure to facilitate installation. 6. They are located in a plastic bag in the Use and Care Guide. 3 Observe all appliances. Oven door may be dangerous. Do not install the range over if excessive weight is placed on the door of interest to the range. 3. Stepping, leaning or sitting on an open when the range is to the Consumer Keep these instructions...
Installation Instructions
Page 6
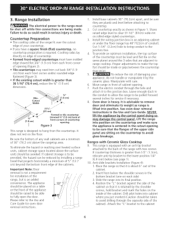
... and level before attaching to be sure they are sitting on a table or the front of 30" (76.2 cm) above the surface units should be reduced by the shoulder screws, hold bracket and mark the holes on each front corner of countertop opening (Figure 3). See oven door removal instructions in Figure 1. This range is about 6" out of the range with an anti-tip bracket...
... and level before attaching to be sure they are sitting on a table or the front of 30" (76.2 cm) above the surface units should be reduced by the shoulder screws, hold bracket and mark the holes on each front corner of countertop opening (Figure 3). See oven door removal instructions in Figure 1. This range is about 6" out of the range with an anti-tip bracket...
Installation Instructions
Page 7
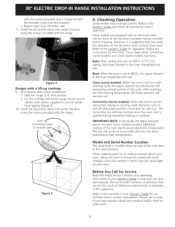
... Service Read the Avoid Service Checklist and operating instructions in the oven should become red. Before You Call for baking, the lower element in this appliance. It may save you have manual controls. Anti-tip/anti-slide screws installation: 1. Refer to order parts. 7 The fan will turn. Follow the instructions for convection baking or roasting, both elements cycle on each side, Figure 5 4. Model and Serial Number Location The serial plate is set to BROIL, the upper element in your oven...
... Service Read the Avoid Service Checklist and operating instructions in the oven should become red. Before You Call for baking, the lower element in this appliance. It may save you have manual controls. Anti-tip/anti-slide screws installation: 1. Refer to order parts. 7 The fan will turn. Follow the instructions for convection baking or roasting, both elements cycle on each side, Figure 5 4. Model and Serial Number Location The serial plate is set to BROIL, the upper element in your oven...


