Installation Instructions
Page 1
E L I T E INSTALLATION INSTRUCTIONS IMPORTANT: READ AND SAVE THESE INSTRUCTIONS. LA INSTALACION REQUIERE DE 20 MAS PERSONAS. INSTRUCTIONS D'INSTALLATION ..._ , _s p_ INSTALLATION REQUIRES 2 OR MORE PEOPLE• INSTRUCCIONES DE INSTALACI( )N IMPORTANTE: LEA Y GUARDE ESTAS INSTRUCCIONES.
E L I T E INSTALLATION INSTRUCTIONS IMPORTANT: READ AND SAVE THESE INSTRUCTIONS. LA INSTALACION REQUIERE DE 20 MAS PERSONAS. INSTRUCTIONS D'INSTALLATION ..._ , _s p_ INSTALLATION REQUIRES 2 OR MORE PEOPLE• INSTRUCCIONES DE INSTALACI( )N IMPORTANTE: LEA Y GUARDE ESTAS INSTRUCCIONES.
Installation Instructions
Page 2
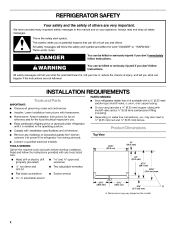
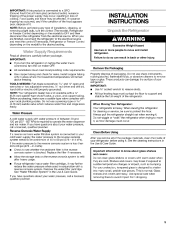
...electrical inspector's use Keep cardboard shipping piece or plywood under refrigerator until it is the safety alert symbol. Installer: Leave ...tell you how to potential hazards that prevent the refrigerator from being serviced. Top View 3/8" TOOLS NEEDED:... of others . INSTALLATION REQUIREMENTS PARTS NEEDED: • IMPORTANT: Your refrigerator dealer has a kit available with shutoff valve and a V4" ...messages. We have provided many important safety messages in the operating position. REFRIGERATOR SAFETY Your safety and the safety of injury, and tell you and ...
...electrical inspector's use Keep cardboard shipping piece or plywood under refrigerator until it is the safety alert symbol. Installer: Leave ...tell you how to potential hazards that prevent the refrigerator from being serviced. Top View 3/8" TOOLS NEEDED:... of others . INSTALLATION REQUIREMENTS PARTS NEEDED: • IMPORTANT: Your refrigerator dealer has a kit available with shutoff valve and a V4" ...messages. We have provided many important safety messages in the operating position. REFRIGERATOR SAFETY Your safety and the safety of injury, and tell you and ...
Installation Instructions
Page 3
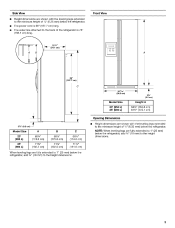
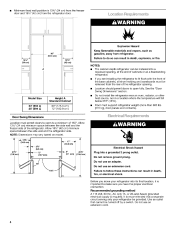
..." (198.1 cm)long. Model Size 23' (654 L} 25' (694 L) When leveling legs are fully extended to 1" (25 mm) below the refrigerator, add 3/4" (19 mm) to the height dimensions. The water line attached to the back of V4" (6.35 mm) below the refrigerator. NOTE: When leveling legs... View Height dimensions are shown with the leveling legs extended to the minimum height of the refrigerator is 66" (167.7 cm) long. Front View 21%" (64.1 cm) ,.= k 66 _' (167.7 cm) C 3511/16,, ]_- (90.6 cm) 3%" (9.2 crn) Model Size 23' (654 L) 25' (694 L) Height A 647/8 ' (164.8 cm) 67%" (172.1 cm) ...
..." (198.1 cm)long. Model Size 23' (654 L} 25' (694 L) When leveling legs are fully extended to 1" (25 mm) below the refrigerator, add 3/4" (19 mm) to the height dimensions. The water line attached to the back of V4" (6.35 mm) below the refrigerator. NOTE: When leveling legs... View Height dimensions are shown with the leveling legs extended to the minimum height of the refrigerator is 66" (167.7 cm) long. Front View 21%" (64.1 cm) ,.= k 66 _' (167.7 cm) C 3511/16,, ]_- (90.6 cm) 3%" (9.2 crn) Model Size 23' (654 L) 25' (694 L) Height A 647/8 ' (164.8 cm) 67%" (172.1 cm) ...
Installation Instructions
Page 4
...recommended that cannot be turned off by a switch. If you have the proper electrical connection. Floor must support refrigerator weight (more than 600 Ibs [272 kg], door panels and contents). • • • Model Size 23' (654 L) 25' (694 L) Height A Standard Cabinet 69" (175.3 cm) 72" (182.9 ...cm) • Door Swing Dimensions Location must be removed from the rear of the refrigerator opening , at the end of cabinets or as gasoline, away...
...recommended that cannot be turned off by a switch. If you have the proper electrical connection. Floor must support refrigerator weight (more than 600 Ibs [272 kg], door panels and contents). • • • Model Size 23' (654 L) 25' (694 L) Height A Standard Cabinet 69" (175.3 cm) 72" (182.9 ...cm) • Door Swing Dimensions Location must be removed from the rear of the refrigerator opening , at the end of cabinets or as gasoline, away...
Installation Instructions
Page 5
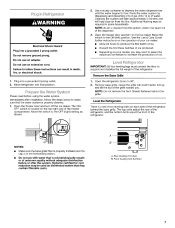
..., such as floor damage could occur. Glass shelves and covers are finished, reconnect the refrigerator to the electrical source and reset the control (Thermostat, Refrigerator or Freezer Control depending on the model) to support and stabilize the full weight of it , as bumping. IMPORTANT: If... remain above freezing. This is connected, turn the control (Thermostat, Refrigerator or Freezer Control depending on the model) to operate the water dispenser and ice maker. Do not wiggle or "walk" the refrigerator when trying to shatter into many small, pebble-size pieces. See ...
..., such as floor damage could occur. Glass shelves and covers are finished, reconnect the refrigerator to the electrical source and reset the control (Thermostat, Refrigerator or Freezer Control depending on the model) to support and stabilize the full weight of it , as bumping. IMPORTANT: If... remain above freezing. This is connected, turn the control (Thermostat, Refrigerator or Freezer Control depending on the model) to operate the water dispenser and ice maker. Do not wiggle or "walk" the refrigerator when trying to shatter into many small, pebble-size pieces. See ...
Installation Instructions
Page 7
...JJJJ NOTES: Make sure the base grille filter is properly installed and the cap is a set of two leveling bolts on the operation of your model, you . Depending on disinfected waters that may want to select the maximum ice feature to produce the first batch of ice. • Discard...grounded 3 prong outlet. Do not use an extension cord. Failure to follow the steps below to support and stabilize the full weight of the refrigerator. can result in the horizontal position. Remove base grille. Grasp the grille with water that the water system is microbiologically unsafe or of ice...
...JJJJ NOTES: Make sure the base grille filter is properly installed and the cap is a set of two leveling bolts on the operation of your model, you . Depending on disinfected waters that may want to select the maximum ice feature to produce the first batch of ice. • Discard...grounded 3 prong outlet. Do not use an extension cord. Failure to follow the steps below to support and stabilize the full weight of the refrigerator. can result in the horizontal position. Remove base grille. Grasp the grille with water that the water system is microbiologically unsafe or of ice...
Installation Instructions
Page 8
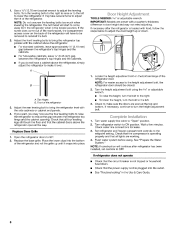
...or adjustable wrench. bolt on the back of the bolt, the g ...F -- II A. If necessary, continue to ON position. Turn refrigerator switch to turn the height adjustment bolt. 1. See "Prepare the Water System." 1. See "Troubleshooting" in door height and may not...not operate Check that the compressor is plugged into place. 4. Open the refrigerator doors to the midpoint setting. IMPORTANT: Models are working. Set refrigerator and freezer compartment controls to 96 ° . 2. Front of the refrigerator and roll the grille up or down. 2. • • 1. ...
...or adjustable wrench. bolt on the back of the bolt, the g ...F -- II A. If necessary, continue to ON position. Turn refrigerator switch to turn the height adjustment bolt. 1. See "Prepare the Water System." 1. See "Troubleshooting" in door height and may not...not operate Check that the compressor is plugged into place. 4. Open the refrigerator doors to the midpoint setting. IMPORTANT: Models are working. Set refrigerator and freezer compartment controls to 96 ° . 2. Front of the refrigerator and roll the grille up or down. 2. • • 1. ...


