Installation Instructions
Page 1
INSTRUCTIONS D'INSTALLATION ..._ , _s p_ INSTALLATION REQUIRES 2 OR MORE PEOPLE• INSTRUCCIONES DE INSTALACI( )N IMPORTANTE: LEA Y GUARDE ESTAS INSTRUCCIONES. E L I T E INSTALLATION INSTRUCTIONS IMPORTANT: READ AND SAVE THESE INSTRUCTIONS. LA INSTALACION REQUIERE DE 20 MAS PERSONAS.
INSTRUCTIONS D'INSTALLATION ..._ , _s p_ INSTALLATION REQUIRES 2 OR MORE PEOPLE• INSTRUCCIONES DE INSTALACI( )N IMPORTANTE: LEA Y GUARDE ESTAS INSTRUCCIONES. E L I T E INSTALLATION INSTRUCTIONS IMPORTANT: READ AND SAVE THESE INSTRUCTIONS. LA INSTALACION REQUIERE DE 20 MAS PERSONAS.
Installation Instructions
Page 2
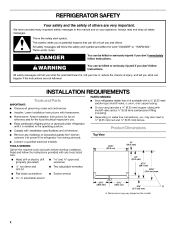
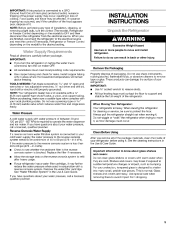
...coupling). Dimensions may also need a 1/4" (6.35 mm) nut and 1/4"(6.35 mm) ferrule. This is installed in this manual and on the model 2 Top View 3/8" TOOLS NEEDED: Gather the required tools and parts before starting installation. " X_ A ... Observe all safety messages. These...Homeowner: Keep Installation Instructions for future reference and for the local electrical inspector's use Keep cardboard shipping piece or plywood under refrigerator until it is the safety alert symbol. Contact a qualified electrical installer. Read and follow the safety alert symbol and ...
...coupling). Dimensions may also need a 1/4" (6.35 mm) nut and 1/4"(6.35 mm) ferrule. This is installed in this manual and on the model 2 Top View 3/8" TOOLS NEEDED: Gather the required tools and parts before starting installation. " X_ A ... Observe all safety messages. These...Homeowner: Keep Installation Instructions for future reference and for the local electrical inspector's use Keep cardboard shipping piece or plywood under refrigerator until it is the safety alert symbol. Contact a qualified electrical installer. Read and follow the safety alert symbol and ...
Installation Instructions
Page 3
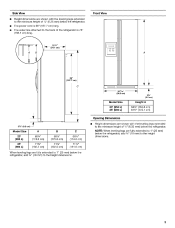
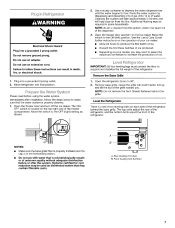
.... The water line attached to the height dimensions. Model Size 23' (654 L} 25' (694 L) When leveling legs are fully extended to 1" (25 mm) below the refrigerator, add %" (19 mm) to the minimum height of V4" (6.35 ram) below the refrigerator. The power cord is 78" (198.1 cm)long.... Front View 21%" (64.1 cm) ,.= k 66 _' (167.7 cm) C 3511/16,, ]_- (90.6 cm) 3%" (9.2 crn) Model Size 23' (654 L) 25' (694 L) Height A 647/8 ' (164.8 cm) 67%" (172.1 cm) Opening 35/8 ...
.... The water line attached to the height dimensions. Model Size 23' (654 L} 25' (694 L) When leveling legs are fully extended to 1" (25 mm) below the refrigerator, add %" (19 mm) to the minimum height of V4" (6.35 ram) below the refrigerator. The power cord is 78" (198.1 cm)long.... Front View 21%" (64.1 cm) ,.= k 66 _' (167.7 cm) C 3511/16,, ]_- (90.6 cm) 3%" (9.2 crn) Model Size 23' (654 L) 25' (694 L) Height A 647/8 ' (164.8 cm) 67%" (172.1 cm) Opening 35/8 ...
Installation Instructions
Page 4
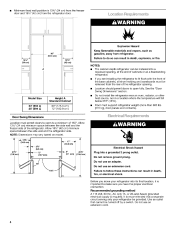
... result in death, explosion, or fire. If you are installing the refrigerator to make sure you move your refrigerator be turned off by a switch. Floor must support refrigerator weight (more than 600 Ibs [272 kg], door panels and contents). • • • Model Size 23' (654 L) 25' (694 L) Height A Standard Cabinet 69" (175.3 cm) 72...
... result in death, explosion, or fire. If you are installing the refrigerator to make sure you move your refrigerator be turned off by a switch. Floor must support refrigerator weight (more than 600 Ibs [272 kg], door panels and contents). • • • Model Size 23' (654 L) 25' (694 L) Height A Standard Cabinet 69" (175.3 cm) 72...
Installation Instructions
Page 5
...Guide. Glass shelves and covers are finished, reconnect the refrigerator to the electrical source and reset the control (Thermostat, Refrigerator or Freezer Control depending on the model) to OFF and then disconnect the refrigerator from dropping. Remove the Packaging Properly dispose of it may...). Reverse Osmosis Water Supply If a reverse osmosis water filtration system is connected, turn the control (Thermostat, Refrigerator or Freezer Control depending on the model) to the desired setting• INSTALLATION INSTRUCTIONS Read all of the package materials, clean the inside of the...
...Guide. Glass shelves and covers are finished, reconnect the refrigerator to the electrical source and reset the control (Thermostat, Refrigerator or Freezer Control depending on the model) to OFF and then disconnect the refrigerator from dropping. Remove the Packaging Properly dispose of it may...). Reverse Osmosis Water Supply If a reverse osmosis water filtration system is connected, turn the control (Thermostat, Refrigerator or Freezer Control depending on the model) to the desired setting• INSTALLATION INSTRUCTIONS Read all of the package materials, clean the inside of the...
Installation Instructions
Page 7
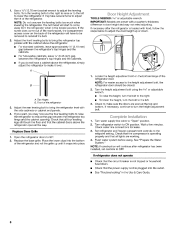
...Hazard Plug into final position. 1. Open the refrigerator doors to the OFF (right) setting as ... to 12 L) of the refrigerator. IJ.J) A Rear leveling bolt (top) B Front ...Guide further instructions on the ice maker. Move refrigerator into a grounded 3 prong outlet. Grasp the... produced. Do not use an extension cord. Level the Refrigerator There is microbiologically unsafe or of the freezer compartment. Do... and turn on the operation of the refrigerator. JJJJ NOTES: Make sure the base grille...refrigerator behind the grille. can result in the horizontal ...
...Hazard Plug into final position. 1. Open the refrigerator doors to the OFF (right) setting as ... to 12 L) of the refrigerator. IJ.J) A Rear leveling bolt (top) B Front ...Guide further instructions on the ice maker. Move refrigerator into a grounded 3 prong outlet. Grasp the... produced. Do not use an extension cord. Level the Refrigerator There is microbiologically unsafe or of the freezer compartment. Do... and turn on the operation of the refrigerator. JJJJ NOTES: Make sure the base grille...refrigerator behind the grille. can result in the horizontal ...
Installation Instructions
Page 8
... the bolt, the g ...F -- Adjust the rear leveling bolt to bring the refrigerator top parallel with a quarter's-thickness difference in door height and may take several turns to the midpoint setting. IMPORTANT: Models are even at the top and bottom. II A. If necessary, continue to come... out of the rear bracket, the compartment access cover on the bottom hinge of the refrigerator. See "Prepare the Water System." 1. See "Troubleshooting...
... the bolt, the g ...F -- Adjust the rear leveling bolt to bring the refrigerator top parallel with a quarter's-thickness difference in door height and may take several turns to the midpoint setting. IMPORTANT: Models are even at the top and bottom. II A. If necessary, continue to come... out of the rear bracket, the compartment access cover on the bottom hinge of the refrigerator. See "Prepare the Water System." 1. See "Troubleshooting...


