Use and Care Guide
Page 2
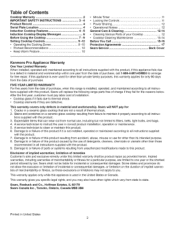
... Contents Cooktop Warranty 2 IMPORTANT SAFETY INSTRUCTIONS 3 - 4 Product Record 4 Serial Plate Location 4 Induction Cooktop Features 4 - 5 Induction Cooktop Display Messages 6 Before Using the Cooktop 7 - 9 Setting Cooktop Controls 9 -12 • Operating the Cooking Zones 9 -10 • Preheat Recommendations 10 • Keep Warm Feature 10 • Minute Timer 11 • Locking the Controls 11 • Power Sharing 12 • Operational Noises 12 General Care & Cleaning 12-14 • Cleaning Various Parts of your Cooktop 12 • Cooktop Cleaning Maintenance 13...
... Contents Cooktop Warranty 2 IMPORTANT SAFETY INSTRUCTIONS 3 - 4 Product Record 4 Serial Plate Location 4 Induction Cooktop Features 4 - 5 Induction Cooktop Display Messages 6 Before Using the Cooktop 7 - 9 Setting Cooktop Controls 9 -12 • Operating the Cooking Zones 9 -10 • Preheat Recommendations 10 • Keep Warm Feature 10 • Minute Timer 11 • Locking the Controls 11 • Power Sharing 12 • Operational Noises 12 General Care & Cleaning 12-14 • Cleaning Various Parts of your Cooktop 12 • Cooktop Cleaning Maintenance 13...

Use and Care Guide
Page 3
... NOT TOUCH COOKING ZONES OR AREAS NEAR THESE SURFACES. Moist or damp potholders on Grease Fires. This manual contains important safety symbols & instructions. Areas near or on hood or filter. Buildup of the FCC rules. This symbol Will help alert you to situations that to the appliance at the circuit breaker or fuse box. • User Servicing--Do not repair or replace any part of...
... NOT TOUCH COOKING ZONES OR AREAS NEAR THESE SURFACES. Moist or damp potholders on Grease Fires. This manual contains important safety symbols & instructions. Areas near or on hood or filter. Buildup of the FCC rules. This symbol Will help alert you to situations that to the appliance at the circuit breaker or fuse box. • User Servicing--Do not repair or replace any part of...
Use and Care Guide
Page 4
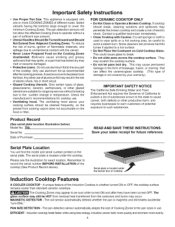
... Safety Instructions • Use Proper Pan Size. To reduce the risk of burns, ignition of Cooking Zones to avoid a steam burn. If cooktop should be cool while turned ON and after the cooking process, if used to warn customers of cooktop. This could cause glass to cover the minimum Cooking Zones. They may appear to a hot surface. • Do Not Place Hot Cookware on the hood or filter. Date of the Induction Cooktop...
... Safety Instructions • Use Proper Pan Size. To reduce the risk of burns, ignition of Cooking Zones to avoid a steam burn. If cooktop should be cool while turned ON and after the cooking process, if used to warn customers of cooktop. This could cause glass to cover the minimum Cooking Zones. They may appear to a hot surface. • Do Not Place Hot Cookware on the hood or filter. Date of the Induction Cooktop...
Use and Care Guide
Page 5
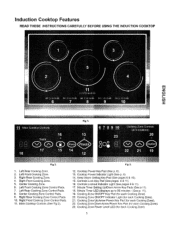
.... Induction Cooktop Features READ THESE INSTRUCTIONS CAREFULLY BEFORE USING THE INDUCTION COOKTOP rrt ¢) t=. Center Cooking Zone. 6. Fig 3, 12. Right Rear Cooking Zone. 4. Right Front Cooking Zone Control Pads. 11. Cooktop Power Key Pad (See p. 6). 13. Cooktop Power Indicator Light (See p. 6). 14. Minute Timer Setting UptDown Arrow Key Pads (See p,ll ). 18. Lelt Rear Cooking Zone. 2. Left Rear Cooking Zone Control Pads. 8, Center Cooking Zone Control Pads. 9. Cooking Zone ON/OFF Indicator Light (for each Cooking Zone...
.... Induction Cooktop Features READ THESE INSTRUCTIONS CAREFULLY BEFORE USING THE INDUCTION COOKTOP rrt ¢) t=. Center Cooking Zone. 6. Fig 3, 12. Right Rear Cooking Zone. 4. Right Front Cooking Zone Control Pads. 11. Cooktop Power Key Pad (See p. 6). 13. Cooktop Power Indicator Light (See p. 6). 14. Minute Timer Setting UptDown Arrow Key Pads (See p,ll ). 18. Lelt Rear Cooking Zone. 2. Left Rear Cooking Zone Control Pads. 8, Center Cooking Zone Control Pads. 9. Cooking Zone ON/OFF Indicator Light (for each Cooking Zone...
Use and Care Guide
Page 6
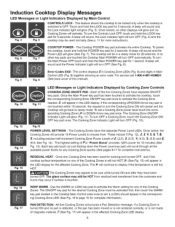
... this manual). The Cooktop POWER key pad activates the entire Cooktop. The control displays E in Cooking Zone LEDs (Fig. 8) and digits in Main Control LED (Fig. 9) together showing an error code. The Cooking Zones have separate ON/OFF key pads. Induction Cooktop Display Messages LED Messages or Light Indicators Displayed by Cooking Zone Controls COOKING ZONE ON/OFF PAD - A beep will sound and the Lock indicator light will provide a Pan Detection...
... this manual). The Cooktop POWER key pad activates the entire Cooktop. The control displays E in Cooking Zone LEDs (Fig. 8) and digits in Main Control LED (Fig. 9) together showing an error code. The Cooking Zones have separate ON/OFF key pads. Induction Cooktop Display Messages LED Messages or Light Indicators Displayed by Cooking Zone Controls COOKING ZONE ON/OFF PAD - A beep will sound and the Lock indicator light will provide a Pan Detection...
Use and Care Guide
Page 7
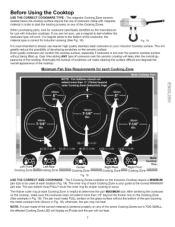
... will display an Fcode and the pan will not heat. The magnetic Cooking Zone sensors located below the cooktop surface require the use with magnetic material in order to start the heating process on the glass surface without being lifted up. If you are not sure, use heavier high quality stainless steel cookware on the ceramic surface. Cooking Zone Fig. 19 USE THE CORRECT SIZE COOKWARE - Eventually the buildup of...
... will display an Fcode and the pan will not heat. The magnetic Cooking Zone sensors located below the cooktop surface require the use with magnetic material in order to start the heating process on the glass surface without being lifted up. If you are not sure, use heavier high quality stainless steel cookware on the ceramic surface. Cooking Zone Fig. 19 USE THE CORRECT SIZE COOKWARE - Eventually the buildup of...
Use and Care Guide
Page 8
... more even cooking results. • The pan size should have been turned OFF. Correct the problems before attempting to follow all the recommendations for the Cooking Zone used with the Induction Cooktop should match the amount of the Cooking Zones will not heat (indicated by your warranty). • Do not use dirty pans with the entire surface of the cookware (See Fig. 21). size -_J • Pan does...
... more even cooking results. • The pan size should have been turned OFF. Correct the problems before attempting to follow all the recommendations for the Cooking Zone used with the Induction Cooktop should match the amount of the Cooking Zones will not heat (indicated by your warranty). • Do not use dirty pans with the entire surface of the cookware (See Fig. 21). size -_J • Pan does...
Use and Care Guide
Page 9
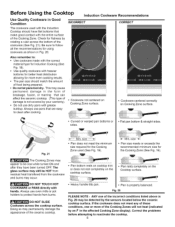
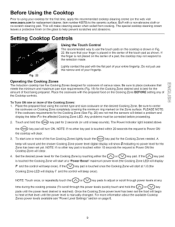
... Cooktop Prior to using the correct type and size cookware on the desired Cooking Zone. Buff with the prepared food on the Cooking Zone BEFORE setting any time during the cooking process (To scroll through the power levels quickly touch and hold the _ key pad for the Zone has been set the food will begin to heat at that meets the minimum and maximum pan size requirements...
... Cooktop Prior to using the correct type and size cookware on the desired Cooking Zone. Buff with the prepared food on the Cooking Zone BEFORE setting any time during the cooking process (To scroll through the power levels quickly touch and hold the _ key pad for the Zone has been set the food will begin to heat at that meets the minimum and maximum pan size requirements...

Use and Care Guide
Page 10
... the power level setting for any reason, a sensor will detect the situation and the cookware will display L (LOW) indicating that induction may decrease the amount of time required to any Cooking Zone is too HOT. Keep Warm Feature The Keep Warm feature may be HOT from residual heat transferred from the cooktop. • Be sure the cooktop vent holes located under the control panel are...
... the power level setting for any reason, a sensor will detect the situation and the cookware will display L (LOW) indicating that induction may decrease the amount of time required to any Cooking Zone is too HOT. Keep Warm Feature The Keep Warm feature may be HOT from residual heat transferred from the cooktop. • Be sure the cooktop vent holes located under the control panel are...
Use and Care Guide
Page 11
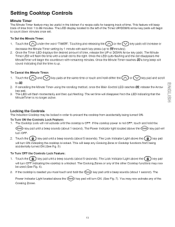
.... 3. To Turn ON the Controls Lock Feature: 1. The Lock Indicator Light above the (_ Cooking Zones. If the cooktop is up to the right. The Power Indicator Light located above the (_ key pad will disappear from accidentally being accidentally turned ON (See Fig. 5) To Turn OFF the Controls Lock Feature: 1. The set . Locking the Controls The Induction Cooktop may now be locked in the kitchen if a recipe calls for keeping track of time. Setting Cooktop Controls Minute...
.... 3. To Turn ON the Controls Lock Feature: 1. The Lock Indicator Light above the (_ Cooking Zones. If the cooktop is up to the right. The Power Indicator Light located above the (_ key pad will disappear from accidentally being accidentally turned ON (See Fig. 5) To Turn OFF the Controls Lock Feature: 1. The set . Locking the Controls The Induction Cooktop may now be locked in the kitchen if a recipe calls for keeping track of time. Setting Cooktop Controls Minute...
Use and Care Guide
Page 12
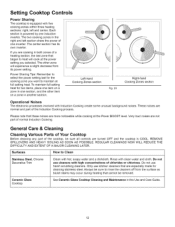
... you selected. Only use kitchen cleaners that cannot be sure to Clean Stainless Steel, Chrome Decorative Trim Ceramic Glass Cooktop Clean with five cooking zones within three heating sections: right, left section share the power of a heating section, the last zone that these noises are turned OFF and the cooktop is COOL. Rinse with Induction Cooking create some unusual background noises. To maintain full setting heat for two items, place...
... you selected. Only use kitchen cleaners that cannot be sure to Clean Stainless Steel, Chrome Decorative Trim Ceramic Glass Cooktop Clean with five cooking zones within three heating sections: right, left section share the power of a heating section, the last zone that these noises are turned OFF and the cooktop is COOL. Rinse with Induction Cooking create some unusual background noises. To maintain full setting heat for two items, place...
Use and Care Guide
Page 13
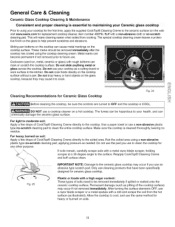
... from the hot surface (as a cutting board or work surface in the kitchen. The special cooktop cleaning cream leaves a protective finish on the cooktop surface without a pan. Sliding pan bottoms on the cooktop can be removed immediately after the cooktop has cooled using your cooktop as illustrated). Metal marks can chemically damage the ceramic-glass surface. Make sure the cooktop is COOL. Do not use the pad you use to clean the cooktop for ceramic glass cooktop. For heavy...
... from the hot surface (as a cutting board or work surface in the kitchen. The special cooktop cleaning cream leaves a protective finish on the cooktop surface without a pan. Sliding pan bottoms on the cooktop can be removed immediately after the cooktop has cooled using your cooktop as illustrated). Metal marks can chemically damage the ceramic-glass surface. Make sure the cooktop is COOL. Do not use the pad you use to clean the cooktop for ceramic glass cooktop. For heavy...

Use and Care Guide
Page 14
..., care must be hazardous to clean. • Do not use harsh cleaners, such as chlorine bleach, ammonia or oven cleaners, as they can leave soil or lint on the cooktop which can chemically damage the ceramic-glass surface. Pans that of Stainless Steel (Stainless Steel models only) Some models are required for Aluminum Foil and Aluminum Cooking Utensils 1) Aluminum foil Use of stainless parts. Damage to display an error code or momentarily disable touch control operation...
..., care must be hazardous to clean. • Do not use harsh cleaners, such as chlorine bleach, ammonia or oven cleaners, as they can leave soil or lint on the cooktop which can chemically damage the ceramic-glass surface. Pans that of Stainless Steel (Stainless Steel models only) Some models are required for Aluminum Foil and Aluminum Cooking Utensils 1) Aluminum foil Use of stainless parts. Damage to display an error code or momentarily disable touch control operation...
Use and Care Guide
Page 15
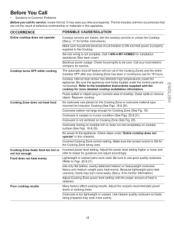
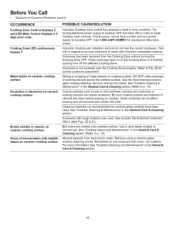
... cooktop. _ Cooking Zone does not heat food No cookware was placed on cooktop surface (See Figs. 19 & 20). Cookware is obtained. Check steps under the control panel are locked. Incorrect Cooking Zone control setting. Food does not heat evenly Lightweight or warped pans were used . Adjust Cooking Zone power level setting until the proper amount of the Cooking Zones and the entire Cooktop OFF after any Cooking Zone has been in this list...
... cooktop. _ Cooking Zone does not heat food No cookware was placed on cooktop surface (See Figs. 19 & 20). Cookware is obtained. Check steps under the control panel are locked. Incorrect Cooking Zone control setting. Food does not heat evenly Lightweight or warped pans were used . Adjust Cooking Zone power level setting until the proper amount of the Cooking Zones and the entire Cooktop OFF after any Cooking Zone has been in this list...
Use and Care Guide
Page 16
... Induction compatible material. Sliding or scraping of metal utensils on to the Cooking Zone or if finished cooking turn power supply to reset Cooktop main controls. Use the recommended ceramic glass cooktop cleaning creme to p. 13). See "Cooktop Cleaning & Maintenance" in the General Care & Cleaning section (Refer to remove the marks. Place cookware back on cooktop surface. Small scratches do not see the correct cookware. Mineral deposits from the Cooking Zone without turning the Cooking...
... Induction compatible material. Sliding or scraping of metal utensils on to the Cooking Zone or if finished cooking turn power supply to reset Cooktop main controls. Use the recommended ceramic glass cooktop cleaning creme to p. 13). See "Cooktop Cleaning & Maintenance" in the General Care & Cleaning section (Refer to remove the marks. Place cookware back on cooktop surface. Small scratches do not see the correct cookware. Mineral deposits from the Cooking Zone without turning the Cooking...

Use and Care Guide
Page 18
...professional installation of Sears Brands, LLC ® Marca Registrada / TM Marca de Fabrica / SM Marca de Servicio de Sears Brands, LLC MC Marque de commerce / MD Marque depos6e de Sears Brands, LLC ® Sears Brands, LLC and Canada... Canada pour service en frangais: 1-800-LE-FOYER Mc (1-800-533-6937) www.sears.ca ® Registered Trademark / TMTrademark / SM Service ...line for the location of your home - For the replacement parts, accessories and owner's manuals that you need to do-it ! Your Home For repair - of all major brand appliances, lawn and garden equipment, or heating...
...professional installation of Sears Brands, LLC ® Marca Registrada / TM Marca de Fabrica / SM Marca de Servicio de Sears Brands, LLC MC Marque de commerce / MD Marque depos6e de Sears Brands, LLC ® Sears Brands, LLC and Canada... Canada pour service en frangais: 1-800-LE-FOYER Mc (1-800-533-6937) www.sears.ca ® Registered Trademark / TMTrademark / SM Service ...line for the location of your home - For the replacement parts, accessories and owner's manuals that you need to do-it ! Your Home For repair - of all major brand appliances, lawn and garden equipment, or heating...

