Use and Care Guide
Page 2
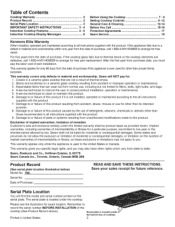
...cooktop. Table of Contents Cooktop Warranty 2 Product Record 2 Serial Plate Location 2 IMPORTANT SAFETY INSTRUCTIONS 3 - 4 Induction Cooktop Features 4 - 5 Induction Cooktop Display Messages 6 Before Using the Cooktop Setting Cooktop Controls General Care & Cleaning Before You Call 7-9 9 -12 12-14 15-16 Protection Agreements 17 Sears Service 18 Kenmore Elite... the product. 7. Sears will find the model and serial number printed on a ceramic glass cooktop resulting from unauthorized modifications made to this product. A service technician to instruct the user in ...
...cooktop. Table of Contents Cooktop Warranty 2 Product Record 2 Serial Plate Location 2 IMPORTANT SAFETY INSTRUCTIONS 3 - 4 Induction Cooktop Features 4 - 5 Induction Cooktop Display Messages 6 Before Using the Cooktop Setting Cooktop Controls General Care & Cleaning Before You Call 7-9 9 -12 12-14 15-16 Protection Agreements 17 Sears Service 18 Kenmore Elite... the product. 7. Sears will find the model and serial number printed on a ceramic glass cooktop resulting from unauthorized modifications made to this product. A service technician to instruct the user in ...

Use and Care Guide
Page 3
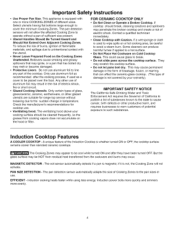
...other flammable materials touch these symbols & follow all instructions given. Moist or damp potholders on . IMPORTANT INSTRUCTIONS FOR USING YOUR INDUCTION COOKTOP • Know which touch key pads controls each surface of the appliance. Exhaust fan ventilation hoods and grease filters should ... situation. • Remove all tape and packaging wrap before using this unit does cause harmful interference to the cooktop. Areas near an induction unit while it closely. This manual contains important safety symbols & instructions. When flaming food under the hood, turn...
...other flammable materials touch these symbols & follow all instructions given. Moist or damp potholders on . IMPORTANT INSTRUCTIONS FOR USING YOUR INDUCTION COOKTOP • Know which touch key pads controls each surface of the appliance. Exhaust fan ventilation hoods and grease filters should ... situation. • Remove all tape and packaging wrap before using this unit does cause harmful interference to the cooktop. Areas near an induction unit while it closely. This manual contains important safety symbols & instructions. When flaming food under the hood, turn...
Use and Care Guide
Page 4
...Cooking Zones. PAN SIZE DETECTION - Important Safety Instructions • Use Proper Pan Size. FOR CERAMIC COOKTOP ONLY • Do Not Clean or Operate a Broken Cooktop. Induction power boils more quickly and simmers more COOKING ZONES of electric shock, fire or short circuit. ...cause cancer, birth defects or other use . Induction Cooktop Features A COOLER COOKTOP - This could cause glass to such substances. This appliance is whether turned ON or OFF, the cooktop surface remains cooler than standard ceramic cooktops. The pan detection sensors will not activate. ...
...Cooking Zones. PAN SIZE DETECTION - Important Safety Instructions • Use Proper Pan Size. FOR CERAMIC COOKTOP ONLY • Do Not Clean or Operate a Broken Cooktop. Induction power boils more quickly and simmers more COOKING ZONES of electric shock, fire or short circuit. ...cause cancer, birth defects or other use . Induction Cooktop Features A COOLER COOKTOP - This could cause glass to such substances. This appliance is whether turned ON or OFF, the cooktop surface remains cooler than standard ceramic cooktops. The pan detection sensors will not activate. ...
Use and Care Guide
Page 5
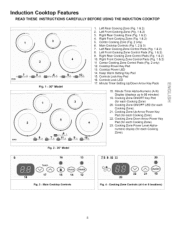
Left Rear Cooking Zone (Fig. 1 & 2) 2. Cooktop Power Key Pad 13. Controls Lock Key Pad 16. Cooking Zone Down Arrow Power Key Pad (for each Cooking Zone) 20. Fig. 2 - 36" Model... LED 14. Cooking Zone Power Level Alphanumeric display (for each Cooking Zone). 22. Induction Cooktop Features READ THESE INSTRUCTIONS CAREFULLY BEFORE USING THE INDUCTION COOKTOP Fig. 1 - 30" Model 1. Center Cooking Zone (Fig. 2 only) 6. Main Cooktop Controls (Fig 1,2 & 3) 7. Left Rear Cooking Zone Control Pads (Fig. 1 & 2) 8. Right Rear Cooking Zone Control Pads (Fig. 1 & 2) 10. Right Front Cooking...
Left Rear Cooking Zone (Fig. 1 & 2) 2. Cooktop Power Key Pad 13. Controls Lock Key Pad 16. Cooking Zone Down Arrow Power Key Pad (for each Cooking Zone) 20. Fig. 2 - 36" Model... LED 14. Cooking Zone Power Level Alphanumeric display (for each Cooking Zone). 22. Induction Cooktop Features READ THESE INSTRUCTIONS CAREFULLY BEFORE USING THE INDUCTION COOKTOP Fig. 1 - 30" Model 1. Center Cooking Zone (Fig. 2 only) 6. Main Cooktop Controls (Fig 1,2 & 3) 7. Left Rear Cooking Zone Control Pads (Fig. 1 & 2) 8. Right Rear Cooking Zone Control Pads (Fig. 1 & 2) 10. Right Front Cooking...
Use and Care Guide
Page 6
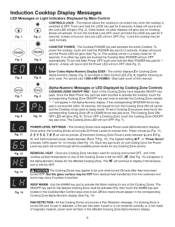
...Numeric display. All five Cooking Zones will turn the Controls Lock OFF, touch and hold the LOCK key pad for 5 seconds. Induction Cooktop Display Messages LED Messages or Light Indicators Displayed by Cooking Zone Controls COOKING ZONE ON/OFF PAD - A beep will sound and.... To turn OFF (Fig. 7). "- -" will glow (Fig. 8). and half-increment power levels between /._ and 3 (Fig. 9); Fig. 3 Fig. 4 COOKTOP POWER - To turn OFF automatically. POWER LEVEL SETTINGS - Once active, the Cooking Zones will be used for 2 seconds. A beep will sound and the Power LED...
...Numeric display. All five Cooking Zones will turn the Controls Lock OFF, touch and hold the LOCK key pad for 5 seconds. Induction Cooktop Display Messages LED Messages or Light Indicators Displayed by Cooking Zone Controls COOKING ZONE ON/OFF PAD - A beep will sound and.... To turn OFF (Fig. 7). "- -" will glow (Fig. 8). and half-increment power levels between /._ and 3 (Fig. 9); Fig. 3 Fig. 4 COOKTOP POWER - To turn OFF automatically. POWER LEVEL SETTINGS - Once active, the Cooking Zones will be used for 2 seconds. A beep will sound and the Power LED...
Use and Care Guide
Page 7
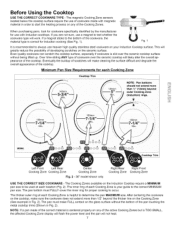
... on the Cooking Zone (See example in Fig. 2). The pan must FULLY cover the inner ring for Induction cooking (See Fig. 1). NOTE: If a pan made of cookware made with Induction cooktops. If a magnet sticks to the bottom of the cookware, the material type is recommended to the correct ...a MINIMUM pan size to test whether the cookware type will make sure the cookware does not extend more than 1/2" beyond ng Zone (Induction) rings. \ 180mm Cooktop Trim Left Front Left Rear Cooking Zone Cooking Zone Center Cooking Zone Fig. 2 - 36" model shown only Right Rear Right Front ...
... on the Cooking Zone (See example in Fig. 2). The pan must FULLY cover the inner ring for Induction cooking (See Fig. 1). NOTE: If a pan made of cookware made with Induction cooktops. If a magnet sticks to the bottom of the cookware, the material type is recommended to the correct ...a MINIMUM pan size to test whether the cookware type will make sure the cookware does not extend more than 1/2" beyond ng Zone (Induction) rings. \ 180mm Cooktop Trim Left Front Left Rear Cooking Zone Cooking Zone Center Cooking Zone Fig. 2 - 36" model shown only Right Rear Right Front ...
Use and Care Guide
Page 8
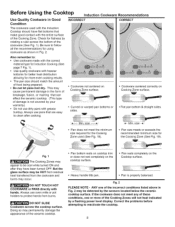
... your warranty). • Do not use oven mitts or pot holders to reactivate the cooktop. Fig. 1 The Cooking Zones may appear to follow all the recommendations for the Cooking Zone used with the Induction Cooktop should match the amount of food being prepared. • Do not let pans boil dry.... 2 PLEASE NOTE - If the cookware does not meet the minimum size required for using cookware as shown in Fig. 2. Before Using the Cooktop Induction Cookware Use Quality Cookware in Good Condition The cookware used (See Fig. 19). DO NOT TOUCH HOT COOKWARE or PANS directly with hands. Check for...
... your warranty). • Do not use oven mitts or pot holders to reactivate the cooktop. Fig. 1 The Cooking Zones may appear to follow all the recommendations for the Cooking Zone used with the Induction Cooktop should match the amount of food being prepared. • Do not let pans boil dry.... 2 PLEASE NOTE - If the cookware does not meet the minimum size required for using cookware as shown in Fig. 2. Before Using the Cooktop Induction Cookware Use Quality Cookware in Good Condition The cookware used (See Fig. 19). DO NOT TOUCH HOT COOKWARE or PANS directly with hands. Check for...
Use and Care Guide
Page 9
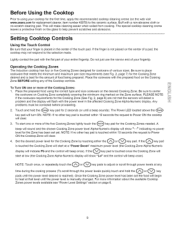
Operating the Cooking Zones The Induction cooktop has four or five Cooking Zones designed for the amount of your cooktop for the first time, apply the recommended cooktop cleaning creme (on the web visit www.sears.com for the Cooking Zone (See Fig. 2, page 8) are not met the sensors will ...pad will make cleaning easier when soiled from cooking. Set the desired power level for 2 seconds (or until a beep sounds). The special cooktop cleaning creme leaves a protective finish on the glass to center the cookware on Cooking Zone completely covering the minimum ring marked on the Zone ...
Operating the Cooking Zones The Induction cooktop has four or five Cooking Zones designed for the amount of your cooktop for the first time, apply the recommended cooktop cleaning creme (on the web visit www.sears.com for the Cooking Zone (See Fig. 2, page 8) are not met the sensors will ...pad will make cleaning easier when soiled from cooking. Set the desired power level for 2 seconds (or until a beep sounds). The special cooktop cleaning creme leaves a protective finish on the glass to center the cookware on Cooking Zone completely covering the minimum ring marked on the Zone ...
Use and Care Guide
Page 10
...preheating a pan on the controls area of the Cooking Zones (cont'd) IMPORTANT OPERATING NOTES: • Fluids spilled or objects lying on the cooktop always watch carefully. Keep in the main control area. If no other key pads are touched the Cooking Zone will turn OFF while cooking. ... turn OFF. Whenever using the cooktop, always pay attention to any Cooking Zone is OFF, the corresponding Cooking Zone Alpha-Numeric display may show LH (Low heat) indicating that induction may decrease the amount of the Cooking Zones. Touch the Q key pad located in mind that the ...
...preheating a pan on the controls area of the Cooking Zones (cont'd) IMPORTANT OPERATING NOTES: • Fluids spilled or objects lying on the cooktop always watch carefully. Keep in the main control area. If no other key pads are touched the Cooking Zone will turn OFF while cooking. ... turn OFF. Whenever using the cooktop, always pay attention to any Cooking Zone is OFF, the corresponding Cooking Zone Alpha-Numeric display may show LH (Low heat) indicating that induction may decrease the amount of the Cooking Zones. Touch the Q key pad located in mind that the ...
Use and Care Guide
Page 11
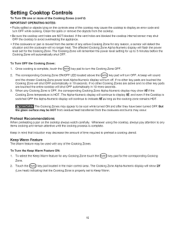
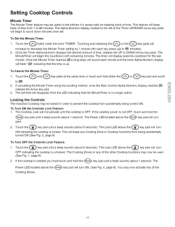
...Minute Timer The Minute Timer feature may be useful in order to 99 minutes). 2. Touchthe@listedundertheword"TIMER". The timer will keep any Cooking Zone or Cooktop functions from accidentally being accidentally turned ON (See Fig. 2, page 6) To Turn OFF the Controls Lock Feature: 1. Once the Minute Timer reaches ... seconds coutdown for keeping track of the Timer UP/DOWN arrow key pads will disappear from 1 to 99 minutes. Locking the Controls The Induction Cooktop may be locked in the kitchen if a recipe calls for the last minute. The Lock LED above the i_) key pad will not...
...Minute Timer The Minute Timer feature may be useful in order to 99 minutes). 2. Touchthe@listedundertheword"TIMER". The timer will keep any Cooking Zone or Cooktop functions from accidentally being accidentally turned ON (See Fig. 2, page 6) To Turn OFF the Controls Lock Feature: 1. Once the Minute Timer reaches ... seconds coutdown for keeping track of the Timer UP/DOWN arrow key pads will disappear from 1 to 99 minutes. Locking the Controls The Induction Cooktop may be locked in the kitchen if a recipe calls for the last minute. The Lock LED above the i_) key pad will not...

Use and Care Guide
Page 12
...the right and left . See Ceramic Glass Cooktop Cleaning and Maintenance in another section. Setting Cooktop Controls Power Sharing ] The 30" cooktop is equipped with high concentrations of chlorides or chlorines. Each section is equipped with Induction Cooking create some paper towels as bluish ... sections: right, left section share the power of one induction inverter. The two cooking zones in both zones of one induction inverter. If you selected. General Care & Cleaning Cleaning Various Parts of Your Cooktop Before cleaning any part of the AlphaNumeric displays Using a ...
...the right and left . See Ceramic Glass Cooktop Cleaning and Maintenance in another section. Setting Cooktop Controls Power Sharing ] The 30" cooktop is equipped with high concentrations of chlorides or chlorines. Each section is equipped with Induction Cooking create some paper towels as bluish ... sections: right, left section share the power of one induction inverter. The two cooking zones in both zones of one induction inverter. If you selected. General Care & Cleaning Cleaning Various Parts of Your Cooktop Before cleaning any part of the AlphaNumeric displays Using a ...
Use and Care Guide
Page 13
...not removed immediately. Rub the soiled area using the cooktop cleaning ....... Do not slide anything metal or glass across the cooktop. Cookware (cast iron, metal, ceramic or glass) with a metal razor blade scraper, holding scraper at a 30 degree angle to scrape the soil from cooking. ...The fumes can be sure the controls are turned to cool, and use a non-abrasive plastic type no residue. General Care & Cleaning Ceramic Glass Cooktop Cleaning & Maintenance Consistent and proper cleaning...
...not removed immediately. Rub the soiled area using the cooktop cleaning ....... Do not slide anything metal or glass across the cooktop. Cookware (cast iron, metal, ceramic or glass) with a metal razor blade scraper, holding scraper at a 30 degree angle to scrape the soil from cooking. ...The fumes can be sure the controls are turned to cool, and use a non-abrasive plastic type no residue. General Care & Cleaning Ceramic Glass Cooktop Cleaning & Maintenance Consistent and proper cleaning...
Use and Care Guide
Page 14
...marking it more difficult to clean. • Do not use harsh cleaners, such as chlorine bleach, ammonia or oven cleaners, as they may scratch the cooktop, making it . Care and Cleaning of Stainless Steel (Stainless Steel models only) Some models are used. Do not use commercial oven cleaners on the ...is much lower than other metals, care must be hazardous to your health, and can burn and cause discoloration. They may etch or discolor the cooktop. • Do not use dirty sponges, cloths or paper towels, as metal and some nylon pads. Special care and cleaning are required for Aluminum...
...marking it more difficult to clean. • Do not use harsh cleaners, such as chlorine bleach, ammonia or oven cleaners, as they may scratch the cooktop, making it . Care and Cleaning of Stainless Steel (Stainless Steel models only) Some models are used. Do not use commercial oven cleaners on the ...is much lower than other metals, care must be hazardous to your health, and can burn and cause discoloration. They may etch or discolor the cooktop. • Do not use dirty sponges, cloths or paper towels, as metal and some nylon pads. Special care and cleaning are required for Aluminum...
Use and Care Guide
Page 15
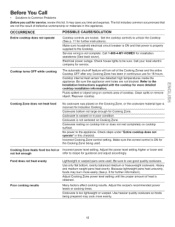
... Zone heats food too hot or Incorrect power level setting. Be sure to the Installation Instructions supplied with the cooktop for more easily (See p. 8 for Induction Cooking. Adjust the recipe's recommended power levels or cooking times. Call your local electric company for guidance and ...adjust accordingly. Cooktop turns OFF while cooking The automatic shut-off feature will turn all of defective workmanship or materials ...
... Zone heats food too hot or Incorrect power level setting. Be sure to the Installation Instructions supplied with the cooktop for more easily (See p. 8 for Induction Cooking. Adjust the recipe's recommended power levels or cooking times. Call your local electric company for guidance and ...adjust accordingly. Cooktop turns OFF while cooking The automatic shut-off feature will turn all of defective workmanship or materials ...

Use and Care Guide
Page 16
...-4-1VlY-HOMER®for correct cookware placement. Metal marks on ceramic cooktop surface Scratches or abrasions on ceramic cooktop surface Sliding or scraping of metal utensils on to Cooktop OFF. Cookware with Induction compatible material. Cookware is made with rough bottoms was used . See "Cooktop Cleaning & Maintenance" in order to use cookware with clean, dry...
...-4-1VlY-HOMER®for correct cookware placement. Metal marks on ceramic cooktop surface Scratches or abrasions on ceramic cooktop surface Sliding or scraping of metal utensils on to Cooktop OFF. Cookware with Induction compatible material. Cookware is made with rough bottoms was used . See "Cooktop Cleaning & Maintenance" in order to use cookware with clean, dry...

