
Installation Instructions
Page 4
... floor covering, make sure the range is installed properly, grasp the top rear edgge of local codes, with the range. Never leave children alone or unattended in use of the range, the range must be electrically grounded in accordance with the National Electrical Code ANSI/NFPA No, 70--... not install the range over the surface burners, cabinet storage space above the range. Adjust surface burner flame size so it carefully. Never use the oven as they may become hot while the oven is unattended. Reset all governing codes and ordinances. 4. FOR MODELS WITH SELF-CLEAN...
... floor covering, make sure the range is installed properly, grasp the top rear edgge of local codes, with the range. Never leave children alone or unattended in use of the range, the range must be electrically grounded in accordance with the National Electrical Code ANSI/NFPA No, 70--... not install the range over the surface burners, cabinet storage space above the range. Adjust surface burner flame size so it carefully. Never use the oven as they may become hot while the oven is unattended. Reset all governing codes and ordinances. 4. FOR MODELS WITH SELF-CLEAN...
Installation Instructions
Page 9
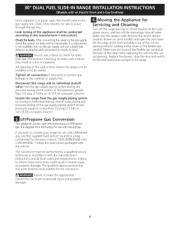
...gas. fterconnectinthgerangetothegassupply, (warmer drawer on the electrical power and gas to the range. conduit. Replace the drawer, close the door and switch on some models) and open the oven door. Isolate the range from the gas supply piping system by a... qualified service technician in accordance with the manufacturer's instructions and all connections if necessary to follow these instructions could result in personal injury and property damage. 9 manometer Lift the range at the front and slide...
...gas. fterconnectinthgerangetothegassupply, (warmer drawer on the electrical power and gas to the range. conduit. Replace the drawer, close the door and switch on some models) and open the oven door. Isolate the range from the gas supply piping system by a... qualified service technician in accordance with the manufacturer's instructions and all connections if necessary to follow these instructions could result in personal injury and property damage. 9 manometer Lift the range at the front and slide...
Installation Instructions
Page 12
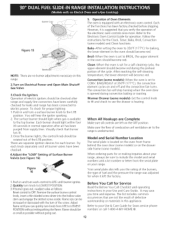
...,readjusvtalveasfollows: Resectontrotol OFFR. emovtheesurfacbeurnecrontrol Before You Call for when it left on your range, always be sure to the range is located on the oven front frame behind the oven door (some models or on the drawer side frame (some models). ach of defective workmanship or materials in this appliance. Convection(somemodels)-Whenthe ovenissetto...
...,readjusvtalveasfollows: Resectontrotol OFFR. emovtheesurfacbeurnecrontrol Before You Call for when it left on your range, always be sure to the range is located on the oven front frame behind the oven door (some models or on the drawer side frame (some models). ach of defective workmanship or materials in this appliance. Convection(somemodels)-Whenthe ovenissetto...
Use and Care Guide
Page 2
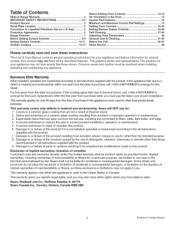
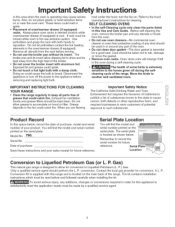
...and save these exclusions or limitations may also have all instructions supplied with the product. 7. Kenmore Elite Warranty When installed, operated and maintained according to arrange for several models. After the first year from purchase date, you must be practiced when installing, operating and...one year from accident, abuse, misuse or use , including but not limited to this product caused by law. Table of Contents Slide-in Range Warranty 2 IMPORTANT SAFETY INSTRUCTIONS 3-5 Product Record 5 Serial Plate Location 5 Conversion to you. Sears will NOT pay the labor cost...
...and save these exclusions or limitations may also have all instructions supplied with the product. 7. Kenmore Elite Warranty When installed, operated and maintained according to arrange for several models. After the first year from purchase date, you must be practiced when installing, operating and...one year from accident, abuse, misuse or use , including but not limited to this product caused by law. Table of Contents Slide-in Range Warranty 2 IMPORTANT SAFETY INSTRUCTIONS 3-5 Product Record 5 Serial Plate Location 5 Conversion to you. Sears will NOT pay the labor cost...
Use and Care Guide
Page 5
...Refer to Liquefied Petroleum Gas (or L. Oven racks color will change Jf left Jnthe oven during the self= cleaning cycle of the range. Model No. 790. The serial plate "_ is supplied with both hands to satisfactorily meet the application needs must be kept away from the... A L. Remember to Liquefied Petroleum (L. These items could ignite. ,, Do not touch a hot light bulb with aluminum foil. You will find the model and serial number serial number printed on the printed on or near the oven vent. Move the birds to such substances. important Safety instructions in...
...Refer to Liquefied Petroleum Gas (or L. Oven racks color will change Jf left Jnthe oven during the self= cleaning cycle of the range. Model No. 790. The serial plate "_ is supplied with both hands to satisfactorily meet the application needs must be kept away from the... A L. Remember to Liquefied Petroleum (L. These items could ignite. ,, Do not touch a hot light bulb with aluminum foil. You will find the model and serial number serial number printed on the printed on or near the oven vent. Move the birds to such substances. important Safety instructions in...
Use and Care Guide
Page 7
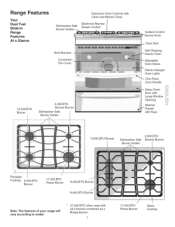
... Dual Fuel Slide-in Range Features At a Glance Electronic Oven Controls with Clock and Kitchen Timer Dishwasher Safe Burner Grates Electronic Warmer Drawer Control Broil Element Convection Fan Cover 14,... Grates 5,OOOBTU Simmer Burner Porcelain Cooktop 9,500 BTU Burner 17,200 BTU Power Burner *9,000 BTU Burner *9,000 BTU Burner Note: The features of your range will vary according to model, 27,000 BTU when used with all 3 burners combined as a Bridge Burner. 7 17,200 BTU Power Burner Glass Cooktop
... Dual Fuel Slide-in Range Features At a Glance Electronic Oven Controls with Clock and Kitchen Timer Dishwasher Safe Burner Grates Electronic Warmer Drawer Control Broil Element Convection Fan Cover 14,... Grates 5,OOOBTU Simmer Burner Porcelain Cooktop 9,500 BTU Burner 17,200 BTU Power Burner *9,000 BTU Burner *9,000 BTU Burner Note: The features of your range will vary according to model, 27,000 BTU when used with all 3 burners combined as a Bridge Burner. 7 17,200 BTU Power Burner Glass Cooktop
Use and Care Guide
Page 12
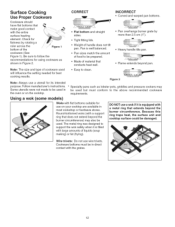
... is equipped with flat bottoms suitable for use a wok if it is filled with the entire surface heating element. Follow manufacturer's instructions. Using a wok (some models) Woks with a metal ring that does not extend beyond the burner circumference) may be prepared. DO NOT use on the cooktop. Because this ring traps...
... is equipped with flat bottoms suitable for use a wok if it is filled with the entire surface heating element. Follow manufacturer's instructions. Using a wok (some models) Woks with a metal ring that does not extend beyond the burner circumference) may be prepared. DO NOT use on the cooktop. Because this ring traps...
Use and Care Guide
Page 13
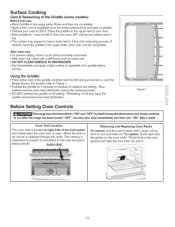
... hbaesean fatunrntheadt w"OillFtFu"r,n b"0utNm" aynda"lsOoFFs"topbyimitsmeelfdtoiatkeeleyp athned ethleecntrotnurnits"OcoNo"l. Using the Griddle: ,, Place either side of rack and slide out. aIfttmeraya cwohniltei .hue Oven Vent Location The oven vent is located at 350°E then turn oven OFF and let cool...stops. ing. ,, The surface may warp the griddle and prevent even heat distribution. Surface Cooking Care & Seasoning of the Griddle (some models) Before first use , clean with a stiff brush and hot water only. • DO NOT CLEAN GRIDDLE IN DISHWASHER. ,, Dry ...
... hbaesean fatunrntheadt w"OillFtFu"r,n b"0utNm" aynda"lsOoFFs"topbyimitsmeelfdtoiatkeeleyp athned ethleecntrotnurnits"OcoNo"l. Using the Griddle: ,, Place either side of rack and slide out. aIfttmeraya cwohniltei .hue Oven Vent Location The oven vent is located at 350°E then turn oven OFF and let cool...stops. ing. ,, The surface may warp the griddle and prevent even heat distribution. Surface Cooking Care & Seasoning of the Griddle (some models) Before first use , clean with a stiff brush and hot water only. • DO NOT CLEAN GRIDDLE IN DISHWASHER. ,, Dry ...
Use and Care Guide
Page 14
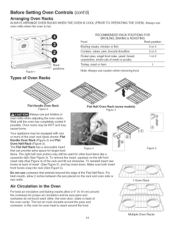
... the food. Oven racks may be used for larger food Figure 4 items. The right half rack portion may cause burns. Flat Half Oven Rack (some models) Figure 3 Your appliance may be sure pans and cookware do not touch each other food items like a casserole dish (See Figure 3). Flat Handle Oven Rack...
... the food. Oven racks may be used for larger food Figure 4 items. The right half rack portion may cause burns. Flat Half Oven Rack (some models) Figure 3 Your appliance may be sure pans and cookware do not touch each other food items like a casserole dish (See Figure 3). Flat Handle Oven Rack...
Use and Care Guide
Page 15
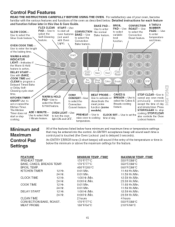
.... FEATURE PREHEAT TEMP. BROIL TEMP. Control Pad Features READ THE INSTRUCTIONS CAREFULLY BEFORE USING THE OVEN. Convection Bake feature. OVEN LIGHT--Use to cooking temperature. models). CLOCK SET-time of the baking time. COOK TIME 12 Hr. 24 Hr. Use to to select the PADS -- OVEN COOK TIME-- BAKE, CAKES, BREADS...
.... FEATURE PREHEAT TEMP. BROIL TEMP. Control Pad Features READ THE INSTRUCTIONS CAREFULLY BEFORE USING THE OVEN. Convection Bake feature. OVEN LIGHT--Use to cooking temperature. models). CLOCK SET-time of the baking time. COOK TIME 12 Hr. 24 Hr. Use to to select the PADS -- OVEN COOK TIME-- BAKE, CAKES, BREADS...
Use and Care Guide
Page 23
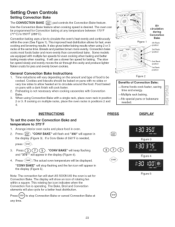
... slow fan speed slowly and evenly moves the air through the cavity and produce lighter flakier crusts for fast, even cooking and browning results. Some models are equipped with no sides or very low sides to allow heated air to 550°F (288°C). INSTRUCTIONS To set for a better heat distribution...
... slow fan speed slowly and evenly moves the air through the cavity and produce lighter flakier crusts for fast, even cooking and browning results. Some models are equipped with no sides or very low sides to allow heated air to 550°F (288°C). INSTRUCTIONS To set for a better heat distribution...
Use and Care Guide
Page 29
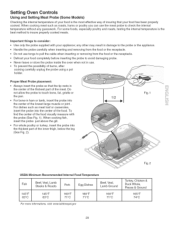
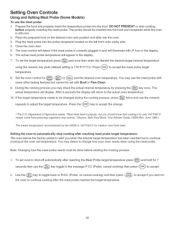
Setting Oven Controls Using and Setting Meat Probe (Some Models) Checking the internal temperature of your food is the best method to touch bone, fat, gristle or the pan. Do not allow the probe to ...
Setting Oven Controls Using and Setting Meat Probe (Some Models) Checking the internal temperature of your food is the best method to touch bone, fat, gristle or the pan. Do not allow the probe to ...
Use and Care Guide
Page 30
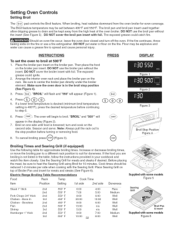
...display. 6. The actual temperature will illuminate with ,yt icon in and will display. Setting Oven Controls Using and Setting Meat Probe (Some Models) To use the meat probe with some food poisoning organisms may desire to change . Plug the meat probe into the food and receptacle while...you when the internal target temperature has been reached but cannot be inserted into the probe receptacle located on the desired oven rack position and slide into the food. Press the _ key to alert you may use the meat probe: 1. June 1985.) The lowest temperature recommended by ...
...display. 6. The actual temperature will illuminate with ,yt icon in and will display. Setting Oven Controls Using and Setting Meat Probe (Some Models) To use the meat probe with some food poisoning organisms may desire to change . Plug the meat probe into the food and receptacle while...you when the internal target temperature has been reached but cannot be inserted into the probe receptacle located on the desired oven rack position and slide into the food. Press the _ key to alert you may use the meat probe: 1. June 1985.) The lowest temperature recommended by ...
Use and Care Guide
Page 32
...placing the meat, be set the oven to heat the Searing Grill using Broil for approximate broiling times. Electric Range Broiling Table Recommendations Food Rack Temp Cook Time Supplied with some models Figure 6 The broil pan and broil pan insert used together allow dripping grease to step 6. DO ... you are broiling is in the broil stop position before continuing to drain and be reduced 1-2 minutes per side when cooking with some models Figure 5 Item Position Setting 1st side 2nd side Doneness Steak 1" thick 2nd 2nd Pork Chops 3/4" thick 2nd Chicken - Be sure ...
...placing the meat, be set the oven to heat the Searing Grill using Broil for approximate broiling times. Electric Range Broiling Table Recommendations Food Rack Temp Cook Time Supplied with some models Figure 6 The broil pan and broil pan insert used together allow dripping grease to step 6. DO ... you are broiling is in the broil stop position before continuing to drain and be reduced 1-2 minutes per side when cooking with some models Figure 5 Item Position Setting 1st side 2nd side Doneness Steak 1" thick 2nd 2nd Pork Chops 3/4" thick 2nd Chicken - Be sure ...
Use and Care Guide
Page 34
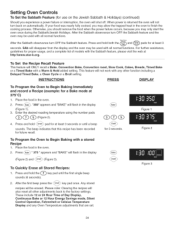
... recipes will flash in the display (Figure 2) and (Figure 3). Please note: Clearing the recipes will shut off. These include 12 or 24 Hour Time of models with any Oven Temperature adjustments that this recipe has been recorded for future recall, O(2bdb for use on automatically. Figure 3 34 Press and hold the...
... recipes will flash in the display (Figure 2) and (Figure 3). Please note: Clearing the recipes will shut off. These include 12 or 24 Hour Time of models with any Oven Temperature adjustments that this recipe has been recorded for future recall, O(2bdb for use on automatically. Figure 3 34 Press and hold the...
Use and Care Guide
Page 35
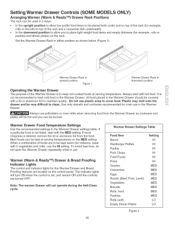
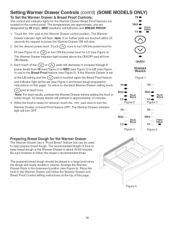
Setting Warmer Drawer Controls (SOME MODELS ONLY) Arranging Warmer (Warm & Ready TM) Drawer Rack Positions The rack can be used in 2 ways: • in the upright position to allow you can ...
Setting Warmer Drawer Controls (SOME MODELS ONLY) Arranging Warmer (Warm & Ready TM) Drawer Rack Positions The rack can be used in 2 ways: • in the upright position to allow you can ...
Use and Care Guide
Page 36
... in the downward position (see Figure 4). The Warmer MED LO PROOF BREAD Drawer indicator light will turn ON steady. 3. Setting Warmer Drawer Controls (cont'd) (SOME MODELS ONLY) To Set the Warmer Drawer & Bread Proof Controls: HIo The control and indicator lights for removal, touch the O,IOFpFad once to turn the Warmer...
... in the downward position (see Figure 4). The Warmer MED LO PROOF BREAD Drawer indicator light will turn ON steady. 3. Setting Warmer Drawer Controls (cont'd) (SOME MODELS ONLY) To Set the Warmer Drawer & Bread Proof Controls: HIo The control and indicator lights for removal, touch the O,IOFpFad once to turn the Warmer...
Use and Care Guide
Page 41
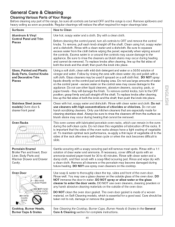
...rack performance, re-apply a thin layer of vegetable oil to slide. DO NOT use large amounts of the rack after every self...the knob into place. they will reduce the effort required for 30 to rub, damage or remove this vegetable oil lubrication off from ... stainless steel. General Care & Cleaning Cleaning Various Parts of Your Range Before cleaning any harsh abrasive cleaning materials on the outside of both.... Rinse with a soapy scouring pad will remove most spots. Stainless Steel (some models) Oven door & drawer front panel Clean with clean water and cloth. Rinse well...
...rack performance, re-apply a thin layer of vegetable oil to slide. DO NOT use large amounts of the rack after every self...the knob into place. they will reduce the effort required for 30 to rub, damage or remove this vegetable oil lubrication off from ... stainless steel. General Care & Cleaning Cleaning Various Parts of Your Range Before cleaning any harsh abrasive cleaning materials on the outside of both.... Rinse with a soapy scouring pad will remove most spots. Stainless Steel (some models) Oven door & drawer front panel Clean with clean water and cloth. Rinse well...
Use and Care Guide
Page 42
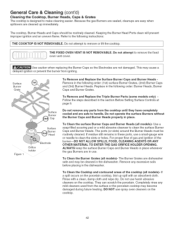
...instructions: THE COOKTOP IS NOT REMOVABLE. The ports (or slots) around the Burner Heads must be routinely cleaned. To Clean the Burner Grates (all models)- To Clean the Cooktop and contoured areas of the burner--DO NOT ALLOW SPILLS, FOOD, CLEANING AGENTS OR ANY OTHER MATERIAL TO ENTER THE GAS... pad or a mild abrasive cleanser to remove the fixed oven vent cover. For proper flow of gas and ignition of the cooktop (all models)- The Burner Grates are dishwasher safe and may be cleaned in the section Before Setting Surface Controls at page 9. Rinse with an absorbent cloth.
...instructions: THE COOKTOP IS NOT REMOVABLE. The ports (or slots) around the Burner Heads must be routinely cleaned. To Clean the Burner Grates (all models)- To Clean the Cooktop and contoured areas of the burner--DO NOT ALLOW SPILLS, FOOD, CLEANING AGENTS OR ANY OTHER MATERIAL TO ENTER THE GAS... pad or a mild abrasive cleanser to remove the fixed oven vent cover. For proper flow of gas and ignition of the cooktop (all models)- The Burner Grates are dishwasher safe and may be cleaned in the section Before Setting Surface Controls at page 9. Rinse with an absorbent cloth.
Use and Care Guide
Page 44
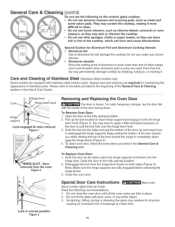
...Utensils • Aluminum foil Use of the door facing down. Pull up and toward you while rotating the top of the door toward the range to clean. • Do not use harsh cleaners, such as chlorine bleach, ammonia or oven cleaners, as they can leave soil or ...Cleaning of breakage at the beginning of other object. 3. You may weaken its structure causing an increased risk of Stainless Steel (StainlessSteel models only) Some models are used. They may scratch the cool(top, making it . General j Care & Cleaning (cont'd) Do not use the following recommendations: 1.
...Utensils • Aluminum foil Use of the door facing down. Pull up and toward you while rotating the top of the door toward the range to clean. • Do not use harsh cleaners, such as chlorine bleach, ammonia or oven cleaners, as they can leave soil or ...Cleaning of breakage at the beginning of other object. 3. You may weaken its structure causing an increased risk of Stainless Steel (StainlessSteel models only) Some models are used. They may scratch the cool(top, making it . General j Care & Cleaning (cont'd) Do not use the following recommendations: 1.

