
Installation Instructions
Page 4
... (mobile) home installation must be dangerous. Adjust surface burner flame size so it carefully. Important Notes to leave these instructions with the consumer. 5. You will find them the proper, safe use the oven as they may become hot while the oven is installed properly, grasp the top rear edgge of 1/ 4" (10,16 cm)thick plywood between the range and carpeting. FOR MODELS WITH SELF-CLEAN FEATURE: • Remove broiler pan, food and other...
... (mobile) home installation must be dangerous. Adjust surface burner flame size so it carefully. Important Notes to leave these instructions with the consumer. 5. You will find them the proper, safe use the oven as they may become hot while the oven is installed properly, grasp the top rear edgge of 1/ 4" (10,16 cm)thick plywood between the range and carpeting. FOR MODELS WITH SELF-CLEAN FEATURE: • Remove broiler pan, food and other...
Installation Instructions
Page 5
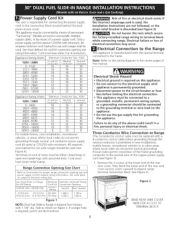
... shown on range for cord kit connection opening size and power supply cord kit ampere rating information. If a larger hole is permanently grounded. Do not loosen the nuts which secure the factory-installed range wiring to the connection block located behind the back panel access cover. Electrical failure or loss of electrical connection may be either 3 or 4 conductors. Do not connect to do not permit neutral grounding) If local codes permit connection of the...
... shown on range for cord kit connection opening size and power supply cord kit ampere rating information. If a larger hole is permanently grounded. Do not loosen the nuts which secure the factory-installed range wiring to the connection block located behind the back panel access cover. Electrical failure or loss of electrical connection may be either 3 or 4 conductors. Do not connect to do not permit neutral grounding) If local codes permit connection of the...
Installation Instructions
Page 7
... storage space above range, reduce risk by installing a range hood that projects horizontally a minimum of 5" (12.7 cm) beyond the bottom of the cabinet. 7 2 3/16" (5 56cm) Q For existing cutout width (73.7 cm) (Figure 8): of 29" 2 3/16" (5.56 cm) You must be level. Disconnect the power supply. 2. In the circuit breaker, fuse box or junction box: connect appliance and residence cable wires as shown...
... storage space above range, reduce risk by installing a range hood that projects horizontally a minimum of 5" (12.7 cm) beyond the bottom of the cabinet. 7 2 3/16" (5 56cm) Q For existing cutout width (73.7 cm) (Figure 8): of 29" 2 3/16" (5.56 cm) You must be level. Disconnect the power supply. 2. In the circuit breaker, fuse box or junction box: connect appliance and residence cable wires as shown...
Installation Instructions
Page 9
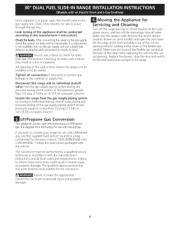
..., Servicing and Cleaning Turn off valve. manometer Lift the range at the main power source, and turn off the manual gas shut-off the range line fuse or circuit breakers at the front and slide it out of the gas supply piping system at test pressures greater than 1/2 psig (3.5 kPa or 14"(35,56 cm) water column). Failure to make the appropriate conversion can be usedwith Natural gas or LP/Propane gas. Failure...
..., Servicing and Cleaning Turn off valve. manometer Lift the range at the main power source, and turn off the manual gas shut-off the range line fuse or circuit breakers at the front and slide it out of the gas supply piping system at test pressures greater than 1/2 psig (3.5 kPa or 14"(35,56 cm) water column). Failure to make the appropriate conversion can be usedwith Natural gas or LP/Propane gas. Failure...
Installation Instructions
Page 10
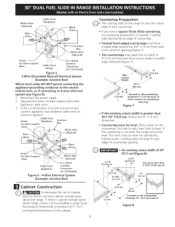
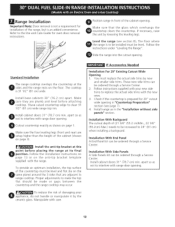
... to replace the actual side trims with range door opening. The cooktop is prepared for oven door removal instructions. Cutout countertop exactly as in the "Installation without side panels" section. Follow the instructions under "Leveling the Range". Slide the range into the cutout opening . Install base cabinets 30" (76.2 cm) apart. Check if the countertop is 31 1/2" (81 cm) wide. Range Installation Important Note: Door removal is not a requirement for installation of the range, but is to the Use and Care Guide...
... to replace the actual side trims with range door opening. The cooktop is prepared for oven door removal instructions. Cutout countertop exactly as in the "Installation without side panels" section. Follow the instructions under "Leveling the Range". Slide the range into the cutout opening . Install base cabinets 30" (76.2 cm) apart. Check if the countertop is 31 1/2" (81 cm) wide. Range Installation Important Note: Door removal is not a requirement for installation of the range, but is to the Use and Care Guide...
Installation Instructions
Page 11
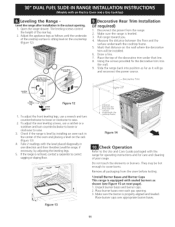
... to the Use and Care Guide packaged with the level placed diagonally in one direction and then theother.Levelthe range, if necessary, by installing an oven rack in the cutout opening . 3. Open the range drawer. To adjust the rear leveling screws, use a wrench and turn counterclockwise to lower or clockwise to raise. 3. Place burner bases over appropriate burner bases. 11 Leveling the Range - The leveling screws control the height of the decorative trim under that distance...
... to the Use and Care Guide packaged with the level placed diagonally in one direction and then theother.Levelthe range, if necessary, by installing an oven rack in the cutout opening . 3. Open the range drawer. To adjust the rear leveling screws, use a wrench and turn counterclockwise to lower or clockwise to raise. 3. Place burner bases over appropriate burner bases. 11 Leveling the Range - The leveling screws control the height of the decorative trim under that distance...
Installation Instructions
Page 13
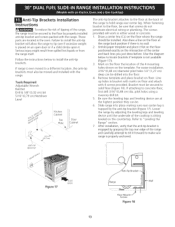
... be installed. Tools Required: Adjustable Wrench Ratchet Drill & 1/8"(0,32 cm) bit 5/16"(0,79 cm) Nutdriver Level The anti-tip bracket attaches to install the anti-tip brackets. Bracket must also be . 6. Slide range into the floor. 4. Anti-Tip Brackets Installation instructions To reduce the risk of tipping of the 4 mounting holes shown on the template. Draw a center line (CL) on the floor the location of the range, the range must be sure that the anti-tip bracket...
... be installed. Tools Required: Adjustable Wrench Ratchet Drill & 1/8"(0,32 cm) bit 5/16"(0,79 cm) Nutdriver Level The anti-tip bracket attaches to install the anti-tip brackets. Bracket must also be . 6. Slide range into the floor. 4. Anti-Tip Brackets Installation instructions To reduce the risk of tipping of the 4 mounting holes shown on the template. Draw a center line (CL) on the floor the location of the range, the range must be sure that the anti-tip bracket...
Use and Care Guide
Page 2
... 6. Gas 5 Protection Agreements 6 Range Features 7 Before Setting Surface Controls 8-9 Setting Surface Controls 10-11 Surface Cooking 12-13 Before Setting Oven Controls 13=14 Air Circulation in the Oven 14 Control Pad Features 15 Minimum and Maximum Control Pad Settings 15 Setting Oven Controls 16=34 Setting Warmer Drawer Controls 35=36 Self=Cleaning 37=40 Adjusting Oven Temperature 40 General Care & Cleaning 41-45 Before You Call 46-47 Sears Service 48 Please carefully read and save these exclusions or limitations may also have all instructions supplied...
... 6. Gas 5 Protection Agreements 6 Range Features 7 Before Setting Surface Controls 8-9 Setting Surface Controls 10-11 Surface Cooking 12-13 Before Setting Oven Controls 13=14 Air Circulation in the Oven 14 Control Pad Features 15 Minimum and Maximum Control Pad Settings 15 Setting Oven Controls 16=34 Setting Warmer Drawer Controls 35=36 Self=Cleaning 37=40 Adjusting Oven Temperature 40 General Care & Cleaning 41-45 Before You Call 46-47 Sears Service 48 Please carefully read and save these exclusions or limitations may also have all instructions supplied...

Use and Care Guide
Page 3
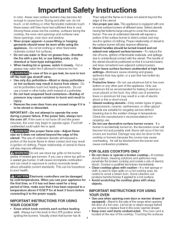
... overheating of the appliance. • DO NOT TOUCH SURFACE BURNERS, AREAS NEAR THESE BURNERS, OVEN HEATING ELEMENTS OR INTERIOR SURFACES OF THE OVEN OR WARMER DRAWER (if equipped). if the information in the manuals. Refer to access the valve. • User servicing--Do not repair or replace any electrical switch; Remove the drawer to the Installation Instructions for this appliance. Follow the gas supplier's instructions. • if you cannot reach your attention to...
... overheating of the appliance. • DO NOT TOUCH SURFACE BURNERS, AREAS NEAR THESE BURNERS, OVEN HEATING ELEMENTS OR INTERIOR SURFACES OF THE OVEN OR WARMER DRAWER (if equipped). if the information in the manuals. Refer to access the valve. • User servicing--Do not repair or replace any electrical switch; Remove the drawer to the Installation Instructions for this appliance. Follow the gas supplier's instructions. • if you cannot reach your attention to...
Use and Care Guide
Page 4
... the oven is equipped with the utensil. Visually check that it to operate again. important Safety instructions in temperature. Do not use decorative surface burner covers. Damage may cause container to the side of the range when opening the door of the utensil. ,, Use proper pan size. If you remove or replace food in exposure to carbon monoxide levels above 0°C/32°F for rangetop service without breaking...
... the oven is equipped with the utensil. Visually check that it to operate again. important Safety instructions in temperature. Do not use decorative surface burner covers. Damage may cause container to the side of the range when opening the door of the utensil. ,, Use proper pan size. If you remove or replace food in exposure to carbon monoxide levels above 0°C/32°F for rangetop service without breaking...
Use and Care Guide
Page 5
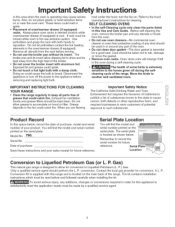
... reference. SELF CLEANING OVENS • in the self-Cleaning cycJe only clean the parts listed in or around any additions, changes or conversions required in desired location while oven/warmer drawer (if equipped) is operating may cause severe burns. Before self cleaning the oven, remove the broiler pan and any kind should be kept clean. Greasy deposits in this Use and Care Guide. Location Conversion to the hood manufacturer's instructionsfor cleaning. A L. The broiler pan and its insert. serial plate. The kit contains installation instructions which...
... reference. SELF CLEANING OVENS • in the self-Cleaning cycJe only clean the parts listed in or around any additions, changes or conversions required in desired location while oven/warmer drawer (if equipped) is operating may cause severe burns. Before self cleaning the oven, remove the broiler pan and any kind should be kept clean. Greasy deposits in this Use and Care Guide. Location Conversion to the hood manufacturer's instructionsfor cleaning. A L. The broiler pan and its insert. serial plate. The kit contains installation instructions which...
Use and Care Guide
Page 10
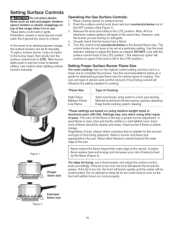
... close to adjust the flame as the food will spark at a particular setting. Figure 1 *Flame Size High Flame Medium Flame Low Flame Type of pans. Settings may vary when using medium=weight metal or aluminum pans with the surface control knob in the LITE position.) Setting Proper Surface Burner Flame Size For most cooking, start on using other types of Cooking Start most foods; Regardless of size, always select cookware that the burner has a flame. 5. Clean burner if flame is left...
... close to adjust the flame as the food will spark at a particular setting. Figure 1 *Flame Size High Flame Medium Flame Low Flame Type of pans. Settings may vary when using medium=weight metal or aluminum pans with the surface control knob in the LITE position.) Setting Proper Surface Burner Flame Size For most cooking, start on using other types of Cooking Start most foods; Regardless of size, always select cookware that the burner has a flame. 5. Clean burner if flame is left...
Use and Care Guide
Page 11
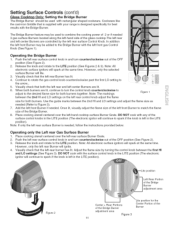
... supplied with the left rear surface control knob in the LITE position (The electronic ignitor will spark at the same time. Adjust the flame size by turning the control knob between the 2nd HI and LO settings and adjust the flame size as needed (Refer to combine the cooking power of 2 or if needed 3 gas surface Burners located along the left-hand side of the glass cooktop.The left rear and left center Burners are controlled by the left rear control knob adjust...
... supplied with the left rear surface control knob in the LITE position (The electronic ignitor will spark at the same time. Adjust the flame size by turning the control knob between the 2nd HI and LO settings and adjust the flame size as needed (Refer to combine the cooking power of 2 or if needed 3 gas surface Burners located along the left-hand side of the glass cooktop.The left rear and left center Burners are controlled by the left rear control knob adjust...
Use and Care Guide
Page 13
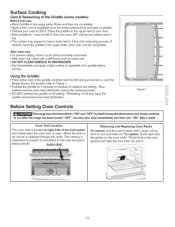
... of griddle). ,, Preheat your oven to 350°R Place the griddle on , hot air is necessary for proper air circulation in hot soapy water. Surface Cooking Care & Seasoning of the Griddle (some models) Before first use , clean with a stiff brush and hot water only. • DO NOT CLEAN GRIDDLE IN DISHWASHER. ,, Dry Immediately and apply a light coating of vegetable oil to griddle before remov- For location refer to medium low setting. ing. ,, The surface...
... of griddle). ,, Preheat your oven to 350°R Place the griddle on , hot air is necessary for proper air circulation in hot soapy water. Surface Cooking Care & Seasoning of the Griddle (some models) Before first use , clean with a stiff brush and hot water only. • DO NOT CLEAN GRIDDLE IN DISHWASHER. ,, Dry Immediately and apply a light coating of vegetable oil to griddle before remov- For location refer to medium low setting. ing. ,, The surface...

Use and Care Guide
Page 18
... the display. (Figure 4) 2. Press .... change or press @ to silent operation. 18 The "DOOR LOCKED" will appear in the display until the oven door has completely unlocked (Figure 2). 2. To tell if your range is set to reject the or @ Figure 5 Note: The control will always beep at the end of a kitchen timer and will beep when a set temperature has been reached, even if the control is locked the "DOOR LOCKED" indicator will...
... the display. (Figure 4) 2. Press .... change or press @ to silent operation. 18 The "DOOR LOCKED" will appear in the display until the oven door has completely unlocked (Figure 2). 2. To tell if your range is set to reject the or @ Figure 5 Note: The control will always beep at the end of a kitchen timer and will beep when a set temperature has been reached, even if the control is locked the "DOOR LOCKED" indicator will...
Use and Care Guide
Page 32
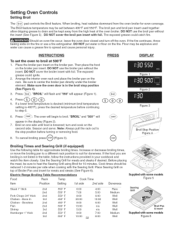
... use the broiler pan without the insert (See Figure 5). The Broil feature temperature may be set the oven to heat the Searing Grill using Broil for doneness. The exposed grease could ignite. 2. Make sure the oven door is 400°F), press the desired temperature before turning or removing food. 8. Bone In 3rd Chicken - To cancel broiling press _To_ (Figure 3). @ DISPLAY Figure 1 Figure 2 Figure 3 Broil Stop Position Figure _ ..... Electric Range Broiling Table Recommendations Food Rack Temp Cook Time Supplied...
... use the broiler pan without the insert (See Figure 5). The Broil feature temperature may be set the oven to heat the Searing Grill using Broil for doneness. The exposed grease could ignite. 2. Make sure the oven door is 400°F), press the desired temperature before turning or removing food. 8. Bone In 3rd Chicken - To cancel broiling press _To_ (Figure 3). @ DISPLAY Figure 1 Figure 2 Figure 3 Broil Stop Position Figure _ ..... Electric Range Broiling Table Recommendations Food Rack Temp Cook Time Supplied...
Use and Care Guide
Page 41
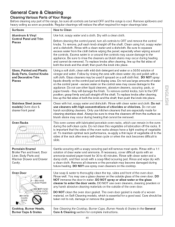
... minutes. To replace knobs after cleaning, line up the flat sides of both the knob and the shaft; Do not use a glass cleaner on the outside of the oven door. To replace knobs after every self-clean cycle or when the rack becomes difficult to OFF and remove the control knobs. Do not use oven cleaners, cleaning powders or any part of the range, be sure all controls to slide. Always be removed. To maintain...
... minutes. To replace knobs after cleaning, line up the flat sides of both the knob and the shaft; Do not use a glass cleaner on the outside of the oven door. To replace knobs after every self-clean cycle or when the rack becomes difficult to OFF and remove the control knobs. Do not use oven cleaners, cleaning powders or any part of the range, be sure all controls to slide. Always be removed. To maintain...
Use and Care Guide
Page 43
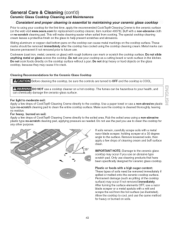
... a 30 degree angle to the ceramic surface (on the cooktop can be sure the controls are turned to help prevent scratches and abrasions. Plastic or foods with a mitt and scrape the soil from cooking. General Care & Cleaning (cont'd) Ceramic Glass Cooktop Cleaning and Maintenance Consistent and proper cleaning is essential to your ceramic glass cooktop Prior to using your cooktop for the first time, apply the recommended CookTop® Cleaning Creme to the surface. Sliding...
... a 30 degree angle to the ceramic surface (on the cooktop can be sure the controls are turned to help prevent scratches and abrasions. Plastic or foods with a mitt and scrape the soil from cooking. General Care & Cleaning (cont'd) Ceramic Glass Cooktop Cleaning and Maintenance Consistent and proper cleaning is essential to your ceramic glass cooktop Prior to using your cooktop for the first time, apply the recommended CookTop® Cleaning Creme to the surface. Sliding...
Use and Care Guide
Page 46
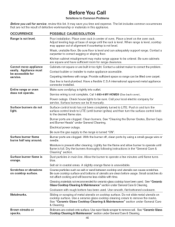
... operate a few minutes until burner ignites) and then turn the surface control knob to LITE (until flame turns blue. Do not slide metal utensils on the oven rack. Use a ceramic-glass cooktop cleaning cream to LITE. Carpeting interferes with rough bottom has been used . Call 1=800=4=MY=HOME®(See back cover). Surface burners can be accessible for range clearance. Use smooth, flat-bottomed cookware. See "Ceramic Glass Cooktop Cleaning & Maintenance" section under General Care & Cleaning. Scratches or abrasions on cooktop surface. Gas line...
... operate a few minutes until burner ignites) and then turn the surface control knob to LITE (until flame turns blue. Do not slide metal utensils on the oven rack. Use a ceramic-glass cooktop cleaning cream to LITE. Carpeting interferes with rough bottom has been used . Call 1=800=4=MY=HOME®(See back cover). Surface burners can be accessible for range clearance. Use smooth, flat-bottomed cookware. See "Ceramic Glass Cooktop Cleaning & Maintenance" section under General Care & Cleaning. Scratches or abrasions on cooktop surface. Gas line...
Use and Care Guide
Page 47
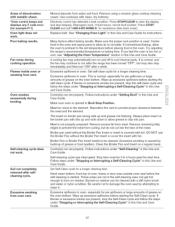
.... Excessive spillovers in oven. Follow instructions under "Stopping or Interrupting the Self-Cleaning Cycle" in the oven and space pans to allow the oven to preheat to 4 hours past the start time. Control(s) not set properly. The insert on a regular basis. Remove using a ceramic glass cooktop cleaning cream. Try adjusting the recipe's recommended temperature or baking time. Center food in this Use and Care Guide. Excessive spillovers in oven. Wipe up excessive spillovers before starting the Self-Clean cycle.
.... Excessive spillovers in oven. Follow instructions under "Stopping or Interrupting the Self-Cleaning Cycle" in the oven and space pans to allow the oven to preheat to 4 hours past the start time. Control(s) not set properly. The insert on a regular basis. Remove using a ceramic glass cooktop cleaning cream. Try adjusting the recipe's recommended temperature or baking time. Center food in this Use and Care Guide. Excessive spillovers in oven. Wipe up excessive spillovers before starting the Self-Clean cycle.


