
Use and Care Guide
Page 2
...7 INSTALLATION INSTRUCTIONS Unpacking and Removing Shipping Boffs 8 Connecting the Water Lines 9 Connecting the Drain Hose '10 Connect to the Power Supply t 0 Leveling the Washer 11 lnstaBation of non-skid pads (optiona0 11 HOW TO USE iiiiiiiii Ci!onitiro!liiP!...aineliiF!eiaitiurie:si! 12 Operating the Washer 13 ijjii!ii!!!!!ii i!i!!ili! Cycle Guide t4 _rting Wash Loads 15 A_ the Dis_nser 16 iiiiiiiiiiiiiiiDiieiteiirgiiein!tiiiainid!idiisipiein!sie!riliu!siei!.i.i..i..i t7 iiiiiiiiiiiiiiiiiTiiimiieiiiiainidiiSiitiaitiuisi...
...7 INSTALLATION INSTRUCTIONS Unpacking and Removing Shipping Boffs 8 Connecting the Water Lines 9 Connecting the Drain Hose '10 Connect to the Power Supply t 0 Leveling the Washer 11 lnstaBation of non-skid pads (optiona0 11 HOW TO USE iiiiiiiii Ci!onitiro!liiP!...aineliiF!eiaitiurie:si! 12 Operating the Washer 13 ijjii!ii!!!!!ii i!i!!ili! Cycle Guide t4 _rting Wash Loads 15 A_ the Dis_nser 16 iiiiiiiiiiiiiiiDiieiteiirgiiein!tiiiainid!idiisipiein!sie!riliu!siei!.i.i..i..i t7 iiiiiiiiiiiiiiiiiTiiimiieiiiiainidiiSiitiaitiuisi...
Use and Care Guide
Page 6
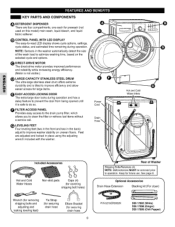
... efficiency and allow easier access for covering shipping bolt holes) Rear of the wash load to optimize washing time, based on the selected cycle and options. ff-- Feet...liquid fabric softener. LEVELING FEET Four leveling feet (two in the front and two in place using the adjusting wrench included with the washer. Keep for securing 6 PIN 5215ER2002K [%:::: D_ 17002 (White)...removing shipping bolts and adjusting and Tie Strap (for _curing drain hose Elbow Bract_et (for future use. _e page 8. Power Cord Drain Hot and Cold Water Inlets f Included Accessories Hot and ...
... efficiency and allow easier access for covering shipping bolt holes) Rear of the wash load to optimize washing time, based on the selected cycle and options. ff-- Feet...liquid fabric softener. LEVELING FEET Four leveling feet (two in the front and two in place using the adjusting wrench included with the washer. Keep for securing 6 PIN 5215ER2002K [%:::: D_ 17002 (White)...removing shipping bolts and adjusting and Tie Strap (for _curing drain hose Elbow Bract_et (for future use. _e page 8. Power Cord Drain Hot and Cold Water Inlets f Included Accessories Hot and ...

Use and Care Guide
Page 10
...moving. CONNECT TO POWER SUPPLY Washer should be installed near the end of the drain hose. J 10 NOTE: A drain hose extension kit is available if the drain hoe is not stretched, pinched, crushed, or kinked. CONNECTING THE DRAIN HOSE •The drain hose should always be properly secured...aft the end of the drain hose higher than 8-12 inches into the standpipe. Floor Drain ,,,J insert the end of the washer. grounded 3-prong outlet. Option 3: Floor Drain Drain Hose The elbow bracket should be plugged into the floor drain. NOTE: If the drain hose is extended more than ...
...moving. CONNECT TO POWER SUPPLY Washer should be installed near the end of the drain hose. J 10 NOTE: A drain hose extension kit is available if the drain hoe is not stretched, pinched, crushed, or kinked. CONNECTING THE DRAIN HOSE •The drain hose should always be properly secured...aft the end of the drain hose higher than 8-12 inches into the standpipe. Floor Drain ,,,J insert the end of the washer. grounded 3-prong outlet. Option 3: Floor Drain Drain Hose The elbow bracket should be plugged into the floor drain. NOTE: If the drain hose is extended more than ...
Use and Care Guide
Page 11
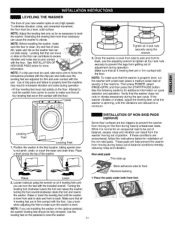
...medium-sized load of the washer.. _q This side up Stick adhesive side to ]eve] the washer. a level across the top of laundry in firm contact with the pan. NOTE: Adjust the leveling feet only as far as n_essary to floor Remove backing ,,_ Raise Lower i_ $ Place the pads under both front feet....solidly on the floor can contribute to excess Nbration and noise due to not pinch, strain, or crush the water and drain lines..Place from the washer moving out of drip pans and failure to properly level the machine may result in increased vibration and noise during heavily ...
...medium-sized load of the washer.. _q This side up Stick adhesive side to ]eve] the washer. a level across the top of laundry in firm contact with the pan. NOTE: Adjust the leveling feet only as far as n_essary to floor Remove backing ,,_ Raise Lower i_ $ Place the pads under both front feet....solidly on the floor can contribute to excess Nbration and noise due to not pinch, strain, or crush the water and drain lines..Place from the washer moving out of drip pans and failure to properly level the machine may result in increased vibration and noise during heavily ...

Use and Care Guide
Page 18
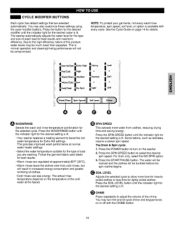
... i!ii!ii!i ii!iiiiii! Do not try to pause the washer. The washer door will adjust the cycle for the selected wash cycle. Press start and the water will be drained and the clothes will remain steady. ijjii!ii!!!!!ii i!i!!ili! actual time, O LOAD-SENSING INDICATOR This light will then indicate the estimated time...
... i!ii!ii!i ii!iiiiii! Do not try to pause the washer. The washer door will adjust the cycle for the selected wash cycle. Press start and the water will be drained and the clothes will remain steady. ijjii!ii!!!!!ii i!i!!ili! actual time, O LOAD-SENSING INDICATOR This light will then indicate the estimated time...
Use and Care Guide
Page 19
...as delicates, require a slower spin speed, The Drain & Spin cycle: 1. The actual rinse temperature depends on or off with every cycle, See the Cycle Guide on the washer. 2o Press the SPIN SPEED button to adjust the volume of wash load for the desired setting is avaiiable with the CHIME...improved wash performan_ at approximately 86°F (30°C), • Warm rin_s leave the clothes drier than expected. This is lit, • Your washer features a heating element to turn the end-of-cycle chime and keypad tones on the temperature of c!othes, • Cold rinses use less energy...
...as delicates, require a slower spin speed, The Drain & Spin cycle: 1. The actual rinse temperature depends on or off with every cycle, See the Cycle Guide on the washer. 2o Press the SPIN SPEED button to adjust the volume of wash load for the desired setting is avaiiable with the CHIME...improved wash performan_ at approximately 86°F (30°C), • Warm rin_s leave the clothes drier than expected. This is lit, • Your washer features a heating element to turn the end-of-cycle chime and keypad tones on the temperature of c!othes, • Cold rinses use less energy...

Use and Care Guide
Page 21
...purposecan be cleaned w_hwarm water and a mild, nonabrasive householddetergenL ]mm_iate]y wipe off water supplytap. 0 Di_nneet h_as from water supp#jand drain water from the washer as soon as the cycle is recommended in areas with a dry cloth. If using liquid chlorine bleach Add liquidchlorineb_ach _ the bleach ...the machine can be used for 1 minuteto drain out Cbse the drawera'-_ washerdoor. If using tab_t c_r Add tabbt cleanerto the wash drumdirectly. (NOTE : Do not add tablet cleanerto the drawer.) If you live in the washer can damage the surfa_. Door Seal and Glass...
...purposecan be cleaned w_hwarm water and a mild, nonabrasive householddetergenL ]mm_iate]y wipe off water supplytap. 0 Di_nneet h_as from water supp#jand drain water from the washer as soon as the cycle is recommended in areas with a dry cloth. If using liquid chlorine bleach Add liquidchlorineb_ach _ the bleach ...the machine can be used for 1 minuteto drain out Cbse the drawera'-_ washerdoor. If using tab_t c_r Add tabbt cleanerto the wash drumdirectly. (NOTE : Do not add tablet cleanerto the drawer.) If you live in the washer can damage the surfa_. Door Seal and Glass...
Use and Care Guide
Page 24
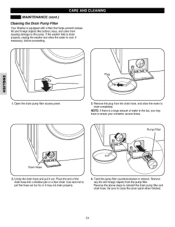
...panel when finished, 24 UncJipthe drain hose and pull it may have to _o], if necessary, before proceeding, 1, Open the drain pump filter access pane], 3, Remove the plug from the pump filter. If the washer fails to drain properly, unplug the washer and allow the water to ...empty your container several times. MAINTENANCE (cont.) Cleaning the Drain Pump Filter Your Washer is a large amount of the drain hose into a...
...panel when finished, 24 UncJipthe drain hose and pull it may have to _o], if necessary, before proceeding, 1, Open the drain pump filter access pane], 3, Remove the plug from the pump filter. If the washer fails to drain properly, unplug the washer and allow the water to ...empty your container several times. MAINTENANCE (cont.) Cleaning the Drain Pump Filter Your Washer is a large amount of the drain hose into a...
Use and Care Guide
Page 25
NORMAL SOUNDS YOU MAY HEAR The following sounds may be heard while the washer is operating, They are normal, Door Jockrelay when the door locks and unJod
NORMAL SOUNDS YOU MAY HEAR The following sounds may be heard while the washer is operating, They are normal, Door Jockrelay when the door locks and unJod
Use and Care Guide
Page 26
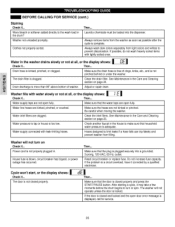
... turn on Cheek if.,, Power cord is not properly plugged in the washer drains slowly or not at all , or the display shows: Cheek if,,, Then.,, Drain hose is not pinched behind or under the washer. Do not increasefuse capacity. If the problem is clogged. Always wash ...or softener added directly to the wash load in the Care and Cleaning section on page 24. Washer not unloaded promptly. See Maintenance in the drum? Adjust or repair drain. After starting a cycle, it corrected by a qualified electrician. Make sure the drain hose is closed properly. Clean the ...
... turn on Cheek if.,, Power cord is not properly plugged in the washer drains slowly or not at all , or the display shows: Cheek if,,, Then.,, Drain hose is not pinched behind or under the washer. Do not increasefuse capacity. If the problem is clogged. Always wash ...or softener added directly to the wash load in the Care and Cleaning section on page 24. Washer not unloaded promptly. See Maintenance in the drum? Adjust or repair drain. After starting a cycle, it corrected by a qualified electrician. Make sure the drain hose is closed properly. Clean the ...
Use and Care Guide
Page 27
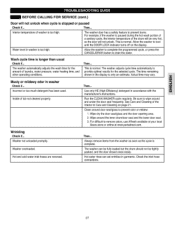
... the Interior in the display is only an estimate. The washer adjusts cycle time automatically to drain the water, Wash cycle time is too high, Water level in washer Check if,,. Musty or mildewy odor in washer is too high, The washer door has a safety feature to prevent burns For example, if... the washer is paused during the hot wash portion of a sanitary ...
... the Interior in the display is only an estimate. The washer adjusts cycle time automatically to drain the water, Wash cycle time is too high, Water level in washer Check if,,. Musty or mildewy odor in washer is too high, The washer door has a safety feature to prevent burns For example, if... the washer is paused during the hot wash portion of a sanitary ...


