
Use and Care Guide
Page 1
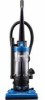
www.sears.com Printed in Korea Impreso en Korea Imprime en Korea Use & Care Guide Manual Del Propietario Manuel Du Propri_taire Vacuum Cleaner Aspiradora Aspirateur Model, Modelo, Modele 401.39000 (U.S.) CAUTION: Read and follow all safety and operating instructions before first use of this product. ATTENTION : Veuillez fire toutes les consignes de s6curite et le mode d'emploi avant d'utiliser ce produit. CUIDADO: Lea y sigue todas las instrucciones de operaci6n y seguridad antes del uso de este producto. Sears, Roebuck and Co., Hoffman Estates, IL 60179 U.S.A.
www.sears.com Printed in Korea Impreso en Korea Imprime en Korea Use & Care Guide Manual Del Propietario Manuel Du Propri_taire Vacuum Cleaner Aspiradora Aspirateur Model, Modelo, Modele 401.39000 (U.S.) CAUTION: Read and follow all safety and operating instructions before first use of this product. ATTENTION : Veuillez fire toutes les consignes de s6curite et le mode d'emploi avant d'utiliser ce produit. CUIDADO: Lea y sigue todas las instrucciones de operaci6n y seguridad antes del uso de este producto. Sears, Roebuck and Co., Hoffman Estates, IL 60179 U.S.A.
Use and Care Guide
Page 2
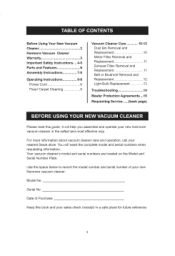
... numbers are located on the Model and Serial Number Plate. Serial No. Before Using Your New Vacuum Cleaner 2 Kenmore Vacuum Cleaner Warranty 3 Important Safety Instructions ... 4=5 Parts and Features 6 Assembly Instructions 7-8 Operating instructions 8-9 Power Cord 8 Flood Carpet Cleaning 9 Vacuum Cleaner Care 10-13 Dust Bin Removal and Replacement 10 Motor Filter Removal and Replacement 11 Exhaust Filter Removal and Replacement 11 Belt or Brushrolt Removal and Replacement 12 Light Bulb Replacement 13 Troubleshooting 14 Master Protection Agreements ...15 Requesting Service...
... numbers are located on the Model and Serial Number Plate. Serial No. Before Using Your New Vacuum Cleaner 2 Kenmore Vacuum Cleaner Warranty 3 Important Safety Instructions ... 4=5 Parts and Features 6 Assembly Instructions 7-8 Operating instructions 8-9 Power Cord 8 Flood Carpet Cleaning 9 Vacuum Cleaner Care 10-13 Dust Bin Removal and Replacement 10 Motor Filter Removal and Replacement 11 Exhaust Filter Removal and Replacement 11 Belt or Brushrolt Removal and Replacement 12 Light Bulb Replacement 13 Troubleshooting 14 Master Protection Agreements ...15 Requesting Service...

Use and Care Guide
Page 3
... of this product caused by the use for free repair. Sears shall not be product repair as provided herein. ONE YEAR LiMiTED WARRANTY ON KENMORE VACUUM CLEANER When installed, operated and maintained according to all instructions supplied with the product, if this appliance fails due to a defect in all instructions supplied with the product. 7. limitation of implied warranties; A service technician to clean or maintain this product. 4. This warranty gives you specific legal rights...
... of this product caused by the use for free repair. Sears shall not be product repair as provided herein. ONE YEAR LiMiTED WARRANTY ON KENMORE VACUUM CLEANER When installed, operated and maintained according to all instructions supplied with the product, if this appliance fails due to a defect in all instructions supplied with the product. 7. limitation of implied warranties; A service technician to clean or maintain this product. 4. This warranty gives you specific legal rights...

Use and Care Guide
Page 4
... use with this manual. Do not use without Dust Bin and filters in this vacuum cleaner. Do not run appliance over cord. Keep hair, loose clothing, fingers, and all controls before servicing. Do not unplug by cord, use an extension cord with any objects into water, return it to prevent tripping accidents. keep free of fire, electrical shock, injury to us. Do not use attachments designed for inspection. Keep the vacuum cleaner on a cord...
... use with this manual. Do not use without Dust Bin and filters in this vacuum cleaner. Do not run appliance over cord. Keep hair, loose clothing, fingers, and all controls before servicing. Do not unplug by cord, use an extension cord with any objects into water, return it to prevent tripping accidents. keep free of fire, electrical shock, injury to us. Do not use attachments designed for inspection. Keep the vacuum cleaner on a cord...

Use and Care Guide
Page 5
... THESE INSTRUCTIONS Proper assembly and safe use . Please pay special attention to these boxes and follow any instructions given. roper voltagieslistedonthecleaner plate. WARNIN:GThecordsw, iresa, nd/ orcablesuppliewdiththisproduct containcshemicalisn,cluding leadorleadcompoundksn,own tothestateofCaliforntiaocause cancearndbirthdefectosrother reproductihvaermW. This guide contains safety statements under warning and caution symbols. ashands afterusing. Read this Use & Care Guide carefully for Household use of your vacuum cleaner are your...
... THESE INSTRUCTIONS Proper assembly and safe use . Please pay special attention to these boxes and follow any instructions given. roper voltagieslistedonthecleaner plate. WARNIN:GThecordsw, iresa, nd/ orcablesuppliewdiththisproduct containcshemicalisn,cluding leadorleadcompoundksn,own tothestateofCaliforntiaocause cancearndbirthdefectosrother reproductihvaermW. This guide contains safety statements under warning and caution symbols. ashands afterusing. Read this Use & Care Guide carefully for Household use of your vacuum cleaner are your...

Use and Care Guide
Page 6
...-00004A 6602-001724 Accessories Crevice Tool Dust Brush/ Upholstery Tool Extension Wand Handle Carry Handle (Dust Bin Handle) Exhaust Filter (Exhaust Filter is important to know your vacuum cleaner. Item Headlight Belt Part No. it is located the door.) Headlight, Quick Release Upper Cord Wrap Power Cord" Power Combination Brush/ Upholstery Tool Handle Release Pedal Cord Clip Hose Clip Vacuum Hose Crevice Tool Extension Wand Lower Cord Wrap Hose Wand Hose Wand Base Power Nozzle Height Adjustment Knob Review these before using your vacuum cleaner's parts and features to assure its...
...-00004A 6602-001724 Accessories Crevice Tool Dust Brush/ Upholstery Tool Extension Wand Handle Carry Handle (Dust Bin Handle) Exhaust Filter (Exhaust Filter is important to know your vacuum cleaner. Item Headlight Belt Part No. it is located the door.) Headlight, Quick Release Upper Cord Wrap Power Cord" Power Combination Brush/ Upholstery Tool Handle Release Pedal Cord Clip Hose Clip Vacuum Hose Crevice Tool Extension Wand Lower Cord Wrap Hose Wand Hose Wand Base Power Nozzle Height Adjustment Knob Review these before using your vacuum cleaner's parts and features to assure its...

Use and Care Guide
Page 7
... handle firmly into the electrical supply until the handle is a gap, continue to lock into the hose clip on the back of the separate REPAIR PARTS LIST or on the carton. Attach the lower cord wrap by lining up the tab on the base with the corresponding notch on the cover of the vacuum handle. 4. Slide the end of your new Kenmore vacuum cleaner. Use this list...
... handle firmly into the electrical supply until the handle is a gap, continue to lock into the hose clip on the back of the separate REPAIR PARTS LIST or on the carton. Attach the lower cord wrap by lining up the tab on the base with the corresponding notch on the cover of the vacuum handle. 4. Slide the end of your new Kenmore vacuum cleaner. Use this list...

Use and Care Guide
Page 8
... power cord into a 120 Volt outlet located near the floor. 4. To store cord, turn upper cord wrap to items in surrounding area could result. * DO NOT use outlets above counters. EXTENSION WAND PLACEMENT Place the crevice tool (A) in the top of the vacuum. The power switch is wider than the other). If the plug does not fit fully in any way. 2. Do not change the plug...
... power cord into a 120 Volt outlet located near the floor. 4. To store cord, turn upper cord wrap to items in surrounding area could result. * DO NOT use outlets above counters. EXTENSION WAND PLACEMENT Place the crevice tool (A) in the top of the vacuum. The power switch is wider than the other). If the plug does not fit fully in any way. 2. Do not change the plug...

Use and Care Guide
Page 9
... pile carpet B 1. I/ Carry Handle (Dust Bin Handle) Press the handle release pedal, located on the lower left side of three cleaning positions. Turn Height Adjustment Knob to room. Lowest Setting - If your vacuum into one of the vacuum, with tools. 2. For storage and above floor cleaning with your foot to place your cleaner is difficult to push, adjust to the next higher setting. 1. HEIGHT ADJUST KNOB The power...
... pile carpet B 1. I/ Carry Handle (Dust Bin Handle) Press the handle release pedal, located on the lower left side of three cleaning positions. Turn Height Adjustment Knob to room. Lowest Setting - If your vacuum into one of the vacuum, with tools. 2. For storage and above floor cleaning with your foot to place your cleaner is difficult to push, adjust to the next higher setting. 1. HEIGHT ADJUST KNOB The power...

Use and Care Guide
Page 10
... the dust bin to body properly. Attach the hook located on thumb button to the vacuum body. 10 Hold dust bin over waste receptacle and push down on the dust bin handle to release contents. After emptying dirt, fit the groove located on the cleaner body. After emptying dust bin, ensure that dust bin is empty, open the cover and clean the cyclone grille. VACUUM CLEANER CARE z WARNING Electrical Shock...
... the dust bin to body properly. Attach the hook located on thumb button to the vacuum body. 10 Hold dust bin over waste receptacle and push down on the dust bin handle to release contents. After emptying dirt, fit the groove located on the cleaner body. After emptying dust bin, ensure that dust bin is empty, open the cover and clean the cyclone grille. VACUUM CLEANER CARE z WARNING Electrical Shock...
Use and Care Guide
Page 11
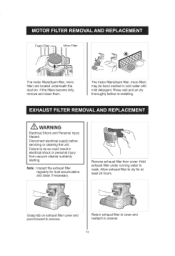
... electrical supply before re-installing. Remove exhaust filter from vacuum cleaner suddenly starting. Grasp tab on exhaust filter cover and pivot forward to cleaner. 11 Return exhaust filter to cover and reattach to remove. Note : Inspect the exhaust filter regularly for at least 24 hours. Allow exhaust filter to wash. Rinse well and air dry thoroughly before servicing or cleaning the unit. The motor filters(foam filter, micro filter) may be hand washed in electrical...
... electrical supply before re-installing. Remove exhaust filter from vacuum cleaner suddenly starting. Grasp tab on exhaust filter cover and pivot forward to cleaner. 11 Return exhaust filter to cover and reattach to remove. Note : Inspect the exhaust filter regularly for at least 24 hours. Allow exhaust filter to wash. Rinse well and air dry thoroughly before servicing or cleaning the unit. The motor filters(foam filter, micro filter) may be hand washed in electrical...
Use and Care Guide
Page 12
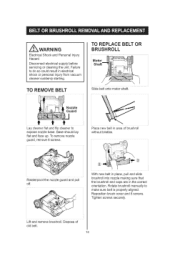
... from vacuum cleaner suddenly starting. Rotate/pivot the nozzle guard and pull off. Rotate brushroll manually to do so could result in the correct orientation. Tighten screws securely. Failure to make sure belt is properly aligned. Reposition brush cover and 6 screws. Z_WARNING Electrical Shock and Personal Injury Hazard Disconnect electrical supply before servicing or cleaning the unit. Nozzle uard t tt Lay cleaner flat...
... from vacuum cleaner suddenly starting. Rotate/pivot the nozzle guard and pull off. Rotate brushroll manually to do so could result in the correct orientation. Tighten screws securely. Failure to make sure belt is properly aligned. Reposition brush cover and 6 screws. Z_WARNING Electrical Shock and Personal Injury Hazard Disconnect electrical supply before servicing or cleaning the unit. Nozzle uard t tt Lay cleaner flat...

Use and Care Guide
Page 13
Install the new bulb by grasping bulb and pulling straight out. 3. Using a screwdriver, remove a screw as shown and lift off the lens. 2. TO REPLACE LIGHT BULB 4. Failure to do so could result in electrical shock or personal injury from the socket by pushing it gently into the socket until the bulb snaps into place. Z WARNING Electrical Shock and Personal Injury Hazard Disconnect electrical supply before servicing or cleaning the unit. Remove the bulb from vacuum cleaner suddenly starting. 1. Reposition lens and secure with a screw. 13
Install the new bulb by grasping bulb and pulling straight out. 3. Using a screwdriver, remove a screw as shown and lift off the lens. 2. TO REPLACE LIGHT BULB 4. Failure to do so could result in electrical shock or personal injury from the socket by pushing it gently into the socket until the bulb snaps into place. Z WARNING Electrical Shock and Personal Injury Hazard Disconnect electrical supply before servicing or cleaning the unit. Remove the bulb from vacuum cleaner suddenly starting. 1. Reposition lens and secure with a screw. 13
Use and Care Guide
Page 14
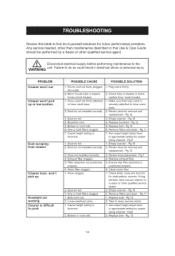
... Clean motor filter 1. Dust escaping from cleaner Cleaner tools won 't pick up Headlight not working Cleaner is securely attached to appropriate setting for obstructions: remove. Carpet height setting is incorrect. 2. Filter assembly not positioned properly. 6. Check fuse or breaker in electrical shock or personal injury. Review dust bin removal and replacement - Replace exhaust filter. 5. Pg.12 6. Review dust bin removal and replacement - Pg.9 2. Review this Use & Care Guide should be performed by a Sears or other qualified service agent. Power cord not firmly plugged...
... Clean motor filter 1. Dust escaping from cleaner Cleaner tools won 't pick up Headlight not working Cleaner is securely attached to appropriate setting for obstructions: remove. Carpet height setting is incorrect. 2. Filter assembly not positioned properly. 6. Check fuse or breaker in electrical shock or personal injury. Review dust bin removal and replacement - Replace exhaust filter. 5. Pg.12 6. Review dust bin removal and replacement - Pg.9 2. Review this Use & Care Guide should be performed by a Sears or other qualified service agent. Power cord not firmly plugged...
Use and Care Guide
Page 15
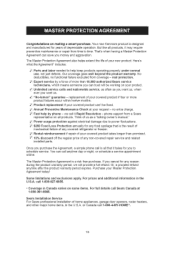
... help keep products operating properly under normal use, not just defects. real protection. ,/ Expert service by phone - replacement of more product failures occur within twelve months. Annual Preventive Maintenance Check at 1-800-361-6665. You can save you to help by a force of your request - The Master Protection Agreement is all that is designed and manufactured for any non-covered repair service and related installed parts...
... help keep products operating properly under normal use, not just defects. real protection. ,/ Expert service by phone - replacement of more product failures occur within twelve months. Annual Preventive Maintenance Check at 1-800-361-6665. You can save you to help by a force of your request - The Master Protection Agreement is all that is designed and manufactured for any non-covered repair service and related installed parts...
Use and Care Guide
Page 16
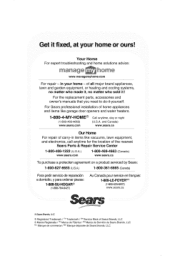
... depos6e de Sears Brands, LLC For the replacement parts, accessories and owner's manuals that you need to do-it ! Your Home For expert troubleshooting and home solutions advice: m aria g@ _ horn@ www,managemyhome.com For repair - and Canada) www.sears.ca Our Home For repair of carry-in your home or ours! For Sears professional installation of home appliances and items like vacuums, lawn...
... depos6e de Sears Brands, LLC For the replacement parts, accessories and owner's manuals that you need to do-it ! Your Home For expert troubleshooting and home solutions advice: m aria g@ _ horn@ www,managemyhome.com For repair - and Canada) www.sears.ca Our Home For repair of carry-in your home or ours! For Sears professional installation of home appliances and items like vacuums, lawn...


