
Owners Manual
Page 1
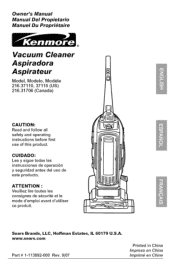
... Impreso en China Imprim_ en Chine CUIDADO: Lea y sigue todas las instrucciones de operaci6n y seguridad antes del use of this product. Owner's Manual Manuel Manual Del Propietario Du Proprietaire Vacuum Cleaner Aspiradora Aspirateur Model, Modelo, Modele 216.37110,37115(US) 216.31706(Canada) CAUTION: Read and follow all safety and operating instructions before first use de este producto. Sears Brands, LLC, Hoffman Estates, IL 60179 U.S.A.
... Impreso en China Imprim_ en Chine CUIDADO: Lea y sigue todas las instrucciones de operaci6n y seguridad antes del use of this product. Owner's Manual Manuel Manual Del Propietario Du Proprietaire Vacuum Cleaner Aspiradora Aspirateur Model, Modelo, Modele 216.37110,37115(US) 216.31706(Canada) CAUTION: Read and follow all safety and operating instructions before first use de este producto. Sears Brands, LLC, Hoffman Estates, IL 60179 U.S.A.
Owners Manual
Page 2
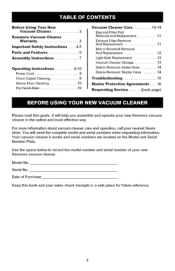
... Debris Removal: Nozzle Valve ......... 14 Troubleshooting 15 Master Protection Agreements ,.. 16 Requesting Service ...... (back page) Please read this book and your new Kenmore vacuum cleaner in a safe place for future reference. You will help you assemble and operate your sales check (receipt) in the safest and most effective way. Use the space below to record the model number and serial number of Purchase Keep this guide. Serial No. Model No. Before Using Your New Vacuum Cleaner 2 Kenmore Vacuum Cleaner Warranty...
... Debris Removal: Nozzle Valve ......... 14 Troubleshooting 15 Master Protection Agreements ,.. 16 Requesting Service ...... (back page) Please read this book and your new Kenmore vacuum cleaner in a safe place for future reference. You will help you assemble and operate your sales check (receipt) in the safest and most effective way. Use the space below to record the model number and serial number of Purchase Keep this guide. Serial No. Model No. Before Using Your New Vacuum Cleaner 2 Kenmore Vacuum Cleaner Warranty...
Owners Manual
Page 3
... or failure of this product if it to any Sears store, Sears Parts & Repair Service Center, or other Kenmore outlet for other than its intended purpose. 6. Damage to or failure of this product resulting from state to state. Damage to or failure of parts or systems resulting from normal use, including but not limited to filters, belts, light bulbs, and bags. 2. Some states and...
... or failure of this product if it to any Sears store, Sears Parts & Repair Service Center, or other Kenmore outlet for other than its intended purpose. 6. Damage to or failure of this product resulting from state to state. Damage to or failure of parts or systems resulting from normal use, including but not limited to filters, belts, light bulbs, and bags. 2. Some states and...
Owners Manual
Page 4
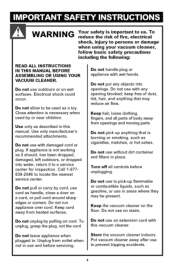
... vacuum cleaner, follow basic safety precautions including the following: READ ALL INSTRUCTIONS IN THIS MANUAL BEFORE ASSEMBLING OR USING YOUR VACUUM CLEANER. Do not handle plug or appliance with this manual. keep free of body away from openings and moving parts. Turn off all parts of dust, lint, hair, and anything that may be used by cord, use cord as it to prevent tripping accidents. Do not unplug by pulling on the floor...
... vacuum cleaner, follow basic safety precautions including the following: READ ALL INSTRUCTIONS IN THIS MANUAL BEFORE ASSEMBLING OR USING YOUR VACUUM CLEANER. Do not handle plug or appliance with this manual. keep free of body away from openings and moving parts. Turn off all parts of dust, lint, hair, and anything that may be used by cord, use cord as it to prevent tripping accidents. Do not unplug by pulling on the floor...
Owners Manual
Page 5
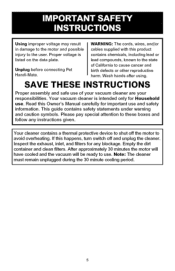
... cords, wires, and/or in damage to the motor and possible cables supplied with this product injury to use. birth defects or other reproductive harm. Your cleaner contains a thermal protective device to avoid overheating. Wash hands after using. Empty the dirt container and clean filters. Your vacuum cleaner is contains chemicals, including lead or listed on the data plate. Please pay special attention to the state of your vacuum cleaner...
... cords, wires, and/or in damage to the motor and possible cables supplied with this product injury to use. birth defects or other reproductive harm. Your cleaner contains a thermal protective device to avoid overheating. Wash hands after using. Empty the dirt container and clean filters. Your vacuum cleaner is contains chemicals, including lead or listed on the data plate. Please pay special attention to the state of your vacuum cleaner...
Owners Manual
Page 6
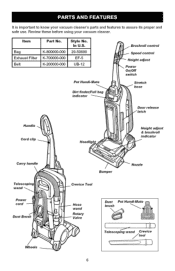
Item Part No, Bag Exhaust Filter Belt K-800000-000 K-700000-000 K-200000-000 Style No, In U.S. 20-50690 EF-5 UB-12 Pet Handi-Mate Speed control Height adjust Power On/Off switch Stretch Dirt finder/Full bag indicator Door release Handle Height adjust & brushroll indicator Carry handle \ Telescoping Power cord Dust Brush Wheels Bumper Crevice Tool Nozzle Hose wand Rotary Telescoping wand Crevice tool It is important to know your vacuum cleaner's parts and features to assure its proper and safe use, Review these before using your vacuum cleaner.
Item Part No, Bag Exhaust Filter Belt K-800000-000 K-700000-000 K-200000-000 Style No, In U.S. 20-50690 EF-5 UB-12 Pet Handi-Mate Speed control Height adjust Power On/Off switch Stretch Dirt finder/Full bag indicator Door release Handle Height adjust & brushroll indicator Carry handle \ Telescoping Power cord Dust Brush Wheels Bumper Crevice Tool Nozzle Hose wand Rotary Telescoping wand Crevice tool It is important to know your vacuum cleaner's parts and features to assure its proper and safe use, Review these before using your vacuum cleaner.
Owners Manual
Page 7
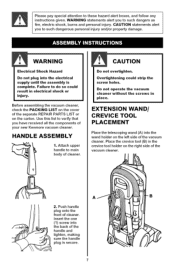
... (1) screw into the electrical supply until the assembly is secure. Failure to main body of the separate REPAIR PARTS LIST or on the cover of cleaner. Attach upper handle to do so could strip the Do not operate the vacuum cleaner without the screws in the crevice tool holder on the left side of your new Kenmore vacuum cleaner, HANDLE ASSEMBLY 1. Before assembling the vacuum cleaner, check the PACKING LIST on the carton...
... (1) screw into the electrical supply until the assembly is secure. Failure to main body of the separate REPAIR PARTS LIST or on the cover of cleaner. Attach upper handle to do so could strip the Do not operate the vacuum cleaner without the screws in the crevice tool holder on the left side of your new Kenmore vacuum cleaner, HANDLE ASSEMBLY 1. Before assembling the vacuum cleaner, check the PACKING LIST on the carton...
Owners Manual
Page 8
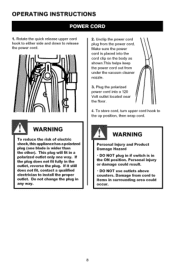
... Occur. To store cord, turn upper cord hook to install the proper outlet. If it still does not fit, contact a qualified electrician to the up position, then wrap cord. Damage from under the vacuum cleaner nozzle. 3. Plug the polarized power cord into the cord clip on the body as shown.This helps keep the power cord out from cord to release the power cord. OPERATING INSTRUCTIONS 1. Rotate the quick release upper cord hook to either...
... Occur. To store cord, turn upper cord hook to install the proper outlet. If it still does not fit, contact a qualified electrician to the up position, then wrap cord. Damage from under the vacuum cleaner nozzle. 3. Plug the polarized power cord into the cord clip on the body as shown.This helps keep the power cord out from cord to release the power cord. OPERATING INSTRUCTIONS 1. Rotate the quick release upper cord hook to either...
Owners Manual
Page 9
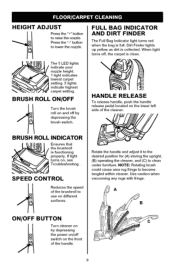
... nozzle. BRUSH ROLL ON/OFF Turn the brush roll on , see Troubleshooting. If light turns on and off by depressing the power on/off , the carpet is full. A B ON/OFF BUTTON Turn cleaner on by depressing the brush switch, FULL BAG INDICATOR AND DIRT FINDER The Full Bag Indicator light turns red when the bag is clean. \ HANDLE RELEASE To release handle, push the handle release pedal located on the front of the handle. Use caution when vacuuming any rugs with fringe. When light turns off switch...
... nozzle. BRUSH ROLL ON/OFF Turn the brush roll on , see Troubleshooting. If light turns on and off by depressing the power on/off , the carpet is full. A B ON/OFF BUTTON Turn cleaner on by depressing the brush switch, FULL BAG INDICATOR AND DIRT FINDER The Full Bag Indicator light turns red when the bag is clean. \ HANDLE RELEASE To release handle, push the handle release pedal located on the front of the handle. Use caution when vacuuming any rugs with fringe. When light turns off switch...
Owners Manual
Page 10
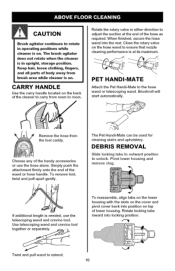
... parts of the handy accessories or use the telescoping wand and crevice tool. Rotate the rotary valve in either direction to adjust the suction at its maximum. PET HANDI-MATE Attach the Pet Handi-Mate to unlock. The Pet Handi-Mate can be used for cleaning stairs and upholstery. If additional length is on . CAUTION Brush agitator continues to rotate in upright, storage position. The brush agitator...
... parts of the handy accessories or use the telescoping wand and crevice tool. Rotate the rotary valve in either direction to adjust the suction at its maximum. PET HANDI-MATE Attach the Pet Handi-Mate to unlock. The Pet Handi-Mate can be used for cleaning stairs and upholstery. If additional length is on . CAUTION Brush agitator continues to rotate in upright, storage position. The brush agitator...
Owners Manual
Page 11
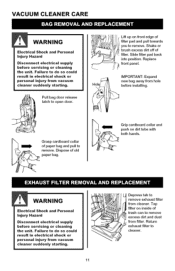
... Disconnect electrical supply before servicing or cleaning the unit. Return exhaust filter to open door. IMPORTANT: Expand new bag away from filter. VACUUM CLEANER CARE WARNING Electrical Shock and Personal Injury Hazard Disconnect electrical supply before servicing or cleaning the unit. Slide filter pad back into position, Replace front panel. Failure to remove I execpersesss ditrat bantod dust from hole before installing, Grasp cardboard collar of filter. Tap filter on dirt tube with both hands...
... Disconnect electrical supply before servicing or cleaning the unit. Return exhaust filter to open door. IMPORTANT: Expand new bag away from filter. VACUUM CLEANER CARE WARNING Electrical Shock and Personal Injury Hazard Disconnect electrical supply before servicing or cleaning the unit. Slide filter pad back into position, Replace front panel. Failure to remove I execpersesss ditrat bantod dust from hole before installing, Grasp cardboard collar of filter. Tap filter on dirt tube with both hands...
Owners Manual
Page 12
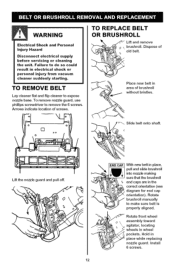
Rotate front wheel \ assembly toward agitator, locating wheels in area of brushroll without bristles. Install 6 screws, Rotate brushroll manually to do so could result in electrical shock or personal injury from vacuum cleaner suddenly starting. Arrows indicate location of _ i Lift and remove Place new belt in wheel pockets. Failure to make sure belt is properly aligned. TO REMOVE BELT Lay cleaner flat and flip cleaner to expose nozzle base, To remove nozzle guard, use phillips screwdriver...
Rotate front wheel \ assembly toward agitator, locating wheels in area of brushroll without bristles. Install 6 screws, Rotate brushroll manually to do so could result in electrical shock or personal injury from vacuum cleaner suddenly starting. Arrows indicate location of _ i Lift and remove Place new belt in wheel pockets. Failure to make sure belt is properly aligned. TO REMOVE BELT Lay cleaner flat and flip cleaner to expose nozzle base, To remove nozzle guard, use phillips screwdriver...
Owners Manual
Page 13
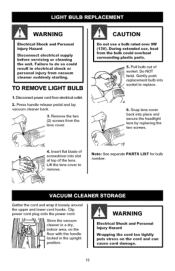
... use , heat from the bulb could result in the upright position, WARNING Electrical Shock and Personal Injury Hazard Wrapping the cord too tightly puts stress on the floor with the handle locked in electrical shock or personal injury from vacuum cleaner suddenly starting. Do NOT 6. Remove the two (2) screws from elec_ical outlet. 2. Pull bulb out of Note: See separate PARTS LIST for bulb number...
... use , heat from the bulb could result in the upright position, WARNING Electrical Shock and Personal Injury Hazard Wrapping the cord too tightly puts stress on the floor with the handle locked in electrical shock or personal injury from vacuum cleaner suddenly starting. Do NOT 6. Remove the two (2) screws from elec_ical outlet. 2. Pull bulb out of Note: See separate PARTS LIST for bulb number...
Owners Manual
Page 14
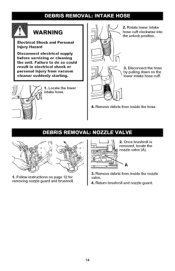
.... 4. Remove debris from vacuum cleaner suddenly starting. 1. Return brushroll and nozzle guard. 14 thhoeseuncloucffk clpoocskiwtioisne, into 2. Disconnect the hose by pulling down on page 12 for removing nozzle guard and brushroll, 3. Rotate lower intake 3. Remove debris from inside the hose, 2re. Locate the lower intake hose. Follow instructions on the lower intake hose cuff. 4. WARNING Electrical Shock and Personal Injury Hazard Disconnect electrical supply before servicing or cleaning...
.... 4. Remove debris from vacuum cleaner suddenly starting. 1. Return brushroll and nozzle guard. 14 thhoeseuncloucffk clpoocskiwtioisne, into 2. Disconnect the hose by pulling down on page 12 for removing nozzle guard and brushroll, 3. Rotate lower intake 3. Remove debris from inside the hose, 2re. Locate the lower intake hose. Follow instructions on the lower intake hose cuff. 4. WARNING Electrical Shock and Personal Injury Hazard Disconnect electrical supply before servicing or cleaning...
Owners Manual
Page 15
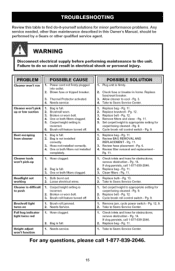
... electrical supply before performing maintenance to Sears Service Center. 1. Cleaner won't run Cleaner won't pick up or low suction Dust escaping from cleaner Cleaner tools won 't function 2. Blown fuse or tripped breaker 3. Needs service. 1. Bag is full. 1. Carpet height setting is full. 2. Brush roll feature turned off , 1. Bag is incorrect. 6. One or both filters not installed completely, 1. Hose clogged. Headlight not working Cleaner is incorrect. 2. Bulb burnt out, 2. Carpet height setting is difficult to appropriate setting for obstructions; Broken...
... electrical supply before performing maintenance to Sears Service Center. 1. Cleaner won't run Cleaner won't pick up or low suction Dust escaping from cleaner Cleaner tools won 't function 2. Blown fuse or tripped breaker 3. Needs service. 1. Bag is full. 1. Carpet height setting is full. 2. Brush roll feature turned off , 1. Bag is incorrect. 6. One or both filters not installed completely, 1. Hose clogged. Headlight not working Cleaner is incorrect. 2. Bulb burnt out, 2. Carpet height setting is difficult to appropriate setting for obstructions; Broken...

Owners Manual
Page 16
... new product. Sears Installation Service For Sears professional installation of home appliances, garage door openers, water heaters, and other major home items, in the U.S.A. Our coverage goes well beyond the product warranty, No deductibles, no extra charge. [] Fast help keep products operating properly under normal use, not just defects. The Master Protection Agreement also helps extend the life of dependable operation. Some limitations and exclusions apply. You can 't be working...
... new product. Sears Installation Service For Sears professional installation of home appliances, garage door openers, water heaters, and other major home items, in the U.S.A. Our coverage goes well beyond the product warranty, No deductibles, no extra charge. [] Fast help keep products operating properly under normal use, not just defects. The Master Protection Agreement also helps extend the life of dependable operation. Some limitations and exclusions apply. You can 't be working...
Owners Manual
Page 17
...: Lea y sigue todas las instrucciones de operaci6n y seguridad antes del use of this product. Owner's Manual Manuel Manual Del Propietario Du Proprietaire Vacuum Cleaner Aspiradora Aspirateur Model, Modelo, Modele 216.37110,37115(US) 216.31706(Canada) CAUTION: Read and follow all safety and operating instructions before first use de este producto. www.sears.com Part # 1-113892-000 Rev. 9/07 Printed in China Impreso en China Imprim_...
...: Lea y sigue todas las instrucciones de operaci6n y seguridad antes del use of this product. Owner's Manual Manuel Manual Del Propietario Du Proprietaire Vacuum Cleaner Aspiradora Aspirateur Model, Modelo, Modele 216.37110,37115(US) 216.31706(Canada) CAUTION: Read and follow all safety and operating instructions before first use de este producto. www.sears.com Part # 1-113892-000 Rev. 9/07 Printed in China Impreso en China Imprim_...

Owners Manual
Page 33
Owner's Manual Manuel Manual Del Propietario Du Proprietaire Vacuum Cleaner Aspiradora Aspirateur Model, Modelo, Modele 216.37110,37115(US) 216.31706(Canada) CAUTION: Read and follow all safety and operating instructions before first use de este producto. ATTENTION : Veuillez lire toutes les consignes de s6curit6 et le mode d'emploi avant d'utiliser ce produit. CUIDADO: Lea y sigue todas las instrucciones ...
Owner's Manual Manuel Manual Del Propietario Du Proprietaire Vacuum Cleaner Aspiradora Aspirateur Model, Modelo, Modele 216.37110,37115(US) 216.31706(Canada) CAUTION: Read and follow all safety and operating instructions before first use de este producto. ATTENTION : Veuillez lire toutes les consignes de s6curit6 et le mode d'emploi avant d'utiliser ce produit. CUIDADO: Lea y sigue todas las instrucciones ...
Owners Manual
Page 49
Your Home For repair - For the replacement parts, accessories and owner's manuals that you need to do-it ! and Canada) www.sears.ca For expert home solutions advice: www.managemyhome.com Our Home For repair of Sears Brands, LLC ® Marca Registrada / TMMarca de Fabdca / sMMarca de Servicio de Sears Brands, LLC McMarque de commerce / MoMarque deposee de Sears Brands, LLC only...
Your Home For repair - For the replacement parts, accessories and owner's manuals that you need to do-it ! and Canada) www.sears.ca For expert home solutions advice: www.managemyhome.com Our Home For repair of Sears Brands, LLC ® Marca Registrada / TMMarca de Fabdca / sMMarca de Servicio de Sears Brands, LLC McMarque de commerce / MoMarque deposee de Sears Brands, LLC only...


