
Owners Manual
Page 1
... d'utiliser ce produito Sears Brands, LLC, Hoffman www.sears.com Estates, IL 60179 U.S.A. Part # 1-113890-000 Rev, 9/07 Printed in China Impreso en China Imprim6 en Chine Owner's Manual Manual Del Propietario Manuel Du Propri_taire ® Vacuum Cleaner Aspiradora Aspirateur [3 Model, Modelo, Mod61e 216.37100, 37105 (US) 216.31704 (Canada) CAUTION: Read and follow all safety and operating instructions before first use of this...
... d'utiliser ce produito Sears Brands, LLC, Hoffman www.sears.com Estates, IL 60179 U.S.A. Part # 1-113890-000 Rev, 9/07 Printed in China Impreso en China Imprim6 en Chine Owner's Manual Manual Del Propietario Manuel Du Propri_taire ® Vacuum Cleaner Aspiradora Aspirateur [3 Model, Modelo, Mod61e 216.37100, 37105 (US) 216.31704 (Canada) CAUTION: Read and follow all safety and operating instructions before first use of this...

Owners Manual
Page 2
...number and serial number of Purchase Keep this guide. Serial No. Before Using Your New Vacuum Cleaner 2 Kenmore Vacuum Cleaner Warranty 3 important Safety Instructions ..... 4-5 Parts and Features 6 Assembly Instructions 7 Operating Instructions Power Cord Floor/Carpet Cleaning Above Floor Cleaning Pet Handi-Mate 8_10 8 9 10 10 Vacuum Cleaner Care .......... 10-14 Bag and Filter Pad Removal and Replacement 11 Exhaust Filter Removal And Replacement 11 Belt or Brushroll Removal And Replacement 12 Light Bulb Replacement 13 Vacuum Cleaner...
...number and serial number of Purchase Keep this guide. Serial No. Before Using Your New Vacuum Cleaner 2 Kenmore Vacuum Cleaner Warranty 3 important Safety Instructions ..... 4-5 Parts and Features 6 Assembly Instructions 7 Operating Instructions Power Cord Floor/Carpet Cleaning Above Floor Cleaning Pet Handi-Mate 8_10 8 9 10 10 Vacuum Cleaner Care .......... 10-14 Bag and Filter Pad Removal and Replacement 11 Exhaust Filter Removal And Replacement 11 Belt or Brushroll Removal And Replacement 12 Light Bulb Replacement 13 Vacuum Cleaner...

Owners Manual
Page 3
.... A service technician to clean or maintain this product. 4_ Damage to or failure of merchantability or fitness, so these exclusions or limitations may also have other than those recommended in all instructions supplied with the product, if this limited warranty shall be liable for free repair,. Damage to or failure of implied warranties; ONE YEAR LIMITED WARRANTY ON KENMORE VACUUM CLEANER When installed, operated and...
.... A service technician to clean or maintain this product. 4_ Damage to or failure of merchantability or fitness, so these exclusions or limitations may also have other than those recommended in all instructions supplied with the product, if this limited warranty shall be liable for free repair,. Damage to or failure of implied warranties; ONE YEAR LIMITED WARRANTY ON KENMORE VACUUM CLEANER When installed, operated and...

Owners Manual
Page 4
... dirt container and filters in . keep free of fire, electrical shock, injury to be present. Do not allow to persons or damage when using your vacuum cleaner, follow basic safety precautions including the following: READ ALL INSTRUCTIONS IN THIS MANUAL BEFORE ASSEMBLING OR USING YOUR VACUUM CLEANER. Close attention is burning or smoking, such as a toy. Do not run appliance over cord. Keep cord away from openings and moving parts...
... dirt container and filters in . keep free of fire, electrical shock, injury to be present. Do not allow to persons or damage when using your vacuum cleaner, follow basic safety precautions including the following: READ ALL INSTRUCTIONS IN THIS MANUAL BEFORE ASSEMBLING OR USING YOUR VACUUM CLEANER. Close attention is burning or smoking, such as a toy. Do not run appliance over cord. Keep cord away from openings and moving parts...
Owners Manual
Page 5
... to use . SAVE INSTRUCTIONS Proper assembly and safe use and safety information. Please pay special attention to shut off and unplug the cleaner. Using improper voltage may result in damage to the motor and possible injury to the state of your vacuum cleaner are your responsibilities. Inspect the exhaust, inlet, and filters for Household use . Empty the dirt container and clean filters. Wash hands after using. This guide...
... to use . SAVE INSTRUCTIONS Proper assembly and safe use and safety information. Please pay special attention to shut off and unplug the cleaner. Using improper voltage may result in damage to the motor and possible injury to the state of your vacuum cleaner are your responsibilities. Inspect the exhaust, inlet, and filters for Household use . Empty the dirt container and clean filters. Wash hands after using. This guide...
Owners Manual
Page 6
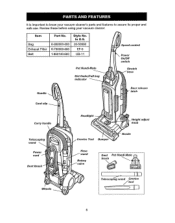
Item Bag Exhaust Filter Belt Part No. In U,S. 20-50690 EF-5 UB-11 Pet Handi-Mate _peed control Power On/Off switch Stretch Dirt finder/Full bag indicator Handle Door release latch Cord clip Carry handle \ Telescoping wand Power cord Dust Brush Wheels Headlight Height adjust knob Bumpe, Nozzle Hose wand Rotary Dust Pet Handi,Mate / Telescoping wand Crevice tool I(-800000-000 }(-700000-000 1-860140-600 Style No. It is important to assure its proper and safe use. Review these before using your vacuum cleaner's parts and features to know your vacuum cleaner.
Item Bag Exhaust Filter Belt Part No. In U,S. 20-50690 EF-5 UB-11 Pet Handi-Mate _peed control Power On/Off switch Stretch Dirt finder/Full bag indicator Handle Door release latch Cord clip Carry handle \ Telescoping wand Power cord Dust Brush Wheels Headlight Height adjust knob Bumpe, Nozzle Hose wand Rotary Dust Pet Handi,Mate / Telescoping wand Crevice tool I(-800000-000 }(-700000-000 1-860140-600 Style No. It is important to assure its proper and safe use. Review these before using your vacuum cleaner's parts and features to know your vacuum cleaner.

Owners Manual
Page 7
... operate the vacuum cleaner without the screws in electrical shock or injury. HANDLE ASSEMBLY 1. Attach upper handle to verify that you have received all the components of cleaner. Overtightening screw holes. Push handle plug onto the front of the vacuum cleaner.. Use this list to main body of your new Kenmore vacuum cleaner. could result in place. Please pay special attention to these hazard alert boxes, and follow any instructions...
... operate the vacuum cleaner without the screws in electrical shock or injury. HANDLE ASSEMBLY 1. Attach upper handle to verify that you have received all the components of cleaner. Overtightening screw holes. Push handle plug onto the front of the vacuum cleaner.. Use this list to main body of your new Kenmore vacuum cleaner. could result in place. Please pay special attention to these hazard alert boxes, and follow any instructions...

Owners Manual
Page 8
... outlet located near the floor_ 4. To store cord, turn upper cord hook to install the proper outlet. DO NOT use outlets above counters. OPERATING INSTRUCTIONS 1 hook the _ase WARNING ance has a polarized This plug will fit in the outlet, reverse the plug. Plug the polarized power cord into the cord clip on the body as shownoThis helps keep the power cord out from under the vacuum cleaner nozzle.. 3. DO NOT plug in...
... outlet located near the floor_ 4. To store cord, turn upper cord hook to install the proper outlet. DO NOT use outlets above counters. OPERATING INSTRUCTIONS 1 hook the _ase WARNING ance has a polarized This plug will fit in the outlet, reverse the plug. Plug the polarized power cord into the cord clip on the body as shownoThis helps keep the power cord out from under the vacuum cleaner nozzle.. 3. DO NOT plug in...
Owners Manual
Page 9
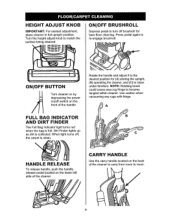
... BUTTON Turn cleaner on by depressing the power on the front of the handle. Turn the height adjust knob to become tangled within cleaner._ Use caution when vacuuming any rugs with fringe. HEIGHT ADJUST KNOB IMPORTANT: For easiest adjustment, place cleaner in full upright position. A B C HANDLE RELEASE To release handle, push the handle release pedal located on the back of the cleaner. FULL BAG INDICATOR AND DIRT FINDER The Full Bag Indicator light turns red...
... BUTTON Turn cleaner on by depressing the power on the front of the handle. Turn the height adjust knob to become tangled within cleaner._ Use caution when vacuuming any rugs with fringe. HEIGHT ADJUST KNOB IMPORTANT: For easiest adjustment, place cleaner in full upright position. A B C HANDLE RELEASE To release handle, push the handle release pedal located on the back of the cleaner. FULL BAG INDICATOR AND DIRT FINDER The Full Bag Indicator light turns red...
Owners Manual
Page 10
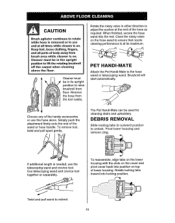
... Brush agitator continues to rotate while hose is removed or in use and at all parts of lower housing,, Rotate locking tabs inward into locking position. will start automatically,, Choose any of the wand or hose handle. When finished, secure the hose wand into position on . DEBRIS REMOVAL Slide locking tabs to outward position to ensure that no771e cleaning performance is on. Remove the hose from floor...
... Brush agitator continues to rotate while hose is removed or in use and at all parts of lower housing,, Rotate locking tabs inward into locking position. will start automatically,, Choose any of the wand or hose handle. When finished, secure the hose wand into position on . DEBRIS REMOVAL Slide locking tabs to outward position to ensure that no771e cleaning performance is on. Remove the hose from floor...

Owners Manual
Page 11
...,IHI,H Pull bag door release latch to do so could result in electrical shock or personal injury from vacuum cleaner suddenly starting . to remove excess dirt and dust from cleaner, Tap filter on dirt tube with both hands° I WARNING Electrical Shock and Personal Injury Hazard Disconnect electrical supply before servicing or cleaning the unit. Failure to open door., Grasp cardboard collar of filter. Replace front panel. Slide filter pad back into...
...,IHI,H Pull bag door release latch to do so could result in electrical shock or personal injury from vacuum cleaner suddenly starting . to remove excess dirt and dust from cleaner, Tap filter on dirt tube with both hands° I WARNING Electrical Shock and Personal Injury Hazard Disconnect electrical supply before servicing or cleaning the unit. Failure to open door., Grasp cardboard collar of filter. Replace front panel. Slide filter pad back into...
Owners Manual
Page 12
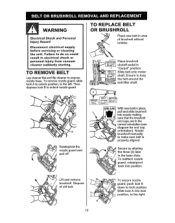
TO REPLACE BELT OR BRUSHROLL Place new belt in electrical shock or personal injury from vacuum cleaner suddenly starting. Ensure to the right. position, to loop the belt around the belt lifter shaff_ Rotate/pivot the nozzle guard and /, pull off f Lift and remove brushrolL Dispose of brushroll without bristles. Failure to the left. To remove nozzle guard, slide lock A to unlock position, to do...
TO REPLACE BELT OR BRUSHROLL Place new belt in electrical shock or personal injury from vacuum cleaner suddenly starting. Ensure to the right. position, to loop the belt around the belt lifter shaff_ Rotate/pivot the nozzle guard and /, pull off f Lift and remove brushrolL Dispose of brushroll without bristles. Failure to the left. To remove nozzle guard, slide lock A to unlock position, to do...

Owners Manual
Page 13
... cover to replace.. 6. Note: See separate PARTS LIST for bulb number,, Gather the cord and wrap it loosely around the upper and lower cord hooks° Lock power cord plug onto the power cord,, Store the vacuum cleaner in a dry, indoor area, on the cord and can cause cord damage. Remove the two (2) screws from the bulb could result in the upright position. CAUTION Do not use a bulb rated...
... cover to replace.. 6. Note: See separate PARTS LIST for bulb number,, Gather the cord and wrap it loosely around the upper and lower cord hooks° Lock power cord plug onto the power cord,, Store the vacuum cleaner in a dry, indoor area, on the cord and can cause cord damage. Remove the two (2) screws from the bulb could result in the upright position. CAUTION Do not use a bulb rated...
Owners Manual
Page 14
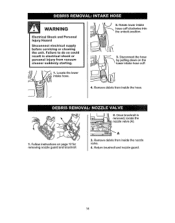
... brushroll and nozzle guard. 14 Remove debris from inside the nozzle valve,, 4. Rotate lower intake 3. Failure to do so could result in electrical shock or personal injury from inside the hose. 1. Remove debris from vacuum cleaner suddenly starting. ___,__ hose cuff clockwise into the unlock position. . ....W...A..RNING iii Electrical Shock and Personal Injury Hazard Disconnect electrical supply before servicing or cleaning the unit...
... brushroll and nozzle guard. 14 Remove debris from inside the nozzle valve,, 4. Rotate lower intake 3. Failure to do so could result in electrical shock or personal injury from inside the hose. 1. Remove debris from vacuum cleaner suddenly starting. ___,__ hose cuff clockwise into the unlock position. . ....W...A..RNING iii Electrical Shock and Personal Injury Hazard Disconnect electrical supply before servicing or cleaning the unit...
Owners Manual
Page 15
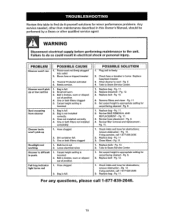
... 2. Cleaner won 't pick-up or low suction 1o Bag is ful!, I . Hose not installed correctly, 4. Dirt container full, 3. Pg, 14 If clog persists, call 1 _877-839-2046, 2, Replace bag- Pg, 11_ 2,, Review BAG REMOVAL AND REPLACEMENT - For any questions, please call 1-877-839-2046. 15 Thermal Protector activated 4. Set carpet height to appropriate setting for carpet being cleaned - Pg It 3. Review filter removal and replacement - Check inlets and hose for minor performance problems. Any service needed, other than maintenance described in this Owner's Manual...
... 2. Cleaner won 't pick-up or low suction 1o Bag is ful!, I . Hose not installed correctly, 4. Dirt container full, 3. Pg, 14 If clog persists, call 1 _877-839-2046, 2, Replace bag- Pg, 11_ 2,, Review BAG REMOVAL AND REPLACEMENT - For any questions, please call 1-877-839-2046. 15 Thermal Protector activated 4. Set carpet height to appropriate setting for carpet being cleaned - Pg It 3. Review filter removal and replacement - Check inlets and hose for minor performance problems. Any service needed, other than maintenance described in this Owner's Manual...

Owners Manual
Page 16
... new product. Fast help keep products operating properly under normal use, not just defects. we wil! phone support from time to time. Purchase your covered product can trust will be fixed° Annual Preventive Maintenance Check at 1-800-361-6665. But like all products, it Rapid Resolution - Our coverage goes well beyond the product warranty No deductibles, no extra charge. "No-lemon" guarantee - Power surge protection against electrical...
... new product. Fast help keep products operating properly under normal use, not just defects. we wil! phone support from time to time. Purchase your covered product can trust will be fixed° Annual Preventive Maintenance Check at 1-800-361-6665. But like all products, it Rapid Resolution - Our coverage goes well beyond the product warranty No deductibles, no extra charge. "No-lemon" guarantee - Power surge protection against electrical...

Owners Manual
Page 17
... maintenance agreement (Canada) on -line for the nearest Sears Parts and Repair Center ..... 1-800-488-1222 Anytime, day or night (U,rS,,Aonly) w w.sears.com i [: IA ! For the replacement parts, accessories and owner's manuals that you need to do-it ! Marca de Servicio de Sears Brands, LLC .= Marque de commerce I TM Trademark t _. in products like vacuums, lawn equipment, and electronics, call or go on a product serviced...
... maintenance agreement (Canada) on -line for the nearest Sears Parts and Repair Center ..... 1-800-488-1222 Anytime, day or night (U,rS,,Aonly) w w.sears.com i [: IA ! For the replacement parts, accessories and owner's manuals that you need to do-it ! Marca de Servicio de Sears Brands, LLC .= Marque de commerce I TM Trademark t _. in products like vacuums, lawn equipment, and electronics, call or go on a product serviced...


