Owners Manual
Page 1
..., Hoffman Estates, IL 60179 U.S.A. www.sears.com Part # 1-115602-000 Rev. 9/07 Printed in China Impreso en China Imprim_ en Chine Owner's Manual Manual Del Propietario Manuel Du Propri_taire Vacuum Cleaner Aspiradora Aspirateur Model, Modelo, Mod61e 216.37000 (U.S.) 31700 (Canada) CAUTION: Read and follow all safety and operating instructions before first use of this product, CUIDADO: Lea y sigue todas las instrucciones de operaci6n...
..., Hoffman Estates, IL 60179 U.S.A. www.sears.com Part # 1-115602-000 Rev. 9/07 Printed in China Impreso en China Imprim_ en Chine Owner's Manual Manual Del Propietario Manuel Du Propri_taire Vacuum Cleaner Aspiradora Aspirateur Model, Modelo, Mod61e 216.37000 (U.S.) 31700 (Canada) CAUTION: Read and follow all safety and operating instructions before first use of this product, CUIDADO: Lea y sigue todas las instrucciones de operaci6n...

Owners Manual
Page 2
Use the space below to record the model number and serial number of Purchase Keep this guide° It will need the complete model and serial numbers when requesting information. You will help you assemble and operate your nearest Sears store. Your vacuum cleaner's model and serial numbers are located on the Model and Serial Number Plate. Power Cord Floor/Carpet Cleaning Above Floor Cleaning 8-10 8 9 10 Vacuum Cleaner Care .......... 10-14 Vacuum Cleaner Storage 10 Dirt Container and Filter Removal and Replacement ....... Serial Noo Date of your sales check (...
Use the space below to record the model number and serial number of Purchase Keep this guide° It will need the complete model and serial numbers when requesting information. You will help you assemble and operate your nearest Sears store. Your vacuum cleaner's model and serial numbers are located on the Model and Serial Number Plate. Power Cord Floor/Carpet Cleaning Above Floor Cleaning 8-10 8 9 10 Vacuum Cleaner Care .......... 10-14 Vacuum Cleaner Storage 10 Dirt Container and Filter Removal and Replacement ....... Serial Noo Date of your sales check (...
Owners Manual
Page 3
..., this appliance is ever used in the United States or Canada, This warranty gives you specific legal rights, and you . This warranty covers only defects in correct product installation, operation or maintenance, 3. A service technician to instruct the user in material and workmanship. A service technician to clean or maintain this product caused by law. Damage to filters, belts, light bulbs, and bags. 2. Implied warranties, including warranties of merchantability or fitness for...
..., this appliance is ever used in the United States or Canada, This warranty gives you specific legal rights, and you . This warranty covers only defects in correct product installation, operation or maintenance, 3. A service technician to instruct the user in material and workmanship. A service technician to clean or maintain this product caused by law. Damage to filters, belts, light bulbs, and bags. 2. Implied warranties, including warranties of merchantability or fitness for...

Owners Manual
Page 4
... THIS MANUAL BEFORE ASSEMBLING OR USING YOUR VACUUM CLEANER. Call 1-877-839-2046 to prevent tripping accidents. 4 Do not unplug by cord, use with wet hands. Electrical shock could occur. Do not use cord as handle, close a door on a cord, or pull cord around sharp edges or corners. Unplug from openings and moving parts. Use only as described in place, Turn off all controls before servicing. Do not run appliance over cord, Keep cord...
... THIS MANUAL BEFORE ASSEMBLING OR USING YOUR VACUUM CLEANER. Call 1-877-839-2046 to prevent tripping accidents. 4 Do not unplug by cord, use with wet hands. Electrical shock could occur. Do not use cord as handle, close a door on a cord, or pull cord around sharp edges or corners. Unplug from openings and moving parts. Use only as described in place, Turn off all controls before servicing. Do not run appliance over cord, Keep cord...

Owners Manual
Page 5
... vacuum cleaner is listed on the cleaner plate. Your cleaner contains a thermal protective device to shut off and unplug the cleaner. WARNING: The cords, wires, and/or cables supplied with this product contains chemicals, including lead or lead compounds, known to cause cancer and birth defects or other reproductive harm. If this Owner's Manual carefully for Household user Read this happens, turn switch off the motor to...
... vacuum cleaner is listed on the cleaner plate. Your cleaner contains a thermal protective device to shut off and unplug the cleaner. WARNING: The cords, wires, and/or cables supplied with this product contains chemicals, including lead or lead compounds, known to cause cancer and birth defects or other reproductive harm. If this Owner's Manual carefully for Household user Read this happens, turn switch off the motor to...

Owners Manual
Page 6
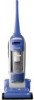
Review these before using your vacuum cleaner's parts and features to assure its proper and safe use. It is important to know your vacuum cleaner° Part No. Pleated item Belt Filter K30OO00000 t ,,H, , 1-860140-600 ,Style No. In U.S, DCF-5 UB-11 Handle Cord clip Carry handle Quick release upper cord hook Power cord Lower cord hook _ Power On/Off switch Whee_ Dirt container release latch Filter Dirt container Exhaust cover (exhaust filter inside) Headlight Height adjust lever Hose wand Crevice Extension wand Stretch hose Nozzle Extension( wand brush Dust Crevice too! _
Review these before using your vacuum cleaner's parts and features to assure its proper and safe use. It is important to know your vacuum cleaner° Part No. Pleated item Belt Filter K30OO00000 t ,,H, , 1-860140-600 ,Style No. In U.S, DCF-5 UB-11 Handle Cord clip Carry handle Quick release upper cord hook Power cord Lower cord hook _ Power On/Off switch Whee_ Dirt container release latch Filter Dirt container Exhaust cover (exhaust filter inside) Headlight Height adjust lever Hose wand Crevice Extension wand Stretch hose Nozzle Extension( wand brush Dust Crevice too! _
Owners Manual
Page 7
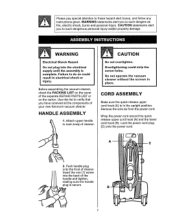
... in place. B || Lock the power cord plug (C) onto the power cord. Remove the wire tie from the power cord, Wrap the power cord around the quick release upper cord hook (A) and the lower cord hook (B). A C 2, Push handle plug onto the front of cleaner. CAUTION statements alert you have received all the components of your new Kenmore vacuum cleaner, HANDLE ASSEMBLY 1, Attach upper handle to these hazard alert boxes, and follow any instructions given. CAUTION Do not overtighten...
... in place. B || Lock the power cord plug (C) onto the power cord. Remove the wire tie from the power cord, Wrap the power cord around the quick release upper cord hook (A) and the lower cord hook (B). A C 2, Push handle plug onto the front of cleaner. CAUTION statements alert you have received all the components of your new Kenmore vacuum cleaner, HANDLE ASSEMBLY 1, Attach upper handle to these hazard alert boxes, and follow any instructions given. CAUTION Do not overtighten...

Owners Manual
Page 8
... injury or damage could occur. Place the extension wand (B) in the wand holder on the body as shown.This helps keep the power cord out from cord to the up position, then wrap cord. Do not change the plug in the outlet, reverse the plug. If the plu_:_t'oes not fit fully in any way. OPERATING INSTRUCTIONS 1. Turn the to install the proper outlet.
... injury or damage could occur. Place the extension wand (B) in the wand holder on the body as shown.This helps keep the power cord out from cord to the up position, then wrap cord. Do not change the plug in the outlet, reverse the plug. If the plu_:_t'oes not fit fully in any way. OPERATING INSTRUCTIONS 1. Turn the to install the proper outlet.

Owners Manual
Page 9
... for (A) storing the upright, (B) operating the cleaner, and (C) to room,, HANDLE RELEASE To release handle, push the handle release pedal located on the lower left side of the cleaner, C CARRY HANDLE Use the carry handle located on the back left side of the cleaner, NOTE: Rotating brush could cause area rug fringe to become tangled within cleaner, Use caution when vacuuming any rugs with fringe, A B ON/OFF BUTTON Turn cleaner on by depressing...
... for (A) storing the upright, (B) operating the cleaner, and (C) to room,, HANDLE RELEASE To release handle, push the handle release pedal located on the lower left side of the cleaner, C CARRY HANDLE Use the carry handle located on the back left side of the cleaner, NOTE: Rotating brush could cause area rug fringe to become tangled within cleaner, Use caution when vacuuming any rugs with fringe, A B ON/OFF BUTTON Turn cleaner on by depressing...

Owners Manual
Page 10
... hose handle° To remove tool, twist and pull apart gently. Lock power cord plug onto the power cord° Store the vacuum cleaner in a dry, indoor area, on . If additional length is needed, use the hose alone. Simply push the attachment firmly onto the end of extension wand. Remove the hose from the tool caddy. Cleaner must be in use and at all parts of the handy accessories or use the extension wand and crevice tool,. VACUUM CLEANER...
... hose handle° To remove tool, twist and pull apart gently. Lock power cord plug onto the power cord° Store the vacuum cleaner in a dry, indoor area, on . If additional length is needed, use the hose alone. Simply push the attachment firmly onto the end of extension wand. Remove the hose from the tool caddy. Cleaner must be in use and at all parts of the handy accessories or use the extension wand and crevice tool,. VACUUM CLEANER...
Owners Manual
Page 11
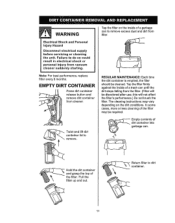
... DIRT CONTAINER Press dirt container release button and remove dirt container from cleaner, Tap the filter on the dirt conditions, tn some cases, more or less cleaning of the filter may be cleaned° Tap the filter firmly against the inside of the filter. eturn filter to remove, dirt container into garbage can until the dirt stops falling from vacuum cleaner suddenly starting. Electrical Shock and Personal Injury Hazard Disconnect electrical supply before servicing or cleaning...
... DIRT CONTAINER Press dirt container release button and remove dirt container from cleaner, Tap the filter on the dirt conditions, tn some cases, more or less cleaning of the filter may be cleaned° Tap the filter firmly against the inside of the filter. eturn filter to remove, dirt container into garbage can until the dirt stops falling from vacuum cleaner suddenly starting. Electrical Shock and Personal Injury Hazard Disconnect electrical supply before servicing or cleaning...
Owners Manual
Page 12
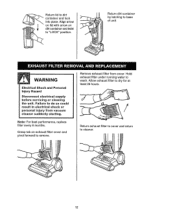
..., Hold exhaust filter under running water to wash. Allow exhaust filter to dry for at least 24 hours_ Return exhaust filter to cover and return to base of unit° WARN ING Electrical Shock and Personal Injury Hazard Disconnect electrical supply before servicing or cleaning the unit. Grasp tab on dirt container and twist to "LOCK" position. For best performance, replace filter every 6 months...
..., Hold exhaust filter under running water to wash. Allow exhaust filter to dry for at least 24 hours_ Return exhaust filter to cover and return to base of unit° WARN ING Electrical Shock and Personal Injury Hazard Disconnect electrical supply before servicing or cleaning the unit. Grasp tab on dirt container and twist to "LOCK" position. For best performance, replace filter every 6 months...
Owners Manual
Page 13
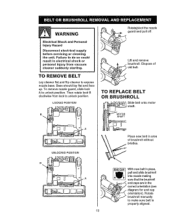
... belt. Electrical Shock and Personal Injury Hazard Disconnect electrical supply before servicing or cleaning the unit, Failure to make sure belt is properly aligned. TO REMOVE BELT Lay cleaner fiat and flip cleaner to unlock position. To remove nozzle guard, slide lock A to unlock position, Then rotate lock B clockwise from vacuum cleaner suddenly starting. TO REPLACE BELT OR BRUSHROLL Slide belt onto motor shaft. MOTOR SHAFT A UNLOCKED POSITION Place new belt in electrical...
... belt. Electrical Shock and Personal Injury Hazard Disconnect electrical supply before servicing or cleaning the unit, Failure to make sure belt is properly aligned. TO REMOVE BELT Lay cleaner fiat and flip cleaner to unlock position. To remove nozzle guard, slide lock A to unlock position, Then rotate lock B clockwise from vacuum cleaner suddenly starting. TO REPLACE BELT OR BRUSHROLL Slide belt onto motor shaft. MOTOR SHAFT A UNLOCKED POSITION Place new belt in electrical...

Owners Manual
Page 14
... from vacuum cleaner suddenly starting. ,i i TO REMOVE LIGHT BULB 1. Press handle release pedal and lay vacuum cleaner back, 3. Snap lens cover back into socket to do so could overheat surrounding plastic parts. Failure to replace. 6. i i , ,11111,111,1 iii i 5. Lift the lens cover to the locked position WARNING Electrical Shock and Personal Injury Hazard Disconnect electrical supply before servicing or cleaning the unit. During extended use a bulb...
... from vacuum cleaner suddenly starting. ,i i TO REMOVE LIGHT BULB 1. Press handle release pedal and lay vacuum cleaner back, 3. Snap lens cover back into socket to do so could overheat surrounding plastic parts. Failure to replace. 6. i i , ,11111,111,1 iii i 5. Lift the lens cover to the locked position WARNING Electrical Shock and Personal Injury Hazard Disconnect electrical supply before servicing or cleaning the unit. During extended use a bulb...

Owners Manual
Page 15
... cleaner to Sears Service Center. Take to coo! - Pg. 11 3, Replace brushroll - Clean filters= Pg 11, 12,, 1, Replace bulb - Pg 13, 14 For any questions, please call 1-877-839-2046 2, Empty dirt container- WARNING Cleaner won 't pick-up or low suction Dust escaping from cleaner Cleaner tools won 't run 1. One or both fillers not Installed completely 1. Hose clogged Headlight not working Cleaner ts difficult to appropriate setting for carpet being cleaned - t. Empty dirt container - Review DIRT CONTAINER REMOVAL AND REPLACEMENT...
... cleaner to Sears Service Center. Take to coo! - Pg. 11 3, Replace brushroll - Clean filters= Pg 11, 12,, 1, Replace bulb - Pg 13, 14 For any questions, please call 1-877-839-2046 2, Empty dirt container- WARNING Cleaner won 't pick-up or low suction Dust escaping from cleaner Cleaner tools won 't run 1. One or both fillers not Installed completely 1. Hose clogged Headlight not working Cleaner ts difficult to appropriate setting for carpet being cleaned - t. Empty dirt container - Review DIRT CONTAINER REMOVAL AND REPLACEMENT...
Owners Manual
Page 16
... charge, [] Fast help keep products operating properly under normal use, not just defects. If you money and aggravation. Or, a prorated refund anytime after the product warranty period expires. no functional failure excluded from a Sears representative on all products. Our coverage goes well beyond the product warranty. we will be fixed, [] Annual Preventive Maintenance Check at 1-800-361-6665. Sears Installation Service For Sears professional installation of your new product. The Master Protection...
... charge, [] Fast help keep products operating properly under normal use, not just defects. If you money and aggravation. Or, a prorated refund anytime after the product warranty period expires. no functional failure excluded from a Sears representative on all products. Our coverage goes well beyond the product warranty. we will be fixed, [] Annual Preventive Maintenance Check at 1-800-361-6665. Sears Installation Service For Sears professional installation of your new product. The Master Protection...
Owners Manual
Page 32
... To purchase a protection agreement (U.SoA,) or maintenance agreement (Canada) on -line for the nearest Sears Parts and Repair Center, 1-800-488-1222 Anytime, day or night (USA,. Service Mark of carry-in products like garage door openers and water heaters. 1-B00-4-MY-HOME Anytime, dayornight w(1w-80w0-4.6s9e.46a6r3),.com(UwS.Aw, wand.sCaenaadra,).ca For expert home solutions...
... To purchase a protection agreement (U.SoA,) or maintenance agreement (Canada) on -line for the nearest Sears Parts and Repair Center, 1-800-488-1222 Anytime, day or night (USA,. Service Mark of carry-in products like garage door openers and water heaters. 1-B00-4-MY-HOME Anytime, dayornight w(1w-80w0-4.6s9e.46a6r3),.com(UwS.Aw, wand.sCaenaadra,).ca For expert home solutions...


