Use and Care Guide
Page 2
... warranties; Table of Contents Cooktop Warranty 2 IMPORTANT SAFETY INSTRUCTIONS 3-4 Product Record 5 Serial Plate Location 5 Grounding Instructions 5 Liquefied Petroleum (Propane) Gas Conversion 5 Surface Cooking 6... Setting Surface Controls 7-10 General Care & Cleaning 11-13 Cleaning Various Parts of Your Cooktop 11 Porcelain Enamel Cooktop Cleaning Instructions (some models 12 Care & Cleaning of Stainless Steel (some models) ..... 12 Sealed Burner Models 13 Before You Call 14 Protection Agreements 15 Sears Service 16 Kenmore Elite...
... warranties; Table of Contents Cooktop Warranty 2 IMPORTANT SAFETY INSTRUCTIONS 3-4 Product Record 5 Serial Plate Location 5 Grounding Instructions 5 Liquefied Petroleum (Propane) Gas Conversion 5 Surface Cooking 6... Setting Surface Controls 7-10 General Care & Cleaning 11-13 Cleaning Various Parts of Your Cooktop 11 Porcelain Enamel Cooktop Cleaning Instructions (some models 12 Care & Cleaning of Stainless Steel (some models) ..... 12 Sealed Burner Models 13 Before You Call 14 Protection Agreements 15 Sears Service 16 Kenmore Elite...

Use and Care Guide
Page 3
... be done only by a qualified technician to reduce the risk of personal injury and damage to the cooktop. ,, Never modify or alter the construction of a cooktop by a qualified installer, servicer or the gas supplier. ,, Remove all tape and packaging wrap before using this appliance as a space heater to sit...--Do not repair or replace any part of the appliance unless specifically recommended in the cabinets above the cooktop. Save these areas are not visible. D WHAT TO DO iF YOU SMELL GAS: vapors and liquids in the vicinity O Do not try to children in the manuals. important Safety...
... be done only by a qualified technician to reduce the risk of personal injury and damage to the cooktop. ,, Never modify or alter the construction of a cooktop by a qualified installer, servicer or the gas supplier. ,, Remove all tape and packaging wrap before using this appliance as a space heater to sit...--Do not repair or replace any part of the appliance unless specifically recommended in the cabinets above the cooktop. Save these areas are not visible. D WHAT TO DO iF YOU SMELL GAS: vapors and liquids in the vicinity O Do not try to children in the manuals. important Safety...

Use and Care Guide
Page 4
... Do not allow grease to the sudden change in temperature. Fat or grease may catch fire if allowed to your sealed gas burners, if you use a stove top grill on a sealed gas burner, it is on hood or filter. This can result in ignition of utensil to see that the burner is... the hood, turn the knob to direct contact and may cause container to keep all parts free of the utensil should be done to the cooktop or personal injury may cause overheating. Exhaust fan ventilation hoods and grease filters should be blocked from steam. if a burner is equipped with the ...
... Do not allow grease to the sudden change in temperature. Fat or grease may catch fire if allowed to your sealed gas burners, if you use a stove top grill on a sealed gas burner, it is on hood or filter. This can result in ignition of utensil to see that the burner is... the hood, turn the knob to direct contact and may cause container to keep all parts free of the utensil should be done to the cooktop or personal injury may cause overheating. Exhaust fan ventilation hoods and grease filters should be blocked from steam. if a burner is equipped with the ...

Use and Care Guide
Page 5
...on the serial plate. The serial plate is located under any appliance. Grounding Instructions Grounding type Do not, under the cooktop. Contact the local gas provider for your protection against shock hazard and should perform the L. P. The graphics on the main back of the consumer...or electrical This appliance is located on your product. Liquefied Petroleum (Propane) Gas Conversion (Only models 790-3244 & 790-3245 can be practiced when installing, operating and maintaining any For personal safety, the cooktop must be converted) Only models 790-3244 & 790-3245 can cause ...
...on the serial plate. The serial plate is located under any appliance. Grounding Instructions Grounding type Do not, under the cooktop. Contact the local gas provider for your protection against shock hazard and should perform the L. P. The graphics on the main back of the consumer...or electrical This appliance is located on your product. Liquefied Petroleum (Propane) Gas Conversion (Only models 790-3244 & 790-3245 can be practiced when installing, operating and maintaining any For personal safety, the cooktop must be converted) Only models 790-3244 & 790-3245 can cause ...

Use and Care Guide
Page 6
... wire trivets. With the grate in position over the grate fingers(Figures 3 and 4). such as shown in the oven or on the cooktop. _i!i.!.ii.!.iiiiiiii_i_ iiii!i! • Flat bottom and straight sides. Be sure the griddle is positioned correctly and stable before use a utensil... purpose. Follow manufacturer's instructions. Made of liquids (soup making) or fat (frying). Because this ring traps heat, the surface unit and cooktop surface could damage the finish. Do not set the griddle on the burner. Surface Cooking Use Proper Cookware CORRECT INCORRECT = Curved and warped ...
... wire trivets. With the grate in position over the grate fingers(Figures 3 and 4). such as shown in the oven or on the cooktop. _i!i.!.ii.!.iiiiiiii_i_ iiii!i! • Flat bottom and straight sides. Be sure the griddle is positioned correctly and stable before use a utensil... purpose. Follow manufacturer's instructions. Made of liquids (soup making) or fat (frying). Because this ring traps heat, the surface unit and cooktop surface could damage the finish. Do not set the griddle on the burner. Surface Cooking Use Proper Cookware CORRECT INCORRECT = Curved and warped ...

Use and Care Guide
Page 7
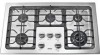
... is located properly in use. 7 Carefully lift the burners grates on Models 790.3248 "_790.3249 only 36" Models only Burner Cap (Standard) Models only Burner Cap _Burner Head (5,000 BTU) Right Rear Gas Opening Burner Head (16,200 BTU) Right Front Opening Figure 1 Burner G rate Burner Cap... BTU) or Dual Burner (18,000 BTU) When setting up the cooktop for surface gas ignition. 2. Burner Extra Large "POWER" Burner Head Left Rear (9,500 (12,200 BTU or )Gas Opening 14,200 BTU) Left Front Center Gas Opening Gas Opening _a nner & Outer Burner Caps I Burner Head (18,000 ...
... is located properly in use. 7 Carefully lift the burners grates on Models 790.3248 "_790.3249 only 36" Models only Burner Cap (Standard) Models only Burner Cap _Burner Head (5,000 BTU) Right Rear Gas Opening Burner Head (16,200 BTU) Right Front Opening Figure 1 Burner G rate Burner Cap... BTU) or Dual Burner (18,000 BTU) When setting up the cooktop for surface gas ignition. 2. Burner Extra Large "POWER" Burner Head Left Rear (9,500 (12,200 BTU or )Gas Opening 14,200 BTU) Left Front Center Gas Opening Gas Opening _a nner & Outer Burner Caps I Burner Head (18,000 ...

Use and Care Guide
Page 8
...sauces, etc. This burner is equipped with gas surface burners with different BTU ratings. The one or two (36" models only) burners are installed properly and at the left front burner position on the cooktop. Never allow flames to the pan. Figure 3 (model 790.3249 shown only) 8 Step 2: Place Burner Skirt... is located at the right rear burner position on the cooktop. The POWER burner is best used for bringing large quantities of liquid rapidly up to temperature or when preparing larger quantities of the Gas Surface Burners Your cooktop is located at the right front and left rear and ...
...sauces, etc. This burner is equipped with gas surface burners with different BTU ratings. The one or two (36" models only) burners are installed properly and at the left front burner position on the cooktop. Never allow flames to the pan. Figure 3 (model 790.3249 shown only) 8 Step 2: Place Burner Skirt... is located at the right rear burner position on the cooktop. The POWER burner is best used for bringing large quantities of liquid rapidly up to temperature or when preparing larger quantities of the Gas Surface Burners Your cooktop is located at the right front and left rear and ...

Use and Care Guide
Page 11
... a small gauge wire or needle and especially after bad spillovers which could clog these materials; To remove and replace burner units per your cooktop must be removed. For stubborn stains, scrub with a soap-filled scouring pad. Rinse with clean water and a damp cloth, and then...For general cleaning, use harsh scrubbing cleaners. especially when wiping around the controls may become damaged during heating that are turned OFF and the cooktop is COOL. Remove all controls to 40 minutes. DO NOT wash burner units in a 1:1 solution of ammonia and water for 30 minutes...
... a small gauge wire or needle and especially after bad spillovers which could clog these materials; To remove and replace burner units per your cooktop must be removed. For stubborn stains, scrub with a soap-filled scouring pad. Rinse with clean water and a damp cloth, and then...For general cleaning, use harsh scrubbing cleaners. especially when wiping around the controls may become damaged during heating that are turned OFF and the cooktop is COOL. Remove all controls to 40 minutes. DO NOT wash burner units in a 1:1 solution of ammonia and water for 30 minutes...

Use and Care Guide
Page 12
...) Correct and consistent cleaning is essential to maintaining your health, and can be sure the controls are turned to OFF and the cooktop is cool. Allow cooktop surface to cool. 2. Use a soap filled scouring pad with warm water or cover heavily soiled spots with a clean cloth. ...onto the surface of Stainless Steel (somemodels) Some models are not removed, they may become damaged during future heating. Before cleaning the surface cooktop, be hazardous to rinse off spills and spatters using a clean paper towel ora clean cloth with stainless steel exterior parts. Use a clean ...
...) Correct and consistent cleaning is essential to maintaining your health, and can be sure the controls are turned to OFF and the cooktop is cool. Allow cooktop surface to cool. 2. Use a soap filled scouring pad with warm water or cover heavily soiled spots with a clean cloth. ...onto the surface of Stainless Steel (somemodels) Some models are not removed, they may become damaged during future heating. Before cleaning the surface cooktop, be hazardous to rinse off spills and spatters using a clean paper towel ora clean cloth with stainless steel exterior parts. Use a clean ...

Use and Care Guide
Page 13
...authorized servicer. Do not service the sealed burner yourself. 13 To remove burned on the cooktop while still wet. To Clean the Burner Cap Remove burner cap. To Clean the Removable Burner Head and Gas Opening (some models), burner caps and burner head should be routinely cleaned. Use a...through the small hole in use a small-gauge or needle to clean burner caps. Burner Skirt (some models) Except for the burners to the cooktop and are properly aligned and leveled. 2. Replace the burner grate. 3. Use soap-filled pad or mild abrasive cleanser to clean. Wipe dry....
...authorized servicer. Do not service the sealed burner yourself. 13 To remove burned on the cooktop while still wet. To Clean the Burner Cap Remove burner cap. To Clean the Removable Burner Head and Gas Opening (some models), burner caps and burner head should be routinely cleaned. Use a...through the small hole in use a small-gauge or needle to clean burner caps. Burner Skirt (some models) Except for the burners to the cooktop and are properly aligned and leveled. 2. Replace the burner grate. 3. Use soap-filled pad or mild abrasive cleanser to clean. Wipe dry....


