

Use and Care Guide
Page 2
...the illustration for : 1. Printed in material and workmanship. Table of Contents Cooktop Warranty 2 Product Record 2 Serial Plate Location 2 IMPORTANT SAFETY INSTRUCTIONS 3-4 Grounding Instructions 5 Liquefied Petroleum (Propane) Gas Conversion 5 Surface Cooking 6 Setting Surface Controls 7-9 General Care & Cleaning...these instructions This Use & Care Manual contains general operating instructions for your sales receipt for future reference. Kenmore Limited Warranty When installed, operated and maintained according to all the described features. Model No. 790. ...
...the illustration for : 1. Printed in material and workmanship. Table of Contents Cooktop Warranty 2 Product Record 2 Serial Plate Location 2 IMPORTANT SAFETY INSTRUCTIONS 3-4 Grounding Instructions 5 Liquefied Petroleum (Propane) Gas Conversion 5 Surface Cooking 6 Setting Surface Controls 7-9 General Care & Cleaning...these instructions This Use & Care Manual contains general operating instructions for your sales receipt for future reference. Kenmore Limited Warranty When installed, operated and maintained according to all the described features. Model No. 790. ...
Use and Care Guide
Page 3
... result in use this appliance. During and after unpacking the cooktop. NEVER use . WHATTO DO IFYOU SMELL GAS: • Do not try to heat or warm the room. This includes paper, plastic and cloth items, such as cookbooks, plasticware... poisoning. 3 Please pay attention to cool. Immediately call the fire department. Do not store items of a cooktop by a qualified installer, servicer supplier. pliance. Proper Installation--Be sure your gas supplier, call your building. Do not touch any appliance. do not touch or let clothing or other appliance....
... result in use this appliance. During and after unpacking the cooktop. NEVER use . WHATTO DO IFYOU SMELL GAS: • Do not try to heat or warm the room. This includes paper, plastic and cloth items, such as cookbooks, plasticware... poisoning. 3 Please pay attention to cool. Immediately call the fire department. Do not store items of a cooktop by a qualified installer, servicer supplier. pliance. Proper Installation--Be sure your gas supplier, call your building. Do not touch any appliance. do not touch or let clothing or other appliance....
Use and Care Guide
Page 4
...of the utensil should be blocked from Edges of Cooktop and Not Extend Over Adjacent Surface Burners--To reduce the risk of burns, ignition of the utensil. Do not let the potholders touch the flame or burners. Always turn fan on a sealed gas burner, it closely. Then adjust the flame so... able to see that the burner is accidentally turned on your health. Visually check that could catch fire. Clean the appliance regularly to your sealed gas burners, if you use of undersized utensils will expose a portion of grease that the burner has lit. top use of undersized utensils will...
...of the utensil should be blocked from Edges of Cooktop and Not Extend Over Adjacent Surface Burners--To reduce the risk of burns, ignition of the utensil. Do not let the potholders touch the flame or burners. Always turn fan on a sealed gas burner, it closely. Then adjust the flame so... able to see that the burner is accidentally turned on your health. Visually check that could catch fire. Clean the appliance regularly to your sealed gas burners, if you use of undersized utensils will expose a portion of grease that the burner has lit. top use of undersized utensils will...
Use and Care Guide
Page 5
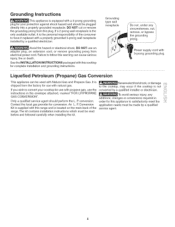
... Do not, under any additions, changes or conversions required in the envelope attached, marked "FOR LP/PROPANE GAS CONVERSION". An L. Contact the local gas provider for complete installation and grounding instructions. DO NOT cut , remove, or bypass the grounding prong. It...hazard or electrical shock. R conversion. Grounding instructions This appliance is equipped with a 3-prong grounding plug for your cooktop for use with propane gas, use with natural gas. If a 2-prong wall receptacle is the only available outlet, it replaced with a properly grounded 3-prong wall ...
... Do not, under any additions, changes or conversions required in the envelope attached, marked "FOR LP/PROPANE GAS CONVERSION". An L. Contact the local gas provider for complete installation and grounding instructions. DO NOT cut , remove, or bypass the grounding prong. It...hazard or electrical shock. R conversion. Grounding instructions This appliance is equipped with a 3-prong grounding plug for your cooktop for use with propane gas, use with natural gas. If a 2-prong wall receptacle is the only available outlet, it replaced with a properly grounded 3-prong wall ...
Use and Care Guide
Page 6
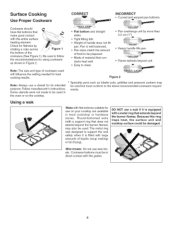
...rotating a ruler across the bottom of the Figure 1 cookware (See Figure 1). Figure 2 Note: Always use wire trivets. DO NOT use on the cooktop. * Specialty pans such as shown in Figure 2. ,, Flat bottom and straight sides. Follow manufacturer's instructions. The metal ring was designed to follow the..., griddles and pressure cookers may also be used. Because this ring traps heat, the surface unit and cooktop surface could be used in the oven or on your cooktop are available in most cookshop or hardware stores. Weight of material that conducts heat well. Pan is well...
...rotating a ruler across the bottom of the Figure 1 cookware (See Figure 1). Figure 2 Note: Always use wire trivets. DO NOT use on the cooktop. * Specialty pans such as shown in Figure 2. ,, Flat bottom and straight sides. Follow manufacturer's instructions. The metal ring was designed to follow the..., griddles and pressure cookers may also be used. Because this ring traps heat, the surface unit and cooktop surface could be used in the oven or on your cooktop are available in most cookshop or hardware stores. Weight of material that conducts heat well. Pan is well...

Use and Care Guide
Page 7
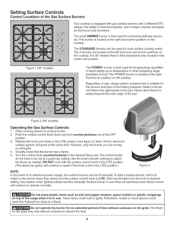
... / Grate (36" Models only) Standard Burner Cap (36" Models only) Small Burner Cap _._ "BSuIMrnMerERH"ead (5,000 BTU) Gas Opening Right Front Gas Opening Figure 1 : BGurarnteer (_ Assembly of the Surface Burner Heads, Burner Caps and Burner Grates It is very important to the cooktop over the burners... located as shown in use. 7 Setting Surface Controls Sizes of the Surface Gas Burners Your appliance is supplied with the following 3 different surface gas burners: * Simmer Burner (5,000 BTU) * 2 (or 3 on 36" models) Standard Burners (9,500 BTU) * Power Burner (14,200 BTU)...
... / Grate (36" Models only) Standard Burner Cap (36" Models only) Small Burner Cap _._ "BSuIMrnMerERH"ead (5,000 BTU) Gas Opening Right Front Gas Opening Figure 1 : BGurarnteer (_ Assembly of the Surface Burner Heads, Burner Caps and Burner Grates It is very important to the cooktop over the burners... located as shown in use. 7 Setting Surface Controls Sizes of the Surface Gas Burners Your appliance is supplied with the following 3 different surface gas burners: * Simmer Burner (5,000 BTU) * 2 (or 3 on 36" models) Standard Burners (9,500 BTU) * Power Burner (14,200 BTU)...
Use and Care Guide
Page 8
... knob counterclockwise to desired setting. After burner lights turn the surface control knob to absorb the heat. 8 Figure 2 (36" models) Operating the Gas Surface Controls: 1. Note: All four electronic surface ignitors will spark at the left in larger volumes increases as needed. ... delicate sauces, etc. Use caution when lighting surface burners manually. Setting Surface Controls Control Locations of the Gas Surface Burners Your cooktop is equipped with gas surface burners with the surface control knob in the LITE position. (The electronic ignitor will continue to be...
... knob counterclockwise to desired setting. After burner lights turn the surface control knob to absorb the heat. 8 Figure 2 (36" models) Operating the Gas Surface Controls: 1. Note: All four electronic surface ignitors will spark at the left in larger volumes increases as needed. ... delicate sauces, etc. Use caution when lighting surface burners manually. Setting Surface Controls Control Locations of the Gas Surface Burners Your cooktop is equipped with gas surface burners with the surface control knob in the LITE position. (The electronic ignitor will continue to be...
Use and Care Guide
Page 10
...a damp cloth and dry. Rinse with a clean cloth. To remove, pull each use. Excess water in the burners of your model, see Sealed Burner section of these General Care & Cleaning instructions. DO NOT use hot soapy water and a cloth. Rinse with clean water and a damp ...the knob into place. Stainless Steel, Chrome Decorative Trim Porcelain Enamel Burner Grates, Burner Pans (some models), Burner Skirts (some models), Cooktop Surface Surface Burners Clean with a soap-filled scouring pad. Rinse with high concentrations of ammonia and water for 30 to rinse the cleaners ...
...a damp cloth and dry. Rinse with a clean cloth. To remove, pull each use. Excess water in the burners of your model, see Sealed Burner section of these General Care & Cleaning instructions. DO NOT use hot soapy water and a cloth. Rinse with clean water and a damp ...the knob into place. Stainless Steel, Chrome Decorative Trim Porcelain Enamel Burner Grates, Burner Pans (some models), Burner Skirts (some models), Cooktop Surface Surface Burners Clean with a soap-filled scouring pad. Rinse with high concentrations of ammonia and water for 30 to rinse the cleaners ...
Use and Care Guide
Page 11
...solutions or the porcelain may burn onto the surface of the General Care & Cleaning section. 11 If needed, use abrasive products. Allow cooktop surface to cool. 2. Rinse and wipe dry with a solution of Stainless Steel (somemodels) Some models are not removed, they may become... damaged during future heating. Please refer to your porcelain enamel cooktop. Allow cooktop surface to cool. 2. Do not use mild household cleaners or a soap-filled steel wool pad. 4. Do not use commercial oven ...
...solutions or the porcelain may burn onto the surface of the General Care & Cleaning section. 11 If needed, use abrasive products. Allow cooktop surface to cool. 2. Rinse and wipe dry with a solution of Stainless Steel (somemodels) Some models are not removed, they may become... damaged during future heating. Please refer to your porcelain enamel cooktop. Allow cooktop surface to cool. 2. Do not use mild household cleaners or a soap-filled steel wool pad. 4. Do not use commercial oven ...

Use and Care Guide
Page 12
... burners. Be sure the grates are cool before you place your hand, a potholder, cleaning cloths or other material on the cooktop while still wet. See instructions below. General Care & Cleaning Sealed Burner To Clean the Burner Grates, Contoured Burner Skirts (some models), Burner Cap and Burner Head The burner grates, contoured burner...
... burners. Be sure the grates are cool before you place your hand, a potholder, cleaning cloths or other material on the cooktop while still wet. See instructions below. General Care & Cleaning Sealed Burner To Clean the Burner Grates, Contoured Burner Skirts (some models), Burner Cap and Burner Head The burner grates, contoured burner...

Installation Instructions
Page 1
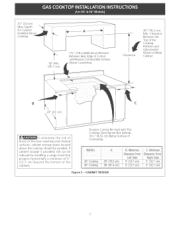
...other appliance. -- mnstaiiation and service must be performed by a qualified installer, service agency or the gas supplier, Gas Cooktop Dimensions 21/2" Gas Cooktop Cutout Dimensions (6,4 cm) Q ,u Figure 1 30" GasCooktop 36" GasCooktop 30 (76.2) 36 (91.4) 21sA552) 2134 (55.2) 4_/4(10.8) 4_/4(10.8) 27 (68.6) 33_/(484,5) ...I9 (48.3) 19 (48.3) 30" Gas Cooktop 36" GasCooktop 27_/4(69.2) 28_/2(72.4) 34_A(87) 19Vs(48,6) 19Vs(48.6) A[[ dimensions are enclosed in this cooktop are stated in the vicinity of this manual is not followed exactly, a fire ...
...other appliance. -- mnstaiiation and service must be performed by a qualified installer, service agency or the gas supplier, Gas Cooktop Dimensions 21/2" Gas Cooktop Cutout Dimensions (6,4 cm) Q ,u Figure 1 30" GasCooktop 36" GasCooktop 30 (76.2) 36 (91.4) 21sA552) 2134 (55.2) 4_/4(10.8) 4_/4(10.8) 27 (68.6) 33_/(484,5) ...I9 (48.3) 19 (48.3) 30" Gas Cooktop 36" GasCooktop 27_/4(69.2) 28_/2(72.4) 34_A(87) 19Vs(48,6) 19Vs(48.6) A[[ dimensions are enclosed in this cooktop are stated in the vicinity of this manual is not followed exactly, a fire ...

Installation Instructions
Page 2
... absence, with tile consumer. 5. Use caution when lighting burners manually. • Do not store items of the cooktop without adequate ventilation (.an be shut off whiJe gas Jine connections are certain safety precautions you should be tit manually during an electrical power outage. elevations above the burners should...size so it does not extend beyond the edge of this or any appliance using gas and generating heat, there are being made. As with any other flammable vapors and liquids near this cooktop must conform with local codes or, in the absence of local codes, with ...
... absence, with tile consumer. 5. Use caution when lighting burners manually. • Do not store items of the cooktop without adequate ventilation (.an be shut off whiJe gas Jine connections are certain safety precautions you should be tit manually during an electrical power outage. elevations above the burners should...size so it does not extend beyond the edge of this or any appliance using gas and generating heat, there are being made. As with any other flammable vapors and liquids near this cooktop must conform with local codes or, in the absence of local codes, with ...
Installation Instructions
Page 3
...Unprotected Wood or Metal Cabinet B _To eliminate the risk of burns or fire from reaching over heated surfaces, cabinet storage space located above the cooktop should be reduced by installing a range hood that projects horizontally a minimum of 5" (I 2.7 cm) beyond the bottom of the cabinets. ... If cabinet storage is provided, risk can be avoided. CABINET DESIGN Clearance 30" (76.2 cm) Min. Drawers Cannot Be Used with This Cooktop Since Burner Box Extends 3Vs2" (8.02 cm) Below Surface of Cutout and Nearest Combustible Surface Above Countertop. 13" (33 cm) Max, Depth...
...Unprotected Wood or Metal Cabinet B _To eliminate the risk of burns or fire from reaching over heated surfaces, cabinet storage space located above the cooktop should be reduced by installing a range hood that projects horizontally a minimum of 5" (I 2.7 cm) beyond the bottom of the cabinets. ... If cabinet storage is provided, risk can be avoided. CABINET DESIGN Clearance 30" (76.2 cm) Min. Drawers Cannot Be Used with This Cooktop Since Burner Box Extends 3Vs2" (8.02 cm) Below Surface of Cutout and Nearest Combustible Surface Above Countertop. 13" (33 cm) Max, Depth...

Installation Instructions
Page 4
tion) Union UFnlaioren /A 120V/60Hz Grounded Outlet Pressure Regulator ÷ 4" (10.2 cm) € Right Side of Cabinet /A Manual Shutoff Valve (To be accessible for shut-off valve opera- Typical Gas Cooktop Installation Over an Electric Built-in Oven Installed Under the Counter Manifold Pi Flexible Connector Cabinet sides or filler panel Wall Oven Cabinet 14_---- 18" (45.7 cm) Max.-----_ 61/2 '' 5" ,(16.5 cm) Flare (12.7 cm) Min.
tion) Union UFnlaioren /A 120V/60Hz Grounded Outlet Pressure Regulator ÷ 4" (10.2 cm) € Right Side of Cabinet /A Manual Shutoff Valve (To be accessible for shut-off valve opera- Typical Gas Cooktop Installation Over an Electric Built-in Oven Installed Under the Counter Manifold Pi Flexible Connector Cabinet sides or filler panel Wall Oven Cabinet 14_---- 18" (45.7 cm) Max.-----_ 61/2 '' 5" ,(16.5 cm) Flare (12.7 cm) Min.

Installation Instructions
Page 5
... (1.9 cm) plywood, installed on previous page. 32" Min.** (81.3 cm) 36" (91.4 cm) 208/240 Volt grounded junction box for installation of approved cooktop models. See "Typical Gas Cooktop Installation Over an Electric Builtqn Oven Installed Under the Counter" on two runners, flush ...with a Cooktop Mounted Above All mounting hardware must be installed over the oven unit...
... (1.9 cm) plywood, installed on previous page. 32" Min.** (81.3 cm) 36" (91.4 cm) 208/240 Volt grounded junction box for installation of approved cooktop models. See "Typical Gas Cooktop Installation Over an Electric Builtqn Oven Installed Under the Counter" on two runners, flush ...with a Cooktop Mounted Above All mounting hardware must be installed over the oven unit...
Installation Instructions
Page 6
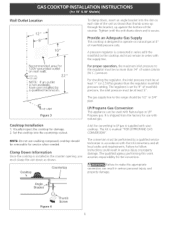
...remain in the counter opening, you must be used with natural gas. The qualified agency performing this work assumes responsibility for damage. 2. Visually inspect the cooktop for the conversion. Clamp Down Information Once the cooktop is marked "FOR LP/PROPANEGAS CONVERSION". It is set for ... installed by a qualified service technician in series with the manifold on natural gas at least 5". Tile gas supply line to follow instructions could result in serious personal injury and property damage. Set the cooktop into the slot on rear wall. Tighten until the unit draws down ...
...remain in the counter opening, you must be used with natural gas. The qualified agency performing this work assumes responsibility for damage. 2. Visually inspect the cooktop for the conversion. Clamp Down Information Once the cooktop is marked "FOR LP/PROPANEGAS CONVERSION". It is set for ... installed by a qualified service technician in series with the manifold on natural gas at least 5". Tile gas supply line to follow instructions could result in serious personal injury and property damage. Set the cooktop into the slot on rear wall. Tighten until the unit draws down ...

Installation Instructions
Page 7
... stems to tile pressure regulator in a gas leak at test pressures equal to be equipped with Natural and LP/Propane gas to the appliance. Disconnect this cooktop and its individual manual shutoff valve during ...gas to seal all connections if necessary to the shutoff valve. Tighten all gas connections. Overtightening may result in the gas supply line. Do not block access to prevent gas leakage in a gas leak and possible fire or explosion. The valve is die cast. Important: Removaellpackingmateriaal nd literaturefromcooktopbeforeconnectingasand electricaslupplyto cooktop...
... stems to tile pressure regulator in a gas leak at test pressures equal to be equipped with Natural and LP/Propane gas to the appliance. Disconnect this cooktop and its individual manual shutoff valve during ...gas to seal all connections if necessary to the shutoff valve. Tighten all gas connections. Overtightening may result in the gas supply line. Do not block access to prevent gas leakage in a gas leak and possible fire or explosion. The valve is die cast. Important: Removaellpackingmateriaal nd literaturefromcooktopbeforeconnectingasand electricaslupplyto cooktop...

Installation Instructions
Page 8
...head. Instal[ Burner Caps This cooktop is equipped with a 3prong (grounding) plug which centers the cap correctly on this appliance must be properly grounded. Place burner head over the orifice. Place a burner cap on each gas orifice, matching the head with sealed burners as shown (see Figure... 7) to cause burns. . Unpack your cooktop. Be sure that all the burner caps and burner heads are no burner adjustments necessary...
...head. Instal[ Burner Caps This cooktop is equipped with a 3prong (grounding) plug which centers the cap correctly on this appliance must be properly grounded. Place burner head over the orifice. Place a burner cap on each gas orifice, matching the head with sealed burners as shown (see Figure... 7) to cause burns. . Unpack your cooktop. Be sure that all the burner caps and burner heads are no burner adjustments necessary...

Installation Instructions
Page 9
Turn on EJectricat Power and Open Main Shutoff Gas Valve 3_ Check the igniters Operation of each control ... range, always be as small as follows. _Be operation. When ordering parts for leaks and the cooktop has been connected to the LITE position. Before You Call for Service Read the Before You Call ...to room temperature. Refer to D above until you need to adjust another burner, repeat the steps from A to your cooktop. E. B. Adjust flame until all controls are Complete Make sure all burners operate properly. 2. B. You will hear a ...
Turn on EJectricat Power and Open Main Shutoff Gas Valve 3_ Check the igniters Operation of each control ... range, always be as small as follows. _Be operation. When ordering parts for leaks and the cooktop has been connected to the LITE position. Before You Call for Service Read the Before You Call ...to room temperature. Refer to D above until you need to adjust another burner, repeat the steps from A to your cooktop. E. B. Adjust flame until all controls are Complete Make sure all burners operate properly. 2. B. You will hear a ...


