Use and Care Guide
Page 2
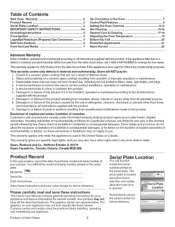
... 5 Liquefied Petroleum (Propane) Gas Conversion 5 Wall Oven Features 6 Oven Vent and Racks 7 Air Circulation in the Oven 7 Control Pad Features 8 Setting the Oven Controls 9=14 Sel=Cleaning 15=16 General Care & Cleaning 17-19 Adjusting the Oven Temperature 19 BeforeYou Call 20 Protection Agreements 21 Sears Service 22 Kenmore Warranty When installed, operated and maintained according to...
... 5 Liquefied Petroleum (Propane) Gas Conversion 5 Wall Oven Features 6 Oven Vent and Racks 7 Air Circulation in the Oven 7 Control Pad Features 8 Setting the Oven Controls 9=14 Sel=Cleaning 15=16 General Care & Cleaning 17-19 Adjusting the Oven Temperature 19 BeforeYou Call 20 Protection Agreements 21 Sears Service 22 Kenmore Warranty When installed, operated and maintained according to...
Use and Care Guide
Page 3
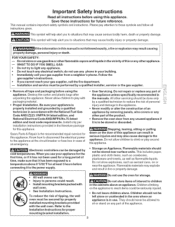
... for at the circuit breaker or fuse box in your building. = Immediately call the fire department. Install only per installation instructions provided in accordance with wall oven. • See Installation Instructions. Sears Parts & Repair is not followed exactly, a fire or explosion may cause bodily injury or property damage. This includes... you cannot reach your appliance for the first time, or if it has not been used for a long period of tipping, the wall oven must be allowed to sit or stand on any unused appliance if it is to be left alone or unattended in the area where ...
... for at the circuit breaker or fuse box in your building. = Immediately call the fire department. Install only per installation instructions provided in accordance with wall oven. • See Installation Instructions. Sears Parts & Repair is not followed exactly, a fire or explosion may cause bodily injury or property damage. This includes... you cannot reach your appliance for the first time, or if it has not been used for a long period of tipping, the wall oven must be allowed to sit or stand on any unused appliance if it is to be left alone or unattended in the area where ...
Use and Care Guide
Page 4
... areas until they have had sufficient time to another well ventilated room. Moist or damp potholders on Grease Fires. Do not use oven cleaners. The wall oven is to rub, damage or move the gasket. ,, Do not use a towel or other flammable materials touch these liners may ...the container to heat or warm the room. Among these openings, oven door, window and broiler drawer ,, Wear Proper Apparel. Once the power resumes, reset the clock and oven function. NEVER cover any wall oven. Always place oven racks in the fan could catch fire. Disconnect the appliance or ...
... areas until they have had sufficient time to another well ventilated room. Moist or damp potholders on Grease Fires. Do not use oven cleaners. The wall oven is to rub, damage or move the gasket. ,, Do not use a towel or other flammable materials touch these liners may ...the container to heat or warm the room. Among these openings, oven door, window and broiler drawer ,, Wear Proper Apparel. Once the power resumes, reset the clock and oven function. NEVER cover any wall oven. Always place oven racks in the fan could catch fire. Disconnect the appliance or ...
Use and Care Guide
Page 5
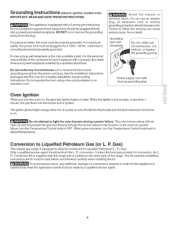
... from the power cord plug. Do not operate the oven using a two-prong adapter or an extension cord. P. If a two-prong wall receptacle is the only available outlet, it is equipped with a properly grounded three-prong wall receptacle installed by a qualified service agent. Power supply... cord with 3-prong grounding plug Oven ignition When you turn the Temperature Control knob to Liquefied Petroleum Gas (or L. P. When the ...
... from the power cord plug. Do not operate the oven using a two-prong adapter or an extension cord. P. If a two-prong wall receptacle is the only available outlet, it is equipped with a properly grounded three-prong wall receptacle installed by a qualified service agent. Power supply... cord with 3-prong grounding plug Oven ignition When you turn the Temperature Control knob to Liquefied Petroleum Gas (or L. P. When the ...
Use and Care Guide
Page 6
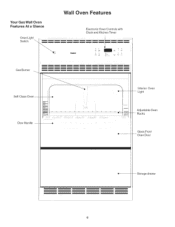
Light Adjustable Oven Racks Glass Front Oven Door Storage d rawer Door Handle -- Wall Oven Features Electronic Oven Controls with Clock and Kitchen Timer m A ,, Interior Oven -- Your Gas Wall Oven Features At a Glance Oven Light Switch Gas Burner Self-Clean Oven --
Light Adjustable Oven Racks Glass Front Oven Door Storage d rawer Door Handle -- Wall Oven Features Electronic Oven Controls with Clock and Kitchen Timer m A ,, Interior Oven -- Your Gas Wall Oven Features At a Glance Oven Light Switch Gas Burner Self-Clean Oven --
Use and Care Guide
Page 7
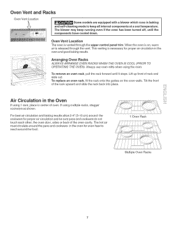
...Lift up front of the rack upward and slide the rack back into place. If using 1 rack, place in center of the oven cavity. To replace an oven rack, fit the rack onto the guides on , warm air is vented through the vent. The blower may keep all internal components... a blower which runs in baking and self=cleaning mode to reach around the cookware for proper air circulation in the oven and good baking results. @ Arranging Oven Racks ALWAYS ARRANGE OVEN RACKS WHEN THE OVEN !S COOL (PRIOR TO OPERATING THE OVEN). When the oven is on the oven walls. Always use oven mitts when using the...
...Lift up front of the rack upward and slide the rack back into place. If using 1 rack, place in center of the oven cavity. To replace an oven rack, fit the rack onto the guides on , warm air is vented through the vent. The blower may keep all internal components... a blower which runs in baking and self=cleaning mode to reach around the cookware for proper air circulation in the oven and good baking results. @ Arranging Oven Racks ALWAYS ARRANGE OVEN RACKS WHEN THE OVEN !S COOL (PRIOR TO OPERATING THE OVEN). When the oven is on the oven walls. Always use oven mitts when using the...

Use and Care Guide
Page 8
...;F or appears in the display, 3. Cleaning cycle. The "Door Locked" light will block the controls from the factory• The oven can be used to activate oven lockout setting. \ SAKE PAD--Used to set the desired stop cooking. For a silent control panel When choosing a function, a beep... to °C (Celsius) or from °C to maintain the selected baking temperaturel When the preheat indicator light turns OFF, your oven control may be selected. Press STOP CLEAR to normal operating mode, Press any function previously entered except the time of the baking time. ...
...;F or appears in the display, 3. Cleaning cycle. The "Door Locked" light will block the controls from the factory• The oven can be used to activate oven lockout setting. \ SAKE PAD--Used to set the desired stop cooking. For a silent control panel When choosing a function, a beep... to °C (Celsius) or from °C to maintain the selected baking temperaturel When the preheat indicator light turns OFF, your oven control may be selected. Press STOP CLEAR to normal operating mode, Press any function previously entered except the time of the baking time. ...

Use and Care Guide
Page 9
...OFF the time Of day Will re,appear for that will then continue to increase or decrease the time. When thedisplay is active. Setting Oven Controls Note: The time of day must first be shown in the display. Note: The indicator light located above the __'ad will ...memory of day display OFF O[ ON in the display presS and hold the A or V until _STet/O_ff mios, pressed• _iiiilJi;ii_ ..i.l.i.i..... To view other oven functions. Within 5 seconds, press and hold for any timed bake or Self-Clean cycle• To Set the MinuteTimer: 1 • Press T_0, Set/Off....
...OFF the time Of day Will re,appear for that will then continue to increase or decrease the time. When thedisplay is active. Setting Oven Controls Note: The time of day must first be shown in the display. Note: The indicator light located above the __'ad will ...memory of day display OFF O[ ON in the display presS and hold the A or V until _STet/O_ff mios, pressed• _iiiilJi;ii_ ..i.l.i.i..... To view other oven functions. Within 5 seconds, press and hold for any timed bake or Self-Clean cycle• To Set the MinuteTimer: 1 • Press T_0, Set/Off....

Use and Care Guide
Page 10
... and the motor driven door lock will appear in the display. 2. Press and hold for Continuous Bake or 12 Hour Energy Saving The oven control has a built-in 12 Hour Energy Saving feature that the control has returned to display Celsius). 3. By pressing and holding the .... hr" will begin to override this feature for continuous baking• To set temperature. To Set the Controls for continuous cooking. To cancel the Oven Lockout feature, press and hold for 5 seconds until tone is locked, the current time of day will beep 3 times. 4. appears in display ...
... and the motor driven door lock will appear in the display. 2. Press and hold for Continuous Bake or 12 Hour Energy Saving The oven control has a built-in 12 Hour Energy Saving feature that the control has returned to display Celsius). 3. By pressing and holding the .... hr" will begin to override this feature for continuous baking• To set temperature. To Set the Controls for continuous cooking. To cancel the Oven Lockout feature, press and hold for 5 seconds until tone is locked, the current time of day will beep 3 times. 4. appears in display ...

Use and Care Guide
Page 11
... ,_ or V. g. Once the controls are set to Shut-Off Automatically: 1. Press the A or V to start time (Delay Start). The oven will turn ON at the delayed start time appears in order to adjust the setting. pressed. Even when chilled, they should be removed promptly when...176;C if the control is completed. 11 Press ...... . Note:During Timed Bake the preheat indicator light will not function: To Program the Oven to change. 2. Press _',,_ The eadiest possible start immediately and shut off automatically. The control will beep 3 times every 60 seconds until...
... ,_ or V. g. Once the controls are set to Shut-Off Automatically: 1. Press the A or V to start time (Delay Start). The oven will turn ON at the delayed start time appears in order to adjust the setting. pressed. Even when chilled, they should be removed promptly when...176;C if the control is completed. 11 Press ...... . Note:During Timed Bake the preheat indicator light will not function: To Program the Oven to change. 2. Press _',,_ The eadiest possible start immediately and shut off automatically. The control will beep 3 times every 60 seconds until...
Use and Care Guide
Page 12
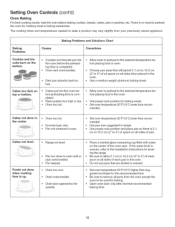
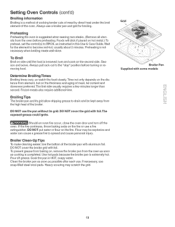
... in the oven. • Do not use pans that will...oven before the preheating time is completed, Oven rack overcrowded. • Dark pan absorbs heat too fast. • Allow oven... preheat the oven for baking. • Open oven door only after...oven before placing food in the oven. Oven too hot. • Incorrect pan size. • Pan not centered in the center. Setting Oven Controls (cont'd) Oven Baking For best cooking results, heat the oven before placing food in oven...Oven too hot. Allow oven to preheat to the selected temperature before preheating time is up. ii Set oven...
... in the oven. • Do not use pans that will...oven before the preheating time is completed, Oven rack overcrowded. • Dark pan absorbs heat too fast. • Allow oven... preheat the oven for baking. • Open oven door only after...oven before placing food in the oven. Oven too hot. • Incorrect pan size. • Pan not centered in the center. Setting Oven Controls (cont'd) Oven Baking For best cooking results, heat the oven before placing food in oven...Oven too hot. Allow oven to preheat to the selected temperature before preheating time is up. ii Set oven...
Use and Care Guide
Page 13
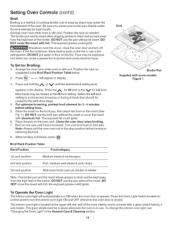
... pan with foil. Use hot pads because the broiler pan is suggested when searing rare steaks. (Remove all utensils from the high heat of the oven. If necessary, use a broiler pan and grid for the element to BROIL as possible after each use a fire extinguisher. Heavy scouring may be ...kept away from the oven before turning or removing food. Always use soap-filled steel wool pads. Preheating is a method of cooking tender cuts of meat by direct heat under...
... pan with foil. Use hot pads because the broiler pan is suggested when searing rare steaks. (Remove all utensils from the high heat of the oven. If necessary, use a broiler pan and grid for the element to BROIL as possible after each use a fire extinguisher. Heavy scouring may be ...kept away from the oven before turning or removing food. Always use soap-filled steel wool pads. Preheating is a method of cooking tender cuts of meat by direct heat under...
Use and Care Guide
Page 14
...be broiled at the upper left rear wall of the oven interior and is still cool. Note: Always pull the oven rack out to turn the interior oven light ON and OFF whenever the oven door is closed. the exposed grease could ignite. 6. Press the Oven Light Switch located on control panel ...When broiling is browned. Be sure you center your broiler pan directly under the broil element of the oven. Should an oven fire occur, close the oven door and turn ON when the oven door is opened. The broiler pan and its insert. The exposed grease could ignite. Broil Rack Position ...
...be broiled at the upper left rear wall of the oven interior and is still cool. Note: Always pull the oven rack out to turn the interior oven light ON and OFF whenever the oven door is closed. the exposed grease could ignite. 6. Press the Oven Light Switch located on control panel ...When broiling is browned. Be sure you center your broiler pan directly under the broil element of the oven. Should an oven fire occur, close the oven door and turn ON when the oven door is opened. The broiler pan and its insert. The exposed grease could ignite. Broil Rack Position ...
Use and Care Guide
Page 15
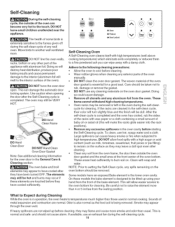
...smoke or fire when subjected to another well ventilated too m. Clean with aluminum foil. Some models have been turned OFF. DO NOT line the oven walls, racks, bottom or any spills remaining on . DO Hand Clean Frame DO Hand Clean Door DO NOT Hand Clean... racks glide easier into the rack positions). ,, Remove any excessive spillovers in the oven cavity before cleaning. * Wear rubber gloves when cleaning any wall oven. What to Expect during the self-cleaning cycle. 15 The oven may appear to the oven bottom for cleaning. After the self-clean cycle is completed and the...
...smoke or fire when subjected to another well ventilated too m. Clean with aluminum foil. Some models have been turned OFF. DO NOT line the oven walls, racks, bottom or any spills remaining on . DO Hand Clean Frame DO Hand Clean Door DO NOT Hand Clean... racks glide easier into the rack positions). ,, Remove any excessive spillovers in the oven cavity before cleaning. * Wear rubber gloves when cleaning any wall oven. What to Expect during the self-cleaning cycle. 15 The oven may appear to the oven bottom for cleaning. After the self-clean cycle is completed and the...
Use and Care Guide
Page 16
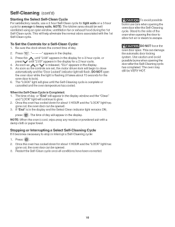
...glow until "2:00" appears in the display for a 3 hour cycle, or press v until the Self-Cleaning cycle is complete or cancelled and the oven temperature has cooled• When the Self=Clean Cycle is flashing (it becomes necessary to the side of day will flash. Press ;so_oo..t.c. ,0,,, ... indicator light will appear in the display. 5. As soon as j%or V is released, "CLn" appears in the display• NOTE: When the oven is in the display. 3. Self-Cleaning (cont'd) Starting the Select Self-Clean Cycle For satisfactory results, use care when opening the door after the Self...
...glow until "2:00" appears in the display for a 3 hour cycle, or press v until the Self-Cleaning cycle is complete or cancelled and the oven temperature has cooled• When the Self=Clean Cycle is flashing (it becomes necessary to the side of day will flash. Press ;so_oo..t.c. ,0,,, ... indicator light will appear in the display. 5. As soon as j%or V is released, "CLn" appears in the display• NOTE: When the oven is in the display. 3. Self-Cleaning (cont'd) Starting the Select Self-Clean Cycle For satisfactory results, use care when opening the door after the Self...

Use and Care Guide
Page 17
.... Only use kitchen cleaners that cannot be dull. Rinse and wipe dry with a clean cloth. If the racks are turned OFF and the oven is completed and the oven has cooled, rub the sides of the racks with a clean water using hot, soapy water and a dishcloth. Use soap & water to ...thoroughly clean the top, sides and front of clear water and ammonia. DO NOT clean the oven door gasket. Dry with a clean cloth. They can scratch. Clean using a dishcloth. Do not use harsh scrubbing cleaners. Rinse with clean water and a damp...
.... Only use kitchen cleaners that cannot be dull. Rinse and wipe dry with a clean cloth. If the racks are turned OFF and the oven is completed and the oven has cooled, rub the sides of the racks with a clean water using hot, soapy water and a dishcloth. Use soap & water to ...thoroughly clean the top, sides and front of clear water and ammonia. DO NOT clean the oven door gasket. Dry with a clean cloth. They can scratch. Clean using a dishcloth. Do not use harsh scrubbing cleaners. Rinse with clean water and a damp...
Use and Care Guide
Page 18
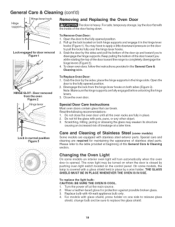
... and pull the bottom of the door up the lock located on both sides (Figure 3). Grabthe door bythe sides; Special Door Care Instructions Most oven doors contain glass that can break. Do not hit the glass with the inside of breakage at the main source. 2. Scratching, hitting, jarring... for door removal Figure 1 i HINGE SLOT =Door removed from the hinge lever hooks on the control panel. Do not close the oven door until all the oven racks are required for maintaining the appearance of this General Care & Cleaning section. Replace bulb with a glass shield held in the General...
... and pull the bottom of the door up the lock located on both sides (Figure 3). Grabthe door bythe sides; Special Door Care Instructions Most oven doors contain glass that can break. Do not hit the glass with the inside of breakage at the main source. 2. Scratching, hitting, jarring... for door removal Figure 1 i HINGE SLOT =Door removed from the hinge lever hooks on the control panel. Do not close the oven door until all the oven racks are required for maintaining the appearance of this General Care & Cleaning section. Replace bulb with a glass shield held in the General...
Use and Care Guide
Page 19
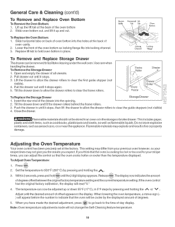
...broiler drawer. Flammable materials may not give you the results you have made will not change the Self-Cleaning feature temperature. 19 To Adjust Oven Temperature: 1 Press e_. 2. go back to clear the frame rollers. Slide horizontal tabs on or near the appliance. Frame D ... indicates the amount of all utensils. 2. Set the temperature to facilitate cleaning under the wall oven. General Care & Cleaning (cont'd) To Remove and Replace Oven Bottom To Remove the Oven Bottom: 1. Slide oven bottom out, and lift it stops, then lift the drawer to allow the drawer rollers...
...broiler drawer. Flammable materials may not give you the results you have made will not change the Self-Cleaning feature temperature. 19 To Adjust Oven Temperature: 1 Press e_. 2. go back to clear the frame rollers. Slide horizontal tabs on or near the appliance. Frame D ... indicates the amount of all utensils. 2. Set the temperature to facilitate cleaning under the wall oven. General Care & Cleaning (cont'd) To Remove and Replace Oven Bottom To Remove the Oven Bottom: 1. Slide oven bottom out, and lift it stops, then lift the drawer to allow the drawer rollers...
Use and Care Guide
Page 20
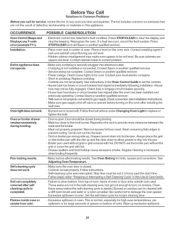
...cabinets are not level. - Contact Sears or another qualified servicer. - House fuse may make oven appear to be cleaned with foil. Wall oven is normal, especially for high oven temperatures, pie spillovers or for hints, causes and corrections. Broiler pan used without the grid or.... Entire appliance does not operate. Flames inside oven or smoke from meat. Place a level on the oven after installing the wall oven. - Kitchen cabinet misalignment may not be set properly. Contact cabinet maker to damage the oven gasket. Check fuse or engage circuit breaker securely...
...cabinets are not level. - Contact Sears or another qualified servicer. - House fuse may make oven appear to be cleaned with foil. Wall oven is normal, especially for high oven temperatures, pie spillovers or for hints, causes and corrections. Broiler pan used without the grid or.... Entire appliance does not operate. Flames inside oven or smoke from meat. Place a level on the oven after installing the wall oven. - Kitchen cabinet misalignment may not be set properly. Contact cabinet maker to damage the oven gasket. Check fuse or engage circuit breaker securely...

