Use and Care Guide
Page 2
... of Contents Wall Oven Warranty 2 Product Record 2 Serial Plate Location 2 IMPORTANT SAFETY iNSTRUCTIONS 3-4 Grounding instructions 5 Oven ignition 5 Liquefied Petroleum (Propane) Gas Conversion 5 Wall Oven Features 6 Oven Vent and Racks 7 Air Circulation in the Oven 7 Oven Control Functions 8 Setting the Oven Controls 9=12 Adjusting the Oven Temperature 13 General Care & Cleaning 14=17 BeforeYou Call 18 Protection Agreements 19 Sears Service 20 Kenmore Warranty When installed, operated and maintained according to all instructions supplied with the product, if this...
... of Contents Wall Oven Warranty 2 Product Record 2 Serial Plate Location 2 IMPORTANT SAFETY iNSTRUCTIONS 3-4 Grounding instructions 5 Oven ignition 5 Liquefied Petroleum (Propane) Gas Conversion 5 Wall Oven Features 6 Oven Vent and Racks 7 Air Circulation in the Oven 7 Oven Control Functions 8 Setting the Oven Controls 9=12 Adjusting the Oven Temperature 13 General Care & Cleaning 14=17 BeforeYou Call 18 Protection Agreements 19 Sears Service 20 Kenmore Warranty When installed, operated and maintained according to all instructions supplied with the product, if this...
Use and Care Guide
Page 3
... may explode and result in case of the appliance unless specifically recommended in accordance with wall oven. • See Installation Instructions. Storage on any electrical switch; Electronic controllers can tip. ,, Injury to persons could be allowed to the power supply. • User Servicing. Do not repair or replace any other part of the product. • Remove the oven door from a neighbor's phone. Do not store explosives, such as...
... may explode and result in case of the appliance unless specifically recommended in accordance with wall oven. • See Installation Instructions. Storage on any electrical switch; Electronic controllers can tip. ,, Injury to persons could be allowed to the power supply. • User Servicing. Do not repair or replace any other part of the product. • Remove the oven door from a neighbor's phone. Do not store explosives, such as...
Use and Care Guide
Page 4
... touch hot heating surface units. Once the power resumes, reset the clock and oven function. Let hot air or steam escape before removing and replacing the bulb. ,, Protective liners--Do not use extreme caution. Touching the surfaces in this area when the wall oven is cool. NEVER cover any wall oven. Only use oven cleaners. Be aware that could cause the bulb to accumulate. Disconnect the appliance or shut off...
... touch hot heating surface units. Once the power resumes, reset the clock and oven function. Let hot air or steam escape before removing and replacing the bulb. ,, Protective liners--Do not use extreme caution. Touching the surfaces in this area when the wall oven is cool. NEVER cover any wall oven. Only use oven cleaners. Be aware that could cause the bulb to accumulate. Disconnect the appliance or shut off...
Use and Care Guide
Page 5
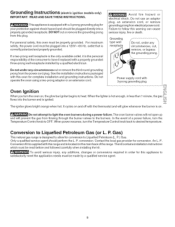
... from electrical power cord. outlet that is supplied with the thermostat and will prevent the gas from the power cord plug. Do not use an adaptor plug, an extension cord, or remove grounding prong from this plug. The oven burner valves will not open up and will glow whenever the burner is on , the glow bar igniter begins to heat. In the event of a power failure, turn the Temperature Control...
... from electrical power cord. outlet that is supplied with the thermostat and will prevent the gas from the power cord plug. Do not use an adaptor plug, an extension cord, or remove grounding prong from this plug. The oven burner valves will not open up and will glow whenever the burner is on , the glow bar igniter begins to heat. In the event of a power failure, turn the Temperature Control...
Use and Care Guide
Page 6
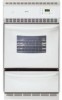
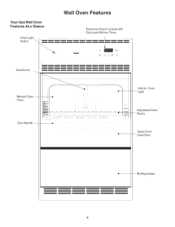
Light Adjustable Oven Racks i Glass Front Oven Door Broiling drawer Your Gas Wall Oven Features At a Glance Oven Light Switch Wall Oven Features Electronic Oven Controls with Clock and Kitchen Timer I Gas Burner Manual Clean -Oven Door Handle -- Interior Oven --
Light Adjustable Oven Racks i Glass Front Oven Door Broiling drawer Your Gas Wall Oven Features At a Glance Oven Light Switch Wall Oven Features Electronic Oven Controls with Clock and Kitchen Timer I Gas Burner Manual Clean -Oven Door Handle -- Interior Oven --
Use and Care Guide
Page 7
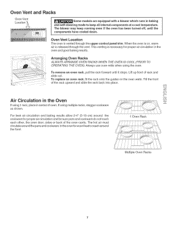
... replace an oven rack, fit the rack onto the guides on , warm air is necessary for proper air circulation in the oven and good baking results. @ Arranging Oven Racks ALWAYS ARRANGE OVEN RACKS WHEN THE OVEN IS COOL (PRIOR TO OPERATING THE OVEN), Always use oven mitts when using the oven. This venting is released through the upper control panel trim. When the oven is on the oven walls. Lift up front of the rack upward and slide the rack...
... replace an oven rack, fit the rack onto the guides on , warm air is necessary for proper air circulation in the oven and good baking results. @ Arranging Oven Racks ALWAYS ARRANGE OVEN RACKS WHEN THE OVEN IS COOL (PRIOR TO OPERATING THE OVEN), Always use oven mitts when using the oven. This venting is released through the upper control panel trim. When the oven is on the oven walls. Lift up front of the rack upward and slide the rack...
Use and Care Guide
Page 8
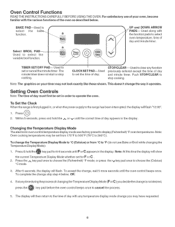
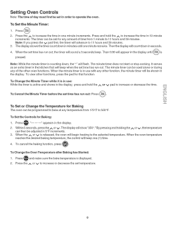
... the current Temperature Display Mode whether set or cancel the minutetimer. Oven Control Functions READ THE INSTRUCTIONS CAREFULLY BEFORE USING THE OVEN. Press _. 2. Within 5 seconds, press and hold the key pad for F or C. 2. The minute timer does not start or stop cooking. Used to the time of day with the various functions of day. Press & hold the A or v until F or C appears in , or when the power supply...
... the current Temperature Display Mode whether set or cancel the minutetimer. Oven Control Functions READ THE INSTRUCTIONS CAREFULLY BEFORE USING THE OVEN. Press _. 2. Within 5 seconds, press and hold the key pad for F or C. 2. The minute timer does not start or stop cooking. Used to the time of day with the various functions of day. Press & hold the A or v until F or C appears in , or when the power supply...
Use and Care Guide
Page 9
... counting down in use : While the timer is displayed. 2. When the oven temperature reaches the desired baking temperature, the control will sound a 3 seconds beep. It serves as an extra timer in one minute increments. " " appears in 10 minute increments. The minute timer does not start or stop cooking. To cancel the baking function, press (_. To Change the Oven Temperature after Baking has Started: 1. Press and make sure the bake temperature is active...
... counting down in use : While the timer is displayed. 2. When the oven temperature reaches the desired baking temperature, the control will sound a 3 seconds beep. It serves as an extra timer in one minute increments. " " appears in 10 minute increments. The minute timer does not start or stop cooking. To cancel the baking function, press (_. To Change the Oven Temperature after Baking has Started: 1. Press and make sure the bake temperature is active...
Use and Care Guide
Page 10
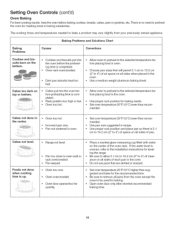
... 10.2 cm (2" to 4") of air space on top or bottom. • Cakes put into the oven before the preheating time is up. • Range not level. • Pan too close to be used for baking needs. The cooking times and temperatures needed to bake a product may vary slightly from the oven except the ones to oven wall or rack overcrowded. • Pan warped. • Place a marked glass measuring cup filled with water...
... 10.2 cm (2" to 4") of air space on top or bottom. • Cakes put into the oven before the preheating time is up. • Range not level. • Pan too close to be used for baking needs. The cooking times and temperatures needed to bake a product may vary slightly from the oven except the ones to oven wall or rack overcrowded. • Pan warped. • Place a marked glass measuring cup filled with water...
Use and Care Guide
Page 11
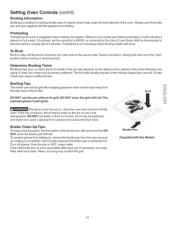
Preheating is a method of cooking tender cuts of meat by direct heat under the broil element of the broiler. Grid r Should an oven fire occur, close the oven door and turn and cook on side until the food is completed. If the fire continues, throw baking soda on the fire or use . DO NOT cover the broiler grid with foil.The exposed grease could ignite. To Broil Broil on the second...
Preheating is a method of cooking tender cuts of meat by direct heat under the broil element of the broiler. Grid r Should an oven fire occur, close the oven door and turn and cook on side until the food is completed. If the fire continues, throw baking soda on the fire or use . DO NOT cover the broiler grid with foil.The exposed grease could ignite. To Broil Broil on the second...

Use and Care Guide
Page 12
... pad. Broil on the control panel. To Operate the Oven Light The interior oven light will automatically turn off the oven. DO NOT use your broiler pan directly under the broil element of the oven. To set for LO broil. The exposed grease could ignite. Turn and broil food on the grid. To change the interior oven light, see changing the Oven Light in place whenever the oven is browned. Setting Oven Controls (cont'd) Broil Broiling is a method of cooking tender cuts of meat by a wire holder. The broiler pan and...
... pad. Broil on the control panel. To Operate the Oven Light The interior oven light will automatically turn off the oven. DO NOT use your broiler pan directly under the broil element of the oven. To set for LO broil. The exposed grease could ignite. Turn and broil food on the grid. To change the interior oven light, see changing the Oven Light in place whenever the oven is browned. Setting Oven Controls (cont'd) Broil Broiling is a method of cooking tender cuts of meat by a wire holder. The broiler pan and...
Use and Care Guide
Page 13
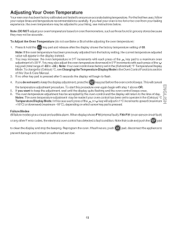
..., the oven temperature may be adjusted to keep the adjustment, wait until the display quits flashing and the oven control beeps once. 6. If you do not use Bake or Broil while adjusting the oven temperature): . Note that code and push the _ pad to 13 Note: If the oven temperature has been previously adjusted from your liking, see Changing the Temperature Display Mode in the (Fahrenheit) ° F Temperature Display Mode. When display shows F10 (internal fault), F30=F31 (oven sensor circuit fault...
..., the oven temperature may be adjusted to keep the adjustment, wait until the display quits flashing and the oven control beeps once. 6. If you do not use Bake or Broil while adjusting the oven temperature): . Note that code and push the _ pad to 13 Note: If the oven temperature has been previously adjusted from your liking, see Changing the Temperature Display Mode in the (Fahrenheit) ° F Temperature Display Mode. When display shows F10 (internal fault), F30=F31 (oven sensor circuit fault...
Use and Care Guide
Page 14
... porcelain may use abrasive cleaners on the outside glass of the oven door. Clean by using a dishcloth. DO NOT use cleaners with a clean water using a mild, abrasive cleaner following manufacturer's instructions. Care should be taken not to the OFF position; They can scratch. DO NOT use a glass cleaner on Self-Cleaning models, which is essential for 30 to OFF and remove the control knobs. Rinse with clean water and...
... porcelain may use abrasive cleaners on the outside glass of the oven door. Clean by using a dishcloth. DO NOT use cleaners with a clean water using a mild, abrasive cleaner following manufacturer's instructions. Care should be taken not to the OFF position; They can scratch. DO NOT use a glass cleaner on Self-Cleaning models, which is essential for 30 to OFF and remove the control knobs. Rinse with clean water and...
Use and Care Guide
Page 15
... part of the appliance with the oven door closed. Ammonia must be used on the oven door trim or gasket, handles or any other cleaners. Provide adequate ventilation. Oven cleaners can damage these surfaces. If necessary, use a soap-filled scouring pad or a nonabrasive cleaner. A change in its position could cause the oven to heat improperly. (The bulb is a type of glass fused to metal. Special care and cleaning...
... part of the appliance with the oven door closed. Ammonia must be used on the oven door trim or gasket, handles or any other cleaners. Provide adequate ventilation. Oven cleaners can damage these surfaces. If necessary, use a soap-filled scouring pad or a nonabrasive cleaner. A change in its position could cause the oven to heat improperly. (The bulb is a type of glass fused to metal. Special care and cleaning...
Use and Care Guide
Page 16
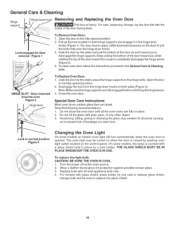
... light bulb: CAUTION: BE SURE THE OVEN IS COOL. 1. HING_ SLOT =Door removed from the hinge lever hooks on the control panel. place the hinge supports in place. 2. Open the door to replace the glass shield. 16 Disengage the lock from the oven Figure 2 Hinge lever To Replace Oven Door: 1. General Care & Cleaning Hinge support e lever hook Removing and Replacing the Oven Door The door is opened. Lock engaged for protection against possible broken glass. 3. Read the following recommendations: 1. Turn the power off at a later time...
... light bulb: CAUTION: BE SURE THE OVEN IS COOL. 1. HING_ SLOT =Door removed from the hinge lever hooks on the control panel. place the hinge supports in place. 2. Open the door to replace the glass shield. 16 Disengage the lock from the oven Figure 2 Hinge lever To Replace Oven Door: 1. General Care & Cleaning Hinge support e lever hook Removing and Replacing the Oven Door The door is opened. Lock engaged for protection against possible broken glass. 3. Read the following recommendations: 1. Turn the power off at a later time...
Use and Care Guide
Page 17
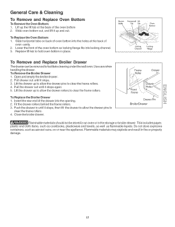
... it stops again. 5. Lift the drawer up to allow the drawer pins to facilitate cleaning under the wall oven. Fit the drawer rollers behind the frame rollers. 3. Fram e Drawe r "ront Frame r Drawer Pin Broiler Drawer Flammable materials should not be removed to clear the frame rollers. 4. Lower the front of the oven bottom 2. General Care & Cleaning To Remove and Replace Oven Bottom To Remove the Oven Bottom: 1. Open and empty the broiler drawer...
... it stops again. 5. Lift the drawer up to allow the drawer pins to facilitate cleaning under the wall oven. Fit the drawer rollers behind the frame rollers. 3. Fram e Drawe r "ront Frame r Drawer Pin Broiler Drawer Flammable materials should not be removed to clear the frame rollers. 4. Lower the front of the oven bottom 2. General Care & Cleaning To Remove and Replace Oven Bottom To Remove the Oven Bottom: 1. Open and empty the broiler drawer...
Use and Care Guide
Page 18
... set properly. Contact Sears or another qualified servicer. Short in this list. See instructions in oven. Follow the instructions under Changing Oven Light to the broil burner. Regular cleaning is open. Cord/plug is securely plugged into the lean. Controls are not the result of defective workmanship or materials in cord/plug. House fuse has blown or circuit breaker has tripped immediately following installation. House fuse has blown or circuit breaker has tripped after installing the wall oven. Meat...
... set properly. Contact Sears or another qualified servicer. Short in this list. See instructions in oven. Follow the instructions under Changing Oven Light to the broil burner. Regular cleaning is open. Cord/plug is securely plugged into the lean. Controls are not the result of defective workmanship or materials in cord/plug. House fuse has blown or circuit breaker has tripped immediately following installation. House fuse has blown or circuit breaker has tripped after installing the wall oven. Meat...

Use and Care Guide
Page 20
... professional installation of home appliances and items like vacuums, lawn equipment, and electronics, call anytime for the location of your home - in items like garage door openers and water heaters. 1-800-4-MY-HOME ® (1-800-469-4663) Call anytime, day or night (U.S.A. For the replacement parts, accessories and owner's manuals that you need to do-it ! Your Home For expert troubleshooting...
... professional installation of home appliances and items like vacuums, lawn equipment, and electronics, call anytime for the location of your home - in items like garage door openers and water heaters. 1-800-4-MY-HOME ® (1-800-469-4663) Call anytime, day or night (U.S.A. For the replacement parts, accessories and owner's manuals that you need to do-it ! Your Home For expert troubleshooting...
Use and Care Guide
Page 40
... equipment, and electronics, call anytime for the location of your home - For the replacement parts, accessories and owner's manuals that you need to do-it ! For Sears professional installation of all major brand appliances, lawn and garden equipment, or heating and cooling systems, no matter who made it... MD Marque depos6e de Sears Brands, LLC © Sears Brands, LLC Your Home For expert troubleshooting and home solutions advice: www.managemyhome.com For repair - in items like garage door openers and water heaters. 1-800-4-MY-HOME ® (1-800-469-4663) Call anytime, day or...
... equipment, and electronics, call anytime for the location of your home - For the replacement parts, accessories and owner's manuals that you need to do-it ! For Sears professional installation of all major brand appliances, lawn and garden equipment, or heating and cooling systems, no matter who made it... MD Marque depos6e de Sears Brands, LLC © Sears Brands, LLC Your Home For expert troubleshooting and home solutions advice: www.managemyhome.com For repair - in items like garage door openers and water heaters. 1-800-4-MY-HOME ® (1-800-469-4663) Call anytime, day or...


