Owners Manual
Page 1
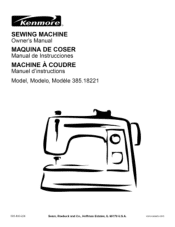
www.sears.com ® SEWING MACHINE Owner's Manual MAQUINA DE COSER Manual de Instrucciones MACHINE .ikCOUDRE Manuel d'instructions Model, Modelo, Modele 385.18221 I 0 505-800-226 Sears, Roebuck and Co., Hoffman Estates, IL 60179 U.S.A.
www.sears.com ® SEWING MACHINE Owner's Manual MAQUINA DE COSER Manual de Instrucciones MACHINE .ikCOUDRE Manuel d'instructions Model, Modelo, Modele 385.18221 I 0 505-800-226 Sears, Roebuck and Co., Hoffman Estates, IL 60179 U.S.A.
Owners Manual
Page 2
... needle, threading the bobbin, changing the presser foot, and the like. 15. Never operate the appliance with same type rated 15 Watts. To unplug, grasp the plug, not the cord. 10. Do not pull or push fabric while stitching. Never drop or insert any other... adjustments mentioned in the needle area, such as a toy. Do not operate where aerosol (spray) products are being administered. 8. Switch this sewing machine off ("O") position, then remove plug from the electric outlet...
... needle, threading the bobbin, changing the presser foot, and the like. 15. Never operate the appliance with same type rated 15 Watts. To unplug, grasp the plug, not the cord. 10. Do not pull or push fabric while stitching. Never drop or insert any other... adjustments mentioned in the needle area, such as a toy. Do not operate where aerosol (spray) products are being administered. 8. Switch this sewing machine off ("O") position, then remove plug from the electric outlet...
Owners Manual
Page 5
...of belts, light bulbs, needle plates and accessory parts if they are defective in material or workmanship This 90 day warranty does not include sewing machine needles, which are defective in material or workmanship. Full 2 Year Warranty on Electrical Equipment For 2 years from the date of purchase, ...specific legal rights, and you may also have other rights which are only included in 90 day warranty described below . Kenmore Sewing Machine Warranty Full 25Year Warranty on Sewing Machine Die-Cast Metal Frame For 25 years from the date of purchase, Sears will provide free repair for the die-...
...of belts, light bulbs, needle plates and accessory parts if they are defective in material or workmanship This 90 day warranty does not include sewing machine needles, which are defective in material or workmanship. Full 2 Year Warranty on Electrical Equipment For 2 years from the date of purchase, ...specific legal rights, and you may also have other rights which are only included in 90 day warranty described below . Kenmore Sewing Machine Warranty Full 25Year Warranty on Sewing Machine Die-Cast Metal Frame For 25 years from the date of purchase, Sears will provide free repair for the die-...
Owners Manual
Page 11
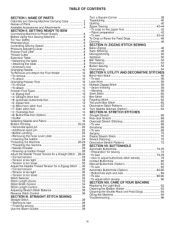
...pin 20 • Additional spool pin 20 • Bobbin winding 22 • Removing the hook cover plate 24 • Inserting the bobbin 24 Threading the Machine 26-28 • Threading the machine 26 • Needle threader 26 • Drawing up bobbin thread 28 Adjust the Needle Thread Tension for a ...38 Topstitching 40 Quilting 40 Zipper Sewing 42-44 • To snap on the zipper foot 42 • Fabric preparation 42 • To sew 42-44 To Drop or Raise the Feed Dogs 46 Darning 46 SECTION IV. NAME OF PARTS Cabinets and Sewing Machine Carrying Case 2 Names of ...
...pin 20 • Additional spool pin 20 • Bobbin winding 22 • Removing the hook cover plate 24 • Inserting the bobbin 24 Threading the Machine 26-28 • Threading the machine 26 • Needle threader 26 • Drawing up bobbin thread 28 Adjust the Needle Thread Tension for a ...38 Topstitching 40 Quilting 40 Zipper Sewing 42-44 • To snap on the zipper foot 42 • Fabric preparation 42 • To sew 42-44 To Drop or Raise the Feed Dogs 46 Darning 46 SECTION IV. NAME OF PARTS Cabinets and Sewing Machine Carrying Case 2 Names of ...
Owners Manual
Page 14
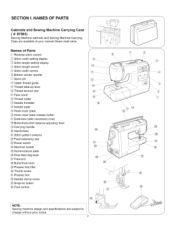
... @_Free-arm @ Buttonhole lever @_Presser foot lifter _0_Thumb screw @ Presser foot @ Needle clamp screw @ Snap-on button @ Foot control NOTE: Sewing machine design and specifications are available at your nearest Sears retail store. NAMES OF PARTS f Cabinets and Sewing Machine Carrying Case ( # 97503) Sewing Machine cabinets and Sewing Machine Carrying Case are subject to change without prior notice. \ 2 J /' \ / / @ @ J
... @_Free-arm @ Buttonhole lever @_Presser foot lifter _0_Thumb screw @ Presser foot @ Needle clamp screw @ Snap-on button @ Foot control NOTE: Sewing machine design and specifications are available at your nearest Sears retail store. NAMES OF PARTS f Cabinets and Sewing Machine Carrying Case ( # 97503) Sewing Machine cabinets and Sewing Machine Carrying Case are subject to change without prior notice. \ 2 J /' \ / / @ @ J
Owners Manual
Page 18
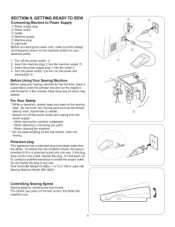
... first time, place a waste fabric under the presser foot and run the machine with Sewing Machine Model 385.18221. / Controlling Sewing Speed Sewing speed is intended to your electrical power. 1. GETTING READYTO SEW f Connecting Machine to Power Supply _1_Power supply plug (2_P' ower switch (3_Outlet _4_Machine socket @ Machine plug @ Light bulb Before connecting the power cord, make sure the...
... first time, place a waste fabric under the presser foot and run the machine with Sewing Machine Model 385.18221. / Controlling Sewing Speed Sewing speed is intended to your electrical power. 1. GETTING READYTO SEW f Connecting Machine to Power Supply _1_Power supply plug (2_P' ower switch (3_Outlet _4_Machine socket @ Machine plug @ Light bulb Before connecting the power cord, make sure the...

Owners Manual
Page 20
...Extension Table • Detaching the table Pull the table away from the machine, as illustrated, for easy removal of the presser foot, or to help you . m _i_ Presser foot lifter _2_Normal up position for "free-arm" sewing of cuffs and sleeves. • Attaching the table Push the extension table...presser foot. You can raise it snaps into the machine. _i_ Extension table _2_Pin _3_Holes _4_Tab _5_Free-arm • Accessory box Open the cover of stretch may also require the pressure at "3" for applique, cut the thread after sewing. Reduce the pressure to cut work, draw work and...
...Extension Table • Detaching the table Pull the table away from the machine, as illustrated, for easy removal of the presser foot, or to help you . m _i_ Presser foot lifter _2_Normal up position for "free-arm" sewing of cuffs and sleeves. • Attaching the table Push the extension table...presser foot. You can raise it snaps into the machine. _i_ Extension table _2_Pin _3_Holes _4_Tab _5_Free-arm • Accessory box Open the cover of stretch may also require the pressure at "3" for applique, cut the thread after sewing. Reduce the pressure to cut work, draw work and...
Owners Manual
Page 32
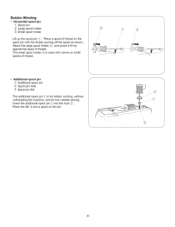
The small spool holder_3_ is used with the thread coming off the spool as shown. Bobbin Winding • Horizontal spool pin _(1_S'pool pin (2_,Large spool holder _3_Small spool holder f / / Lift up the spool pin \12. Place a spool of thread ... pin. 20 j Additional spool pin \/Additional spool pin _2_Spool pin hole ,(3_S, pool pin felt The additional spool pin _1_is for bobbin winding, without unthreading the machine, and for twin needle sewing. Attach the large spool holder _2_.,and press it firmly against the spool of thread. [\lji / / ,. Place the felt _3_and a spool...
The small spool holder_3_ is used with the thread coming off the spool as shown. Bobbin Winding • Horizontal spool pin _(1_S'pool pin (2_,Large spool holder _3_Small spool holder f / / Lift up the spool pin \12. Place a spool of thread ... pin. 20 j Additional spool pin \/Additional spool pin _2_Spool pin hole ,(3_S, pool pin felt The additional spool pin _1_is for bobbin winding, without unthreading the machine, and for twin needle sewing. Attach the large spool holder _2_.,and press it firmly against the spool of thread. [\lji / / ,. Place the felt _3_and a spool...
Owners Manual
Page 34
...and cut the thread close to the hole in the bobbin. [] Depress the foot control again. Return the bobbin winder to its original position by moving the spindle to fix the stopper at the desired positon. _ J 22 The machine will not sew until the clutch is engaged. [] °Z!........ [] ............ []% %% [] J NOTE: / The position of the bobbin winder stopper is fully wound, it has made a few turns, and then cut ...
...and cut the thread close to the hole in the bobbin. [] Depress the foot control again. Return the bobbin winder to its original position by moving the spindle to fix the stopper at the desired positon. _ J 22 The machine will not sew until the clutch is engaged. [] °Z!........ [] ............ []% %% [] J NOTE: / The position of the bobbin winder stopper is fully wound, it has made a few turns, and then cut ...
Owners Manual
Page 54
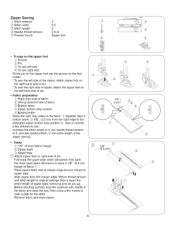
... fabric _ Wrong (bottom) side of fabric _3) Bottom seam _4_Zipper bottom stop the machine with margin edge. Fold back the upper layer seam allowance. Increase the stitch length to 4, set needle thread tension to leave a 1/8" (0.4 cm) margin of pin. Sew a bottom seam ,_3_5/8" (2.2 cm) from the right edge to the estimated zipper...
... fabric _ Wrong (bottom) side of fabric _3) Bottom seam _4_Zipper bottom stop the machine with margin edge. Fold back the upper layer seam allowance. Increase the stitch length to 4, set needle thread tension to leave a 1/8" (0.4 cm) margin of pin. Sew a bottom seam ,_3_5/8" (2.2 cm) from the right edge to the estimated zipper...
Owners Manual
Page 56
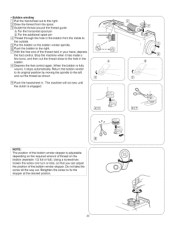
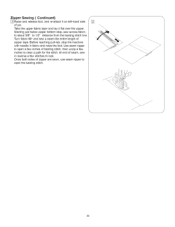
...and raise the foot. Before reaching pull-tab, stop , sew across fabric to about 3/8" to lock. Once both sides of zipper are sewn, use seam ripper to open a few inches of zipper tape. Starting just below zipper bottom stop the machine with needle in reverse a few inches to open the basting... stitch. 44 Use seam ripper to clear a path for the stitch. Zipper Sewing (Continued) []Raise and release foot, and re-attach it flat over the zipper.
...and raise the foot. Before reaching pull-tab, stop , sew across fabric to about 3/8" to lock. Once both sides of zipper are sewn, use seam ripper to open a few inches of zipper tape. Starting just below zipper bottom stop the machine with needle in reverse a few inches to open the basting... stitch. 44 Use seam ripper to clear a path for the stitch. Zipper Sewing (Continued) []Raise and release foot, and re-attach it flat over the zipper.
Owners Manual
Page 58
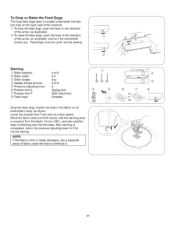
...of fabric under the hole to reinforce it. I II I II 46 Lower the presser foot F and sew at a slow speed. After darning is completed, return the pressure adjusting lever to 6 0 Zigzag foot Satin stitch foot Dropped Drop the feed dogs. Center the hole in the direction of the arrow, as shown. NOTE: If... on the back side of the machine. _1:To drop the feed dogs, push the lever in the direction of the arrow, as illustrated. _2_To raise the feed dogs, push the lever in the fabric on an embroidery hoop, as illustrated, and turn (90°), and sew another layer of stitching over the...
...of fabric under the hole to reinforce it. I II I II 46 Lower the presser foot F and sew at a slow speed. After darning is completed, return the pressure adjusting lever to 6 0 Zigzag foot Satin stitch foot Dropped Drop the feed dogs. Center the hole in the direction of the arrow, as shown. NOTE: If... on the back side of the machine. _1:To drop the feed dogs, push the lever in the direction of the arrow, as illustrated. _2_To raise the feed dogs, push the lever in the fabric on an embroidery hoop, as illustrated, and turn (90°), and sew another layer of stitching over the...

Owners Manual
Page 88
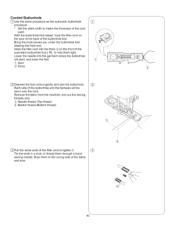
Sew slowly and stop the machine at the starting point. Then shift the selector back to the next setting. pring holder (89' Difference [] Draw both threads to the left under the ... buttonhole setting "[I ". [] When finished, push the buttonhole lever up as far as it will go. 76 > J J -x k_ J J Cut the opening with the buttonhole opener. [] To sew another buttonhole, you must reset the machine. _3_M. ark for placement of buttonhole f @ Starting point [] @ Slider @ There should be no gap. _7_S.
Sew slowly and stop the machine at the starting point. Then shift the selector back to the next setting. pring holder (89' Difference [] Draw both threads to the left under the ... buttonhole setting "[I ". [] When finished, push the buttonhole lever up as far as it will go. 76 > J J -x k_ J J Cut the opening with the buttonhole opener. [] To sew another buttonhole, you must reset the machine. _3_M. ark for placement of buttonhole f @ Starting point [] @ Slider @ There should be no gap. _7_S.
Owners Manual
Page 92
.... Draw them through a hand- Bring the ends toward you under the buttonhole foot, clearing the front end. Remove the fabric from the machine, and cut the sewing threads only. _3_Needle thread (Top thread) _4_Bobbin thread (Bottom thread) [] Pull the loose ends of the filler cord to tighten it. [] Tie the ends in.... Hook the filler cord into the garment where the buttonhole will start, and lower the foot. _1_Spur _2_F' orks f [] / [] Depress the foot control gently, and sew the buttonhole. [] Each side of the fabric and knot. \ / / / J 80
.... Draw them through a hand- Bring the ends toward you under the buttonhole foot, clearing the front end. Remove the fabric from the machine, and cut the sewing threads only. _3_Needle thread (Top thread) _4_Bobbin thread (Bottom thread) [] Pull the loose ends of the filler cord to tighten it. [] Tie the ends in.... Hook the filler cord into the garment where the buttonhole will start, and lower the foot. _1_Spur _2_F' orks f [] / [] Depress the foot control gently, and sew the buttonhole. [] Each side of the fabric and knot. \ / / / J 80

Owners Manual
Page 94
...is to instructions [] and [] on page 80. To cut the opening and to reset for sewing the next buttonhole, refer to start, and lower the foot. J = i J J [] Sew the front bartack and left row, then stop the -x machine at " D" by turning the stitch selector. [] Attach the buttonhole foot [ B] . ... (2.5 cm), a buttonhole must be made manually as follows: [] Turn the handwheel toward you to raise the needle to its highest position. J [] Sew the back bartack and right row, then stop . [] Click the buttonhole lever toward you . J 82 Raise the presser foot. [] Set the stitch ...
...is to instructions [] and [] on page 80. To cut the opening and to reset for sewing the next buttonhole, refer to start, and lower the foot. J = i J J [] Sew the front bartack and left row, then stop the -x machine at " D" by turning the stitch selector. [] Attach the buttonhole foot [ B] . ... (2.5 cm), a buttonhole must be made manually as follows: [] Turn the handwheel toward you to raise the needle to its highest position. J [] Sew the back bartack and right row, then stop . [] Click the buttonhole lever toward you . J 82 Raise the presser foot. [] Set the stitch ...
Owners Manual
Page 98
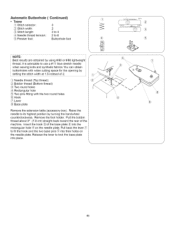
Automatic Buttonhole (Continued) • Tosew _!_'Stitch selector: 3 _2_S, titch width: 2 _3_Stitch length: 3 to 4
Automatic Buttonhole (Continued) • Tosew _!_'Stitch selector: 3 _2_S, titch width: 2 _3_Stitch length: 3 to 4

Owners Manual
Page 102
...time you start , increase the stitch length. Allow the machine to do not try to sew a buttonhole. Lower the buttonhole foot. j 9O Place the fabric behind the machine; insert the fabric between 3 and 4. =.7.... Start sewing slowly. Stop sewing when the needle returns to be sewn at the beginning of...,_4_Fabric Mark the buttonhole position carefully on the buttonhole foot(2). NOTE: If you and lift the base plate off the machine. Interfacing is altered by itself, i.e., do the work by setting the stitch length between the guide plate and the buttonhole foot as ...
...time you start , increase the stitch length. Allow the machine to do not try to sew a buttonhole. Lower the buttonhole foot. j 9O Place the fabric behind the machine; insert the fabric between 3 and 4. =.7.... Start sewing slowly. Stop sewing when the needle returns to be sewn at the beginning of...,_4_Fabric Mark the buttonhole position carefully on the buttonhole foot(2). NOTE: If you and lift the base plate off the machine. Interfacing is altered by itself, i.e., do the work by setting the stitch length between the guide plate and the buttonhole foot as ...

Owners Manual
Page 106
... a year. Oiling the Machine S Unplug the machine. One or two drops of oil is sufficient. Use quality sewing machine oil. 94 \\\\\\ J Open the face cover to allow room to the stopper. In case the machine has not been used for a long period, oil it . [] ,,2)_Bobbin holder [] Brush out dust and lint inside the bobbin holder. Wipe out...
... a year. Oiling the Machine S Unplug the machine. One or two drops of oil is sufficient. Use quality sewing machine oil. 94 \\\\\\ J Open the face cover to allow room to the stopper. In case the machine has not been used for a long period, oil it . [] ,,2)_Bobbin holder [] Brush out dust and lint inside the bobbin holder. Wipe out...
Owners Manual
Page 108
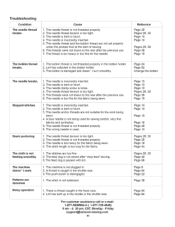
... has built up in the bobbin holder. 3. The needle thread is disengaged. 1. Lint has collected in the shuttle or the shuttle race. The machine doesn' t work being sewn. 1. The needle is too heavy for the fabric being sewn. 4. The needle thread tension is not raised after "drop feed" sewing. 3. The feed dog is too...
... has built up in the bobbin holder. 3. The needle thread is disengaged. 1. Lint has collected in the shuttle or the shuttle race. The machine doesn' t work being sewn. 1. The needle is too heavy for the fabric being sewn. 4. The needle thread tension is not raised after "drop feed" sewing. 3. The feed dog is too...


