Owners Manual
Page 2
... chanical adjustment. 4. Never drop or insert any object into water. Always unplug before cleaning. 2. Replace bulb with any opening blocked. Always use bent needles. 13. Return this owner's manual. Do not unplug by or near children. 2. Close attention is necessary when this owner's manual. Never operate the appliance with same type rated 15 Watts. SAVE THESE INSTRUCTIONS DANGER- Do not use as described in this sewing machine to break. 12...
... chanical adjustment. 4. Never drop or insert any object into water. Always unplug before cleaning. 2. Replace bulb with any opening blocked. Always use bent needles. 13. Return this owner's manual. Do not unplug by or near children. 2. Close attention is necessary when this owner's manual. Never operate the appliance with same type rated 15 Watts. SAVE THESE INSTRUCTIONS DANGER- Do not use as described in this sewing machine to break. 12...
Owners Manual
Page 5
... of purchase, Sears will provide free repair for all components of this sewing machine, if any part of belts, light bulbs, needle plates and accessory parts if they are only included in material or workmanship. This 2 year warranty does not include needle plate or accessory parts, which are only included in material or workmanship. Kenmore Sewing Machine Warranty Full 25Year Warranty on Sewing Machine Die-Cast Metal Frame For 25...
... of purchase, Sears will provide free repair for all components of this sewing machine, if any part of belts, light bulbs, needle plates and accessory parts if they are only included in material or workmanship. This 2 year warranty does not include needle plate or accessory parts, which are only included in material or workmanship. Kenmore Sewing Machine Warranty Full 25Year Warranty on Sewing Machine Die-Cast Metal Frame For 25...
Owners Manual
Page 11
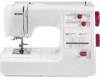
...6 Controlling Sewing Speed 6 Pressure Adjusting Lever 8 Presser Foot Lifter 8 Thread Cutter 8 Extension Table 8 • Detaching the table 8 • Attaching the table 8 • Accessory box 8 Changing Needle 10 To Remove and Attach the Foot Holder 10 • To remove 10 • To attach 10 Changing Presser Foot 10 • To remove 10 • To attach 10 Presser Foot Types 12 • A: Zigzag foot 12 • H: Straight stitch foot 12 • R: Automatic buttonhole foot 12 • E: Zipper foot 12 • G: Blind hem stitch foot 12 • F: Satin stitch foot...
...6 Controlling Sewing Speed 6 Pressure Adjusting Lever 8 Presser Foot Lifter 8 Thread Cutter 8 Extension Table 8 • Detaching the table 8 • Attaching the table 8 • Accessory box 8 Changing Needle 10 To Remove and Attach the Foot Holder 10 • To remove 10 • To attach 10 Changing Presser Foot 10 • To remove 10 • To attach 10 Presser Foot Types 12 • A: Zigzag foot 12 • H: Straight stitch foot 12 • R: Automatic buttonhole foot 12 • E: Zipper foot 12 • G: Blind hem stitch foot 12 • F: Satin stitch foot...
Owners Manual
Page 14
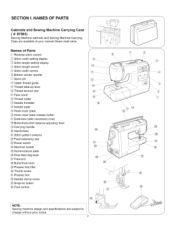
... length control _5_Stitch width control _6_Bobbin winder spindle _7)Spool pin _8_Upper thread guide _§_Thread take-up lever _0_Thread tension dial _ Face cover @ Thread cutter _ Needle threader @ Needle plate _ Hook cover plate _ Hook cover plate release button _7_Extension table (Accessory box) @ Buttonhole pitch balance adjusting lever _9_Carrying handle @0H_andwheel @ Stitch pattern selector @ Feed balancing dial @ Power switch @ Machine socket @_Nomenclature plate @_Drop feed dog lever @_Free-arm @ Buttonhole lever @_Presser foot lifter _0_Thumb screw @ Presser...
... length control _5_Stitch width control _6_Bobbin winder spindle _7)Spool pin _8_Upper thread guide _§_Thread take-up lever _0_Thread tension dial _ Face cover @ Thread cutter _ Needle threader @ Needle plate _ Hook cover plate _ Hook cover plate release button _7_Extension table (Accessory box) @ Buttonhole pitch balance adjusting lever _9_Carrying handle @0H_andwheel @ Stitch pattern selector @ Feed balancing dial @ Power switch @ Machine socket @_Nomenclature plate @_Drop feed dog lever @_Free-arm @ Buttonhole lever @_Presser foot lifter _0_Thumb screw @ Presser...
Owners Manual
Page 16
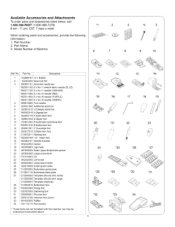
....18 needle (GREEN) *826815000 Twin needle 625031500 Additional spool pin 823801015 H:Straight stitch foot 685502019 A:Zigzag foot 822804118 F:Satin stitch foot 829801002 E:Zipper foot b 753801004 R:Automatic buttonhole foot "820801016 B:Buttonhole foot '. 822801001 C:Overedge foot ; 820817015 G:Blind hem foot • "214872011 Walking foot ; *,200030108 1!4" Seam foot i 200262101 Needle threader ' 802422002 Quilter ; 000009803 Light bulb 647808009 Seam ripper/Buttonhole opener 820832005 Large screwdriver *741814003 Oil '. 802424004 Lint brush ; 822020503 Large spool holder •...
....18 needle (GREEN) *826815000 Twin needle 625031500 Additional spool pin 823801015 H:Straight stitch foot 685502019 A:Zigzag foot 822804118 F:Satin stitch foot 829801002 E:Zipper foot b 753801004 R:Automatic buttonhole foot "820801016 B:Buttonhole foot '. 822801001 C:Overedge foot ; 820817015 G:Blind hem foot • "214872011 Walking foot ; *,200030108 1!4" Seam foot i 200262101 Needle threader ' 802422002 Quilter ; 000009803 Light bulb 647808009 Seam ripper/Buttonhole opener 820832005 Large screwdriver *741814003 Oil '. 802424004 Lint brush ; 822020503 Large spool holder •...
Owners Manual
Page 18
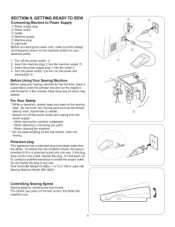
... C-150 is used with thread for a few minutes. Turn the power switch :_to turn off the power switch _2_. 2. Turn off the power switch and unplug from the power supply: - Before Using Your Sewing Machine Before using your sewing machine for the first time, place a waste fabric under the presser foot and run the machine with Sewing Machine Model 385.18221. / Controlling Sewing Speed Sewing speed is intended to your eyes on the power and sewing light ,_6_'. Do...
... C-150 is used with thread for a few minutes. Turn the power switch :_to turn off the power switch _2_. 2. Turn off the power switch and unplug from the power supply: - Before Using Your Sewing Machine Before using your sewing machine for the first time, place a waste fabric under the presser foot and run the machine with Sewing Machine Model 385.18221. / Controlling Sewing Speed Sewing speed is intended to your eyes on the power and sewing light ,_6_'. Do...

Owners Manual
Page 20
... to cut work, draw work and basting. J Presser Foot Lifter /- Simply use the built-in the box. Extension Table • Detaching the table Pull the table away from the machine, as illustrated, for applique, cut the thread after sewing. Reduce the pressure to help you . m _i_ Presser foot lifter _2_Normal up position for easy removal of the presser foot, or to "2" for "free-arm" sewing of cuffs and sleeves. • Attaching the table Push the extension table until it...
... to cut work, draw work and basting. J Presser Foot Lifter /- Simply use the built-in the box. Extension Table • Detaching the table Pull the table away from the machine, as illustrated, for applique, cut the thread after sewing. Reduce the pressure to help you . m _i_ Presser foot lifter _2_Normal up position for easy removal of the presser foot, or to "2" for "free-arm" sewing of cuffs and sleeves. • Attaching the table Push the extension table until it...

Owners Manual
Page 24
... straight. Simply set to guide the folded edge of the buttonhole as the button. Foot H: Prensatelas H: Pied H: Foot R: Prensatelas R: Pied R: Zipper foot ( Foot E) This foot can sew exactly the same length of your hem. For: Zipper sewing (page 42) Foot E: Prensatelas E: Pied E: Blind hem stitch foot ( Foot G) Use this foot for perfect blind hemming and topstitching. For: Blind hem stitch (page 56) !Foot G: Prensatelas G: Pied G: 12 J 1 l 1 For: Automatic buttonhole (page 74) ! The edges of the foot guide the zipper and keep the fabric from slipping, and a screw...
... straight. Simply set to guide the folded edge of the buttonhole as the button. Foot H: Prensatelas H: Pied H: Foot R: Prensatelas R: Pied R: Zipper foot ( Foot E) This foot can sew exactly the same length of your hem. For: Zipper sewing (page 42) Foot E: Prensatelas E: Pied E: Blind hem stitch foot ( Foot G) Use this foot for perfect blind hemming and topstitching. For: Blind hem stitch (page 56) !Foot G: Prensatelas G: Pied G: 12 J 1 l 1 For: Automatic buttonhole (page 74) ! The edges of the foot guide the zipper and keep the fabric from slipping, and a screw...
Owners Manual
Page 42
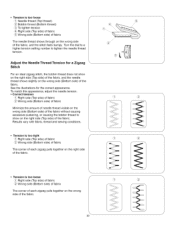
... on the wrong side of the fabric. Adjust the Needle Thread Tension for the correct appearance. Turn the dial to a higher tension setting number to show on the right side (Top side) of the fabric, and the needle thread shows slightly on the right side (Top side) of the fabric. See the illustrations for a Zigzag Stitch For an ideal zigzag stitch, the bobbin thread does not show on the...
... on the wrong side of the fabric. Adjust the Needle Thread Tension for the correct appearance. Turn the dial to a higher tension setting number to show on the right side (Top side) of the fabric, and the needle thread shows slightly on the right side (Top side) of the fabric. See the illustrations for a Zigzag Stitch For an ideal zigzag stitch, the bobbin thread does not show on the...

Owners Manual
Page 46
... J Stitch Length Control S ( how to adjust the stitch length) Slide the stitch length control to the desired stitch width number. when using the twin needle. Set the stitch length control at S.S. The higher the number, the greater the stitch length. The mark shows the adjustment range when using a stretch stitch. The _ mark shows the adjustment range when sewing the buttonhole. * Raise the presser foot before sliding the stitch length control. /,\Jj Sti,tch length control STRETCH T 0_1_2m3m4 LENGTH \\\ J 34 Stitch Width Control f ( how to adjust the stitch width...
... J Stitch Length Control S ( how to adjust the stitch length) Slide the stitch length control to the desired stitch width number. when using the twin needle. Set the stitch length control at S.S. The higher the number, the greater the stitch length. The mark shows the adjustment range when using a stretch stitch. The _ mark shows the adjustment range when sewing the buttonhole. * Raise the presser foot before sliding the stitch length control. /,\Jj Sti,tch length control STRETCH T 0_1_2m3m4 LENGTH \\\ J 34 Stitch Width Control f ( how to adjust the stitch width...
Owners Manual
Page 50
... to help you want to the point where you measure seam width. The numbers on the needle plate indicate the distance between the center needle position and the edge of fabric reaches the cornering guide lines. 2. The lines in the new direction. _ J 38 Lower the needle to start. l Turn a Square Corner ? (1_C' ornering guide When sewing with the thread cutter. Stop stitching when front edge of the fabric. Raise the presser foot...
... to help you want to the point where you measure seam width. The numbers on the needle plate indicate the distance between the center needle position and the edge of fabric reaches the cornering guide lines. 2. The lines in the new direction. _ J 38 Lower the needle to start. l Turn a Square Corner ? (1_C' ornering guide When sewing with the thread cutter. Stop stitching when front edge of the fabric. Raise the presser foot...

Owners Manual
Page 62
...the applique, making sure the needle falls along the raw edge of stabilizer on the fabric with tailor's chalk. NOTE: Maximum stitch width for pattern #7 is 1.4" (3.5 mm) when setting the stitch width control at 6.5. J r _• 0--1 --2--3=4=5_6,5 WIDTH J \ _ J 5O Applique (i) Stitch selector: 7 f :1 a ,(_ Stitch width: 6.5 (37 Stitch length: Gold stretch stitch position (4_ Needle thread tension: 2to6 (59 Presser foot F: Satin stitch foot (63 Pressure adjusting lever: 2 Baste applique pieces on fabric joiner. pieces with a satin stitch, adjusting the...
...the applique, making sure the needle falls along the raw edge of stabilizer on the fabric with tailor's chalk. NOTE: Maximum stitch width for pattern #7 is 1.4" (3.5 mm) when setting the stitch width control at 6.5. J r _• 0--1 --2--3=4=5_6,5 WIDTH J \ _ J 5O Applique (i) Stitch selector: 7 f :1 a ,(_ Stitch width: 6.5 (37 Stitch length: Gold stretch stitch position (4_ Needle thread tension: 2to6 (59 Presser foot F: Satin stitch foot (63 Pressure adjusting lever: 2 Baste applique pieces on fabric joiner. pieces with a satin stitch, adjusting the...
Owners Manual
Page 64
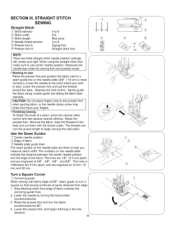
... dogs: * Presser foot: 3 1 to 6.5 Any 2 to engage the needle thread tension. titch selector: _2_Stitch width: _3_S' titch length: _4_Needle thread tension: _5_Presser foot A: 3 2 to 6.5 0.5 to 1 2 to 6 Zigzag foot f ,_4/, 0--1 --2--3=4=5_6.5 sm_c_ V--0--_--_l_2__S__4 LEr_GTH J This is similar to a very short satin stitch, and is completed, raise the feed dogs for one complete turn. Lower the presser foot lifter to 6 Dropped Remove f fJ-\ ) S_ _4_, Drop the feed dogs, and then remove the foot holder. BarTacking _1_S. After embroidery is used...
... dogs: * Presser foot: 3 1 to 6.5 Any 2 to engage the needle thread tension. titch selector: _2_Stitch width: _3_S' titch length: _4_Needle thread tension: _5_Presser foot A: 3 2 to 6.5 0.5 to 1 2 to 6 Zigzag foot f ,_4/, 0--1 --2--3=4=5_6.5 sm_c_ V--0--_--_l_2__S__4 LEr_GTH J This is similar to a very short satin stitch, and is completed, raise the feed dogs for one complete turn. Lower the presser foot lifter to 6 Dropped Remove f fJ-\ ) S_ _4_, Drop the feed dogs, and then remove the foot holder. BarTacking _1_S. After embroidery is used...
Owners Manual
Page 66
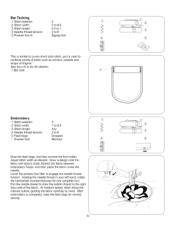
...]H _-..... Drop the feed dogs. Trim excess threads from the raw edge of holes (if applicable) using the zigzag foot, start overcasting with the leftmost needle position about 10 stitches. 5. For lightweight fabrics, use the overedge foot. Thread the needle. Lower the presser foot to help you determine the zigzag width. 3. Determine which stitch width setting matches the f distance between the button holes. Overcasting \f_1/Stitch selector: _2_Stitch width: _3}"Stitch length: {@ Needle thread tension: _5} Presser foot A: _6} Presser foot C: {7} Brush holder seam guide...
...]H _-..... Drop the feed dogs. Trim excess threads from the raw edge of holes (if applicable) using the zigzag foot, start overcasting with the leftmost needle position about 10 stitches. 5. For lightweight fabrics, use the overedge foot. Thread the needle. Lower the presser foot to help you determine the zigzag width. 3. Determine which stitch width setting matches the f distance between the button holes. Overcasting \f_1/Stitch selector: _2_Stitch width: _3}"Stitch length: {@ Needle thread tension: _5} Presser foot A: _6} Presser foot C: {7} Brush holder seam guide...

Owners Manual
Page 76
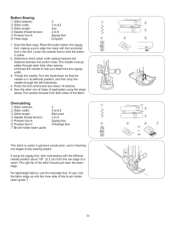
... J 64 Insert the additional spool pin into its hole. When you want to shift the fabric to change the sewing direction, you separate the two threads by placing one thread in each needle from front to a twin needle _5_.Thread each needle bar thread guide@. Twin Needle Stitches (Option) f _i_ Stitch selector: 11 to13 _2_Stitch width: (3_ Stitch length: 1 to2.5 C_ C Gold stretch stitch position _4_Needle thread tension: or green zone 3to7 _5_Presser foot A: Zigzag foot (6_ Presser foot F: _7_Needle: Satin stitch foot @ Twin needle (optional item) Select stitch width...
... J 64 Insert the additional spool pin into its hole. When you want to shift the fabric to change the sewing direction, you separate the two threads by placing one thread in each needle from front to a twin needle _5_.Thread each needle bar thread guide@. Twin Needle Stitches (Option) f _i_ Stitch selector: 11 to13 _2_Stitch width: (3_ Stitch length: 1 to2.5 C_ C Gold stretch stitch position _4_Needle thread tension: or green zone 3to7 _5_Presser foot A: Zigzag foot (6_ Presser foot F: _7_Needle: Satin stitch foot @ Twin needle (optional item) Select stitch width...
Owners Manual
Page 92
... will start, and lower the foot. _1_Spur _2_F' orks f [] / [] Depress the foot control gently, and sew the buttonhole. [] Each side of the fabric and knot. \ / / / J 80 Bring the ends toward you under the buttonhole foot, clearing the front end. sewing needle. Remove the fabric from the machine, and cut the sewing threads only. _3_Needle thread (Top thread) _4_Bobbin thread (Bottom thread) [] Pull the loose ends of the buttonhole foot. With the buttonhole foot raised, hook the filler cord...
... will start, and lower the foot. _1_Spur _2_F' orks f [] / [] Depress the foot control gently, and sew the buttonhole. [] Each side of the fabric and knot. \ / / / J 80 Bring the ends toward you under the buttonhole foot, clearing the front end. sewing needle. Remove the fabric from the machine, and cut the sewing threads only. _3_Needle thread (Top thread) _4_Bobbin thread (Bottom thread) [] Pull the loose ends of the buttonhole foot. With the buttonhole foot raised, hook the filler cord...

Owners Manual
Page 94
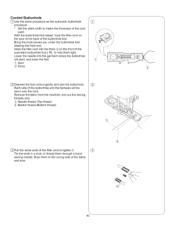
... -x machine at " D" by turning the stitch selector. [] Attach the buttonhole foot [ B] . [] Pull the buttonhole lever downward as far as follows: [] Turn the handwheel toward you to raise the needle to its highest position. To cut the opening and to reset for sewing the next buttonhole, refer to instructions [] and [] on page 80. Manual Buttonhole (Option) ,_1_Stitch selector: _] (BH) /2_ Stitch width: 3 to 6.5 _3_Stitch length: 0.25 to 1.0 @ Needle thread tension: 2 to 6 ,_5_Presser foot B: Buttonhole foot...
... -x machine at " D" by turning the stitch selector. [] Attach the buttonhole foot [ B] . [] Pull the buttonhole lever downward as far as follows: [] Turn the handwheel toward you to raise the needle to its highest position. To cut the opening and to reset for sewing the next buttonhole, refer to instructions [] and [] on page 80. Manual Buttonhole (Option) ,_1_Stitch selector: _] (BH) /2_ Stitch width: 3 to 6.5 _3_Stitch length: 0.25 to 1.0 @ Needle thread tension: 2 to 6 ,_5_Presser foot B: Buttonhole foot...
Owners Manual
Page 98
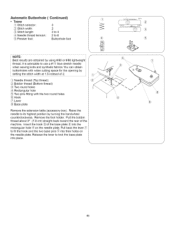
Automatic Buttonhole (Continued) • Tosew _!_'Stitch selector: 3 _2_S, titch width: 2 _3_Stitch length: 3 to 4
Automatic Buttonhole (Continued) • Tosew _!_'Stitch selector: 3 _2_S, titch width: 2 _3_Stitch length: 3 to 4

Owners Manual
Page 106
... out the bobbin. _1_N, eedle plate [] Lift up the triangle marks. _(}_The notch fits next to remove the needle plate screw with a soft, dry cloth. _3_Feed dogs f_X ; In case the machine has not been used for a long period, oil it before sewing. Clean [] the feed dogs _3_and hook race(4_with a lint brush. Cleaning the Shuttle Race and Feed Dogs [] Unplug the machine and remove the presser foot and needle. One or two drops of oil is...
... out the bobbin. _1_N, eedle plate [] Lift up the triangle marks. _(}_The notch fits next to remove the needle plate screw with a soft, dry cloth. _3_Feed dogs f_X ; In case the machine has not been used for a long period, oil it before sewing. Clean [] the feed dogs _3_and hook race(4_with a lint brush. Cleaning the Shuttle Race and Feed Dogs [] Unplug the machine and remove the presser foot and needle. One or two drops of oil is...
Owners Manual
Page 108
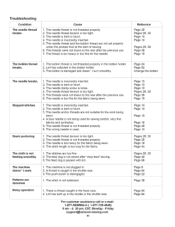
... threaded properly. 6. The stitch length is not threaded properly in the bobbin holder. 3. Troubleshooting if Condition The needle thread breaks. The needle is bent or blunt. 3. The bobbin thread is too long for the needle. Lint has collected in the bobbin holder. 2. The machine doesn' t work being sewn. 4. Patterns are not set properly under the presser foot at the start of sewing. 6. The needle is incorrectly inserted. 5. The threads were not drawn to the rear after "drop feed" sewing. 3. The needle...
... threaded properly. 6. The stitch length is not threaded properly in the bobbin holder. 3. Troubleshooting if Condition The needle thread breaks. The needle is bent or blunt. 3. The bobbin thread is too long for the needle. Lint has collected in the bobbin holder. 2. The machine doesn' t work being sewn. 4. Patterns are not set properly under the presser foot at the start of sewing. 6. The needle is incorrectly inserted. 5. The threads were not drawn to the rear after "drop feed" sewing. 3. The needle...


