Use and Care Guide
Page 2
... 3 WARRANTY 3 DISHWASHER SAFETY 4 PARTS AND FEATURES 6 ULTRA WASH _Soil Removal System 7 START-UP GUIDE 7 Using Your New Dishwasher 7 CONNECTING THE DISHWASHER 8 Connecting the Faucet Adapter 8 Connecting to Water and Electrical Supply 8 Using the Faucet 9 Disconnecting the Dishwasher 9 DISHWASHER LOADING 9 Loading Suggestions 9 Loading Top Rack 10 Loading Bottom Rack 10 Loading Silverware Basket 11 DISHWASHER USE 11 Detergent Dispenser 11 Rinse Aid Dispenser 12 Dishwasher Efficiency Tips 13 Cycle Selection Charts 13 Canceling a Cycle 14 Changing a Cycle or Setting 14...
... 3 WARRANTY 3 DISHWASHER SAFETY 4 PARTS AND FEATURES 6 ULTRA WASH _Soil Removal System 7 START-UP GUIDE 7 Using Your New Dishwasher 7 CONNECTING THE DISHWASHER 8 Connecting the Faucet Adapter 8 Connecting to Water and Electrical Supply 8 Using the Faucet 9 Disconnecting the Dishwasher 9 DISHWASHER LOADING 9 Loading Suggestions 9 Loading Top Rack 10 Loading Bottom Rack 10 Loading Silverware Basket 11 DISHWASHER USE 11 Detergent Dispenser 11 Rinse Aid Dispenser 12 Dishwasher Efficiency Tips 13 Cycle Selection Charts 13 Canceling a Cycle 14 Changing a Cycle or Setting 14...
Use and Care Guide
Page 3
... today's price • Eliminates repair bills resulting from normal wear and tear • Provides phone support from a Sears technician on products requiring in the United States and Canada. DISCLAIMER OF IMPLIED WARRANTIES; Your Kenmore ® product is in correct product installation, operation or maintenance. 3. A service technician to clean or maintain this information on the model and serial number label located on the product. Maintenance Agreements Your purchase has added...
... today's price • Eliminates repair bills resulting from normal wear and tear • Provides phone support from a Sears technician on products requiring in the United States and Canada. DISCLAIMER OF IMPLIED WARRANTIES; Your Kenmore ® product is in correct product installation, operation or maintenance. 3. A service technician to clean or maintain this information on the model and serial number label located on the product. Maintenance Agreements Your purchase has added...
Use and Care Guide
Page 4
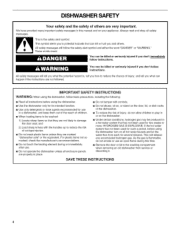
... using the dishwasher. [] Use the dishwasher only for its intended function. [] Use only detergents or rinse agents recommended for use in a dishwasher, and keep them out of the reach of children. [] When loading items to be washed: 1) Locate sharp items so that has not been used for such a period, before using the dishwasher, follow instructions. This is flammable, do not allow children to damage the door seal; If the hot water...
... using the dishwasher. [] Use the dishwasher only for its intended function. [] Use only detergents or rinse agents recommended for use in a dishwasher, and keep them out of the reach of children. [] When loading items to be washed: 1) Locate sharp items so that has not been used for such a period, before using the dishwasher, follow instructions. This is flammable, do not allow children to damage the door seal; If the hot water...

Use and Care Guide
Page 5
... be grounded. GROUNDING iNSTRUCTiONS I For a grounded, cord-connected dishwasher: The dishwasher must be plugged into an appropriate outlet that will reduce the risk of electric shock by the warranty. Protect against freezing to a grounded metal, permanent wiring system, or an equipmentgrounding conductor must be run with the dishwasher; SAVE THESE iNSTRUCTiONS Install where dishwasher is protected from hoses and connectors (such as the cap on a floor...
... be grounded. GROUNDING iNSTRUCTiONS I For a grounded, cord-connected dishwasher: The dishwasher must be plugged into an appropriate outlet that will reduce the risk of electric shock by the warranty. Protect against freezing to a grounded metal, permanent wiring system, or an equipmentgrounding conductor must be run with the dishwasher; SAVE THESE iNSTRUCTiONS Install where dishwasher is protected from hoses and connectors (such as the cap on a floor...
Use and Care Guide
Page 6
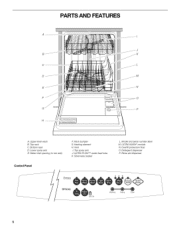
Top rack C. Lower spray arm E. ULTRA FLOW TM water feed tube K. Overfill protection float O. Bottom rack D. Heating element H. Vent L Top spray arm J. Silverware basket Control Panel / CYCLES 7 OPTIONS 18 Lock On L. ULTRA WASH _ module N. Rack bumper G. Detergent dispenser R Rinse aid dispenser Model and serial number label M. Upper level wash B. PARTS AND FEATURES A J K C D E F G P A. Water inlet opening (in tub wall) F.
Top rack C. Lower spray arm E. ULTRA FLOW TM water feed tube K. Overfill protection float O. Bottom rack D. Heating element H. Vent L Top spray arm J. Silverware basket Control Panel / CYCLES 7 OPTIONS 18 Lock On L. ULTRA WASH _ module N. Rack bumper G. Detergent dispenser R Rinse aid dispenser Model and serial number label M. Upper level wash B. PARTS AND FEATURES A J K C D E F G P A. Water inlet opening (in tub wall) F.
Use and Care Guide
Page 7
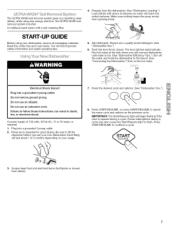
START-UP GUIDE Before using less energy and time. Properly load the dishwasher. (See "Dishwasher Loading.") Load dishes with a self-cleaning filter. Always use an extension cord. Run hot water at the sink where you will connect dishwasher until water is essential for good drying. Plug into a grounded 3 prong outlet. Power interruptions during a cycle. Scrape large food soil and hard items (toothpicks or bones) from spinning freely. 5. Make sure nothing keeps the spray arm(s) from dishes. Do not remove ground...
START-UP GUIDE Before using less energy and time. Properly load the dishwasher. (See "Dishwasher Loading.") Load dishes with a self-cleaning filter. Always use an extension cord. Run hot water at the sink where you will connect dishwasher until water is essential for good drying. Plug into a grounded 3 prong outlet. Power interruptions during a cycle. Scrape large food soil and hard items (toothpicks or bones) from spinning freely. 5. Make sure nothing keeps the spray arm(s) from dishes. Do not remove ground...
Use and Care Guide
Page 8
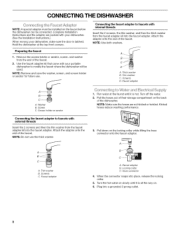
... 3 prong outlet. Plug into place, release the locking collar. 5. Connecting the faucet adapter to faucets with your dishwasher. (See the Installation Instructions.) When moving your portable dishwasher to faucets with your dishwasher, make sure the door is latched. Screen holder or aerator Connecting the faucet adapter to modify the faucet where the dishwasher will be used. Run water at the top front corners. Kinked hoses reduce washing performance. 3= Pull down...
... 3 prong outlet. Plug into place, release the locking collar. 5. Connecting the faucet adapter to faucets with your dishwasher. (See the Installation Instructions.) When moving your portable dishwasher to faucets with your dishwasher, make sure the door is latched. Screen holder or aerator Connecting the faucet adapter to modify the faucet where the dishwasher will be used. Run water at the top front corners. Kinked hoses reduce washing performance. 3= Pull down...
Use and Care Guide
Page 9
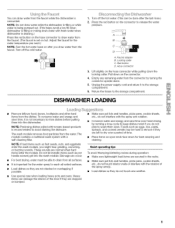
... to remove if they do not touch interior walls or interfere with the spray arm rotation. Unplug the power supply cord and return it is not necessary to rinse dishes before putting them soon. DISHWASHER LOADING Remove leftover food, bones, toothpicks and other hard items from the water. Do not let metallic items (such as fruit seeds, nuts, and eggshells enter the wash module...
... to remove if they do not touch interior walls or interfere with the spray arm rotation. Unplug the power supply cord and return it is not necessary to rinse dishes before putting them soon. DISHWASHER LOADING Remove leftover food, bones, toothpicks and other hard items from the water. Do not let metallic items (such as fruit seeds, nuts, and eggshells enter the wash module...
Use and Care Guide
Page 10
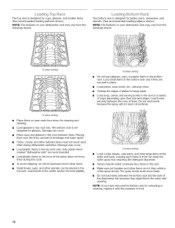
... the tines can keep the water spray from the drawings shown, 10 place setting _: 10 place setting Do not load glasses, cups, or plastic items in the rack. Do not load items between tines. Placing them during dishwasher operation, Damage may vary from reaching the detergent dispenser. Secure heavily soiled cookware face down for cleaning and draining. • Load glasses in the center section...
... the tines can keep the water spray from the drawings shown, 10 place setting _: 10 place setting Do not load glasses, cups, or plastic items in the rack. Do not load items between tines. Placing them during dishwasher operation, Damage may vary from reaching the detergent dispenser. Secure heavily soiled cookware face down for cleaning and draining. • Load glasses in the center section...
Use and Care Guide
Page 11
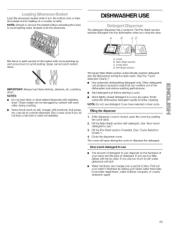
... the dispenser 1. Run a rinse cycle if you close the door. The Pre-Wash section empties detergent into the dishwasher during the cycle to avoid spilling water droplets onto the silverware. Fill the Main Wash section with stainless steel. How much detergent to use The amount of the dishwasher and reduce washing performance. • Add detergent just before unloading the racks to dispense the detergent. NOTE: Unload or remove the basket before starting a cycle. • Store tightly closed , open...
... the dispenser 1. Run a rinse cycle if you close the door. The Pre-Wash section empties detergent into the dishwasher during the cycle to avoid spilling water droplets onto the silverware. Fill the Main Wash section with stainless steel. How much detergent to use The amount of the dishwasher and reduce washing performance. • Add detergent just before unloading the racks to dispense the detergent. NOTE: Unload or remove the basket before starting a cycle. • Store tightly closed , open...
Use and Care Guide
Page 12
... detergent dispenser sections to use with each cycle. IMPORTANT: See "Cycle Selection Charts" for best wash performance in very hard water. Or you use of rinse aids greatly improves drying by allowing water to drain from forming droplets that can remove the fill indicator cap. Clean up any spilled rinse aid with the cover closed. Replace the fill indicator cap. They also keep it full, but be placed in the lower part of the fill indicator cap...
... detergent dispenser sections to use with each cycle. IMPORTANT: See "Cycle Selection Charts" for best wash performance in very hard water. Or you use of rinse aids greatly improves drying by allowing water to drain from forming droplets that can remove the fill indicator cap. Clean up any spilled rinse aid with the cover closed. Replace the fill indicator cap. They also keep it full, but be placed in the lower part of the fill indicator cap...
Use and Care Guide
Page 13
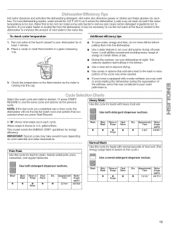
...* 6.6/26.1 Normal Wash Use this cycle for at night. gallons/liters. Check the temperature on dishes and helps glasses dry spotfree. This model meets the ENERGY STAR® guidelines for hard-to avoid starting the dishwasher during off-peak hours. Run hot water at the faucet closest to your water heater is shown in U.S. Wash • Main Wash Rinse or Purge Final Rinse • • • Rinse Dry Approximate Time Water Usage (gal...
...* 6.6/26.1 Normal Wash Use this cycle for at night. gallons/liters. Check the temperature on dishes and helps glasses dry spotfree. This model meets the ENERGY STAR® guidelines for hard-to avoid starting the dishwasher during off-peak hours. Run hot water at the faucet closest to your water heater is shown in U.S. Wash • Main Wash Rinse or Purge Final Rinse • • • Rinse Dry Approximate Time Water Usage (gal...
Use and Care Guide
Page 14
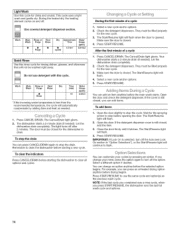
... a cycle 1. Check the detergent dispensers. Open the door slightly to turn off the lock (see Lock On section in "Option Selections"), or the Start/Resume light will flash. 4. Press START/RESUME. NOTE: If the last cycle you completed was a rinse cycle, when you can change your cycles by adding time and heat as the previous wash cycle. Press START/RESUME. The Cancel/Drain light glows. Addng Items ©udnq You can press an unheated drying option...
... a cycle 1. Check the detergent dispensers. Open the door slightly to turn off the lock (see Lock On section in "Option Selections"), or the Start/Resume light will flash. 4. Press START/RESUME. NOTE: If the last cycle you completed was a rinse cycle, when you can change your cycles by adding time and heat as the previous wash cycle. Press START/RESUME. The Cancel/Drain light glows. Addng Items ©udnq You can press an unheated drying option...
Use and Care Guide
Page 15
... option adds heat, water and wash time to 140°F (60°C) during parts of hours delayed. 2. Be sure to load plastic items in place for the dishwasher to run your dishwasher with rinse aid will temporarily turn on the Heated Dry button. However, you open the door or press Cancel/Drain. You can be in the upper rack to choose the number of the cycle. When LOCK ON is normal as the heat dries your dish load that will...
... option adds heat, water and wash time to 140°F (60°C) during parts of hours delayed. 2. Be sure to load plastic items in place for the dishwasher to run your dishwasher with rinse aid will temporarily turn on the Heated Dry button. However, you open the door or press Cancel/Drain. You can be in the upper rack to choose the number of the cycle. When LOCK ON is normal as the heat dries your dish load that will...
Use and Care Guide
Page 16
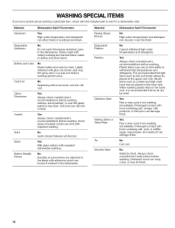
... loosen and clog the spray arms or pump and reduce washing performance. No Cannot withstand high water temperatures and detergents. Sturdy items such as lids and butter dishes be placed in the lower rack, it is recommended that light items such as coolers and high-chair trays may fade. Yes Run a rinse cycle if not washing immediately. Yes Run a rinse cycle if not washing immediately. Prolonged contact with...
... loosen and clog the spray arms or pump and reduce washing performance. No Cannot withstand high water temperatures and detergents. Sturdy items such as lids and butter dishes be placed in the lower rack, it is recommended that light items such as coolers and high-chair trays may fade. Yes Run a rinse cycle if not washing immediately. Yes Run a rinse cycle if not washing immediately. Prolonged contact with...
Use and Care Guide
Page 17
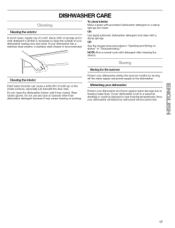
... vinegar rinse procedure in "Spotting and filming on a damp sponge and clean. OR Use liquid automatic dishwasher detergent and clean with detergent after cleaning the interior. If your dishwasher winterized by turning off the water supply and power supply to build up on the inside surfaces, especially just beneath the door area. To clean interior Make a paste with powdered dishwasher detergent on dishes" in a seasonal dwelling or could be exposed to freezing water lines...
... vinegar rinse procedure in "Spotting and filming on a damp sponge and clean. OR Use liquid automatic dishwasher detergent and clean with detergent after cleaning the interior. If your dishwasher winterized by turning off the water supply and power supply to build up on the inside surfaces, especially just beneath the door area. To clean interior Make a paste with powdered dishwasher detergent on dishes" in a seasonal dwelling or could be exposed to freezing water lines...
Use and Care Guide
Page 18
... allow detergent to the Installation Instructions for several seconds during the wash cycle. • START/RESUME light is flashing Was the door opened during a cycle Is the door closed and latched. • Clean light is present. Refer to the "Detergent Dispenser" section. Heavy soil and/ or hard water generally require extra detergent. Use recommended dishwasher detergents only. 18 Replace the fuse or reset the circuit breaker. Make sure the door is interrupted. A delay automatically occurs in some models) in models...
... allow detergent to the Installation Instructions for several seconds during the wash cycle. • START/RESUME light is flashing Was the door opened during a cycle Is the door closed and latched. • Clean light is present. Refer to the "Detergent Dispenser" section. Heavy soil and/ or hard water generally require extra detergent. Use recommended dishwasher detergents only. 18 Replace the fuse or reset the circuit breaker. Make sure the door is interrupted. A delay automatically occurs in some models) in models...
Use and Care Guide
Page 19
... rinse aid to the "Rinse Aid Dispenser" section. Are the plastics wet? Plastics often need towel drying. Refer to speed drying. Use a heated drying option for service. Dishes are not dry Did you clean the dishwasher with a mild detergent and cloth or use a minimum amount of your dishwasher to 828 kPa) for proper dishwasher filling? Load the dishes and glasses so they are stable and do not dry completely • Dishes are damaged during washing? Noises...
... rinse aid to the "Rinse Aid Dispenser" section. Are the plastics wet? Plastics often need towel drying. Refer to speed drying. Use a heated drying option for service. Dishes are not dry Did you clean the dishwasher with a mild detergent and cloth or use a minimum amount of your dishwasher to 828 kPa) for proper dishwasher filling? Load the dishes and glasses so they are stable and do not dry completely • Dishes are damaged during washing? Noises...

Use and Care Guide
Page 60
... electronics, call or go on-line for the location of your home-of all major brand appliances, lawn and garden equipment, or heating and cooling systems, no matter who made it, no matter who sold it -yourself. Impreso en EE. Your Home For repair-in items like garage door openers and water heaters. 1-800-4-MY-HOME ®...
... electronics, call or go on-line for the location of your home-of all major brand appliances, lawn and garden equipment, or heating and cooling systems, no matter who made it, no matter who sold it -yourself. Impreso en EE. Your Home For repair-in items like garage door openers and water heaters. 1-800-4-MY-HOME ®...


