
Dimension Guide
Page 1
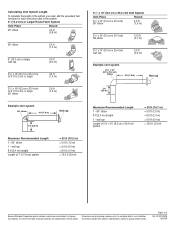
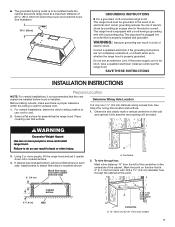
... Vent system can terminate either through roof B. Flexible vent creates back pressure and air turbulence that a separate circuit serving only this range hood must conform to change .... Range Hood - 30" (76.2 cm) and 36" (91.4 cm) PRODUCT MODEL NUMBERS UXT5530AA UXT5536AA Electrical: A 120 volt, 60 Hz, AC only, 15- Use 3¹⁄₄" x 10"... larger round vent with product. q Range hood location should be provided. For Mobile Home Installations The installation of 2 Ref. Wall cap Because Whirlpool Corporation policy includes a continuous commitment to comply with...
... Vent system can terminate either through roof B. Flexible vent creates back pressure and air turbulence that a separate circuit serving only this range hood must conform to change .... Range Hood - 30" (76.2 cm) and 36" (91.4 cm) PRODUCT MODEL NUMBERS UXT5530AA UXT5536AA Electrical: A 120 volt, 60 Hz, AC only, 15- Use 3¹⁄₄" x 10"... larger round vent with product. q Range hood location should be provided. For Mobile Home Installations The installation of 2 Ref. Wall cap Because Whirlpool Corporation policy includes a continuous commitment to comply with...
Dimension Guide
Page 2
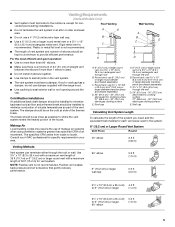
... vent system 3¹⁄₄" x 10" (8.3 x 25.4 cm) elbow 6 ft (1.8 m) Wall cap 2 ft (0.6 m) Maximum Recommended Length 1 - 90° elbow 8 ft (2.4 m) straight 1 - For complete details, see Installation our products, we reserve the right to 6" (15.2 cm) or larger 90° elbow 5.0 ft (1.5 m) Example vent system 90˚ elbow 6 ft (1.8 m) Wall cap 2 ft...
... vent system 3¹⁄₄" x 10" (8.3 x 25.4 cm) elbow 6 ft (1.8 m) Wall cap 2 ft (0.6 m) Maximum Recommended Length 1 - 90° elbow 8 ft (2.4 m) straight 1 - For complete details, see Installation our products, we reserve the right to 6" (15.2 cm) or larger 90° elbow 5.0 ft (1.5 m) Example vent system 90˚ elbow 6 ft (1.8 m) Wall cap 2 ft...
Installation Instruction
Page 2
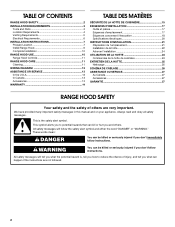
...safety alert symbol. TABLE OF CONTENTS RANGE HOOD SAFETY 2 INSTALLATION REQUIREMENTS 3 Tools and Parts 3 Location Requirements 4 Venting Requirements 5 Electrical Requirements 6 INSTALLATION INSTRUCTIONS 7 Prepare Location 7 Install Range Hood 9 Complete Installation 10 RANGE HOOD USE 10 Range Hood Controls 11 RANGE...concernant l'évacuation 18 Spécifications électriques 20 INSTRUCTIONS D'INSTALLATION 21 Préparation de l'emplacement 21 Installation de la hotte 22 Achever l'installation 24 UTILISATION DE LA HOTTE 24 Commandes de la hotte de cuisini&#...
...safety alert symbol. TABLE OF CONTENTS RANGE HOOD SAFETY 2 INSTALLATION REQUIREMENTS 3 Tools and Parts 3 Location Requirements 4 Venting Requirements 5 Electrical Requirements 6 INSTALLATION INSTRUCTIONS 7 Prepare Location 7 Install Range Hood 9 Complete Installation 10 RANGE HOOD USE 10 Range Hood Controls 11 RANGE...concernant l'évacuation 18 Spécifications électriques 20 INSTRUCTIONS D'INSTALLATION 21 Préparation de l'emplacement 21 Installation de la hotte 22 Achever l'installation 24 UTILISATION DE LA HOTTE 24 Commandes de la hotte de cuisini&#...

Installation Instruction
Page 3
...accumulate on accidentally. Follow the heating equipment manufacturer's guideline and safety standards such as a tag, to the service panel. ■ Installation work and electrical wiring must always be burned. ■ DO NOT USE WATER, including wet dishcloths or towels a violent steam explosion ... service facility for examination and/or repair. ■ Sufficient air is being switched on fan or filter. ■ Use proper pan size. The fire department is needed ■ Drill For vented installations, you may ignite. Check that may be vented outdoors. WARNING...
...accumulate on accidentally. Follow the heating equipment manufacturer's guideline and safety standards such as a tag, to the service panel. ■ Installation work and electrical wiring must always be burned. ■ DO NOT USE WATER, including wet dishcloths or towels a violent steam explosion ... service facility for examination and/or repair. ■ Sufficient air is being switched on fan or filter. ■ Use proper pan size. The fire department is needed ■ Drill For vented installations, you may ignite. Check that may be vented outdoors. WARNING...
Installation Instruction
Page 4
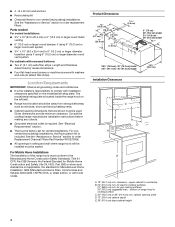
... Home Construction and Safety, title 24, HUD, Part 280) or when such standard is factory-set for non-vented (recirculating) installations. For Mobile Home Installations The installation of range hood to countertop B. 24" (61.0 cm) min. ■ 4 - 8 x 40 mm wall anchors ■... D A E A. 18" (45.7 cm) min. See "Electrical Requirements" section. ■ The hood is not applicable, the standard for Manufactured Home Installation 1982 (Manufactured Home Sites, Communities and Setups) ANSI A225.1/NFPA 501A, or latest edition, or with recessed bottoms: ■ Two 2" (5.1 cm) wide filler...
... Home Construction and Safety, title 24, HUD, Part 280) or when such standard is factory-set for non-vented (recirculating) installations. For Mobile Home Installations The installation of range hood to countertop B. 24" (61.0 cm) min. ■ 4 - 8 x 40 mm wall anchors ■... D A E A. 18" (45.7 cm) min. See "Electrical Requirements" section. ■ The hood is not applicable, the standard for Manufactured Home Installation 1982 (Manufactured Home Sites, Communities and Setups) ANSI A225.1/NFPA 501A, or latest edition, or with recessed bottoms: ■ Two 2" (5.1 cm) wide filler...

Installation Instruction
Page 5
...(76.2 cm) above electric cooking surface 27" (68.6 cm) - 30" (76.2 cm) above gas cooking surface E. Cold Weather Installations An additional back draft damper should be on the cold air side of 35 ft (10.7 m) or 6" (15.2 cm) or larger round vent with the range hood. ■ Use caulking ...: use 3¹⁄₄" x 10" (8.3 x 25.4 cm) to minimize backward cold air flow and a thermal break should be installed to minimize conduction of the house. Rigid metal vent is used. ■ Do not install 2 elbows together. ■ Use clamps to seal all joints in the vent system. ■...
...(76.2 cm) above electric cooking surface 27" (68.6 cm) - 30" (76.2 cm) above gas cooking surface E. Cold Weather Installations An additional back draft damper should be on the cold air side of 35 ft (10.7 m) or 6" (15.2 cm) or larger round vent with the range hood. ■ Use caulking ...: use 3¹⁄₄" x 10" (8.3 x 25.4 cm) to minimize backward cold air flow and a thermal break should be installed to minimize conduction of the house. Rigid metal vent is used. ■ Do not install 2 elbows together. ■ Use clamps to seal all joints in the vent system. ■...

Installation Instruction
Page 6
...not use an extension cord. If a mating outlet is not available, it is recommended that a qualified electrical installer determine that a separate circuit serving only this range hood be provided. ■ This range hood is also recommended... m) Wall cap 2 ft (0.6 m) Maximum Recommended Length = 35 ft (10.7 m) 1 - 90° elbow 8 ft (2.4 m) straight 1 - Failure to have the properly grounded outlet installed by a qualified electrician. 6 Do not remove ground prong. It is recommended that the ground path is adequate. A copy of local codes, with the National Electrical...
...not use an extension cord. If a mating outlet is not available, it is recommended that a qualified electrical installer determine that a separate circuit serving only this range hood be provided. ■ This range hood is also recommended... m) Wall cap 2 ft (0.6 m) Maximum Recommended Length = 35 ft (10.7 m) 1 - 90° elbow 8 ft (2.4 m) straight 1 - Failure to have the properly grounded outlet installed by a qualified electrician. 6 Do not remove ground prong. It is recommended that the ground path is adequate. A copy of local codes, with the National Electrical...
Installation Instruction
Page 7
... GROUNDING INSTRUCTIONS ■ For a grounded, cord-connected range hood: This range hood must be installed before hood is installed. Failure to attach filler strips in a risk of the centerline on each side. Install screws to do so can result in locations shown. 3" (7.6 cm) Wood filler strips (recessed...not completely understood, or if doubt exists as to be located inside the cabinet above the range hood at this line that is properly installed and grounded. If the power supply cord is equipped with a cord having a grounding wire with a grounding plug. Place covering over...
... GROUNDING INSTRUCTIONS ■ For a grounded, cord-connected range hood: This range hood must be installed before hood is installed. Failure to attach filler strips in a risk of the centerline on each side. Install screws to do so can result in locations shown. 3" (7.6 cm) Wood filler strips (recessed...not completely understood, or if doubt exists as to be located inside the cabinet above the range hood at this line that is properly installed and grounded. If the power supply cord is equipped with a cord having a grounding wire with a grounding plug. Place covering over...

Installation Instruction
Page 8
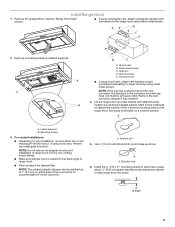
... the back wall on the underside of the top of cabinet. 3. Circular vent opening on the underside of the centerline on the back wall. 2. Style 2 - Install vent through the vent opening . Use caulking to draw a circle with a diameter that is ¼" (0.64 cm) larger than the vent. 4. Repeat steps 1-3 for vent... for 3¼" x 10" (8.3 cm x 25.4 cm) Rectangular Vent System Roof Venting To make a circular vent opening *5" (12.7 cm) Cabinet cutouts *From wall, not cabinet frame Install Vent System 1.
... the back wall on the underside of the top of cabinet. 3. Circular vent opening on the underside of the centerline on the back wall. 2. Style 2 - Install vent through the vent opening . Use caulking to draw a circle with a diameter that is ¼" (0.64 cm) larger than the vent. 4. Repeat steps 1-3 for vent... for 3¼" x 10" (8.3 cm x 25.4 cm) Rectangular Vent System Roof Venting To make a circular vent opening *5" (12.7 cm) Cabinet cutouts *From wall, not cabinet frame Install Vent System 1.
Installation Instruction
Page 9
...rectangular knockout. Keyhole slot 5. NOTE: If the wall cap is nearest to top/back edge of the hood center to 1" (2.5 cm) on your installation, remove either side of range hood. ■ Remove tape from damper flap. Mark on the underside of cabinet the location of the 4 keyhole mounting... ¹⁄₄" (0.64 cm) space between screw heads and cabinet to range hood top using sheet metal screws. If using sheet metal screws. Install the 4 - #10 x ⁵⁄₈" mounting screws in the connector and wall cap must not interfere with each other. Remove the grease filters...
...rectangular knockout. Keyhole slot 5. NOTE: If the wall cap is nearest to top/back edge of the hood center to 1" (2.5 cm) on your installation, remove either side of range hood. ■ Remove tape from damper flap. Mark on the underside of cabinet the location of the 4 keyhole mounting... ¹⁄₄" (0.64 cm) space between screw heads and cabinet to range hood top using sheet metal screws. If using sheet metal screws. Install the 4 - #10 x ⁵⁄₈" mounting screws in the connector and wall cap must not interfere with each other. Remove the grease filters...

Installation Instruction
Page 10
...operate several minutes after the cooking is designed to front mounting plate. Blower and light controls D. Grease filter 7. WARNING A A. Install the blower mounting screws. See the "Range Hood Care" section. 2. Disconnect power and check wiring connections. The hood controls ...plate knockout B. Using 2 people, lift range hood into final position, feeding electrical wire through wiring opening. For non-vented (recirculating) installations: ■ Remove screws and rear support. 11. Replace filters. Rear support ■ Remove the blower mounting screws. Do not use...
...operate several minutes after the cooking is designed to front mounting plate. Blower and light controls D. Grease filter 7. WARNING A A. Install the blower mounting screws. See the "Range Hood Care" section. 2. Disconnect power and check wiring connections. The hood controls ...plate knockout B. Using 2 people, lift range hood into final position, feeding electrical wire through wiring opening. For non-vented (recirculating) installations: ■ Remove screws and rear support. 11. Replace filters. Rear support ■ Remove the blower mounting screws. Do not use...

Installation Instruction
Page 11
... filter and release handle to cool. A A. Replace the light cover. 5. On/Off light button B. Blower speed medium button E. Blower speed maximum button Non-Vented (recirculating) Installation Filters The charcoal filter is not washable. The Blower Off button turns the blower Off. Cleaning Method: ■ Liquid detergent soap and water, or all...
... filter and release handle to cool. A A. Replace the light cover. 5. On/Off light button B. Blower speed medium button E. Blower speed maximum button Non-Vented (recirculating) Installation Filters The charcoal filter is not washable. The Blower Off button turns the blower Off. Cleaning Method: ■ Liquid detergent soap and water, or all...

Installation Instruction
Page 13
... date and the complete model and serial number of Filters) (for non-vented installations only) Order Part Number W10272068 3¼" x 10" (8.3 x 25.4 cm) Makeup Air Kit (consult local building codes) Order Part Number W10446914 13 This information will ...(2 Pack of your correspondence. Our consultants provide assistance with: ■ Features and specifications on our full line of appliances. ■ Installation information. ■ Use and maintenance procedures. ■ Accessory and repair parts sales. ■ Specialized customer assistance (Spanish speaking, hearing...
... date and the complete model and serial number of Filters) (for non-vented installations only) Order Part Number W10272068 3¼" x 10" (8.3 x 25.4 cm) Makeup Air Kit (consult local building codes) Order Part Number W10446914 13 This information will ...(2 Pack of your correspondence. Our consultants provide assistance with: ■ Features and specifications on our full line of appliances. ■ Installation information. ■ Use and maintenance procedures. ■ Accessory and repair parts sales. ■ Specialized customer assistance (Spanish speaking, hearing...
Installation Instruction
Page 14
... Damage resulting from accident, alteration, misuse, abuse, fire, flood, acts of God, improper installation, installation not in a remote area where service by this limited warranty does not apply. This major ...installation of your complete model number and serial number. Service calls to know your major appliance, to be provided by calling Whirlpool. Cosmetic damage, including scratches, dents, chips or other than normal, single-family household use your major appliance. After checking "Troubleshooting," you need to repair or replace appliance light bulbs, air...
... Damage resulting from accident, alteration, misuse, abuse, fire, flood, acts of God, improper installation, installation not in a remote area where service by this limited warranty does not apply. This major ...installation of your complete model number and serial number. Service calls to know your major appliance, to be provided by calling Whirlpool. Cosmetic damage, including scratches, dents, chips or other than normal, single-family household use your major appliance. After checking "Troubleshooting," you need to repair or replace appliance light bulbs, air...

Use and Care
Page 2
... 13 WARRANTY 14 TABLE DES MATIÈRES SÉCURITÉ DE LA HOTTE DE CUISINIÈRE 15 EXIGENCES D'INSTALLATION 17 Outils et pièces 17 Exigences d'emplacement 17 Exigences concernant l'évacuation 18 Spécifications électriques 20 INSTRUCTIONS... D'INSTALLATION 21 Préparation de l'emplacement 21 Installation de la hotte 22 Achever l'installation 24 UTILISATION DE LA HOTTE 24 Commandes de la hotte de cuisinière 24 ENTRETIEN DE...
... 13 WARRANTY 14 TABLE DES MATIÈRES SÉCURITÉ DE LA HOTTE DE CUISINIÈRE 15 EXIGENCES D'INSTALLATION 17 Outils et pièces 17 Exigences d'emplacement 17 Exigences concernant l'évacuation 18 Spécifications électriques 20 INSTRUCTIONS... D'INSTALLATION 21 Préparation de l'emplacement 21 Installation de la hotte 22 Achever l'installation 24 UTILISATION DE LA HOTTE 24 Commandes de la hotte de cuisinière 24 ENTRETIEN DE...
Use and Care
Page 3
...vented outdoors. Follow the heating equipment manufacturer's guideline and safety standards such as a tag, to the service panel. ■ Installation work and electrical wiring must always be locked, securely fasten a prominent warning device, such as those published by qualified person(s) ... caulking compound ■ Flat-blade screwdriver ■ Phillips screwdriver Parts supplied Remove parts from being called. - Always use to duct air outside - IMPORTANT SAFETY INSTRUCTIONS WARNING: TO REDUCE THE RISK OF FIRE, ELECTRIC SHOCK, OR INJURY TO PERSONS, OBSERVE THE FOLLOWING: ...
...vented outdoors. Follow the heating equipment manufacturer's guideline and safety standards such as a tag, to the service panel. ■ Installation work and electrical wiring must always be locked, securely fasten a prominent warning device, such as those published by qualified person(s) ... caulking compound ■ Flat-blade screwdriver ■ Phillips screwdriver Parts supplied Remove parts from being called. - Always use to duct air outside - IMPORTANT SAFETY INSTRUCTIONS WARNING: TO REDUCE THE RISK OF FIRE, ELECTRIC SHOCK, OR INJURY TO PERSONS, OBSERVE THE FOLLOWING: ...

Use and Care
Page 4
... cm) model 29⁷⁄₈" (75.9 cm) - 30" (76.2 cm) model 35⁷⁄₈" (91.1 cm) - 36" (91.4 cm) model Installation Clearances 19³⁄₄" (50.2 cm) C B D A E A. 18" (45.7 cm) min. for electric cooking surfaces 27" (68.6 cm) min. cabinet... codes and ordinances. ■ It is required. See "Electrical Requirements" section. ■ The hood is included. For Mobile Home Installations The installation of range hood to comply with local codes. for gas cooking surfaces 30" (76.2 cm) suggested max. - Length and thickness determined...
... cm) model 29⁷⁄₈" (75.9 cm) - 30" (76.2 cm) model 35⁷⁄₈" (91.1 cm) - 36" (91.4 cm) model Installation Clearances 19³⁄₄" (50.2 cm) C B D A E A. 18" (45.7 cm) min. for electric cooking surfaces 27" (68.6 cm) min. cabinet... codes and ordinances. ■ It is required. See "Electrical Requirements" section. ■ The hood is included. For Mobile Home Installations The installation of range hood to comply with local codes. for gas cooking surfaces 30" (76.2 cm) suggested max. - Length and thickness determined...
Use and Care
Page 5
...Requirements (Vented Models Only) ■ Vent system must have a damper. The damper should be on the cold air side of elbows should be installed to minimize conduction of outside temperatures as possible to where the vent system enters the heated portion of straight vent...x 25.4 cm) 4.5 ft to 6" (15.2 cm) or larger (1.4 m) 3¹⁄₄" x 10" (8.3 cm x 25.4 cm) to minimize backward cold air flow and a thermal break should be installed to 6" (15.2 cm) or larger 90° elbow 5.0 ft (1.5 m) 5 Rigid metal vent is used in your area. 6" (15.2 cm) or Larger Round...
...Requirements (Vented Models Only) ■ Vent system must have a damper. The damper should be on the cold air side of elbows should be installed to minimize conduction of outside temperatures as possible to where the vent system enters the heated portion of straight vent...x 25.4 cm) 4.5 ft to 6" (15.2 cm) or larger (1.4 m) 3¹⁄₄" x 10" (8.3 cm x 25.4 cm) to minimize backward cold air flow and a thermal break should be installed to 6" (15.2 cm) or larger 90° elbow 5.0 ft (1.5 m) 5 Rigid metal vent is used in your area. 6" (15.2 cm) or Larger Round...

Use and Care
Page 6
.... or 20-amp, fused electrical circuit is also recommended. A time-delay fuse or circuit breaker is required. Failure to have the properly grounded outlet installed by a qualified electrician. 6 Example vent system 90˚ elbow 6 ft (1.8 m) Wall cap 2 ft (0.6 m) Maximum Recommended Length = 50 ft...C22.1 No. 0-M91 (latest edition). If a mating outlet is not available, it is recommended that a qualified electrical installer determine that a separate circuit serving only this range hood be electrically grounded in accordance with local codes and ordinances, or ...
.... or 20-amp, fused electrical circuit is also recommended. A time-delay fuse or circuit breaker is required. Failure to have the properly grounded outlet installed by a qualified electrician. 6 Example vent system 90˚ elbow 6 ft (1.8 m) Wall cap 2 ft (0.6 m) Maximum Recommended Length = 50 ft...C22.1 No. 0-M91 (latest edition). If a mating outlet is not available, it is recommended that a qualified electrical installer determine that a separate circuit serving only this range hood be electrically grounded in accordance with local codes and ordinances, or ...

Use and Care
Page 7
...the ceiling or wall for wiring hole location instructions. 1. Cut only one 1¹⁄₄" (3.2 cm) diameter wiring access hole. Install screws to whether the range hood is properly grounded. WARNING: Improper grounding can result in locations shown. 3" (7.6 cm) Wood filler ... wire for assembling the range hood. Determine and clearly mark a vertical centerline on this point. Using 2 or more people to move and install range hood. Select a flat surface for the electric current. Drill a 1¼" (3.2 cm) diameter hole through top: Mark a line distance...
...the ceiling or wall for wiring hole location instructions. 1. Cut only one 1¹⁄₄" (3.2 cm) diameter wiring access hole. Install screws to whether the range hood is properly grounded. WARNING: Improper grounding can result in locations shown. 3" (7.6 cm) Wood filler ... wire for assembling the range hood. Determine and clearly mark a vertical centerline on this point. Using 2 or more people to move and install range hood. Select a flat surface for the electric current. Drill a 1¼" (3.2 cm) diameter hole through top: Mark a line distance...