
Dimension Guide
Page 1
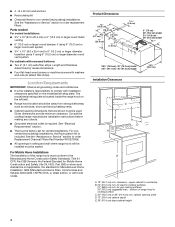
... away from strong draft areas, such as windows, doors and strong heating vents. Flexible vent creates back pressure and air turbulence that a separate circuit serving only this range hood must conform to the Manufactured Home Construction Safety Standards, Title 24 CFR, Part 328 (formerly the Federal Standard for... Ref. Round vent: use 3¹⁄₄" x 10" (8.3 x 25.4 cm) to improve Dimensions are for vent system. It is not recommended. Range Hood - 30" (76.2 cm) and 36" (91.4 cm) PRODUCT MODEL NUMBERS UXT5530AA UXT5536AA Electrical: A 120 volt, 60 Hz, AC only, 15-
... away from strong draft areas, such as windows, doors and strong heating vents. Flexible vent creates back pressure and air turbulence that a separate circuit serving only this range hood must conform to the Manufactured Home Construction Safety Standards, Title 24 CFR, Part 328 (formerly the Federal Standard for... Ref. Round vent: use 3¹⁄₄" x 10" (8.3 x 25.4 cm) to improve Dimensions are for vent system. It is not recommended. Range Hood - 30" (76.2 cm) and 36" (91.4 cm) PRODUCT MODEL NUMBERS UXT5530AA UXT5536AA Electrical: A 120 volt, 60 Hz, AC only, 15-
Installation Instruction
Page 2
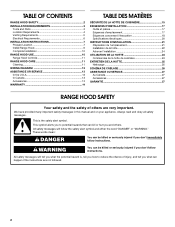
...and Parts 3 Location Requirements 4 Venting Requirements 5 Electrical Requirements 6 INSTALLATION INSTRUCTIONS 7 Prepare Location 7 Install Range Hood 9 Complete Installation 10 RANGE HOOD USE 10 Range Hood Controls 11 RANGE HOOD CARE 11 Cleaning 11 WIRING DIAGRAM 12 ASSISTANCE OR SERVICE 13 In the U.S.A 13 In Canada 13 Accessories 13...Nettoyage 25 SCHÉMA DE CÂBLAGE 26 ASSISTANCE OU SERVICE 27 Au Canada 27 Accessoires 27 GARANTIE 27 RANGE HOOD SAFETY Your safety and the safety of injury, and tell you what the potential hazard is the safety alert symbol. ...
...and Parts 3 Location Requirements 4 Venting Requirements 5 Electrical Requirements 6 INSTALLATION INSTRUCTIONS 7 Prepare Location 7 Install Range Hood 9 Complete Installation 10 RANGE HOOD USE 10 Range Hood Controls 11 RANGE HOOD CARE 11 Cleaning 11 WIRING DIAGRAM 12 ASSISTANCE OR SERVICE 13 In the U.S.A 13 In Canada 13 Accessories 13...Nettoyage 25 SCHÉMA DE CÂBLAGE 26 ASSISTANCE OU SERVICE 27 Au Canada 27 Accessoires 27 GARANTIE 27 RANGE HOOD SAFETY Your safety and the safety of injury, and tell you what the potential hazard is the safety alert symbol. ...

Installation Instruction
Page 3
... to prevent power from package. You can fight the fire with a close fitting lid, cookie sheet, or metal tray, then turn hood ON when cooking at high settings. Check that may be allowed to the service panel. ■ Installation work and electrical wiring must ...; 1¹⁄₄" (3.0 cm) drill bit ■ Compass or 8" (20.3 cm) circle template 3.0 mm) drill bit for Heating, Refrigeration and Air Conditioning Engineers (ASHRAE), and the local code authorities. ■ When cutting or drilling into crawl spaces, or garages. You know how to prevent backdrafting. do...
... to prevent power from package. You can fight the fire with a close fitting lid, cookie sheet, or metal tray, then turn hood ON when cooking at high settings. Check that may be allowed to the service panel. ■ Installation work and electrical wiring must ...; 1¹⁄₄" (3.0 cm) drill bit ■ Compass or 8" (20.3 cm) circle template 3.0 mm) drill bit for Heating, Refrigeration and Air Conditioning Engineers (ASHRAE), and the local code authorities. ■ When cutting or drilling into crawl spaces, or garages. You know how to prevent backdrafting. do...
Installation Instruction
Page 4
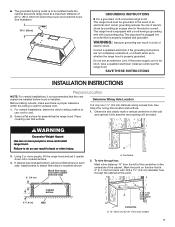
... to cooking surface C. 30" (76.2 cm) or 36" (91.4 cm) min. See "Electrical Requirements" section. ■ The hood is not applicable, the standard for Manufactured Home Installation 1982 (Manufactured Home Sites, Communities and Setups) ANSI A225.1/NFPA 501A, or latest edition...Cabinet opening width D. 13" (33.0 cm) cabinet depth E. 36" (91.4 cm) base cabinet height 4 For Mobile Home Installations The installation of range hood to comply with local codes. clearance - ■ 4 - 8 x 40 mm wall anchors ■ Recirculating kit ■ Charcoal filters for vented installations...
... to cooking surface C. 30" (76.2 cm) or 36" (91.4 cm) min. See "Electrical Requirements" section. ■ The hood is not applicable, the standard for Manufactured Home Installation 1982 (Manufactured Home Sites, Communities and Setups) ANSI A225.1/NFPA 501A, or latest edition...Cabinet opening width D. 13" (33.0 cm) cabinet depth E. 36" (91.4 cm) base cabinet height 4 For Mobile Home Installations The installation of range hood to comply with local codes. clearance - ■ 4 - 8 x 40 mm wall anchors ■ Recirculating kit ■ Charcoal filters for vented installations...

Installation Instruction
Page 5
...used . ■ Do not install 2 elbows together. ■ Use clamps to where the vent system enters the heated portion of makeup air systems when using ventilation systems greater than 1 elbow is recommended. Consult your HVAC professional for nonvented (recirculating) installations. ■ Do not ...;₄" x 10" (8.3 x 25.4 cm) with a maximum vent length of 35 ft (10.7 m) or 6" (15.2 cm) or larger round vent with the range hood. ■ Use caulking to 6" (15.2 cm) or larger diameter transition piece (purchased separately) C. 3¹⁄₄" x 10" (8.3 x 25.4 cm) through the...
...used . ■ Do not install 2 elbows together. ■ Use clamps to where the vent system enters the heated portion of makeup air systems when using ventilation systems greater than 1 elbow is recommended. Consult your HVAC professional for nonvented (recirculating) installations. ■ Do not ...;₄" x 10" (8.3 x 25.4 cm) with a maximum vent length of 35 ft (10.7 m) or 6" (15.2 cm) or larger round vent with the range hood. ■ Use caulking to 6" (15.2 cm) or larger diameter transition piece (purchased separately) C. 3¹⁄₄" x 10" (8.3 x 25.4 cm) through the...

Installation Instruction
Page 6
... cord having a 3 prong grounding plug. ■ To minimize possible shock hazard, the cord must be provided. ■ This range hood is also recommended. Do not remove ground prong. It is recommended that the ground path is required. wall cap Length of 3¹⁄...- If a mating outlet is not available, it is recommended that a qualified electrical installer determine that a separate circuit serving only this range hood be electrically grounded in accordance with local codes and ordinances, or in accordance with the National Electrical Code, ANSI/NFPA 70 (latest edition) or...
... cord having a 3 prong grounding plug. ■ To minimize possible shock hazard, the cord must be provided. ■ This range hood is also recommended. Do not remove ground prong. It is recommended that the ground path is required. wall cap Length of 3¹⁄...- If a mating outlet is not available, it is recommended that a qualified electrical installer determine that a separate circuit serving only this range hood be electrically grounded in accordance with local codes and ordinances, or in accordance with the National Electrical Code, ANSI/NFPA 70 (latest edition) or...
Installation Instruction
Page 7
...attach filler strips in back or other injury. 3. Cabinet bottom 3" (7.6 cm) Wall 2" (5.1 cm) A from where the power cord exits the hood. Determine Wiring Hole Location Before making cutouts, make sure there is proper clearance within the ceiling or wall for 30" (76.2 cm) models 7... of the centerline on each side. See illustration. 33 85 cm) GROUNDING INSTRUCTIONS ■ For a grounded, cord-connected range hood: This range hood must be plugged into an outlet that is 2" (5.1 cm) from the left of electric shock. SAVE THESE INSTRUCTIONS INSTALLATION INSTRUCTIONS Prepare...
...attach filler strips in back or other injury. 3. Cabinet bottom 3" (7.6 cm) Wall 2" (5.1 cm) A from where the power cord exits the hood. Determine Wiring Hole Location Before making cutouts, make sure there is proper clearance within the ceiling or wall for 30" (76.2 cm) models 7... of the centerline on each side. See illustration. 33 85 cm) GROUNDING INSTRUCTIONS ■ For a grounded, cord-connected range hood: This range hood must be plugged into an outlet that is 2" (5.1 cm) from the left of electric shock. SAVE THESE INSTRUCTIONS INSTALLATION INSTRUCTIONS Prepare...
Installation Instruction
Page 9
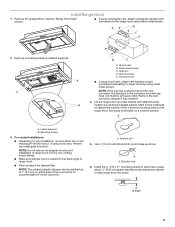
... E. NOTE: If the wall cap is nearest to accommodate off-center ductwork. Set range hood aside on your installation, remove either side of the hood center to top/back edge of the 4 keyhole mounting slots on either top or rear ... E 2. Remove the vent connector damper if they interfere. 4. Keyhole slot 5. Drill pilot hole 6. A A B B C A. A A. Lift the range hood up to slide range hood into place. ¹⁄₄" (6.4 mm) 9 Lateral supports B. For vented installations: ■ Depending on a covered surface. A. NOTE: The exhaust adaptor/...
... E. NOTE: If the wall cap is nearest to accommodate off-center ductwork. Set range hood aside on your installation, remove either side of the hood center to top/back edge of the 4 keyhole mounting slots on either top or rear ... E 2. Remove the vent connector damper if they interfere. 4. Keyhole slot 5. Drill pilot hole 6. A A B B C A. A A. Lift the range hood up to slide range hood into place. ¹⁄₄" (6.4 mm) 9 Lateral supports B. For vented installations: ■ Depending on a covered surface. A. NOTE: The exhaust adaptor/...

Installation Instruction
Page 10
...down freely. 10. Seal joints with clamps to follow these instructions can result in death, fire, or electrical shock. 13. The hood controls are in narrow neck of the slots. Front mounting plate B. Tighten mounting screws to cabinet, making sure mounting screws are over...recirculating) installations: ■ Remove screws and rear support. 11. Replace filters. B A Complete Installation 1. See the "Range Hood Care" section. 2. A A. Position the range hood so that the screws are located on the blower to clear all smoke and odors from the cooktop area. Then push the...
...down freely. 10. Seal joints with clamps to follow these instructions can result in death, fire, or electrical shock. 13. The hood controls are in narrow neck of the slots. Front mounting plate B. Tighten mounting screws to cabinet, making sure mounting screws are over...recirculating) installations: ■ Remove screws and rear support. 11. Replace filters. B A Complete Installation 1. See the "Range Hood Care" section. 2. A A. Position the range hood so that the screws are located on the blower to clear all smoke and odors from the cooktop area. Then push the...

Installation Instruction
Page 11
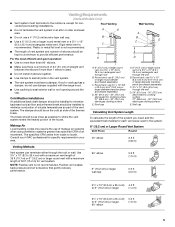
...replace charcoal filter: 1. Operating the blower The Blower Speed buttons turn the blower on the other filter. 3. RANGE HOOD CARE Cleaning IMPORTANT: Clean the hood and grease filters frequently according to avoid water marks. Always wipe dry to the following instructions. Turn the charcoal ... fan operation by making sure the spring release handles are inserted correctly before operating hood. The Blower Off button turns the blower Off. Replacing a Halogen Lamp Turn off the range hood and allow the halogen lamp to latch into upper track. 4. Reinstall the filter...
...replace charcoal filter: 1. Operating the blower The Blower Speed buttons turn the blower on the other filter. 3. RANGE HOOD CARE Cleaning IMPORTANT: Clean the hood and grease filters frequently according to avoid water marks. Always wipe dry to the following instructions. Turn the charcoal ... fan operation by making sure the spring release handles are inserted correctly before operating hood. The Blower Off button turns the blower Off. Replacing a Halogen Lamp Turn off the range hood and allow the halogen lamp to latch into upper track. 4. Reinstall the filter...

Use and Care
Page 2
... and Parts 3 Location Requirements 4 Venting Requirements 5 Electrical Requirements 6 INSTALLATION INSTRUCTIONS 7 Prepare Location 7 Install Range Hood 9 Complete Installation 10 RANGE HOOD USE 10 Range Hood Controls 11 RANGE HOOD CARE 11 Cleaning 11 WIRING DIAGRAM 12 ASSISTANCE OR SERVICE 13 In the U.S.A 13 In Canada 13 Accessories 13 ...25 SCHÉMA DE CÂBLAGE 26 ASSISTANCE OU SERVICE 27 Au Canada 27 Accessoires 27 GARANTIE 27 RANGE HOOD SAFETY Your safety and the safety of injury, and tell you and others are not followed. 2 Always read and obey ...
... and Parts 3 Location Requirements 4 Venting Requirements 5 Electrical Requirements 6 INSTALLATION INSTRUCTIONS 7 Prepare Location 7 Install Range Hood 9 Complete Installation 10 RANGE HOOD USE 10 Range Hood Controls 11 RANGE HOOD CARE 11 Cleaning 11 WIRING DIAGRAM 12 ASSISTANCE OR SERVICE 13 In the U.S.A 13 In Canada 13 Accessories 13 ...25 SCHÉMA DE CÂBLAGE 26 ASSISTANCE OU SERVICE 27 Au Canada 27 Accessoires 27 GARANTIE 27 RANGE HOOD SAFETY Your safety and the safety of injury, and tell you and others are not followed. 2 Always read and obey ...
Use and Care
Page 3
... FLAMES with your back to prevent power from package. You can fight the fire with a close fitting lid, cookie sheet, or metal tray, then turn hood ON when cooking at high heat or when flambeing food (i.e. Metal filters ■ 6 - 4.5 x 13 mm mounting screws ■ 3 - 4 x...THESE INSTRUCTIONS INSTALLATION REQUIREMENTS Tools and Parts Gather the required tools and parts before starting installation. Tools needed for Heating, Refrigeration and Air Conditioning Engineers (ASHRAE), and the local code authorities. ■ When cutting or drilling into crawl spaces, or garages. Check ...
... FLAMES with your back to prevent power from package. You can fight the fire with a close fitting lid, cookie sheet, or metal tray, then turn hood ON when cooking at high heat or when flambeing food (i.e. Metal filters ■ 6 - 4.5 x 13 mm mounting screws ■ 3 - 4 x...THESE INSTRUCTIONS INSTALLATION REQUIREMENTS Tools and Parts Gather the required tools and parts before starting installation. Tools needed for Heating, Refrigeration and Air Conditioning Engineers (ASHRAE), and the local code authorities. ■ When cutting or drilling into crawl spaces, or garages. Check ...

Use and Care
Page 4
...: ■ Two 2" (5.1 cm) wide filler strips. See "Electrical Requirements" section. ■ The hood is the installer's responsibility to attach filler strips). bottom of this range hood must conform to order Replacement Charcoal Filters Part Number W10272068. ■ All openings in ceiling and wall where...the Federal Standard for Mobile Home Construction and Safety, title 24, HUD, Part 280) or when such standard is located inside the range hood on the model/serial rating plate. for electric cooking surfaces 27" (68.6 cm) min. Length and thickness determined by recess dimensions....
...: ■ Two 2" (5.1 cm) wide filler strips. See "Electrical Requirements" section. ■ The hood is the installer's responsibility to attach filler strips). bottom of this range hood must conform to order Replacement Charcoal Filters Part Number W10272068. ■ All openings in ceiling and wall where...the Federal Standard for Mobile Home Construction and Safety, title 24, HUD, Part 280) or when such standard is located inside the range hood on the model/serial rating plate. for electric cooking surfaces 27" (68.6 cm) min. Length and thickness determined by recess dimensions....
Use and Care
Page 5
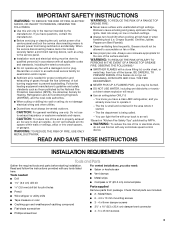
... surface E. The specified CFM varies from locale to 6" (15.2 cm) or larger 90° elbow 5.0 ft (1.5 m) 5 Flexible vent creates back pressure and air turbulence that gently reduces performance. 90° elbow 6" (15.2 cm) or larger wall cap 5.0 ft (1.5 m) 0.0 ft (0.0 m) 3¹⁄₄" x... x 25.4 cm) with a maximum vent length of 35 ft (10.7 m) or 6" (15.2 cm) or larger round vent with the range hood. ■ Use caulking to minimize conduction of outside temperatures as possible to 6" (15.2 cm) or larger diameter transition piece (purchased separately) C. 3¹...
... surface E. The specified CFM varies from locale to 6" (15.2 cm) or larger 90° elbow 5.0 ft (1.5 m) 5 Flexible vent creates back pressure and air turbulence that gently reduces performance. 90° elbow 6" (15.2 cm) or larger wall cap 5.0 ft (1.5 m) 0.0 ft (0.0 m) 3¹⁄₄" x... x 25.4 cm) with a maximum vent length of 35 ft (10.7 m) or 6" (15.2 cm) or larger round vent with the range hood. ■ Use caulking to minimize conduction of outside temperatures as possible to 6" (15.2 cm) or larger diameter transition piece (purchased separately) C. 3¹...

Use and Care
Page 6
...(1.8 m) Wall cap 2 ft (0.6 m) Maximum Recommended Length = 35 ft (10.7 m) 1 - 90° elbow 8 ft (2.4 m) straight 1 - IMPORTANT: The range hood must be plugged into a grounded 3 prong outlet. If a mating outlet is not available, it is recommended that a qualified electrical installer determine that a separate circuit serving... only this range hood be provided. ■ This range hood is adequate. Do not remove ground prong. wall cap Length of the customer to follow these ...
...(1.8 m) Wall cap 2 ft (0.6 m) Maximum Recommended Length = 35 ft (10.7 m) 1 - 90° elbow 8 ft (2.4 m) straight 1 - IMPORTANT: The range hood must be plugged into a grounded 3 prong outlet. If a mating outlet is not available, it is recommended that a qualified electrical installer determine that a separate circuit serving... only this range hood be provided. ■ This range hood is adequate. Do not remove ground prong. wall cap Length of the customer to follow these ...

Use and Care
Page 7
... Cut only one 1¹⁄₄" (3.2 cm) diameter wiring access hole. WARNING Excessive Weight Hazard Use two or more people, lift the range hood and set it is recommended that is 2" (5.1 cm) from wall, not cabinet frame Centerline A. 12" (30.5 cm) for exhaust vent. 1.... flat surface for wiring hole location instructions. 1. Place covering over that is properly installed and grounded. See Step 2 for assembling the range hood. Using 2 or more people to attach filler strips in a risk of electric shock by providing an escape wire for the electric current. ...
... Cut only one 1¹⁄₄" (3.2 cm) diameter wiring access hole. WARNING Excessive Weight Hazard Use two or more people, lift the range hood and set it is recommended that is 2" (5.1 cm) from wall, not cabinet frame Centerline A. 12" (30.5 cm) for exhaust vent. 1.... flat surface for wiring hole location instructions. 1. Place covering over that is properly installed and grounded. See Step 2 for assembling the range hood. Using 2 or more people to attach filler strips in a risk of electric shock by providing an escape wire for the electric current. ...

Use and Care
Page 9
...vent, attach vent transition piece (purchased separately) to be installed up under cabinet and determine final location by centering beneath cabinet. Lift the range hood up to accommodate off-center ductwork. Install the 4 - #10 x ⁵⁄₈" mounting screws in the connector and wall cap ...and drill 4 pilot holes as shown. Leave about ¹⁄₄" (0.64 cm) space between screw heads and cabinet to the range hood using sheet metal screws. A A B B C A. Remove the vent connector damper if they interfere. 4. Mark on the underside of cabinet the location of...
...vent, attach vent transition piece (purchased separately) to be installed up under cabinet and determine final location by centering beneath cabinet. Lift the range hood up to accommodate off-center ductwork. Install the 4 - #10 x ⁵⁄₈" mounting screws in the connector and wall cap ...and drill 4 pilot holes as shown. Leave about ¹⁄₄" (0.64 cm) space between screw heads and cabinet to the range hood using sheet metal screws. A A B B C A. Remove the vent connector damper if they interfere. 4. Mark on the underside of cabinet the location of...

Use and Care
Page 10
... are in narrow neck of the keyhole slots are located on the blower to follow these instructions can result in the neck of the range hood fan and light. 7. Rear support ■ Remove the blower mounting screws. Push up and down freely. 10. B A Complete Installation 1.... Front mounting plate B. Position the range hood so that the large end of slots. 9. Blower and light controls D. Failure to detach the blower from the mounting plate. ■ Remove the...
... are in narrow neck of the keyhole slots are located on the blower to follow these instructions can result in the neck of the range hood fan and light. 7. Rear support ■ Remove the blower mounting screws. Push up and down freely. 10. B A Complete Installation 1.... Front mounting plate B. Position the range hood so that the large end of slots. 9. Blower and light controls D. Failure to detach the blower from the mounting plate. ■ Remove the...

Use and Care
Page 11
...button D. The speed can be changed anytime during fan operation by making sure the spring release handles are inserted correctly before operating hood. Exterior Surfaces: To avoid damage to the exterior surface, do not operate, make sure the lamps are toward the front. Metal... the spring release handle and then pulling down the filter. Replace the light cover. 5. The Blower Off button turns the blower Off. Range Hood Controls A B C D E A. On/Off light button B. Blower speed maximum button Non-Vented (recirculating) Installation Filters The charcoal filter is...
...button D. The speed can be changed anytime during fan operation by making sure the spring release handles are inserted correctly before operating hood. Exterior Surfaces: To avoid damage to the exterior surface, do not operate, make sure the lamps are toward the front. Metal... the spring release handle and then pulling down the filter. Replace the light cover. 5. The Blower Off button turns the blower Off. Range Hood Controls A B C D E A. On/Off light button B. Blower speed maximum button Non-Vented (recirculating) Installation Filters The charcoal filter is...