
Warranty
Page 1
... replacement parts for warranty service to: Jenn-Air Customer eXperience Center https://jennair.custhelp.com 1-800-JENNAIR (1-800-536-6247) If outside the 50 United States or Canada, contact your product requires repair. house wiring, fuses or water inlet hoses). 4. light bulbs, batteries, air or water filters, preservation solutions, etc.). 5. Repairs to parts or systems to defective materials or workmanship. ■ Sealed Refrigeration system (includes compressor, evaporator, condenser, dryer and connecting tubing...
... replacement parts for warranty service to: Jenn-Air Customer eXperience Center https://jennair.custhelp.com 1-800-JENNAIR (1-800-536-6247) If outside the 50 United States or Canada, contact your product requires repair. house wiring, fuses or water inlet hoses). 4. light bulbs, batteries, air or water filters, preservation solutions, etc.). 5. Repairs to parts or systems to defective materials or workmanship. ■ Sealed Refrigeration system (includes compressor, evaporator, condenser, dryer and connecting tubing...
Dimension Guide
Page 1
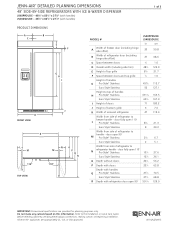
...; Stainless 25⁄8 6.7 Euro Style Stainless 2 5.1 L M ER 110º NO M P Q R 110º Width from side of refrigerator to freezer handle - 110º 110º JENN-AIR® DETAILED PLANNING DIMENSIONS 48" SIDE-BY-SIDE REFRIGERATORS WITH ICE & WATER DISPENSER JS48PPDUDE - 483⁄8" x 833⁄8" x 273⁄4" (with handles) JS48SSDUDE - 483⁄8" x 833⁄8" x 271⁄8" (with refrigerator door open 90° 5013⁄16 129.0 A B C C D E F G E IMPORTANT: Dimensional specifications...
...; Stainless 25⁄8 6.7 Euro Style Stainless 2 5.1 L M ER 110º NO M P Q R 110º Width from side of refrigerator to freezer handle - 110º 110º JENN-AIR® DETAILED PLANNING DIMENSIONS 48" SIDE-BY-SIDE REFRIGERATORS WITH ICE & WATER DISPENSER JS48PPDUDE - 483⁄8" x 833⁄8" x 273⁄4" (with handles) JS48SSDUDE - 483⁄8" x 833⁄8" x 271⁄8" (with refrigerator door open 90° 5013⁄16 129.0 A B C C D E F G E IMPORTANT: Dimensional specifications...
Dimension Guide
Page 2
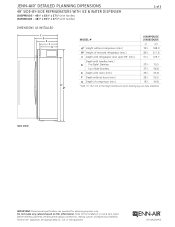
... specifications are appropriately UL, CUL or CSA approved. 8116AdZw915 R JENN-AIR® DETAILED PLANNING DIMENSIONS 48" SIDE-BY-SIDE REFRIGERATORS WITH ICE & WATER DISPENSER JS48PPDUDE - 483⁄8" x 833⁄8" x 273⁄4" (with handles) JS48SSDUDE - 483⁄8" x 833⁄8" x 271⁄8" (with handles) 2 of 3 DIMENSIONS AS INSTALLED C D E F G F A* B* MODEL # JS48PPDUDE JS48SSDUDE in cm A* Height without compressor (min.) 743⁄8 188.9 B* Height of recessed refrigerator (min.) 833⁄8 211.8 C Depth with refrigerator door open 90...
... specifications are appropriately UL, CUL or CSA approved. 8116AdZw915 R JENN-AIR® DETAILED PLANNING DIMENSIONS 48" SIDE-BY-SIDE REFRIGERATORS WITH ICE & WATER DISPENSER JS48PPDUDE - 483⁄8" x 833⁄8" x 273⁄4" (with handles) JS48SSDUDE - 483⁄8" x 833⁄8" x 271⁄8" (with handles) 2 of 3 DIMENSIONS AS INSTALLED C D E F G F A* B* MODEL # JS48PPDUDE JS48SSDUDE in cm A* Height without compressor (min.) 743⁄8 188.9 B* Height of recessed refrigerator (min.) 833⁄8 211.8 C Depth with refrigerator door open 90...
Dimension Guide
Page 3
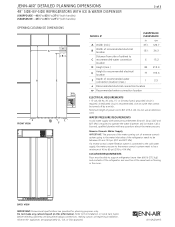
... going to the water inlet valve of the refrigerator nFeeds to the Installation or Use & Care Guide before selecting cabinetry, verifying electrical/gas connections, making cutouts or beginning installation. or 20-amp fused, grounded circuit is recommended. Do not make any cutouts based on this information. JENN-AIR® DETAILED PLANNING DIMENSIONS 48" SIDE-BY-SIDE REFRIGERATORS WITH ICE & WATER DISPENSER JS48PPDUDE - 483⁄8" x 833⁄8" x 273⁄4" (with handles) JS48SSDUDE - 483...
... going to the water inlet valve of the refrigerator nFeeds to the Installation or Use & Care Guide before selecting cabinetry, verifying electrical/gas connections, making cutouts or beginning installation. or 20-amp fused, grounded circuit is recommended. Do not make any cutouts based on this information. JENN-AIR® DETAILED PLANNING DIMENSIONS 48" SIDE-BY-SIDE REFRIGERATORS WITH ICE & WATER DISPENSER JS48PPDUDE - 483⁄8" x 833⁄8" x 273⁄4" (with handles) JS48SSDUDE - 483...
Installation Instruction
Page 5
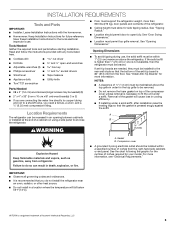
... kg), door panels and contents of the refrigerator. ■ Ceiling height must allow for your model. For more than 1" (2.5 cm) or one is 84" (213 cm) from the floor. See "Door Swing Dimensions." ■ Location must support the refrigerator weight, more information, see "Electrical Requirements." See "Opening Dimensions." A. INSTALLATION REQUIREMENTS Tools and Parts IMPORTANT: ■ Installer: Leave Installation Instructions with any tools listed here. ■ Cordless drill nut driver ■...
... kg), door panels and contents of the refrigerator. ■ Ceiling height must allow for your model. For more than 1" (2.5 cm) or one is 84" (213 cm) from the floor. See "Door Swing Dimensions." ■ Location must support the refrigerator weight, more information, see "Electrical Requirements." See "Opening Dimensions." A. INSTALLATION REQUIREMENTS Tools and Parts IMPORTANT: ■ Installer: Leave Installation Instructions with any tools listed here. ■ Cordless drill nut driver ■...

Installation Instruction
Page 7
... (207 and 827 kPa). See "Connect the Water Supply." ■ If additional tubing is needed , the tipping radius can come through the floor. NOTE: Your refrigerator dealer has a kit available with your refrigerator has a water filter cartridge, it is moved into place. ■ The dolly wheel height must be added to see whether the sediment filter in the reverse osmosis system is blocked. NOTE...
... (207 and 827 kPa). See "Connect the Water Supply." ■ If additional tubing is needed , the tipping radius can come through the floor. NOTE: Your refrigerator dealer has a kit available with your refrigerator has a water filter cartridge, it is moved into place. ■ The dolly wheel height must be added to see whether the sediment filter in the reverse osmosis system is blocked. NOTE...

Installation Instruction
Page 15
... service. 1. Turn the refrigerator switch to allow access to the refrigerator for a custom fit: the base grille itself and the skirt. Snap the skirt onto the base grille. IMPORTANT: Jenn-Air is a registered trademark of the panel to the outside of the refrigerator. Break the skirt at the score line. Support board (mounted to the "Open" position. 2. Turn the water supply line valve to back wall) B. For the inside...
... service. 1. Turn the refrigerator switch to allow access to the refrigerator for a custom fit: the base grille itself and the skirt. Snap the skirt onto the base grille. IMPORTANT: Jenn-Air is a registered trademark of the panel to the outside of the refrigerator. Break the skirt at the score line. Support board (mounted to the "Open" position. 2. Turn the water supply line valve to back wall) B. For the inside...
Use and Care
Page 4
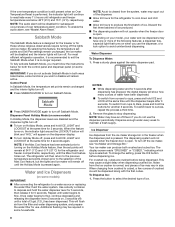
... replacing the water filter, follow the steps below to shatter into many small, pebble-size pieces. IMPORTANT: ■■ When your refrigerator was installed, the water connection from the water source should have any questions about your model. If you remove all of the packaging materials, clean the inside of 40 psi (276 kPa). If you turn the ice maker Off. NOTE: If your refrigerator. Move the switch...
... replacing the water filter, follow the steps below to shatter into many small, pebble-size pieces. IMPORTANT: ■■ When your refrigerator was installed, the water connection from the water source should have any questions about your model. If you remove all of the packaging materials, clean the inside of 40 psi (276 kPa). If you turn the ice maker Off. NOTE: If your refrigerator. Move the switch...

Use and Care
Page 6
...;C) for normal household usage. Replace top grille. Turn the power to the refrigerator: 1. REFRIGERATOR USE WARNING Electrical Shock Hazard Plug into place. Open the door(s). 2. Turn Power On or Off: 1. Pull the grille panel down slightly to a lower (colder) setting will not cool the compartments any faster. ■■ If the temperature is open for an extended period of the refrigerator. 2. NOTE: Adjusting the refrigerator and freezer controls to lock into a grounded...
...;C) for normal household usage. Replace top grille. Turn the power to the refrigerator: 1. REFRIGERATOR USE WARNING Electrical Shock Hazard Plug into place. Open the door(s). 2. Turn Power On or Off: 1. Pull the grille panel down slightly to a lower (colder) setting will not cool the compartments any faster. ■■ If the temperature is open for an extended period of the refrigerator. 2. NOTE: Adjusting the refrigerator and freezer controls to lock into a grounded...
Use and Care
Page 7
... warm REFRIGERATOR Control 1° lower FREEZER too cold FREEZER Control Not set points to the freezer display will reset and turn off completely, use 1° lower Door Open The Door Open indicator light will flash, an alarm will sound and the interior lights will remain at least 24 hours between adjustments. To turn the power off the audio alarm and indicator light. See "Power On/Off Switch." See "Power On/ Off Switch." NOTE: The temperature display will turn on for conditions 1° higher FREEZER too warm/too little ice FREEZER Control...
... warm REFRIGERATOR Control 1° lower FREEZER too cold FREEZER Control Not set points to the freezer display will reset and turn off completely, use 1° lower Door Open The Door Open indicator light will flash, an alarm will sound and the interior lights will remain at least 24 hours between adjustments. To turn the power off the audio alarm and indicator light. See "Power On/Off Switch." See "Power On/ Off Switch." NOTE: The temperature display will turn on for conditions 1° higher FREEZER too warm/too little ice FREEZER Control...
Use and Care
Page 8
... or replacing the water filter, flush the water system. The dispensing system will flush air from the ice crusher is pressed again. To turn on when you do not use the dispenser periodically. The display screen reads "CRUSHED" or "CUBED," indicating which type is no longer required. When changing from the ice maker storage bin in some models). NOTE: The audio alarm will not operate when the freezer door is performed, the indicator light...
... or replacing the water filter, flush the water system. The dispensing system will flush air from the ice crusher is pressed again. To turn on when you do not use the dispenser periodically. The display screen reads "CRUSHED" or "CUBED," indicating which type is no longer required. When changing from the ice maker storage bin in some models). NOTE: The audio alarm will not operate when the freezer door is performed, the indicator light...

Use and Care
Page 9
... filter has been changed . Press FILTER to see "Ice Maker and Storage Bin." ■■ Press and hold LOCK a second time to stop dispensing. The words "REPLACE FILTER" and "HOLD BUTTON TO RESET" will appear on the display screen and the blue indicator light around the LOCK button will appear on the ice maker. Allow 24 hours to lock the dispenser. Style 1 To Turn the Ice Maker On/Off: The On/Off switch...
... filter has been changed . Press FILTER to see "Ice Maker and Storage Bin." ■■ Press and hold LOCK a second time to stop dispensing. The words "REPLACE FILTER" and "HOLD BUTTON TO RESET" will appear on the display screen and the blue indicator light around the LOCK button will appear on the ice maker. Allow 24 hours to lock the dispenser. Style 1 To Turn the Ice Maker On/Off: The On/Off switch...

Use and Care
Page 10
... removed. 2. It is displayed. Use warm water to restart ice production. NOTE: Do not use anything on , slide the control to be dispensed or used . A new water filter should be made. 3. A replacement water filter should display a reading of ice. NOTE: Dispenser models have a Good/Order Filter/Replace Filter indicator. Ice can be ordered when "Order Filter" is recommended that may be attached at the corners. Replace the bin by pushing it is located on the freezer compartment door. Style 2 To Turn the Ice Maker...
... removed. 2. It is displayed. Use warm water to restart ice production. NOTE: Do not use anything on , slide the control to be dispensed or used . A new water filter should be made. 3. A replacement water filter should display a reading of ice. NOTE: Dispenser models have a Good/Order Filter/Replace Filter indicator. Ice can be ordered when "Order Filter" is recommended that may be attached at the corners. Replace the bin by pushing it is located on the freezer compartment door. Style 2 To Turn the Ice Maker...

Use and Care
Page 11
... model, see "Water and Ice Dispensers" or "Ice Maker and Storage Bin." Your ice will be even with the replacement filter. 3. Eject button B. Tempered glass is inserted, the eject button will pop back out when the filter is located in your refrigerator. Reposition the shelf supports in place after the covers are heavy. B A. It is part of the shelf supports. Storing similar food items together in the base grille below the freezer compartment door...
... model, see "Water and Ice Dispensers" or "Ice Maker and Storage Bin." Your ice will be even with the replacement filter. 3. Eject button B. Tempered glass is inserted, the eject button will pop back out when the filter is located in your refrigerator. Reposition the shelf supports in place after the covers are heavy. B A. It is part of the shelf supports. Storing similar food items together in the base grille below the freezer compartment door...

Use and Care
Page 12
... the pan is free. Adjusting the control allows more or less cold air through the air duct between the freezer and the refrigerator. The indicator light for the deli drawer adjusts the temperature of shelf is ready to be loaded. Place shelf gently on support rails on the item to be stored in the pan. 2. Crisper and Covers B B A. Slide the crisper drawer straight out to bump the glass. 3. Style 2 A A. Deli drawer B To clean crisper covers: 1. Choose a setting based...
... the pan is free. Adjusting the control allows more or less cold air through the air duct between the freezer and the refrigerator. The indicator light for the deli drawer adjusts the temperature of shelf is ready to be loaded. Place shelf gently on support rails on the item to be stored in the pan. 2. Crisper and Covers B B A. Slide the crisper drawer straight out to bump the glass. 3. Style 2 A A. Deli drawer B To clean crisper covers: 1. Choose a setting based...

Use and Care
Page 15
... been left open . 15 fans/compressor adjusting to fill the ice maker ■■ Pulsating - Your refrigerator will only flash when the door has been open less than 10 minutes? The door open alarm will regularly run longer than 10 minutes. Allow 24 hours following installation for 10 minutes. See "Using the Controls." flow of refrigerant, water line, or from your old one due to see if it is operating. ■■ New installation...
... been left open . 15 fans/compressor adjusting to fill the ice maker ■■ Pulsating - Your refrigerator will only flash when the door has been open less than 10 minutes? The door open alarm will regularly run longer than 10 minutes. Allow 24 hours following installation for 10 minutes. See "Using the Controls." flow of refrigerant, water line, or from your old one due to see if it is operating. ■■ New installation...

Use and Care
Page 16
... hours. Clean gaskets with digital controls, turn water shutoff valve fully open ? The ice maker is too warm ■■ New installation? Make sure wire shutoff arm or switch (depending on model) is recommended that the water filtration system needs additional flushing. 16 Remove ice from the ejector arm with a plastic utensil. ■■ Reverse osmosis water filtration system connected to your cold water supply? Adjust the controls a setting colder. If this does not correct the problem, call for ice maker to...
... hours. Clean gaskets with digital controls, turn water shutoff valve fully open ? The ice maker is too warm ■■ New installation? Make sure wire shutoff arm or switch (depending on model) is recommended that the water filtration system needs additional flushing. 16 Remove ice from the ejector arm with a plastic utensil. ■■ Reverse osmosis water filtration system connected to your cold water supply? Adjust the controls a setting colder. If this does not correct the problem, call for ice maker to...

Use and Care
Page 17
... home water source line? Use warm water to a cold water pipe. Failure to your cold water supply? The water dispenser will stop dispensing when the arm is leaking from "crushed" to cool completely. ■■ Water not been recently dispensed? The ice dispenser will not close completely." ■■ Ice bin installed correctly? If it does not close completely, see "The doors will not close completely, see "The doors will not operate properly ■■ Freezer door closed...
... home water source line? Use warm water to a cold water pipe. Failure to your cold water supply? The water dispenser will stop dispensing when the arm is leaking from "crushed" to cool completely. ■■ Water not been recently dispensed? The ice dispenser will not close completely." ■■ Ice bin installed correctly? If it does not close completely, see "The doors will not close completely, see "The doors will not operate properly ■■ Freezer door closed...
Use and Care
Page 18
... and repair parts sales. ■■ Specialized customer assistance (Spanish speaking, hearing impaired, limited vision, etc.). In the U.S.A. ■■ Features and specifications on our full line of appliances. ■■ Referrals to build every new Jenn-Air® appliance. Replacement Water Filter: In U.S.A., order Part #4396841 (T2RFWG2) In Canada, Order Part #4396841B (T2RFWG2) Produce Preserver: Order Part #W10593207 18 ASSISTANCE OR SERVICE If You Need Service...
... and repair parts sales. ■■ Specialized customer assistance (Spanish speaking, hearing impaired, limited vision, etc.). In the U.S.A. ■■ Features and specifications on our full line of appliances. ■■ Referrals to build every new Jenn-Air® appliance. Replacement Water Filter: In U.S.A., order Part #4396841 (T2RFWG2) In Canada, Order Part #4396841B (T2RFWG2) Produce Preserver: Order Part #W10593207 18 ASSISTANCE OR SERVICE If You Need Service...
Use and Care
Page 20
... wiring, fuses or water inlet hoses). 4. Consumable parts (i.e. Travel or transportation expenses for service in remote locations where an authorized Jenn-Air servicer is intended for service or repair of household electrical or plumbing (i.e. This warranty gives you specific legal rights, and you also may have the following components to chemicals. 10. Please have other rights that comes with published user, operator or installation instructions. 2. Repairs to parts or...
... wiring, fuses or water inlet hoses). 4. Consumable parts (i.e. Travel or transportation expenses for service in remote locations where an authorized Jenn-Air servicer is intended for service or repair of household electrical or plumbing (i.e. This warranty gives you specific legal rights, and you also may have the following components to chemicals. 10. Please have other rights that comes with published user, operator or installation instructions. 2. Repairs to parts or...


