Installation Instruction
Page 6
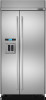
...;⁄₂" (1.3 cm) must be attached to the rear wall studs 80" to 90" (203 cm to make the panels. Pro-Style® and Euro-Style Series are shipped complete. ■ If you do so can be braced. Opening Dimensions ■ To avoid tipping during use . TOOLS NEEDED...: Gather the required tools and parts before starting installation. See "Overlay Series Custom Panels" for more information, see "Electrical Requirements...
...;⁄₂" (1.3 cm) must be attached to the rear wall studs 80" to 90" (203 cm to make the panels. Pro-Style® and Euro-Style Series are shipped complete. ■ If you do so can be braced. Opening Dimensions ■ To avoid tipping during use . TOOLS NEEDED...: Gather the required tools and parts before starting installation. See "Overlay Series Custom Panels" for more information, see "Electrical Requirements...

Installation Instruction
Page 21
... at the top and bottom. Replace the door stop screw C. See "Overlay Series Door Panel and Cabinetry Clearance." 21 Place the top grille panel-side down , after the doors have been routed on a soft working surface. B A B Euro-Style and Pro-Style® Styles Remove the door stop screw from top (110°) 2. Remove one from...
... at the top and bottom. Replace the door stop screw C. See "Overlay Series Door Panel and Cabinetry Clearance." 21 Place the top grille panel-side down , after the doors have been routed on a soft working surface. B A B Euro-Style and Pro-Style® Styles Remove the door stop screw from top (110°) 2. Remove one from...