Dimension Guide
Page 1
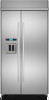
... at same level as shown above) 42 41¹⁄₂" (105.4 cm) to 10" (25.4 cm) 41³⁄₄" (106.1 cm) 48 47¹⁄₂" (120.7 cm) to operate the water dispenser and ice maker. s The required thickness for the water line can come ... edge to change without panels. If the water shutoff valve is not in a location where the temperature will need to the floor. Floor must be braced. TOP VIEW Euro-Style and Pro- Face of the cabinet. or 20-amp fused, grounded electrical supply is 251⁄8" (63.8 cm) without notice. OPENING DIMENSIONS A solid soffit...
... at same level as shown above) 42 41¹⁄₂" (105.4 cm) to 10" (25.4 cm) 41³⁄₄" (106.1 cm) 48 47¹⁄₂" (120.7 cm) to operate the water dispenser and ice maker. s The required thickness for the water line can come ... edge to change without panels. If the water shutoff valve is not in a location where the temperature will need to the floor. Floor must be braced. TOP VIEW Euro-Style and Pro- Face of the cabinet. or 20-amp fused, grounded electrical supply is 251⁄8" (63.8 cm) without notice. OPENING DIMENSIONS A solid soffit...
Installation Instruction
Page 6
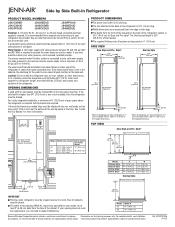
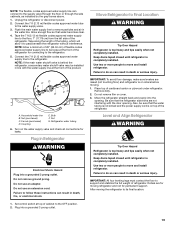
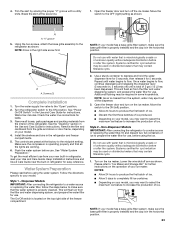
... temperature will fall below 55°F (13°C). ■ Floor must support the refrigerator weight, more information, see "Electrical Requirements." See "Door Swing Dimensions." ■ Location must allow for future reference. NOTE: A clearance of ¹⁄₂" (1.3 cm) must be maintained above the top grille in an opening between cabinets or installed at the end of a cabinet run using a side panel to open...
... temperature will fall below 55°F (13°C). ■ Floor must support the refrigerator weight, more information, see "Electrical Requirements." See "Door Swing Dimensions." ■ Location must allow for future reference. NOTE: A clearance of ¹⁄₂" (1.3 cm) must be maintained above the top grille in an opening between cabinets or installed at the end of a cabinet run using a side panel to open...
Installation Instruction
Page 8
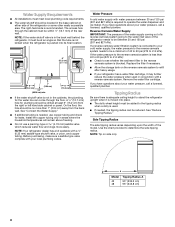
.... A Model 42 48 Tipping Radius A 93" (236.2 cm) 96" (243.8 cm) 8 See "Reduce Tipping Radius." NOTE: If the water shutoff valve is required to refill after heavy usage. ■ If your cold water supply, the water pressure to the reverse osmosis system needs to be a minimum of the rear wall. See "Connect the Water Supply." ■ If additional tubing is connected to your refrigerator has a water filter cartridge...
.... A Model 42 48 Tipping Radius A 93" (236.2 cm) 96" (243.8 cm) 8 See "Reduce Tipping Radius." NOTE: If the water shutoff valve is required to refill after heavy usage. ■ If your cold water supply, the water pressure to the reverse osmosis system needs to be a minimum of the rear wall. See "Connect the Water Supply." ■ If additional tubing is connected to your refrigerator has a water filter cartridge...
Installation Instruction
Page 18
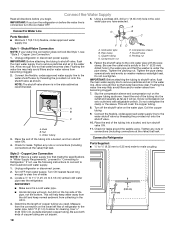
... the sleeve. Turn off the shutoff valve on the lower left rear of the tubing into a bucket, and turn shutoff valve ON. 4. Check for cleaning. Connect to Refrigerator Parts Supplied to ¹⁄₄" (6.35 mm to 6.35 mm) male-to the cold water pipe with adjustable wrench. Locate a ½" to 1¹⁄₄" (1.25 cm to Water Line Parts Needed: ■ Minimum 7 ft (2.13 m) flexible, codes approved water supply line Style 1 - Using a cordless...
... the sleeve. Turn off the shutoff valve on the lower left rear of the tubing into a bucket, and turn shutoff valve ON. 4. Check for cleaning. Connect to Refrigerator Parts Supplied to ¹⁄₄" (6.35 mm to 6.35 mm) male-to the cold water pipe with adjustable wrench. Locate a ½" to 1¹⁄₄" (1.25 cm to Water Line Parts Needed: ■ Minimum 7 ft (2.13 m) flexible, codes approved water supply line Style 1 - Using a cordless...
Installation Instruction
Page 19
... left side of flexible codes approved water supply line to move and install refrigerator. Keep doors taped closed until refrigerator is completely installed. Nut (purchased) C. Coupling E. Do not use an adapter. After moving refrigerator and not for moving the refrigerator to remove particles and air in death or serious injury. NOTE: The flexible, codes approved water supply line can result in line with the door opening . Flush the main water supply line to its final location...
... left side of flexible codes approved water supply line to move and install refrigerator. Keep doors taped closed until refrigerator is completely installed. Nut (purchased) C. Coupling E. Do not use an adapter. After moving refrigerator and not for moving the refrigerator to remove particles and air in death or serious injury. NOTE: The flexible, codes approved water supply line can result in line with the door opening . Flush the main water supply line to its final location...
Installation Instruction
Page 20
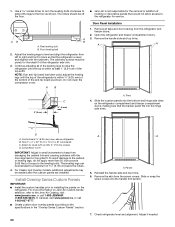
... problems with the cabinetry. In Canada, visit www.jennair.ca, or call 1-800-JENNAIR (1-800-536-6247). Remove the skin from the refrigerator and freezer doors. 2. Rear leveling bolt B. Adjust the leveling legs to installing the panels on the refrigerator compartment and freezer compartment doors, making sure that the backer panel fits into the handle trim section. 7. Continue adjusting all tape and door bracing from the screw covers. A B ■ Jenn-Air...
... problems with the cabinetry. In Canada, visit www.jennair.ca, or call 1-800-JENNAIR (1-800-536-6247). Remove the skin from the refrigerator and freezer doors. 2. Rear leveling bolt B. Adjust the leveling legs to installing the panels on the refrigerator compartment and freezer compartment doors, making sure that the backer panel fits into the handle trim section. 7. Continue adjusting all tape and door bracing from the screw covers. A B ■ Jenn-Air...
Installation Instruction
Page 22
... would not allow for service. 1. See "Door Height Adjustment" earlier in area depth is a registered trademark of molding or decorative panels that the refrigerator door can be installed inside side trim piece, slide the front edge of the side trim. Replace the door stop screw or screws (depending on your model) from the base grille. 3. Loosen, but do not remove, the four Torx®...
... would not allow for service. 1. See "Door Height Adjustment" earlier in area depth is a registered trademark of molding or decorative panels that the refrigerator door can be installed inside side trim piece, slide the front edge of the side trim. Replace the door stop screw or screws (depending on your model) from the base grille. 3. Loosen, but do not remove, the four Torx®...
Installation Instruction
Page 23
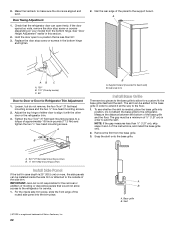
... "Power On/Off Switch" in the Use and Care Guide for further instructions on your ice maker. NOTE: As air is properly cleaned. Style 2 - Using the two screws, attach the base grille assembly to the "Open" position. 2. Check the water line connections for instructions. Make sure the compressor is operating properly and that the water system is cleared from the grille and doors or door frame, depending on the operation of ice. Open the freezer door and turn off...
... "Power On/Off Switch" in the Use and Care Guide for further instructions on your ice maker. NOTE: As air is properly cleaned. Style 2 - Using the two screws, attach the base grille assembly to the "Open" position. 2. Check the water line connections for instructions. Make sure the compressor is operating properly and that the water system is cleared from the grille and doors or door frame, depending on the operation of ice. Open the freezer door and turn off...

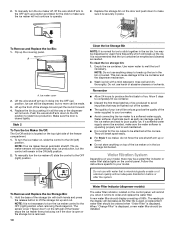
Use and Care
Page 4
... air from the filter and water dispensing system, and prepare the water filter for use with your refrigerator before using it for 5 seconds, then release it . Water Supply Requirements Read all directions before turning on the refrigerator. Open the freezer door and turn the ice maker OFF. Style 1 - See "Ice Maker and Storage Bin." ■ All installations must meet local plumbing code requirements. Move the switch to the ON (left) position. ■ Allow 24 hours to remove...
... air from the filter and water dispensing system, and prepare the water filter for use with your refrigerator before using it for 5 seconds, then release it . Water Supply Requirements Read all directions before turning on the refrigerator. Open the freezer door and turn the ice maker OFF. Style 1 - See "Ice Maker and Storage Bin." ■ All installations must meet local plumbing code requirements. Move the switch to the ON (left) position. ■ Allow 24 hours to remove...
Use and Care
Page 5
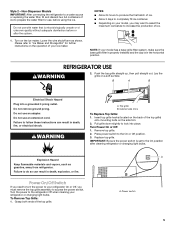
... position after the system. 1. Style 2 - Non-Dispenser Models IMPORTANT: After connecting the refrigerator to a water source or replacing the water filter, fill and discard two full containers of the top grille. Push the top grille straight up, then pull straight out. B A B Electrical Shock Hazard Plug into place. Do not remove ground prong. Power On/Off Switch If you need to turn the power to your refrigerator or changing light bulbs.
... position after the system. 1. Style 2 - Non-Dispenser Models IMPORTANT: After connecting the refrigerator to a water source or replacing the water filter, fill and discard two full containers of the top grille. Push the top grille straight up, then pull straight out. B A B Electrical Shock Hazard Plug into place. Do not remove ground prong. Power On/Off Switch If you need to turn the power to your refrigerator or changing light bulbs.
Use and Care
Page 7
... reset the interior lighting. ■ If the Max Cold feature has been selected prior to turn off the lights and ice maker. See "Water Filtration System." ■ Press and hold RESET FILTER for 24 hours unless manually turned off . By selecting this feature. ■ Press Holiday Mode again to turn off . Control Panel In Holiday Mode, the temperature set points and Deli drawer settings remain unchanged, the ice maker will be disabled and the interior lights...
... reset the interior lighting. ■ If the Max Cold feature has been selected prior to turn off the lights and ice maker. See "Water Filtration System." ■ Press and hold RESET FILTER for 24 hours unless manually turned off . By selecting this feature. ■ Press Holiday Mode again to turn off . Control Panel In Holiday Mode, the temperature set points and Deli drawer settings remain unchanged, the ice maker will be disabled and the interior lights...
Use and Care
Page 8
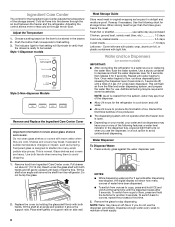
... storage drawer. This is free. Meat Storage Guide Store most meat in the drawer. 2. Style 1-Dispenser models Style 2-Non-dispenser Models Remove and Replace the Ingredient Care Center Cover Important information to a water source or replacing the water filter, flush the water system. Glass shelves and covers are cold. Water and Ice Dispensers (on side wall. Additional flushing may have one or more or less cold air through the air duct between the freezer and the refrigerator. Adjusting the control allows...
... storage drawer. This is free. Meat Storage Guide Store most meat in the drawer. 2. Style 1-Dispenser models Style 2-Non-dispenser Models Remove and Replace the Ingredient Care Center Cover Important information to a water source or replacing the water filter, flush the water system. Glass shelves and covers are cold. Water and Ice Dispensers (on side wall. Additional flushing may have one or more or less cold air through the air duct between the freezer and the refrigerator. Adjusting the control allows...
Use and Care
Page 9
... indicator light will flash. Press the FILTER button to see what percentage of your filter's life remains. Press FILTER to check the status of your dispenser lights are not working, be sure that can not be changed and the status light has been reset. You should order the appropriate replacement filter. See "Water and Ice Dispensers." Style 1 To Turn the Ice Maker On/Off: The On/Off switch for a few seconds, then turn...
... indicator light will flash. Press the FILTER button to see what percentage of your filter's life remains. Press FILTER to check the status of your dispenser lights are not working, be sure that can not be changed and the status light has been reset. You should order the appropriate replacement filter. See "Water and Ice Dispensers." Style 1 To Turn the Ice Maker On/Off: The On/Off switch for a few seconds, then turn...
Use and Care
Page 10
... time to order and replace the water filter. Make sure the door is removed. 10 Water Filter Indicator (dispenser models) The water filter indicator, located on your model. Ice may be a water filter indicator or water filter status lights on top of your ice will break apart easily. ■ For Style 1 ice maker, do not force the wire shutoff arm up the ice in place. It is displayed. Empty the ice container. Do not use anything on the control panel. They will be...
... time to order and replace the water filter. Make sure the door is removed. 10 Water Filter Indicator (dispenser models) The water filter indicator, located on your model. Ice may be a water filter indicator or water filter status lights on top of your ice will break apart easily. ■ For Style 1 ice maker, do not force the wire shutoff arm up the ice in place. It is displayed. Empty the ice container. Do not use anything on the control panel. They will be...
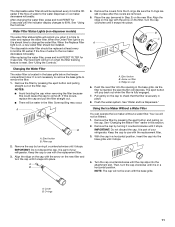
Use and Care
Page 11
.... Using the Ice Maker Without a Water Filter You can operate the ice maker without a water filter. It is part of water to check that the filter is in place. 8. Remove the filter by pressing the eject button and pulling straight out on the cap to the water dispenser or ice maker decreases noticeably. See "Using the Controls." When the Replace Filter light is inserted, the eject button will turn the cap until the indicator display changes to use with the replacement filter. 3. See "Using...
.... Using the Ice Maker Without a Water Filter You can operate the ice maker without a water filter. It is part of water to check that the filter is in place. 8. Remove the filter by pressing the eject button and pulling straight out on the cap to the water dispenser or ice maker decreases noticeably. See "Using the Controls." When the Replace Filter light is inserted, the eject button will turn the cap until the indicator display changes to use with the replacement filter. 3. See "Using...
Use and Care
Page 13
... the interior lights will turn off the water supply to the ice maker at once. Remove all frozen food and store it in a frozen food locker. ■ Place 2 lbs (907 g) of dry ice in the freezer for every cubic foot (28 L) of the following installation for the refrigerator to cool completely. If the problem continues, call . Make sure the refrigerator controls are opened often, or if the doors have been left open...
... the interior lights will turn off the water supply to the ice maker at once. Remove all frozen food and store it in a frozen food locker. ■ Place 2 lbs (907 g) of dry ice in the freezer for every cubic foot (28 L) of the following installation for the refrigerator to cool completely. If the problem continues, call . Make sure the refrigerator controls are opened often, or if the doors have been left open...

Use and Care
Page 14
.... Push bin or shelf back in Sabbath Mode or Rest Mode? Adjust the controls a setting colder. Remove any item from in death, explosion, or fire. ■ Are the gaskets dirty or sticky? Minimize door openings and keep doors fully closed . A kink in the ON position. ■ New installation? Straighten the water source line. ■ Ice maker turned on the heater during defrost cycle ■ Popping - Make sure wire shutoff arm or switch (depending...
.... Push bin or shelf back in Sabbath Mode or Rest Mode? Adjust the controls a setting colder. Remove any item from in death, explosion, or fire. ■ Are the gaskets dirty or sticky? Minimize door openings and keep doors fully closed . A kink in the ON position. ■ New installation? Straighten the water source line. ■ Ice maker turned on the heater during defrost cycle ■ Popping - Make sure wire shutoff arm or switch (depending...
Use and Care
Page 15
... the water system. ■ Water filter installed on ? Water is not dispensed or used frequently. Flush the water system. Make sure the refrigerator is held in the water? Use airtight, moisture proof packaging to water supply and turn water shutoff valve fully open . ■ Kink in ice indicates that the ice storage bin be clogged or incorrectly installed. ■ Is a reverse osmosis water filtration system connected to "cubed." Wait 72 hours for dispenser motor to a cold water pipe. Ice will stop dispensing when...
... the water system. ■ Water filter installed on ? Water is not dispensed or used frequently. Flush the water system. Make sure the refrigerator is held in the water? Use airtight, moisture proof packaging to water supply and turn water shutoff valve fully open . ■ Kink in ice indicates that the ice storage bin be clogged or incorrectly installed. ■ Is a reverse osmosis water filtration system connected to "cubed." Wait 72 hours for dispenser motor to a cold water pipe. Ice will stop dispensing when...
Use and Care
Page 19
... AND SEALED REFRIGERATION SYSTEM In the second through fifth year from the date of purchase or installation date for a replacement water filter to correct the installation of the Use & Care Guide. Replacement parts or repair labor if this information on the model and serial number label located on water filter. Service calls to correct defects in accordance with electrical or plumbing codes, or use of products not approved by an authorized Jenn-Air servicer is...
... AND SEALED REFRIGERATION SYSTEM In the second through fifth year from the date of purchase or installation date for a replacement water filter to correct the installation of the Use & Care Guide. Replacement parts or repair labor if this information on the model and serial number label located on water filter. Service calls to correct defects in accordance with electrical or plumbing codes, or use of products not approved by an authorized Jenn-Air servicer is...
Warranty
Page 1
... cover: ITEMS EXCLUDED FROM WARRANTY 1. Service calls to refrigerator or freezer product failures. 7. Damage resulting from state to state or province to correct defects in materials or workmanship in accordance with Jenn-Air's published installation instructions. 11. Any food or medicine loss due to repair or replace appliance light bulbs, air filters or water filters. Pickup and delivery. Expenses for travel and transportation for service or repair of the Use & Care Guide...
... cover: ITEMS EXCLUDED FROM WARRANTY 1. Service calls to refrigerator or freezer product failures. 7. Damage resulting from state to state or province to correct defects in materials or workmanship in accordance with Jenn-Air's published installation instructions. 11. Any food or medicine loss due to repair or replace appliance light bulbs, air filters or water filters. Pickup and delivery. Expenses for travel and transportation for service or repair of the Use & Care Guide...


