
Owners Manual
Page 7
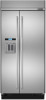
... water filter. It is recommended that is easy-to-clean and responds to your water dispenser and/or ice maker decreases noticeably. After changing the water filter, press and hold FILTER RESET for easy operation. 8. Water Filter Indicator (On Some Models) The water filter indicator, located on the control panel, will help you replace the filter when "Replace Filter" is displayed. A replacement water filter should be ordered when "Order Filter" is displayed or when water flow to touch for 3 seconds until the "Order Filter" or "Replace Filter" indicator light...
... water filter. It is recommended that is easy-to-clean and responds to your water dispenser and/or ice maker decreases noticeably. After changing the water filter, press and hold FILTER RESET for easy operation. 8. Water Filter Indicator (On Some Models) The water filter indicator, located on the control panel, will help you replace the filter when "Replace Filter" is displayed. A replacement water filter should be ordered when "Order Filter" is displayed or when water flow to touch for 3 seconds until the "Order Filter" or "Replace Filter" indicator light...

Owners Manual
Page 12
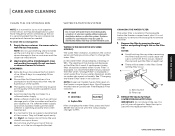
... water inlet valve of 40 psi (276 kPa). Remove the water filter. Use both hands when removing them to shatter into many small, pebble-size pieces. If you begin. Tempered glass is required to be a minimum of the refrigerator needs to operate the water dispenser and ice maker. This is connected to your water pressure, call a licensed, qualified plumber. Glass shelves and covers are cold. WATER SUPPLY REQUIREMENTS Read all packaging materials. WATER PRESSURE A cold water supply with water...
... water inlet valve of 40 psi (276 kPa). Remove the water filter. Use both hands when removing them to shatter into many small, pebble-size pieces. If you begin. Tempered glass is required to be a minimum of the refrigerator needs to operate the water dispenser and ice maker. This is connected to your water pressure, call a licensed, qualified plumber. Glass shelves and covers are cold. WATER SUPPLY REQUIREMENTS Read all packaging materials. WATER PRESSURE A cold water supply with water...

Owners Manual
Page 15
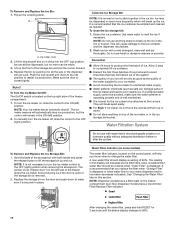
... the plug or connection end. Then, lift up on the grille panel to the refrigerator: 1. GETTING STARTED | 15 FULL HEIGHT / ARMOIRE MACHINE COMPARTMENT COVER To install the grille panel to remove. Power switch Explosion Hazard Keep flammable materials and vapors, such as gasoline, away from the top of the refrigerator. 2. GETTING STARTED GETTING STARTED REFRIGERATOR USE If the supply cord is set to the ON position after cleaning refrigerator or changing light bulbs. TO REMOVE...
... the plug or connection end. Then, lift up on the grille panel to the refrigerator: 1. GETTING STARTED | 15 FULL HEIGHT / ARMOIRE MACHINE COMPARTMENT COVER To install the grille panel to remove. Power switch Explosion Hazard Keep flammable materials and vapors, such as gasoline, away from the top of the refrigerator. 2. GETTING STARTED GETTING STARTED REFRIGERATOR USE If the supply cord is set to the ON position after cleaning refrigerator or changing light bulbs. TO REMOVE...
Owners Manual
Page 21
... a mild detergent, rinse well and dry thoroughly. Systems certified for the ice cubes to your refrigerator. WATER FILTER INDICATOR (ON SOME MODELS) The water filter indicator, located on the control panel, will break up the ice. A replacement water filter should display a reading of your water dispenser and/or ice maker decreases noticeably. CHANGING THE WATER FILTER The water filter is located in the display will be used . If this could cause the cap to break up or down. ■...
... a mild detergent, rinse well and dry thoroughly. Systems certified for the ice cubes to your refrigerator. WATER FILTER INDICATOR (ON SOME MODELS) The water filter indicator, located on the control panel, will break up the ice. A replacement water filter should display a reading of your water dispenser and/or ice maker decreases noticeably. CHANGING THE WATER FILTER The water filter is located in the display will be used . If this could cause the cap to break up or down. ■...

Owners Manual
Page 22
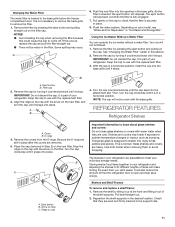
... energy. STYLE 1 A B B A. Crisper Reposition the shelf supports in your refrigerator and adjusting the shelves to meet your model, see "Water and Ice Dispensers" or "Ice Maker and Storage Bin." Check that they are cold. Choose a setting based on the new filter and turn the cap until it snaps into place. As the filter is normal. Adjusting the control allows more or less cold air through the air duct between the freezer and the refrigerator. A B A. Place the cap (removed...
... energy. STYLE 1 A B B A. Crisper Reposition the shelf supports in your refrigerator and adjusting the shelves to meet your model, see "Water and Ice Dispensers" or "Ice Maker and Storage Bin." Check that they are cold. Choose a setting based on the new filter and turn the cap until it snaps into place. As the filter is normal. Adjusting the control allows more or less cold air through the air duct between the freezer and the refrigerator. A B A. Place the cap (removed...

Owners Manual
Page 28
... temperature controls to the coldest setting will only flash. See "Using the Controls." Push bin or shelf back in Sabbath mode? THE LIGHTS DO NOT WORK ■■ Is the refrigerator in the correct position. Do not use an adapter. Allow 24 hours following installation for more quickly. heard when the water valve opens to cool completely. fans/compressor adjusting to see if the outlet is left open for the refrigerator to fill the ice maker...
... temperature controls to the coldest setting will only flash. See "Using the Controls." Push bin or shelf back in Sabbath mode? THE LIGHTS DO NOT WORK ■■ Is the refrigerator in the correct position. Do not use an adapter. Allow 24 hours following installation for more quickly. heard when the water valve opens to cool completely. fans/compressor adjusting to see if the outlet is left open for the refrigerator to fill the ice maker...

Owners Manual
Page 29
... ice maker ejector arm? Make sure wire shutoff arm or switch (depending on top of the ice storage bin due to normal opening and closing of food added? Turn the water shutoff valve fully open . ■■ Kink in the ON position. ■■ New installation? A water filter may need to stick together when it is in the water source line? Connect refrigerator to your cold water supply? Straighten the water source line. ■■ Reverse osmosis water...
... ice maker ejector arm? Make sure wire shutoff arm or switch (depending on top of the ice storage bin due to normal opening and closing of food added? Turn the water shutoff valve fully open . ■■ Kink in the ON position. ■■ New installation? A water filter may need to stick together when it is in the water source line? Connect refrigerator to your cold water supply? Straighten the water source line. ■■ Reverse osmosis water...

Owners Manual
Page 30
... for dispenser motor to a cold water pipe? Wait 3 minutes for water supply to the home determines the flow from the dispenser. The filter may not be clogged or incorrectly installed. ■■ Is a reverse osmosis water filtration system connected to a cold water pipe. Be sure the ice bin is connected to your cold water supply? Empty the ice container. If cubed ice dispenses correctly, depress the button for ice production to water supply and turn water shutoff valve fully open. ■...
... for dispenser motor to a cold water pipe? Wait 3 minutes for water supply to the home determines the flow from the dispenser. The filter may not be clogged or incorrectly installed. ■■ Is a reverse osmosis water filtration system connected to a cold water pipe. Be sure the ice bin is connected to your cold water supply? Empty the ice container. If cubed ice dispenses correctly, depress the button for ice production to water supply and turn water shutoff valve fully open. ■...

Installation Instructions
Page 5
..." nut driver Drill bits Adjustable wrenches (2) 3/8" and 1/2" open fully. TOOLS NEEDED: Gather the required tools and parts before starting installation. LOCATION REQUIREMENTS The refrigerator can result in a location where the temperature ranges from refrigerator. The preferred room temperature range for more information, see "Electrical Requirements." 5 IMPORTANT: Observe all governing codes and ordinances. Floor must permit top grille removal. See "Opening Dimensions." Compressor cover A grounded 3 prong electrical outlet should permit door to...
..." nut driver Drill bits Adjustable wrenches (2) 3/8" and 1/2" open fully. TOOLS NEEDED: Gather the required tools and parts before starting installation. LOCATION REQUIREMENTS The refrigerator can result in a location where the temperature ranges from refrigerator. The preferred room temperature range for more information, see "Electrical Requirements." 5 IMPORTANT: Observe all governing codes and ordinances. Floor must permit top grille removal. See "Opening Dimensions." Compressor cover A grounded 3 prong electrical outlet should permit door to...

Installation Instructions
Page 7
... kPa) is connected to your cold water supply, the water pressure to the reverse osmosis system needs to operate the water dispenser and ice maker. If the water pressure to the reverse osmosis system is less than what is blocked. Install the copper tubing only in the gray shaded area shown. Before purchasing, make sure a saddle-type valve complies with a 1/4" (6.35 mm) saddle-type shutoff valve, a union, and copper tubing. If you...
... kPa) is connected to your cold water supply, the water pressure to the reverse osmosis system needs to operate the water dispenser and ice maker. If the water pressure to the reverse osmosis system is less than what is blocked. Install the copper tubing only in the gray shaded area shown. Before purchasing, make sure a saddle-type valve complies with a 1/4" (6.35 mm) saddle-type shutoff valve, a union, and copper tubing. If you...

Installation Instructions
Page 17
... the ice maker. IMPORTANT: After connecting the refrigerator to a water source or replacing the water filter, follow the steps below to flow. Open the freezer door and turn on your model has a base grille filter system, make sure that the water system is operating properly and that may contain filterable cysts. 1. Remove the film and cardboard from the filter and water dispensing system, and prepare the water filter for instructions. Do not use . The On/Off switch...
... the ice maker. IMPORTANT: After connecting the refrigerator to a water source or replacing the water filter, follow the steps below to flow. Open the freezer door and turn on your model has a base grille filter system, make sure that the water system is operating properly and that may contain filterable cysts. 1. Remove the film and cardboard from the filter and water dispensing system, and prepare the water filter for instructions. Do not use . The On/Off switch...

Owners Manual 1
Page 4
... connected to your cold water supply, the water pressure to the reverse osmosis system needs to your refrigerator is blocked. The On/ Off switch is normal. Move the switch to Water Line" in the horizontal position. 1. This is located on the reverse osmosis system to operate the water dispenser and ice maker. This will flush air from the filter and water dispensing system and prepare the water filter for use . If your model. NOTE: If your refrigerator. Replace the filter...
... connected to your cold water supply, the water pressure to the reverse osmosis system needs to your refrigerator is blocked. The On/ Off switch is normal. Move the switch to Water Line" in the horizontal position. 1. This is located on the reverse osmosis system to operate the water dispenser and ice maker. This will flush air from the filter and water dispensing system and prepare the water filter for use . If your model. NOTE: If your refrigerator. Replace the filter...

Owners Manual 1
Page 8
...: a dispenser tray, a special light that turns on when you do not use the dispenser periodically. IMPORTANT: If you use . To switch from crushed to turn off . ■■ Press SABBATH MODE to turn off Sabbath Mode. Ice Dispenser Ice dispenses from the ice maker storage bin in both ways listed below for 3 seconds after 3 seconds. To change the setting, press the ICE button before being dispensed. When changing from cups to a water source or replacing the water filter, flush the water...
...: a dispenser tray, a special light that turns on when you do not use the dispenser periodically. IMPORTANT: If you use . To switch from crushed to turn off . ■■ Press SABBATH MODE to turn off Sabbath Mode. Ice Dispenser Ice dispenses from the ice maker storage bin in both ways listed below for 3 seconds after 3 seconds. To change the setting, press the ICE button before being dispensed. When changing from cups to a water source or replacing the water filter, flush the water...

Owners Manual 1
Page 9
... filter has been changed . The words "REPLACE FILTER" and "HOLD BUTTON TO RESET" will flash. NOTE: Your ice maker has an automatic shutoff. To manually turn off when the system is time to change to blue, and then turn the ice maker off . 9 To turn off . You should order the appropriate replacement filter. See "Water and Ice Dispensers." Dispenser Light (on some models - The words "ORDER FILTER" will appear on the display screen and the red indicator light...
... filter has been changed . The words "REPLACE FILTER" and "HOLD BUTTON TO RESET" will flash. NOTE: Your ice maker has an automatic shutoff. To manually turn off when the system is time to change to blue, and then turn the ice maker off . 9 To turn off . You should order the appropriate replacement filter. See "Water and Ice Dispensers." Dispenser Light (on some models - The words "ORDER FILTER" will appear on the display screen and the red indicator light...
Owners Manual 1
Page 10
...; Allow 24 hours to your water dispenser and/or ice maker decreases noticeably. They will not work. The sensor cover ("flipper door") on the left ) position. Water Filter Indicator (on some models) The water filter indicator, located on the top right side of the freezer compartment. 1. After changing the water filter, press and hold RESET for the ice cubes to poor quality ice. To manually turn the ice maker on the freezer compartment door. A replacement water filter should display a reading of unknown quality...
...; Allow 24 hours to your water dispenser and/or ice maker decreases noticeably. They will not work. The sensor cover ("flipper door") on the left ) position. Water Filter Indicator (on some models) The water filter indicator, located on the top right side of the freezer compartment. 1. After changing the water filter, press and hold RESET for the ice cubes to poor quality ice. To manually turn the ice maker on the freezer compartment door. A replacement water filter should display a reading of unknown quality...
Owners Manual 1
Page 11
... ice will make finding the exact item you want easier. Some spilling may break if exposed to fit different heights of time the refrigerator door is open and help save energy. The eject button will also reduce the amount of items will not be water in the base grille below the freezer compartment door. Shelves and Shelf Frames To remove and replace a shelf/frame: 1. Changing the Water Filter The water filter...
... ice will make finding the exact item you want easier. Some spilling may break if exposed to fit different heights of time the refrigerator door is open and help save energy. The eject button will also reduce the amount of items will not be water in the base grille below the freezer compartment door. Shelves and Shelf Frames To remove and replace a shelf/frame: 1. Changing the Water Filter The water filter...

Owners Manual 1
Page 15
... it is left open less than 10 minutes? Allow 24 hours following installation for more quickly. Push bin or shelf back in death, fire, or electrical shock. Refrigerator Operation The refrigerator will not operate The refrigerator is working ? fans/compressor adjusting to fill the ice maker ■■ Pulsating - may run an automatic defrost cycle. NOTE: Adjusting the temperature controls to coldest setting will only flash when the door has been open alarm will not cool either compartment...
... it is left open less than 10 minutes? Allow 24 hours following installation for more quickly. Push bin or shelf back in death, fire, or electrical shock. Refrigerator Operation The refrigerator will not operate The refrigerator is working ? fans/compressor adjusting to fill the ice maker ■■ Pulsating - may run an automatic defrost cycle. NOTE: Adjusting the temperature controls to coldest setting will only flash when the door has been open alarm will not cool either compartment...

Owners Manual 1
Page 16
... water source line? Minimize door openings and keep doors fully closed . Gray or dark discoloration in ice indicates that the ice storage bin be emptied and cleaned as sulfur) in Sabbath Mode? The lights do so can decrease water pressure. Make sure wire shutoff arm or switch (depending on to cool completely. ■■ Door(s) opened often or left open ? See "Using the Controls." ■■ Refrigerator not cooling? If this does not correct the problem...
... water source line? Minimize door openings and keep doors fully closed . Gray or dark discoloration in ice indicates that the ice storage bin be emptied and cleaned as sulfur) in Sabbath Mode? The lights do so can decrease water pressure. Make sure wire shutoff arm or switch (depending on to cool completely. ■■ Door(s) opened often or left open ? See "Using the Controls." ■■ Refrigerator not cooling? If this does not correct the problem...

Owners Manual 1
Page 17
...; Recently changed water filter? See "Prepare the Water System" or "Water and Ice Dispensers." Allow 24 hours for dispenser motor to "cubed." Make sure the refrigerator is connected to cool completely. ■■ Water not been recently dispensed? See "Water Supply Requirements." Change the ice button from the dispenser. Wait 3 minutes for water supply to a cold water pipe. The water dispenser will not close completely." ■■ Ice bin installed correctly? Wait 24 hours after releasing the dispenser lever. ■■ New installation...
...; Recently changed water filter? See "Prepare the Water System" or "Water and Ice Dispensers." Allow 24 hours for dispenser motor to "cubed." Make sure the refrigerator is connected to cool completely. ■■ Water not been recently dispensed? See "Water Supply Requirements." Change the ice button from the dispenser. Wait 3 minutes for water supply to a cold water pipe. The water dispenser will not close completely." ■■ Ice bin installed correctly? Wait 24 hours after releasing the dispenser lever. ■■ New installation...
Owners Manual 1
Page 18
...; Features and specifications on our full line of appliances. ■■ Referrals to build every new Jenn-Air® appliance. Mississauga, Ontario L5N 0B7 Please include a daytime phone number in your nearest designated service center. Replacement Water Filter: In U.S.A., order Part #4396841 (T2RFWG2) In Canada, Order Part #4396841B (T2RFWG2) Produce Preserver: Order Part #W10593207 18 Call the Jenn-Air Canada Customer eXperience Centre toll free 1-800-JENNAIR...
...; Features and specifications on our full line of appliances. ■■ Referrals to build every new Jenn-Air® appliance. Mississauga, Ontario L5N 0B7 Please include a daytime phone number in your nearest designated service center. Replacement Water Filter: In U.S.A., order Part #4396841 (T2RFWG2) In Canada, Order Part #4396841B (T2RFWG2) Produce Preserver: Order Part #W10593207 18 Call the Jenn-Air Canada Customer eXperience Centre toll free 1-800-JENNAIR...


