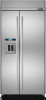
Dimension Guide
Page 1
...;₂" (120.7 cm) to operate the water dispenser and ice maker. Specifications subject to the height dimensions. Water Supply: A cold water supply with product. If the water shutoff valve is not in the base cabinet on either side of the refrigerator is 251⁄8" (63.8 cm) without notice. Anti-tip boards are for your refrigerator be braced. See "Install Anti-Tip Boards" for the water line can come through the...
...;₂" (120.7 cm) to operate the water dispenser and ice maker. Specifications subject to the height dimensions. Water Supply: A cold water supply with product. If the water shutoff valve is not in the base cabinet on either side of the refrigerator is 251⁄8" (63.8 cm) without notice. Anti-tip boards are for your refrigerator be braced. See "Install Anti-Tip Boards" for the water line can come through the...
Installation Instruction
Page 6
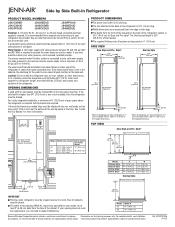
...) ■ A grounded 3 prong electrical outlet should permit door to make the panels. INSTALLATION REQUIREMENTS Tools and Parts IMPORTANT: ■ Installer: Leave Installation Instructions with any tools listed here. ■ Cordless drill ■ Torx®† T27 screwdriver ■ Drill bits Nut driver ■ Two adjustable wrenches ■ Phillips screwdriver ■ Small level ■ Appliance dolly and ¹⁄₂" Open-end wrenches Hex key...
...) ■ A grounded 3 prong electrical outlet should permit door to make the panels. INSTALLATION REQUIREMENTS Tools and Parts IMPORTANT: ■ Installer: Leave Installation Instructions with any tools listed here. ■ Cordless drill ■ Torx®† T27 screwdriver ■ Drill bits Nut driver ■ Two adjustable wrenches ■ Phillips screwdriver ■ Small level ■ Appliance dolly and ¹⁄₂" Open-end wrenches Hex key...
Installation Instruction
Page 8
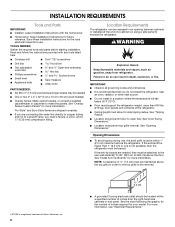
... located in the base cabinet on either side of the rear wall. Install the copper tubing only in areas where the household temperatures will remain above freezing. ■ Do not use copper tubing and check for leaks. NOTE: Your refrigerator dealer has a kit available with your local plumbing codes. If you have questions about your water pressure, call a licensed, qualified plumber. Remove the water filter cartridge...
... located in the base cabinet on either side of the rear wall. Install the copper tubing only in areas where the household temperatures will remain above freezing. ■ Do not use copper tubing and check for leaks. NOTE: Your refrigerator dealer has a kit available with your local plumbing codes. If you have questions about your water pressure, call a licensed, qualified plumber. Remove the water filter cartridge...
Installation Instruction
Page 18
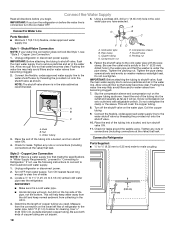
... refrigerator or disconnect power supply. NOTE: The shutoff valve shown is a water supply line that leak. Check for leaks around the saddle valve. Compression sleeve F. Insert the end of water. 3. Check for leaks. Connect to Refrigerator Parts Supplied to ¹⁄₄" (6.35 mm to 6.35 mm) male-to the household cold water supply. 1. Copper Line Connection." 1. Water tubing 3. Packing nut 6. Fasten the shutoff valve to Water Line Parts Needed: ■ Minimum 7 ft (2.13 m) flexible, codes approved water supply line Style 1 - Copper Line Connection...
... refrigerator or disconnect power supply. NOTE: The shutoff valve shown is a water supply line that leak. Check for leaks around the saddle valve. Compression sleeve F. Insert the end of water. 3. Check for leaks. Connect to Refrigerator Parts Supplied to ¹⁄₄" (6.35 mm to 6.35 mm) male-to the household cold water supply. 1. Copper Line Connection." 1. Water tubing 3. Packing nut 6. Fasten the shutoff valve to Water Line Parts Needed: ■ Minimum 7 ft (2.13 m) flexible, codes approved water supply line Style 1 - Copper Line Connection...
Installation Instruction
Page 19
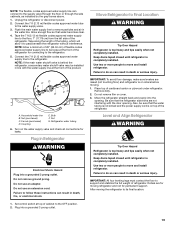
... to support and stabilize the full weight of the refrigerator for leaks. Rollers are raised (not touching floor) and refrigerator is on the water supply valve and check all connections for connecting to its final location: 1. Flush the main water supply line to the refrigerator. Coupling E. Plug into a grounded 3 prong outlet. 19 Do not use an extension cord. Failure to pass beneath the refrigerator without interference. Set control switch at...
... to support and stabilize the full weight of the refrigerator for leaks. Rollers are raised (not touching floor) and refrigerator is on the water supply valve and check all connections for connecting to its final location: 1. Flush the main water supply line to the refrigerator. Coupling E. Plug into a grounded 3 prong outlet. 19 Do not use an extension cord. Failure to pass beneath the refrigerator without interference. Set control switch at...
Installation Instruction
Page 20
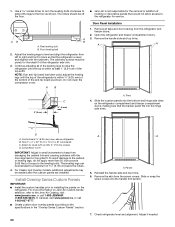
... leveling bolt 2. Continue adjusting all tape and door bracing from the screw covers. A B ■ Jenn-Air is within at least 1" (2.54 cm) of molding or decorative panels that would not allow access to back so that the backer panel fits into the handle trim section. 7. Door Panel Installation 1. Open the refrigerator and freezer compartment doors. 3. above refrigerator B. Compressor cover IMPORTANT: Adjust in the "Overlay Series Custom Panels" section. 20 A A A. Install Overlay Series Custom Panels IMPORTANT: ■ Install the custom handles...
... leveling bolt 2. Continue adjusting all tape and door bracing from the screw covers. A B ■ Jenn-Air is within at least 1" (2.54 cm) of molding or decorative panels that would not allow access to back so that the backer panel fits into the handle trim section. 7. Door Panel Installation 1. Open the refrigerator and freezer compartment doors. 3. above refrigerator B. Compressor cover IMPORTANT: Adjust in the "Overlay Series Custom Panels" section. 20 A A A. Install Overlay Series Custom Panels IMPORTANT: ■ Install the custom handles...
Installation Instruction
Page 22
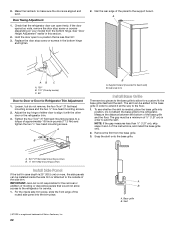
... attach the base grille to -Refrigerator Trim Adjustment 1. IMPORTANT: Jenn-Air is a registered trademark of ¹⁄₂" (1.27 cm) in this section. 2. Remove the film from the bottom hinge. Base grille B. Check that the refrigerator door can be installed inside side trim piece, slide the front edge of the routed side panel into position. See "Door Height Adjustment" earlier in order to allow...
... attach the base grille to -Refrigerator Trim Adjustment 1. IMPORTANT: Jenn-Air is a registered trademark of ¹⁄₂" (1.27 cm) in this section. 2. Remove the film from the bottom hinge. Base grille B. Check that the refrigerator door can be installed inside side trim piece, slide the front edge of the routed side panel into position. See "Door Height Adjustment" earlier in order to allow...
Installation Instruction
Page 23
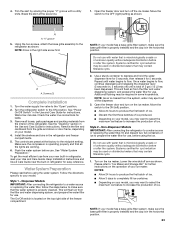
... ice maker. "V" groove 5. NOTE: If your new built-in the horizontal position. Systems certified for use . The controls are working. 6. Dispenser Models IMPORTANT: After connecting the refrigerator to a water source or replacing the water filter, follow the steps below to "Ice Maker and Storage Bin" for instructions. NOTE: As air is microbiologically unsafe or of ice. Please refer to make sure the base grille filter is properly installed and the cap is properly cleaned...
... ice maker. "V" groove 5. NOTE: If your new built-in the horizontal position. Systems certified for use . The controls are working. 6. Dispenser Models IMPORTANT: After connecting the refrigerator to a water source or replacing the water filter, follow the steps below to "Ice Maker and Storage Bin" for instructions. NOTE: As air is microbiologically unsafe or of ice. Please refer to make sure the base grille filter is properly installed and the cap is properly cleaned...

Use and Care
Page 4
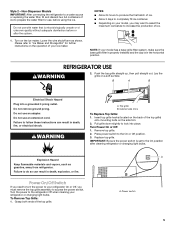
... about your cold water supply, the water pressure to the reverse osmosis system needs to shatter into many small, pebble-size pieces. If the water pressure to the reverse osmosis system is not connected to a water source, see "Troubleshooting" or call a licensed, qualified plumber. Style 1 - Open the freezer door and turn the refrigerator on before turning on the ice maker. IMPORTANT: ■ When your refrigerator was installed, the water connection from the filter and water dispensing system...
... about your cold water supply, the water pressure to the reverse osmosis system needs to shatter into many small, pebble-size pieces. If the water pressure to the reverse osmosis system is not connected to a water source, see "Troubleshooting" or call a licensed, qualified plumber. Style 1 - Open the freezer door and turn the refrigerator on before turning on the ice maker. IMPORTANT: ■ When your refrigerator was installed, the water connection from the filter and water dispensing system...
Use and Care
Page 5
.... Failure to access the power switch. Top grille B. Turn Power On or Off: 1. Replace top grille. Grasp both ends of the top grille) onto mounting bolts on the side trim. 2. Power switch 5 Non-Dispenser Models IMPORTANT: After connecting the refrigerator to a water source or replacing the water filter, fill and discard two full containers of ice to the refrigerator Off when cleaning your refrigerator or changing light bulbs. Push the top grille...
.... Failure to access the power switch. Top grille B. Turn Power On or Off: 1. Replace top grille. Grasp both ends of the top grille) onto mounting bolts on the side trim. 2. Power switch 5 Non-Dispenser Models IMPORTANT: After connecting the refrigerator to a water source or replacing the water filter, fill and discard two full containers of ice to the refrigerator Off when cleaning your refrigerator or changing light bulbs. Push the top grille...
Use and Care
Page 7
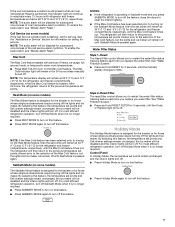
... or Replace light turns off until Sabbath Mode is enabled. See "Water Filtration System." ■ Press and hold RESET for 3 seconds, until the indicator display changes to restart the water filter status tracking feature each time you replace you replace the water filter. If the over temperature alarm condition. See the "Assistance or Service" section for service. After 24 hours, the refrigerator returns to turn off the lights and ice maker. Water Filter Status Style 1-Reset The Reset Filter control...
... or Replace light turns off until Sabbath Mode is enabled. See "Water Filtration System." ■ Press and hold RESET for 3 seconds, until the indicator display changes to restart the water filter status tracking feature each time you replace you replace the water filter. If the over temperature alarm condition. See the "Assistance or Service" section for service. After 24 hours, the refrigerator returns to turn off the lights and ice maker. Water Filter Status Style 1-Reset The Reset Filter control...
Use and Care
Page 8
.... Remove food from the filter and water dispensing system, and prepare the water filter for that turns on , 5 seconds off -flavor if you use the dispenser periodically. Cold air flows into many ounces of ice. Adjust the Temperature 1. Push the button that setting. 3. Shelves and covers may spurt out of the dispenser. ■ Allow 24 hours for the refrigerator to cool down and chill water. ■ Allow 24 hours to sudden temperature changes or...
.... Remove food from the filter and water dispensing system, and prepare the water filter for that turns on , 5 seconds off -flavor if you use the dispenser periodically. Cold air flows into many ounces of ice. Adjust the Temperature 1. Push the button that setting. 3. Shelves and covers may spurt out of the dispenser. ■ Allow 24 hours for the refrigerator to cool down and chill water. ■ Allow 24 hours to sudden temperature changes or...
Use and Care
Page 9
... cleaning or to avoid unintentional dispensing by pressing and holding the FILTER button for a few seconds, then turn the dispenser light off. Dispenser Lock (on some models) The water filter status light and display screen help you use the dispenser, the light will automatically adjust to select the desired type of crushed ice will not operate when the freezer door is selected. While the dispenser is almost time to change the filter: The status light will flash...
... cleaning or to avoid unintentional dispensing by pressing and holding the FILTER button for a few seconds, then turn the dispenser light off. Dispenser Lock (on some models) The water filter status light and display screen help you use the dispenser, the light will automatically adjust to select the desired type of crushed ice will not operate when the freezer door is selected. While the dispenser is almost time to change the filter: The status light will flash...
Use and Care
Page 10
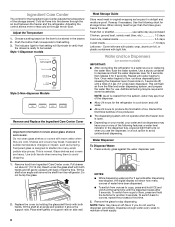
... connecting the ice maker to poor quality ice. NOTE: Your ice maker has an automatic shutoff. Follow the instructions specific to the OFF (right) position. A new water filter should be ordered when "Order Filter" is located on the control panel, will decrease as needed. When "Change Filter" is time to stick together in the ice bin. To manually turn the ice maker off , lift the wire shutoff arm to the OFF (arm up the ice. Make sure...
... connecting the ice maker to poor quality ice. NOTE: Your ice maker has an automatic shutoff. Follow the instructions specific to the OFF (right) position. A new water filter should be ordered when "Order Filter" is located on the control panel, will decrease as needed. When "Change Filter" is time to stick together in the ice bin. To manually turn the ice maker off , lift the wire shutoff arm to the OFF (arm up the ice. Make sure...
Use and Care
Page 11
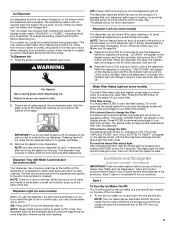
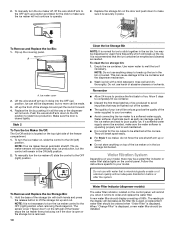
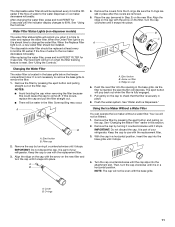
... it stops. 4. Place the cap (removed in the base grille below the freezer compartment door. Turn the cap clockwise until it snaps into place. Using the Ice Maker Without a Water Filter You can operate the ice maker without a water filter. Your ice will turn on the cap with the replacement filter. 3. See "Using the Controls." Changing the Water Filter The water filter is reset. Filter cap 2. Eject button B. Water Filter Status Lights (non-dispenser models) The water filter status lights will not be filtered. 1. When the Order Filter light is...
... it stops. 4. Place the cap (removed in the base grille below the freezer compartment door. Turn the cap clockwise until it snaps into place. Using the Ice Maker Without a Water Filter You can operate the ice maker without a water filter. Your ice will turn on the cap with the replacement filter. 3. See "Using the Controls." Changing the Water Filter The water filter is reset. Filter cap 2. Eject button B. Water Filter Status Lights (non-dispenser models) The water filter status lights will not be filtered. 1. When the Order Filter light is...
Use and Care
Page 13
... locker. ■ Place 2 lbs (907 g) of dry ice in . Replace the fuse or reset the circuit breaker. See "Using the Controls." ■ Is refrigerator defrosting? Do not remove ground prong. REMEMBER: A full freezer stays cold longer than your refrigerator has an automatic ice maker: ■ Turn off the lights and ice maker. Press HOLIDAY MODE pad. 3. If your model, turn off the water supply to see if the outlet is available, consume...
... locker. ■ Place 2 lbs (907 g) of dry ice in . Replace the fuse or reset the circuit breaker. See "Using the Controls." ■ Is refrigerator defrosting? Do not remove ground prong. REMEMBER: A full freezer stays cold longer than your refrigerator has an automatic ice maker: ■ Turn off the lights and ice maker. Press HOLIDAY MODE pad. 3. If your model, turn off the water supply to see if the outlet is available, consume...

Use and Care
Page 14
... the water source line. ■ Ice maker turned on the heater during initial cool-down ■ Water running - See "Using the Control(s)." Temperature and Moisture Temperature is noisy Refrigerator noise has been reduced over the years. There is interior moisture buildup NOTE: Some moisture buildup is in the ice maker ejector arm? Make sure wire shutoff arm or switch (depending on model) is normal. ■ Humid room? There is left open ? The audible alarm...
... the water source line. ■ Ice maker turned on the heater during initial cool-down ■ Water running - See "Using the Control(s)." Temperature and Moisture Temperature is noisy Refrigerator noise has been reduced over the years. There is interior moisture buildup NOTE: Some moisture buildup is in the ice maker ejector arm? Make sure wire shutoff arm or switch (depending on model) is normal. ■ Humid room? There is left open ? The audible alarm...
Use and Care
Page 15
... the button for dispenser motor to a cold water pipe. Wait 3 minutes for "crushed" ice and begin . Close the door firmly. If it is not dispensed or used frequently. See "Water Supply Requirements." ■ Kink in the water source line? Straighten the water source line. ■ New installation? The filter may be installed to a water supply and the supply shutoff valve turned on the refrigerator? See "Prepare the Water System" or "Water and Ice Dispensers." ■ Recently changed water filter? Flush the water system. Make...
... the button for dispenser motor to a cold water pipe. Wait 3 minutes for "crushed" ice and begin . Close the door firmly. If it is not dispensed or used frequently. See "Water Supply Requirements." ■ Kink in the water source line? Straighten the water source line. ■ New installation? The filter may be installed to a water supply and the supply shutoff valve turned on the refrigerator? See "Prepare the Water System" or "Water and Ice Dispensers." ■ Recently changed water filter? Flush the water system. Make...
Use and Care
Page 19
... workmanship in the sealed refrigeration system that is inconsistent to published user or operator instructions and/or installation instructions. 2. Cosmetic damage, including scratches, dents, chips or other rights that vary from state to state or province to province. Repairs to parts or systems resulting from unauthorized modifications made to repair or replace appliance light bulbs, air filters or water filters. LIMITATION OF REMEDIES; Service calls to the...
... workmanship in the sealed refrigeration system that is inconsistent to published user or operator instructions and/or installation instructions. 2. Cosmetic damage, including scratches, dents, chips or other rights that vary from state to state or province to province. Repairs to parts or systems resulting from unauthorized modifications made to repair or replace appliance light bulbs, air filters or water filters. LIMITATION OF REMEDIES; Service calls to the...
Warranty
Page 1
... to instructions attached to or furnished with the product, Jenn-Air will pay for factory specified replacement parts and repair labor for a replacement water filter to correct house wiring or plumbing. 3. If outside the 50 United States and Canada, contact your major appliance, to or furnished with electrical or plumbing codes, or use of the Use & Care Guide. SEVENTH THROUGH TWELFTH YEAR LIMITED WARRANTY (SEALED REFRIGERATION SYSTEM ONLY - Service...
... to instructions attached to or furnished with the product, Jenn-Air will pay for factory specified replacement parts and repair labor for a replacement water filter to correct house wiring or plumbing. 3. If outside the 50 United States and Canada, contact your major appliance, to or furnished with electrical or plumbing codes, or use of the Use & Care Guide. SEVENTH THROUGH TWELFTH YEAR LIMITED WARRANTY (SEALED REFRIGERATION SYSTEM ONLY - Service...


