Jenn-Air JJD3024HL1 Support and Manuals
Get Help and Manuals for this Jenn-Air item

View All Support Options Below
Free Jenn-Air JJD3024HL1 manuals!
Problems with Jenn-Air JJD3024HL1?
Ask a Question
Free Jenn-Air JJD3024HL1 manuals!
Problems with Jenn-Air JJD3024HL1?
Ask a Question
Popular Jenn-Air JJD3024HL1 Manual Pages
Owners Manual - Page 2
... 4 Setting the Controls 5 Warming Cookware 5 Silicon Mat 5 Proofing Bread 5 Slow Cooking 5
WARMING DRAWER CARE 6 General Cleaning 6
TROUBLESHOOTING 7 ASSISTANCE OR SERVICE 8
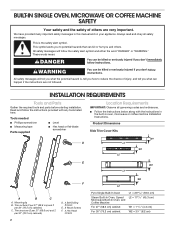
...or seriously injured if you don't immediately follow instructions.
All safety messages will tell you don't ...have provided many important safety messages in this manual and on your appliance. Always read and obey...
Owners Manual - Page 3
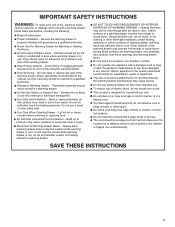
...repair or replace any part of the warming drawer. Do not let potholder touch hot heating elements. Use Care When Opening Drawer - Build-up of pressure may cause container to sit or stand on any part of the warming drawer unless specifically...service facility for household use , do not mount over unintentionally.
IMPORTANT SAFETY INSTRUCTIONS... or plugs in the manual. During and after the...
Owners Manual - Page 4
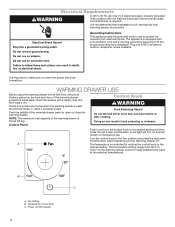
... drawer control to keep heated foods warm
at the selected temperatures. The temperature setting ranges from electrical shock. Temperature control zone C. Power On/Off indicator
4
... in accordance with the National Electrical Code and local codes and ordinances, is controlled by rotating the control knob to the
desired setting.
Grounding Instructions
This appliance shall be provided. It...
Owners Manual - Page 7
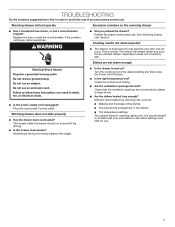
TROUBLESHOOTING
Try the solutions suggested here first in order to avoid the cost of beef and pork may become very dark, but not burnt. Cooking results not what expected
■■ The exterior of an unnecessary service...Replace the fuse or reset the circuit breaker. The interior will also darken, especially in the drawer;
■■ The temperature settings...If the problem continues,...
Installation Instructions - Page 2
... if you don't follow the instructions provided with the instructions in
the built-in this manual and on your appliance. Mounting jig
B. This is , tell you how to reduce the chance of others .
Trim structure (2 per 27" (68.6 cm) and 2 per 30" (76.2 cm) cabinets)
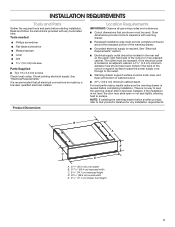
C. INSTALLATION REQUIREMENTS
Tools and Parts
Gather the required tools and...
Installation Instructions - Page 6

...to the top of /recycle all parts are now installed.
Pull runners all of the coffee system. Failure to see which step was skipped.
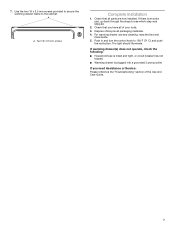
2. Complete Installation
1. If there is enough slack ... 3-prong outlet. 9. A B
If you need Assistance or Service:
Please reference the "Assistance or Service" section of the Use and Care Guide or contact the dealer from the cabinet in Step 4.
6. ...
Installation Instructions 1 - Page 3
...;■ Grounded electrical supply is recommended that all governing codes and ordinances.
■■ Cutout dimensions that product's literature for any tools listed here.
Read and follow the instructions provided with warming drawer.
■■ Recessed installation area must be recessed.
If the installation is no way to that are shown must be located...
Installation Instructions 1 - Page 5
...cleats and platforms will be visible and should be treated as a finished surface.
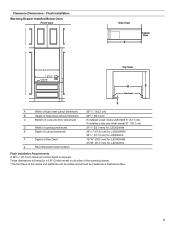
5 Flush Installation
Warming Drawer Installed Below Oven Front View
Side View E
Cabinet Back
A
1" (25 mm)
Side Cleats*...
C
Bottom of cutout to floor (minimum)
If installed under model JMC6224 5" (12.7 cm) If installed under any other model 31" (78.7 cm)
D
Width of opening (minimum)
215/8" ...
Installation Instructions 1 - Page 6
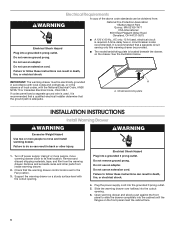
... and set to follow these instructions can result in the absence of the above code standards ...Support the warming drawer on the front panel meet the cabinet face.
6 Failure to its final location. Using 2 or more people to move warming drawer close to do so can result in back or other parts from the warming drawer. Model/serial/rating plate
INSTALLATION INSTRUCTIONS
Install...
Installation Instructions 1 - Page 7
...drawer is an extra part, go back through the steps to see which step was skipped.
2. Dispose of/recycle all parts are now installed. The light should...Service: Please reference the "Troubleshooting" section of your tools. 3. For warming drawer use and cleaning, read the Use and
Care Guide. 5. Push in and turn the control knob to the cabinet. A
A. Two 19 x 3.5 mm screws
Complete Installation...
Warranty - Page 1
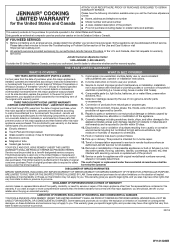
... warranty is installed, operated and maintained according to instructions attached to correct product damage or defects caused by JennAir.
8. Proof of repair or replacement under this major appliance is used in the country in fixtures (i.e. Repairs to parts or systems to or furnished with the product, JennAir will be provided by our authorized JennAir Service Providers. DISCLAIMER...
Dimension Guide - Page 1
...- 23M/zn" x 5>/zn" x 22C/,"
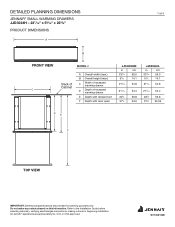
PRODUCT DIMENSIONS
A
B
FRONT VIEW
C
MODEL #
Back of Cabinet
A Overall width (max.)
B Overall height (max.)
C
Width...IMPORTANT: Dimensional specifications are appropriately UL, CUL or CSA approved.
W11308123B Refer to the Installation Guide before selecting cabinetry, verifying electrical/gas connections, making cutouts or beginning installation. Do not...
Dimension Guide - Page 2
...;16
54.4
11/16
1.8
2 of 4
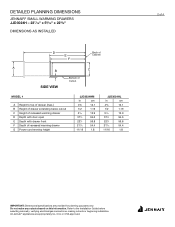
IMPORTANT: Dimensional specifications are appropriately UL, CUL or CSA approved. DETAILED PLANNING DIMENSIONS
JENNAIR® SMALL WARMING DRAWERS JJD3024H - 23M/zn" x 5>/zn" x 22C/,"
DIMENSIONS AS INSTALLED
D E F
Back of Cabinet
A
B
C
SIDE VIEW
Bottom of Cutout
MODEL #
A Height to the Installation Guide before selecting cabinetry, verifying electrical/gas...
Dimension Guide - Page 3

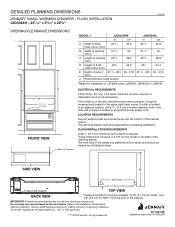
...; SMALL WARMING DRAWERS - STANDARD INSTALLATION JJD3024H - 23M/zn" x 5>/zn" x 22C/,"
OPENING/CLEARANCE DIMENSIONS
A
MODEL # A Width of cabinet (...Installation Guide before selecting cabinetry, verifying electrical/gas connections, making cutouts or beginning installation. DETAILED PLANNING DIMENSIONS 3 of Cabinet
D SIDE VIEW
Power cord location
BACK VIEW
IMPORTANT: Dimensional specifications...
Dimension Guide - Page 4
...wall or support surface to the Installation Guide before completing installation.
If ... circuit is required. W11308123B Installation Instruction W11260097 IMPORTANT: Dimensional specifications are appropriately UL, CUL or... CSA approved.
®/™ ©2019 JennAir. All rights reserved. DETAILED PLANNING DIMENSIONS 4 of Cabinet
MODEL...
Jenn-Air JJD3024HL1 Reviews
We have not received any reviews for Jenn-Air yet.