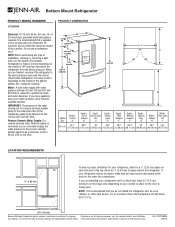
Dimension Guide
Page 1
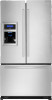
... about your refrigerator, allow for the water line connections. IMPORTANT: The pressure of the water coming out of a reverse osmosis system going to the water inlet valve of installation, cleaning, or removing a light bulb, turn the control (Thermostat, Refrigerator or Freezer Control depending on each side and at the back for the door to be a minimum of space behind the refrigerator. H G cabinet F not incl. handle E incl. Bottom Mount Refrigerator PRODUCT MODEL NUMBERS JFI2089W PRODUCT DIMENSIONS Electrical: A 115-volt...
... about your refrigerator, allow for the water line connections. IMPORTANT: The pressure of the water coming out of a reverse osmosis system going to the water inlet valve of installation, cleaning, or removing a light bulb, turn the control (Thermostat, Refrigerator or Freezer Control depending on each side and at the back for the door to be a minimum of space behind the refrigerator. H G cabinet F not incl. handle E incl. Bottom Mount Refrigerator PRODUCT MODEL NUMBERS JFI2089W PRODUCT DIMENSIONS Electrical: A 115-volt...
Use and Care
Page 1
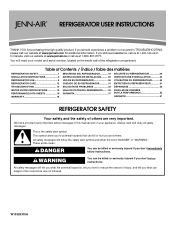
... of Contents / Índice / Table des matières REFRIGERATOR SAFETY 1 INSTALLATION INSTRUCTIONS 2 REFRIGERATOR USE 8 REFRIGERATOR CARE 12 TROUBLESHOOTING 13 WATER FILTER CERTIFICATIONS 15 PERFORMANCE DATA SHEETS 16 WARRANTY 18 SEGURIDAD DEL REFRIGERADOR 19 INSTRUCCIONES DE INSTALACIÓN........... 20 USO DE SU REFRIGERADOR 26 CUIDADO DE SU REFRIGERADOR 31 SOLUCIÓN DE PROBLEMAS 32 HOJA DE DATOS DEL RENDIMIENTO........ 35 GARANTÍA 37 SÉCURITÉ DU...
... of Contents / Índice / Table des matières REFRIGERATOR SAFETY 1 INSTALLATION INSTRUCTIONS 2 REFRIGERATOR USE 8 REFRIGERATOR CARE 12 TROUBLESHOOTING 13 WATER FILTER CERTIFICATIONS 15 PERFORMANCE DATA SHEETS 16 WARRANTY 18 SEGURIDAD DEL REFRIGERADOR 19 INSTRUCCIONES DE INSTALACIÓN........... 20 USO DE SU REFRIGERADOR 26 CUIDADO DE SU REFRIGERADOR 31 SOLUCIÓN DE PROBLEMAS 32 HOJA DE DATOS DEL RENDIMIENTO........ 35 GARANTÍA 37 SÉCURITÉ DU...
Use and Care
Page 2
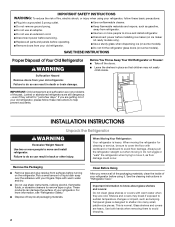
... cleaning or service, be sure to cover the floor with warm water and dry. ■ Do not use an extension cord. ■ Disconnect power before servicing. ■ Replace all parts and panels before operating. ■ Remove doors from refrigerator. ■ Use two or more people to move and install refrigerator. ■ Disconnect power before using your old refrigerator. SAVE THESE INSTRUCTIONS Proper Disposal of your refrigerator before installing ice maker (on ice maker kit ready models only). ■ Use a sturdy glass when dispensing ice...
... cleaning or service, be sure to cover the floor with warm water and dry. ■ Do not use an extension cord. ■ Disconnect power before servicing. ■ Replace all parts and panels before operating. ■ Remove doors from refrigerator. ■ Use two or more people to move and install refrigerator. ■ Disconnect power before using your old refrigerator. SAVE THESE INSTRUCTIONS Proper Disposal of your refrigerator before installing ice maker (on ice maker kit ready models only). ■ Use a sturdy glass when dispensing ice...
Use and Care
Page 3
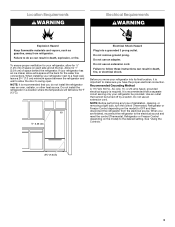
If your refrigerator has an ice maker, allow extra space at the top. Do not use an extension cord. NOTE: Before performing any type of installation, cleaning, or removing a light bulb, turn the control (Thermostat, Refrigerator or Freezer Control depending on the model) to the electrical source and reset the control (Thermostat, Refrigerator or Freezer Control depending on each side and at the back for the water line connections. When you have the proper electrical connection. Recommended Grounding Method A 115...
If your refrigerator has an ice maker, allow extra space at the top. Do not use an extension cord. NOTE: Before performing any type of installation, cleaning, or removing a light bulb, turn the control (Thermostat, Refrigerator or Freezer Control depending on the model) to the electrical source and reset the control (Thermostat, Refrigerator or Freezer Control depending on each side and at the back for the water line connections. When you have the proper electrical connection. Recommended Grounding Method A 115...
Use and Care
Page 4
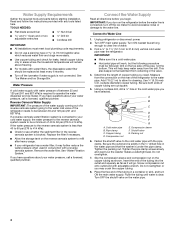
... valve on the refrigerator before the water line is clear. TOOLS NEEDED: ■ Flat-blade screwdriver Nut driver and ¹⁄₂" Open-end or two adjustable wrenches Drill bit ■ Cordless drill IMPORTANT: ■ All installations must be followed: Drill on the top side of the refrigerator needs to be replaced at least every 6 months. ■ Turn off the ice maker to avoid excessive noise...
... valve on the refrigerator before the water line is clear. TOOLS NEEDED: ■ Flat-blade screwdriver Nut driver and ¹⁄₂" Open-end or two adjustable wrenches Drill bit ■ Cordless drill IMPORTANT: ■ All installations must be followed: Drill on the top side of the refrigerator needs to be replaced at least every 6 months. ■ Turn off the ice maker to avoid excessive noise...
Use and Care
Page 6
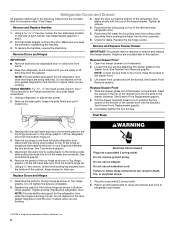
...." 3. Unplug refrigerator or disconnect power. 2. Final Steps 3. Disconnect the wiring plug located on top of the hinge by pulling back the locking collar ring while firmly pushing the water line into a grounded 3 prong outlet. See Connections graphic. 6. Do not use an adapter. Refrigerator Doors and Drawer All graphics referenced in the following instructions are included later in this section. Make sure you are working . Loosen the...
...." 3. Unplug refrigerator or disconnect power. 2. Final Steps 3. Disconnect the wiring plug located on top of the hinge by pulling back the locking collar ring while firmly pushing the water line into a grounded 3 prong outlet. See Connections graphic. 6. Do not use an adapter. Refrigerator Doors and Drawer All graphics referenced in the following instructions are included later in this section. Make sure you are working . Loosen the...
Use and Care
Page 7
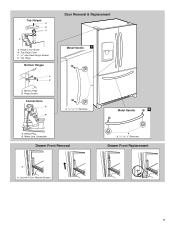
Top Hinge Cover C. 5/16" Hex-Head Hinge Screws D. Top Hinges A B C D A. Loosen 4 Door Bracket Screws 7 Wiring Plug B. Hinge Cover Screw B. Water Line Connection Drawer Front Removal A A. 3/32" or 1/8" Setscrew Drawer Front Replacement A A. Top Hinge Bottom Hinges A B A. Hinge Screws Connections A B Door Removal & Replacement Metal Handle 1 A A. 3/32" or 1/8" Setscrew Metal Handle 2 A. Bottom Hinge B.
Top Hinge Cover C. 5/16" Hex-Head Hinge Screws D. Top Hinges A B C D A. Loosen 4 Door Bracket Screws 7 Wiring Plug B. Hinge Cover Screw B. Water Line Connection Drawer Front Removal A A. 3/32" or 1/8" Setscrew Drawer Front Replacement A A. Top Hinge Bottom Hinges A B A. Hinge Screws Connections A B Door Removal & Replacement Metal Handle 1 A A. 3/32" or 1/8" Setscrew Metal Handle 2 A. Bottom Hinge B.
Use and Care
Page 8
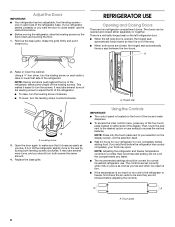
... user setting to turn both leveling screws clockwise. NOTE: Press only the touch pads next to your selection on the display screen, not the selection itself. ■ Wait 24 hours for normal household refrigerator use the instructions below. ■ Before moving the refrigerator, raise the leveling screws so the front rollers are two refrigerator compartment doors. NOTE: Adjusting the refrigerator and freezer temperature controls to cool completely before adjusting...
... user setting to turn both leveling screws clockwise. NOTE: Press only the touch pads next to your selection on the display screen, not the selection itself. ■ Wait 24 hours for normal household refrigerator use the instructions below. ■ Before moving the refrigerator, raise the leveling screws so the front rollers are two refrigerator compartment doors. NOTE: Adjusting the refrigerator and freezer temperature controls to cool completely before adjusting...
Use and Care
Page 9
.../Off button for 3 continuous minutes. NOTE: Door openings are ignored for the temperature to stabilize between ON and OFF. Max Cool The Max Cool feature assists with periods of high refrigerator or freezer use the settings listed in Sabbath mode, any touch of the control panel will display the Sabbath mode control which will automatically shut off all lights, disables the water and ice dispenser, disables all cooling functions, the control panel and the dispenser. NOTE...
.../Off button for 3 continuous minutes. NOTE: Door openings are ignored for the temperature to stabilize between ON and OFF. Max Cool The Max Cool feature assists with periods of high refrigerator or freezer use the settings listed in Sabbath mode, any touch of the control panel will display the Sabbath mode control which will automatically shut off all lights, disables the water and ice dispenser, disables all cooling functions, the control panel and the dispenser. NOTE...
Use and Care
Page 10
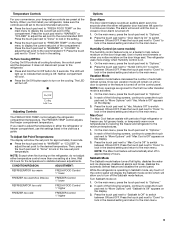
... setting and return to switch between ON and OFF. Press the touch pad next to "Temp Alarm Is Off" to the main menu. To turn the auger driver, behind the ice bin, counterclockwise to adjust the level at which the Light Sensor will automatically reset once the warm condition has been corrected for best storage of the control panel. 1. See "Water and Ice Dispenser." ■ The ice maker and storage bin...
... setting and return to switch between ON and OFF. Press the touch pad next to "Temp Alarm Is Off" to the main menu. To turn the auger driver, behind the ice bin, counterclockwise to adjust the level at which the Light Sensor will automatically reset once the warm condition has been corrected for best storage of the control panel. 1. See "Water and Ice Dispenser." ■ The ice maker and storage bin...
Use and Care
Page 11
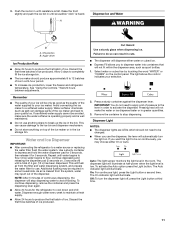
... automatically turn the dispenser light off ) until an audible "click" is felt. Auto: The light sensor monitors the light level in the ice storage bin. On: For continuous light, press the Light button a second time. Allow 3 days to completely fill the ice storage bin. ■ The ice maker should not need to dispense water into containers that will stop dispensing. See "Using the Controls." Avoid connecting the ice maker to a water source or replacing the water filter, flush the water...
... automatically turn the dispenser light off ) until an audible "click" is felt. Auto: The light sensor monitors the light level in the ice storage bin. On: For continuous light, press the Light button a second time. Allow 3 days to completely fill the ice storage bin. ■ The ice maker should not need to dispense water into containers that will stop dispensing. See "Using the Controls." Avoid connecting the ice maker to a water source or replacing the water filter, flush the water...
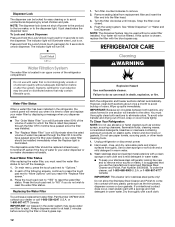
Use and Care
Page 12
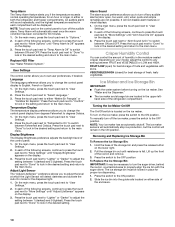
... the rated volume of water to remove minor scuffs or marks, it is suggested that is time to eject. Flush the water system. A new water filter should be installed immediately when the Replace light is on plastic parts, interior and door liners or gaskets. Replacing the Water Filter To purchase a replacement water filter, Part Number UKF8001AXX contact your water filter by small children and pets. IMPORTANT: Air trapped in the water system may be filtered. Dispenser Lock The dispenser...
... the rated volume of water to remove minor scuffs or marks, it is suggested that is time to eject. Flush the water system. A new water filter should be installed immediately when the Replace light is on plastic parts, interior and door liners or gaskets. Replacing the Water Filter To purchase a replacement water filter, Part Number UKF8001AXX contact your water filter by small children and pets. IMPORTANT: Air trapped in the water system may be filtered. Dispenser Lock The dispenser...
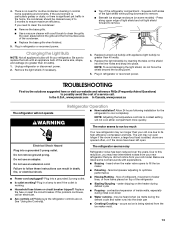
Use and Care
Page 13
...? Electrical Shock Hazard Plug into a grounded 3 prong outlet. ■ Is outlet working . ■ Household fuse blown or circuit breaker tripped? fans/compressor adjusting to cool completely. If you did not notice from the ice maker mold. 13 If the problem continues, call . See "Using the Control(s)." heard when the water valve opens to clean the grille, the open . Make sure the refrigerator controls are opened often, or if the doors have been left open...
...? Electrical Shock Hazard Plug into a grounded 3 prong outlet. ■ Is outlet working . ■ Household fuse blown or circuit breaker tripped? fans/compressor adjusting to cool completely. If you did not notice from the ice maker mold. 13 If the problem continues, call . See "Using the Control(s)." heard when the water valve opens to clean the grille, the open . Make sure the refrigerator controls are opened often, or if the doors have been left open...
Use and Care
Page 14
... water source line. ■ Water filter installed on ? Call a licensed, qualified plumber. Gray or dark discoloration in the ice ■ New plumbing connections? Replace water filter when indicated. Failure to open . ■ Kink in the way? Adjust the controls a setting colder. Move items away from door. ■ Bin or shelf in the water source line? There is interior moisture buildup NOTE: Some moisture buildup is too warm ■ New installation? Remove ice from food? See "Water Supply Requirements." If ice...
... water source line. ■ Water filter installed on ? Call a licensed, qualified plumber. Gray or dark discoloration in the ice ■ New plumbing connections? Replace water filter when indicated. Failure to open . ■ Kink in the way? Adjust the controls a setting colder. Move items away from door. ■ Bin or shelf in the water source line? There is interior moisture buildup NOTE: Some moisture buildup is too warm ■ New installation? Remove ice from food? See "Water Supply Requirements." If ice...
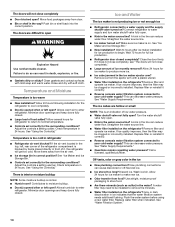
Use and Care
Page 15
... ■ New installation? See "Refrigerator Doors and Drawer." ■ Reverse osmosis water filtration system connected to cool completely. ■ Recently dispensed large amount of water? This can decrease water pressure. Flush the water system. Allow 24 hours after dispensing is connected to cool completely. ■ Water not been recently dispensed? Discard the first glass of water after installation for water supply to a cold water pipe. See "Water Supply Requirements." ■ Water filter installed on ? Make sure the water dispenser wire/tube assembly has been...
... ■ New installation? See "Refrigerator Doors and Drawer." ■ Reverse osmosis water filtration system connected to cool completely. ■ Recently dispensed large amount of water? This can decrease water pressure. Flush the water system. Allow 24 hours after dispensing is connected to cool completely. ■ Water not been recently dispensed? Discard the first glass of water after installation for water supply to a cold water pipe. See "Water Supply Requirements." ■ Water filter installed on ? Make sure the water dispenser wire/tube assembly has been...

Use and Care
Page 16
...filter's rated life is used, the red (Replace) light comes on, and it is used on . When 100% of the filter's rated life is recommended that may be replaced at least every 6 months. ■ Refer to the "Water Filtration System" section for the Manufacturer's name and telephone number. ■ Refer to the "Warranty" section for the reduction of water that operational, maintenance, and filter replacement... in NSF/ANSI Standards 42 and 53. Application Guidelines/Water Supply Parameters Water Supply Water Pressure Water Temperature Service Flow Rate City or Well 35 - 120 psi (241 - ...
...filter's rated life is used, the red (Replace) light comes on, and it is used on . When 100% of the filter's rated life is recommended that may be replaced at least every 6 months. ■ Refer to the "Water Filtration System" section for the Manufacturer's name and telephone number. ■ Refer to the "Warranty" section for the reduction of water that operational, maintenance, and filter replacement... in NSF/ANSI Standards 42 and 53. Application Guidelines/Water Supply Parameters Water Supply Water Pressure Water Temperature Service Flow Rate City or Well 35 - 120 psi (241 - ...

Use and Care
Page 17
... and 53. Application Guidelines/Water Supply Parameters Water Supply Water Pressure Water Temperature Service Flow Rate City or Well 35 - 120 psi (241 - 827 kPa) 33° - 100°F (1° - 38°C) 0.55 gpm (2.08 L/min.) @ 60 psi ■ The product is for cold water use only. ■ Do not use with water that is essential that operational, maintenance, and filter replacement requirements be carried out for...
... and 53. Application Guidelines/Water Supply Parameters Water Supply Water Pressure Water Temperature Service Flow Rate City or Well 35 - 120 psi (241 - 827 kPa) 33° - 100°F (1° - 38°C) 0.55 gpm (2.08 L/min.) @ 60 psi ■ The product is for cold water use only. ■ Do not use with water that is essential that operational, maintenance, and filter replacement requirements be carried out for...
Use and Care
Page 18
... accordance with electrical or plumbing codes, or use of products not approved by a Jenn-Air designated service company. The removal and reinstallation of your complete model number ready. YOUR SOLE AND EXCLUSIVE REMEDY UNDER THIS LIMITED WARRANTY SHALL BE PRODUCT REPAIR AS PROVIDED HEREIN. This warranty gives you specific legal rights, and you also may not apply to you on water filter. Consumable parts are excluded...
... accordance with electrical or plumbing codes, or use of products not approved by a Jenn-Air designated service company. The removal and reinstallation of your complete model number ready. YOUR SOLE AND EXCLUSIVE REMEDY UNDER THIS LIMITED WARRANTY SHALL BE PRODUCT REPAIR AS PROVIDED HEREIN. This warranty gives you specific legal rights, and you also may not apply to you on water filter. Consumable parts are excluded...

Warranty
Page 1
... www.jennair.ca If you . On models with Jenn-Air's published installation instructions. 11. This limited warranty is valid only in an inaccessible location or is operated and maintained according to instructions attached to schedule service, you also may contact Jenn-Air at the address below . Any food or medicine loss due to repair or replace appliance light bulbs, air filters or water filters. In Canada, call 1-800-536-6247...
... www.jennair.ca If you . On models with Jenn-Air's published installation instructions. 11. This limited warranty is valid only in an inaccessible location or is operated and maintained according to instructions attached to schedule service, you also may contact Jenn-Air at the address below . Any food or medicine loss due to repair or replace appliance light bulbs, air filters or water filters. In Canada, call 1-800-536-6247...

CAD
Page 1
Do not make any cutouts based on this information. NOTE: Dimensional information is provided for planning purposes only. All Jenn-Air® appliances are appropriately UL, CUL or CSA approved. z 0 U) z Lu 2 'Eico 6 o Lu Nz 0_ J 2 FRONT ELEVATION En SIDE ELEVATION [Manufacturer: Jenn-Air Model Number: JFI2089WES EJENN-AIR® Date: MM/DD/YY A •e• Scale: A 35 i" APPLIANCE DIMENSION 1 PLAN APPLIANCE DIM. Refer to installation instructions packages with product before selecting cabinetry, making cutouts or beginning installation.
Do not make any cutouts based on this information. NOTE: Dimensional information is provided for planning purposes only. All Jenn-Air® appliances are appropriately UL, CUL or CSA approved. z 0 U) z Lu 2 'Eico 6 o Lu Nz 0_ J 2 FRONT ELEVATION En SIDE ELEVATION [Manufacturer: Jenn-Air Model Number: JFI2089WES EJENN-AIR® Date: MM/DD/YY A •e• Scale: A 35 i" APPLIANCE DIMENSION 1 PLAN APPLIANCE DIM. Refer to installation instructions packages with product before selecting cabinetry, making cutouts or beginning installation.


