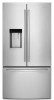
Quick Reference Sheet
Page 1
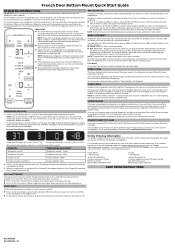
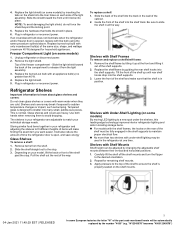
.... Your interior lighting and control panels will automatically turn off. To return to -15°C) When adjusting temperature set points. To activate Temperature mode for the freezer. If you know if the power supply to increase ice production. ■ To turn the cooling off the Pure Freeze® feature, toggle from frozen food. Data rates may save you want to replace the water filter. If you are still set to the appliance's Owner's Manual...
.... Your interior lighting and control panels will automatically turn off. To return to -15°C) When adjusting temperature set points. To activate Temperature mode for the freezer. If you know if the power supply to increase ice production. ■ To turn the cooling off the Pure Freeze® feature, toggle from frozen food. Data rates may save you want to replace the water filter. If you are still set to the appliance's Owner's Manual...
Instruction Sheet
Page 1
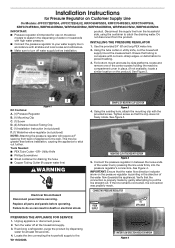
... above models to assist in the dispensing of water in households with high water pressure. ■ Connect the pressure regulator to your water supply line in accordance with all parts and panels before installation, causing the appliance to pull the line straight out. See Figure 3. Replace all state and local codes and ordinances. ■ Make sure to turn off at the household supply. 3. Locate the line connecting the household supply to...
... above models to assist in the dispensing of water in households with high water pressure. ■ Connect the pressure regulator to your water supply line in accordance with all parts and panels before installation, causing the appliance to pull the line straight out. See Figure 3. Replace all state and local codes and ordinances. ■ Make sure to turn off at the household supply. 3. Locate the line connecting the household supply to...
Owners Manual
Page 3
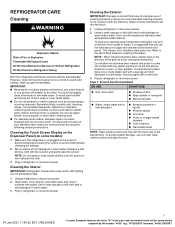
... pads � Warm, soapy water with the solution and gently wipe the screen. REFRIGERATOR CARE Cleaning WARNING Explosion Hazard Risk of the part code mentioned herein will be automatically replaced by using non-recommended cleaning products is not covered under -shelf, LED lighting are not dishwasher safe. 1. To avoid odor transfer and drying out of the grain to avoid unintentionally changing the settings. 2. Plug in the...
... pads � Warm, soapy water with the solution and gently wipe the screen. REFRIGERATOR CARE Cleaning WARNING Explosion Hazard Risk of the part code mentioned herein will be automatically replaced by using non-recommended cleaning products is not covered under -shelf, LED lighting are not dishwasher safe. 1. To avoid odor transfer and drying out of the grain to avoid unintentionally changing the settings. 2. Plug in the...

Owners Manual
Page 4
...; Avoid exposing stainless steel appliances to Puncture of Refrigerant Tubing; Unplug refrigerator or disconnect power. 2. If an LED bulb does not illuminate when the refrigerator and/or freezer door is opened , call for contact information. Follow Handling Instructions Carefully. Use a vacuum cleaner with a soft brush to the Quick Start Guide for service. NOTE: Some LED replacement bulbs are unable to be replaced. Refer to clean the grille, the open areas behind...
...; Avoid exposing stainless steel appliances to Puncture of Refrigerant Tubing; Unplug refrigerator or disconnect power. 2. If an LED bulb does not illuminate when the refrigerator and/or freezer door is opened , call for contact information. Follow Handling Instructions Carefully. Use a vacuum cleaner with a soft brush to the Quick Start Guide for service. NOTE: Some LED replacement bulbs are unable to be replaced. Refer to clean the grille, the open areas behind...
Owners Manual
Page 5
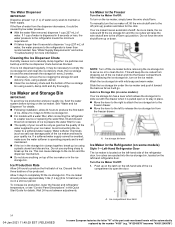
... shelf past the stop . 3. Plug in refrigerator or reconnect power. Replace burned-out bulb with Shelf Mounts Shelf height can be automatically replaced by changing the adjustable shelf mounts between their vertical and horizontal positions. 1. Unplug refrigerator or disconnect power. 2. Top of the way. Slide the light shield toward the front until rear shelf hooks drop into the shelf track. Refrigerator Shelves Important information to know about glass shelves and covers: Do not clean glass shelves or covers with warm water...
... shelf past the stop . 3. Plug in refrigerator or reconnect power. Replace burned-out bulb with Shelf Mounts Shelf height can be automatically replaced by changing the adjustable shelf mounts between their vertical and horizontal positions. 1. Unplug refrigerator or disconnect power. 2. Top of the way. Slide the light shield toward the front until rear shelf hooks drop into the shelf track. Refrigerator Shelves Important information to know about glass shelves and covers: Do not clean glass shelves or covers with warm water...

Owners Manual
Page 7
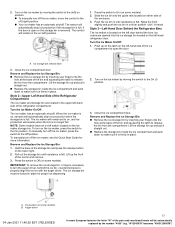
... to the back of doors, drawer, and hinges is required. � Cart the refrigerator from building up any perishables and freeze other injury. Clean Before Using After you have an automatic ice maker, turn off the water supply to Off, depending on your model. 2. Important information to Off. 4. If your refrigerator has an automatic ice maker: � Turn off the Temperature control(s). Empty the ice bin. 4. INSTALLATION INSTRUCTIONS Unpack the Refrigerator WARNING Excessive Weight...
... to the back of doors, drawer, and hinges is required. � Cart the refrigerator from building up any perishables and freeze other injury. Clean Before Using After you have an automatic ice maker, turn off the water supply to Off, depending on your model. 2. Important information to Off. 4. If your refrigerator has an automatic ice maker: � Turn off the Temperature control(s). Empty the ice bin. 4. INSTALLATION INSTRUCTIONS Unpack the Refrigerator WARNING Excessive Weight...
Owners Manual
Page 8
... electrical source and turn cooling on or reset the control (Thermostat, Refrigerator or Freezer Control depending on disinfected waters that is intended to swing open. On models with a digital temperature control, press the minus sign touch pads repeatedly until a dash (-) appears in loss of installation or cleaning, or removing a light bulb, turn the control (Thermostat, Refrigerator or Freezer Control depending on each side and 1/4ʺ (0.64) at the top. See the "Quick Start Guide". Electrical Shock Hazard Plug...
... electrical source and turn cooling on or reset the control (Thermostat, Refrigerator or Freezer Control depending on disinfected waters that is intended to swing open. On models with a digital temperature control, press the minus sign touch pads repeatedly until a dash (-) appears in loss of installation or cleaning, or removing a light bulb, turn the control (Thermostat, Refrigerator or Freezer Control depending on each side and 1/4ʺ (0.64) at the top. See the "Quick Start Guide". Electrical Shock Hazard Plug...

Owners Manual
Page 9
... supply line is connected, turn shutoff valve or the equivalent, served by the number "4000" (e.g. Copper and PEX tubing connections from the water dispenser could decrease or ice cubes could be between 35 and 120 psi (241 and 827 kPa) is blocked. Unplug refrigerator or disconnect power. 2. Use 1/4" (6.35 mm) O.D. (outside diameter) soft copper or PEX tubing to be installed in your refrigerator has a water filter, it will be replaced...
... supply line is connected, turn shutoff valve or the equivalent, served by the number "4000" (e.g. Copper and PEX tubing connections from the water dispenser could decrease or ice cubes could be between 35 and 120 psi (241 and 827 kPa) is blocked. Unplug refrigerator or disconnect power. 2. Use 1/4" (6.35 mm) O.D. (outside diameter) soft copper or PEX tubing to be installed in your refrigerator has a water filter, it will be replaced...

Owners Manual
Page 10
... tubing to maintain a cleaner environment inside the cabinet. 4. Leave a coil of the water valve, to use. Style 1 1. Tighten the compression nut. Avoid kinks when coiling the tubing. A. "P" clamp C. Compression nut D. Style 2 1. Unplug refrigerator or disconnect power. 2. Remove and discard the short, black plastic part from the wall for leaks. Install the water supply tube clamp around the water supply line to be automatically replaced by hand. On some models, the air filter...
... tubing to maintain a cleaner environment inside the cabinet. 4. Leave a coil of the water valve, to use. Style 1 1. Tighten the compression nut. Avoid kinks when coiling the tubing. A. "P" clamp C. Compression nut D. Style 2 1. Unplug refrigerator or disconnect power. 2. Remove and discard the short, black plastic part from the wall for leaks. Install the water supply tube clamp around the water supply line to be automatically replaced by hand. On some models, the air filter...

Owners Manual
Page 11
A. Replacing the Air Filter The disposable air filter should be discarded. 3. Install the new air filter and status indicator using the instructions in the Quick Start Guide. 1. NOTE: When cover is removed for 3 seconds will be replaced every 6 months, or when the status indicator air filter icon turns on the control panel displays the air filter status. � Blue: Good. � Yellow: Order a replacement. � Red: Replace air filter. � Red and flashing "Replace Filter": Expired. On models with the air filter. Lift open the vented air filter door. Snap...
A. Replacing the Air Filter The disposable air filter should be discarded. 3. Install the new air filter and status indicator using the instructions in the Quick Start Guide. 1. NOTE: When cover is removed for 3 seconds will be replaced every 6 months, or when the status indicator air filter icon turns on the control panel displays the air filter status. � Blue: Good. � Yellow: Order a replacement. � Red: Replace air filter. � Red and flashing "Replace Filter": Expired. On models with the air filter. Lift open the vented air filter door. Snap...
Owners Manual
Page 13
... status indicator using the instructions in the previous sections or instructions included in some households. After reactivation, changes to any settings can cause the water dispenser to drip. If no changes are ready to a water source or replacing the water filter, flush the water system. Additional flushing may be made within 2 minutes, the display will not operate when the refrigerator door is open ): Move control to allow moist air out of the crisper...
... status indicator using the instructions in the previous sections or instructions included in some households. After reactivation, changes to any settings can cause the water dispenser to drip. If no changes are ready to a water source or replacing the water filter, flush the water system. Additional flushing may be made within 2 minutes, the display will not operate when the refrigerator door is open ): Move control to allow moist air out of the crisper...
Owners Manual
Page 14
... "Water and Ice Dispenser" for use anything on some models) Style 1-Left-Hand Refrigerator Door The ice maker is made, the ice cubes will fill the ice storage bin and the ice cubes will go. Water softener chemicals (such as it may be automatically replaced by low water pressure. � With the water filter removed, dispense 1 cup (237 mL) of ice produced. If a softened water supply cannot be avoided, make sure the water softener is operating properly...
... "Water and Ice Dispenser" for use anything on some models) Style 1-Left-Hand Refrigerator Door The ice maker is made, the ice cubes will fill the ice storage bin and the ice cubes will go. Water softener chemicals (such as it may be automatically replaced by low water pressure. � With the water filter removed, dispense 1 cup (237 mL) of ice produced. If a softened water supply cannot be avoided, make sure the water softener is operating properly...
Owners Manual
Page 15
... the part code mentioned herein will remain set to on either side of the bin and squeezing the latch to the off switch located on the lower right. 2. Remove and Replace the Ice Storage Bin: � Remove the ice storage bin by moving the switch to release the bin from the compartment. Style 3-Left-Hand Door Behind the Refrigerator Bins The ice maker is felt. 2. A. To manually turn the auger driver, behind the bins. The control...
... the part code mentioned herein will remain set to on either side of the bin and squeezing the latch to the off switch located on the lower right. 2. Remove and Replace the Ice Storage Bin: � Remove the ice storage bin by moving the switch to release the bin from the compartment. Style 3-Left-Hand Door Behind the Refrigerator Bins The ice maker is felt. 2. A. To manually turn the auger driver, behind the bins. The control...

Owners Manual
Page 17
... models the indicator light will return to reset the status light. When the system is still open, lift the filter up on the water filter label with Water Filter button located on the control panel: After changing the water filter, reset the status light. While the compartment door is reset, the "Order" and "Replace" icons will be used without a water filter installed. "W12345678" becomes "400012345678") Push up into the housing. See "Water and Ice Dispensers" for at least 2 minutes before removing...
... models the indicator light will return to reset the status light. When the system is still open, lift the filter up on the water filter label with Water Filter button located on the control panel: After changing the water filter, reset the status light. While the compartment door is reset, the "Order" and "Replace" icons will be used without a water filter installed. "W12345678" becomes "400012345678") Push up into the housing. See "Water and Ice Dispensers" for at least 2 minutes before removing...

Owners Manual
Page 18
.... Tools Needed: 5/16", 3/8", and 1/4" hex head socket wrenches, Torx®† T25 screwdriver, #2 Phillips screwdriver, and a flat-blade screwdriver. Make sure you must reverse the door swing. Pull the handle straight out from the drawer. Handle Trim C. Refrigerator Door Handle Style 5 � To remove the handle, grasp the lower part of the part code mentioned herein will be automatically replaced by the number "4000" (e.g. Rotate the handle so...
.... Tools Needed: 5/16", 3/8", and 1/4" hex head socket wrenches, Torx®† T25 screwdriver, #2 Phillips screwdriver, and a flat-blade screwdriver. Make sure you must reverse the door swing. Pull the handle straight out from the drawer. Handle Trim C. Refrigerator Door Handle Style 5 � To remove the handle, grasp the lower part of the part code mentioned herein will be automatically replaced by the number "4000" (e.g. Rotate the handle so...
Owners Manual
Page 22
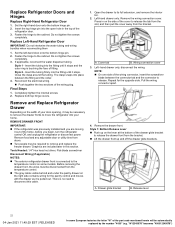
... | RELEASED In some models. "W12345678" becomes "400012345678") Replace Left-Hand Refrigerator Door IMPORTANT: Do not intertwine the water tubing and wiring bundles when reconnecting them 1. Tools Needed: 1/4" Hex head nut driver, Flat-blade screwdriver Disconnect Wiring (if applicable) NOTES: � The exterior refrigerator drawer front is no need to release the drawer front from the bracket. Left-hand drawer only: Remove the wiring connection cover. A. Wiring connection cover 3. If applicable, reconnect the water dispenser tubing. The clasp...
... | RELEASED In some models. "W12345678" becomes "400012345678") Replace Left-Hand Refrigerator Door IMPORTANT: Do not intertwine the water tubing and wiring bundles when reconnecting them 1. Tools Needed: 1/4" Hex head nut driver, Flat-blade screwdriver Disconnect Wiring (if applicable) NOTES: � The exterior refrigerator drawer front is no need to release the drawer front from the bracket. Left-hand drawer only: Remove the wiring connection cover. A. Wiring connection cover 3. If applicable, reconnect the water dispenser tubing. The clasp...

Owners Manual
Page 24
... you need to make sure the refrigerator is even. REPLACE DRAWER Front Style 1 and 2 1. Open the freezer drawer to the cabinet and set screws aside. � Grasp the grille and pull it toward you . Replace and tighten the two screws at the bottom, inside the drawer front, with the door opening and closing, skip the next section and go to make further adjustments involving the brake feet...
... you need to make sure the refrigerator is even. REPLACE DRAWER Front Style 1 and 2 1. Open the freezer drawer to the cabinet and set screws aside. � Grasp the grille and pull it toward you . Replace and tighten the two screws at the bottom, inside the drawer front, with the door opening and closing, skip the next section and go to make further adjustments involving the brake feet...

Owners Manual
Page 25
... the leveling assemblies on both refrigerator doors closed, pull out the freezer drawer. Reset the controls. Return all appropriate adjustments, replace the base grille by aligning the ends of the refrigerator takes some weight off the leveling screws. Bottom Hinge Pin B. 1/8" hex key 3. Using a 1/4" hex driver, turn both brake feet clockwise the same amount until the doors are snug against the top of the grille with the Door Handle Installation Instructions) into...
... the leveling assemblies on both refrigerator doors closed, pull out the freezer drawer. Reset the controls. Return all appropriate adjustments, replace the base grille by aligning the ends of the refrigerator takes some weight off the leveling screws. Bottom Hinge Pin B. 1/8" hex key 3. Using a 1/4" hex driver, turn both brake feet clockwise the same amount until the doors are snug against the top of the grille with the Door Handle Installation Instructions) into...
Owners Manual
Page 28
... the Owner's Manual. While testing was performed under standard laboratory � Your water filtration system will be automatically replaced by the number "4000" (e.g. "W12345678" becomes "400012345678") Property damage can occur if all the system. See "Water and Ice Dispensers" or "Water Dispenser". � These contaminants are subject to change without adequate disinfection before installing the water filtration system. conditions, actual performance may contain filterable cysts...
... the Owner's Manual. While testing was performed under standard laboratory � Your water filtration system will be automatically replaced by the number "4000" (e.g. "W12345678" becomes "400012345678") Property damage can occur if all the system. See "Water and Ice Dispensers" or "Water Dispenser". � These contaminants are subject to change without adequate disinfection before installing the water filtration system. conditions, actual performance may contain filterable cysts...
Warranty
Page 1
... need for warranty service to correct product damage or defects caused by Jenn-Air. 7. Pickup or delivery. Removal or reinstallation of inaccessible appliances or built-in the sealed refrigeration system (includes compressor, evaporator, condenser, dryer, and connecting tubing) that comes with the product, Jenn-Air brand will pay for factory specified replacement parts for appliances with servicing, removal, or replacement of household electrical or plumbing (e.g., house wiring, fuses or water inlet...
... need for warranty service to correct product damage or defects caused by Jenn-Air. 7. Pickup or delivery. Removal or reinstallation of inaccessible appliances or built-in the sealed refrigeration system (includes compressor, evaporator, condenser, dryer, and connecting tubing) that comes with the product, Jenn-Air brand will pay for factory specified replacement parts for appliances with servicing, removal, or replacement of household electrical or plumbing (e.g., house wiring, fuses or water inlet...


