Owners Manual
Page 2
... the refrigerant circuit. � Do not use electrical appliances inside the food compartment of electric shock. 2 SAVE THESE INSTRUCTIONS NOTE: The appliance must install the water line and ice maker. We have been given supervision or instruction concerning use of the appliance by a person responsible for their safety. � Do not use an extension cord. � If power supply cord is damaged, it must be replaced by...
... the refrigerant circuit. � Do not use electrical appliances inside the food compartment of electric shock. 2 SAVE THESE INSTRUCTIONS NOTE: The appliance must install the water line and ice maker. We have been given supervision or instruction concerning use of the appliance by a person responsible for their safety. � Do not use an extension cord. � If power supply cord is damaged, it must be replaced by...
Owners Manual
Page 3
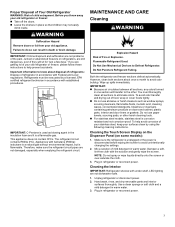
.... Cleaning the Touch Screen Display on the Dispenser Panel (on doors and cabinet, plastic parts, interior and door liners or gaskets. Dampen a soft, lint-free cloth with Isobutane (R600a): isobutane is a natural gas without environmental impact, but is flammable. Cleaning the Interior: IMPORTANT: Refrigerator shelves with established procedures. Use a clean sponge or soft cloth and a mild detergent in place so that children may not easily climb inside. Plug...
.... Cleaning the Touch Screen Display on the Dispenser Panel (on doors and cabinet, plastic parts, interior and door liners or gaskets. Dampen a soft, lint-free cloth with Isobutane (R600a): isobutane is a natural gas without environmental impact, but is flammable. Cleaning the Interior: IMPORTANT: Refrigerator shelves with established procedures. Use a clean sponge or soft cloth and a mild detergent in place so that children may not easily climb inside. Plug...
Owners Manual
Page 4
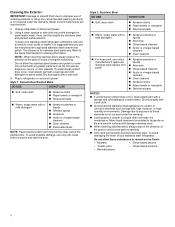
... finish due to the Quick Start Guide for stainless steel parts only. To keep your stainless steel refrigerator: Do not allow the stainless steel cleaner and polish to caustic or corrosive elements such as the trim pieces, dispenser covers, or door gaskets. NOTE : When cleaning stainless steel, always wipe in the direction of cleaning products or using non-recommended cleaning products is suggested that you...
... finish due to the Quick Start Guide for stainless steel parts only. To keep your stainless steel refrigerator: Do not allow the stainless steel cleaner and polish to caustic or corrosive elements such as the trim pieces, dispenser covers, or door gaskets. NOTE : When cleaning stainless steel, always wipe in the direction of cleaning products or using non-recommended cleaning products is suggested that you...
Owners Manual
Page 5
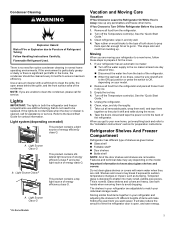
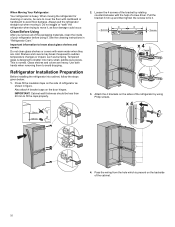
... light source of energy class G. Tape the doors closed and tape the power cord to Turn Off the Refrigerator Before You Leave: 1. Follow Handling Instructions Carefully. Remove all removable parts, wrap them well, and tape them to ensure maximum efficiency. If your refrigerator has an automatic ice maker: � Turn off the water supply to the ice maker at least one day ahead of time. � Disconnect the water line from the refrigerator. 2. Clean...
... light source of energy class G. Tape the doors closed and tape the power cord to Turn Off the Refrigerator Before You Leave: 1. Follow Handling Instructions Carefully. Remove all removable parts, wrap them well, and tape them to ensure maximum efficiency. If your refrigerator has an automatic ice maker: � Turn off the water supply to the ice maker at least one day ahead of time. � Disconnect the water line from the refrigerator. 2. Clean...
Owners Manual
Page 6
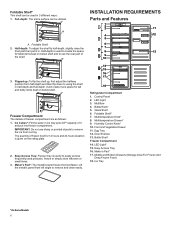
... 3. Control Panel 2. Multitemperature Knob* 8. Multitemperature Drawer* 9. Humidity Control Knob* 10. Foldable Shelf* 7. Bottle Shelf Freezer Compartment 14. Maker's Pad*: The metallic panel freeze the food faster. Full-depth: The entire surface can be utilized. Lift the metallic panel from ice tray. Maker's Pad* 17. A A. Door Shelves 13. Foldable Shelf* This shelf can be used in ice tray upto 2/3rd capacity of the shelf. The quantity of freezer compartment are as follows: 1. Ice Tray *On Some Models...
... 3. Control Panel 2. Multitemperature Knob* 8. Multitemperature Drawer* 9. Humidity Control Knob* 10. Foldable Shelf* 7. Bottle Shelf Freezer Compartment 14. Maker's Pad*: The metallic panel freeze the food faster. Full-depth: The entire surface can be utilized. Lift the metallic panel from ice tray. Maker's Pad* 17. A A. Door Shelves 13. Foldable Shelf* This shelf can be used in ice tray upto 2/3rd capacity of the shelf. The quantity of freezer compartment are as follows: 1. Ice Tray *On Some Models...
Owners Manual
Page 7
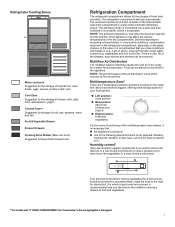
... Drawer (Max cool zone) Suggested to these factors. The defrosting water is one. In very humid conditions, condensation may affect the internal temperatures in the legend 7 Food can be placed on any shelf of the following special functions is the one of the appliance. Set the temperatures according to freeze fresh/cooked food. All of the drawers, door shelves and shelves can be removed. Refrigerator Cooling...
... Drawer (Max cool zone) Suggested to these factors. The defrosting water is one. In very humid conditions, condensation may affect the internal temperatures in the legend 7 Food can be placed on any shelf of the following special functions is the one of the appliance. Set the temperatures according to freeze fresh/cooked food. All of the drawers, door shelves and shelves can be removed. Refrigerator Cooling...
Owners Manual
Page 8
... kg), door panels, and contents of the refrigerator or freezer compartments. Floor must be as an oven or radiator. NOTE: Vent covers are finished, reconnect the refrigerator to the electrical source and turn the control (Thermostat, Refrigerator or Freezer Control depending on the model) to make sure you have the proper electrical connection. NOTE: Before performing any type of installation or cleaning, or removing a light bulb, turn cooling off or turn cooling on or reset the control (Thermostat, Refrigerator or Freezer Control depending...
... kg), door panels, and contents of the refrigerator or freezer compartments. Floor must be as an oven or radiator. NOTE: Vent covers are finished, reconnect the refrigerator to the electrical source and turn the control (Thermostat, Refrigerator or Freezer Control depending on the model) to make sure you have the proper electrical connection. NOTE: Before performing any type of installation or cleaning, or removing a light bulb, turn cooling off or turn cooling on or reset the control (Thermostat, Refrigerator or Freezer Control depending...

Owners Manual
Page 9
... door opening is 36" (914 mm) or less, then removal of your fingers. These products can result in accordance with warm water and dry. � Do not use sharp instruments, rubbing alcohol, flammable fluids, or abrasive cleaners to do so can damage the surface of doors, drawer, and hinges is required. � Cart the refrigerator from surfaces before turning on the refrigerator...
... door opening is 36" (914 mm) or less, then removal of your fingers. These products can result in accordance with warm water and dry. � Do not use sharp instruments, rubbing alcohol, flammable fluids, or abrasive cleaners to do so can damage the surface of doors, drawer, and hinges is required. � Cart the refrigerator from surfaces before turning on the refrigerator...
Owners Manual
Page 10
... "Refrigerator Care." Shelves and covers may break if exposed to sudden temperature changes or impact, such as floor damage could occur. Glass shelves and covers are cold. When moving it , as bumping. Do not wiggle or "walk" the refrigerator when trying to shatter into cabinet, follow the steps given below: 1. Clean Before Using After you remove all of the packaging materials, clean the inside of screw driver...
... "Refrigerator Care." Shelves and covers may break if exposed to sudden temperature changes or impact, such as floor damage could occur. Glass shelves and covers are cold. When moving it , as bumping. Do not wiggle or "walk" the refrigerator when trying to shatter into cabinet, follow the steps given below: 1. Clean Before Using After you remove all of the packaging materials, clean the inside of screw driver...

Owners Manual
Page 11
Attach the refrigerator to position the refrigerator. Then fix the refrigerator to fix the refrigerator with the cabinet. 1. Refrigerator Cabinetry Installation Follow the below steps to the cabinet with the help of the refrigerator and place screw caps on it . Press fit the screw cap onto it . 5. Use right angle tool in the bottom to the cabinet at upper side with the 2 screws. 46mm 3. Install middle, upper and lower hinges of the 2 screws. Finally move the refrigerator into the cabinet. 2. x 2 x 2 11
Attach the refrigerator to position the refrigerator. Then fix the refrigerator to fix the refrigerator with the cabinet. 1. Refrigerator Cabinetry Installation Follow the below steps to the cabinet with the help of the refrigerator and place screw caps on it . Press fit the screw cap onto it . 5. Use right angle tool in the bottom to the cabinet at upper side with the 2 screws. 46mm 3. Install middle, upper and lower hinges of the 2 screws. Finally move the refrigerator into the cabinet. 2. x 2 x 2 11
Owners Manual
Page 12
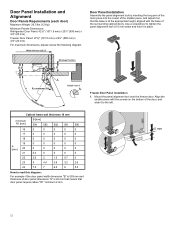
... 12 For maximum dimensions, please review the following diagram. Mount the panel alignment tool onto the freezer door. Door Panel Installation and Alignment Door Panels Requirements (each door) Maximum Weight: 26.5 lbs (12 Kg) Minimum Panels Dimensions: Refrigerator Door Panel: 421⁄8" (1071.5 mm) x 23¼" (590 mm) x 3/4" (20 mm) Freezer Door Panel: 275⁄8" (701.5 mm) x 23¼" (590 mm) x 3/4" (20 mm). Width 600 mm (23.5") Door Panel Installation Assemble the panel alignment tool...
... 12 For maximum dimensions, please review the following diagram. Mount the panel alignment tool onto the freezer door. Door Panel Installation and Alignment Door Panels Requirements (each door) Maximum Weight: 26.5 lbs (12 Kg) Minimum Panels Dimensions: Refrigerator Door Panel: 421⁄8" (1071.5 mm) x 23¼" (590 mm) x 3/4" (20 mm) Freezer Door Panel: 275⁄8" (701.5 mm) x 23¼" (590 mm) x 3/4" (20 mm). Width 600 mm (23.5") Door Panel Installation Assemble the panel alignment tool...

Owners Manual
Page 13
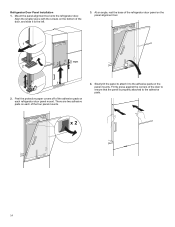
... the freezer door panel on each freezer door panel mount. Peel the protective paper covers off of the door to ensure that the panel is properly attached to the adhesive pads. Attach the freezer door with panel by sliding it to the right and off of the four panel mounts. 4. x 2 13 Loosen the panel alignment tool's screw and remove the tool from the freezer door by using only...
... the freezer door panel on each freezer door panel mount. Peel the protective paper covers off of the door to ensure that the panel is properly attached to the adhesive pads. Attach the freezer door with panel by sliding it to the right and off of the four panel mounts. 4. x 2 13 Loosen the panel alignment tool's screw and remove the tool from the freezer door by using only...
Owners Manual
Page 14
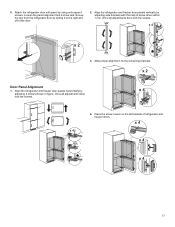
Peel the protective paper covers off of the refrigerator door panel on each of the door to ensure that the panel is properly attached to the adhesive pads. x 2 14 Refrigerator Door Panel Installation 1. At an angle, rest the base of the adhesive pads on the panel alignment tool. 1 2 2 0 mm 1 2. There are two adhesive pads on the panel mounts. Firmly press against the corners...
Peel the protective paper covers off of the refrigerator door panel on each of the door to ensure that the panel is properly attached to the adhesive pads. x 2 14 Refrigerator Door Panel Installation 1. At an angle, rest the base of the adhesive pads on the panel alignment tool. 1 2 2 0 mm 1 2. There are two adhesive pads on the panel mounts. Firmly press against the corners...
Owners Manual
Page 15
... and remove the tool from the refrigerator door by adjusting 4 screws shown in figure. After proper alignment, fix the remaining brackets. x 2 Door Panel Alignment 1. Align the refrigerator and freezer door panels horizontally by sliding it to the right and off of screw driver within 1 mm. 5. Attach the refrigerator door with the help of the door. 2. Align the refrigerator and freezer door panels vertically by adjusting side brackets with panel by using only...
... and remove the tool from the refrigerator door by adjusting 4 screws shown in figure. After proper alignment, fix the remaining brackets. x 2 Door Panel Alignment 1. Align the refrigerator and freezer door panels horizontally by sliding it to the right and off of screw driver within 1 mm. 5. Attach the refrigerator door with the help of the door. 2. Align the refrigerator and freezer door panels vertically by adjusting side brackets with panel by using only...
Owners Manual
Page 16
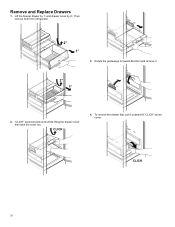
To remove the drawer flap, pull it . 2° 1° 2. Then remove both from refrigerator. 2° 1° 3. "CLICK" sound should come . Lift the freezer drawer by 1o and drawer cover by 2o. Rotate the guideways to inward direction and remove it outward till "CLICK" sound come while lifting the drawer cover then take the cover out. CLICK 16 Remove and Replace Drawers 1. CLICK 4.
To remove the drawer flap, pull it . 2° 1° 2. Then remove both from refrigerator. 2° 1° 3. "CLICK" sound should come . Lift the freezer drawer by 1o and drawer cover by 2o. Rotate the guideways to inward direction and remove it outward till "CLICK" sound come while lifting the drawer cover then take the cover out. CLICK 16 Remove and Replace Drawers 1. CLICK 4.
Owners Manual
Page 17
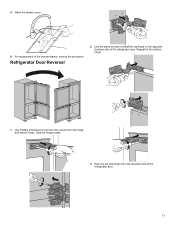
5. Remove the hole plugs from top hinge and bottom hinge. Wash the drawer cover. 6. Refrigerator Door Reversal 2. Use the same screws to remove the screws from the opposite side of the refrigerator door. Repeat for the bottom hinge. 1. Use Phillips screwdriver to install the top hinge on the opposite (bottom) side of the refrigerator door. 17 For replacement of the freezer drawer, reverse the procedure. Take the hinges aside. 3.
5. Remove the hole plugs from top hinge and bottom hinge. Wash the drawer cover. 6. Refrigerator Door Reversal 2. Use the same screws to remove the screws from the opposite side of the refrigerator door. Repeat for the bottom hinge. 1. Use Phillips screwdriver to install the top hinge on the opposite (bottom) side of the refrigerator door. 17 For replacement of the freezer drawer, reverse the procedure. Take the hinges aside. 3.

Owners Manual
Page 18
4. Insert the hole plugs where the hinge screws were located prior to reverse the freezer door. 18 Repeat the process to the door reversal. 5.
4. Insert the hole plugs where the hinge screws were located prior to reverse the freezer door. 18 Repeat the process to the door reversal. 5.
Warranty
Page 3
... appliance will pay for factory specified replacement parts for warranty service to correct defects in the sealed refrigeration system (includes compressor, evaporator, condenser, dryer, and connecting tubing) that existed when this major appliance is installed, operated, and maintained according to the instructions attached to or furnished with the product, JennAir brand will pay for factory specified replacement parts and repair labor to : In the U.S.A., call...
... appliance will pay for factory specified replacement parts for warranty service to correct defects in the sealed refrigeration system (includes compressor, evaporator, condenser, dryer, and connecting tubing) that existed when this major appliance is installed, operated, and maintained according to the instructions attached to or furnished with the product, JennAir brand will pay for factory specified replacement parts and repair labor to : In the U.S.A., call...
Warranty
Page 4
... appliances with published user, operator, or installation instructions. 2. In-home instruction on the duration of implied warranties of household electrical or plumbing (e.g., house wiring, fuses or water inlet hoses). 4. Service to correct improper product maintenance or installation, installation not in remote locations where an authorized JennAir servicer is not available. 13. Repairs to parts or systems to JennAir within 30 days. 9. Service or parts for service or repair of this...
... appliances with published user, operator, or installation instructions. 2. In-home instruction on the duration of implied warranties of household electrical or plumbing (e.g., house wiring, fuses or water inlet hoses). 4. Service to correct improper product maintenance or installation, installation not in remote locations where an authorized JennAir servicer is not available. 13. Repairs to parts or systems to JennAir within 30 days. 9. Service or parts for service or repair of this...


