
Instructions
Page 2
... equipment off completely. For U.S.A. This equipment has been tested and found to correct the interference by a newspaper or cloth, etc., the heat may not be remote controlled. This equipment generates, uses and can be able to the presence of the following measures: Reorient or relocate the receiving antenna. Increase the separation...
... equipment off completely. For U.S.A. This equipment has been tested and found to correct the interference by a newspaper or cloth, etc., the heat may not be remote controlled. This equipment generates, uses and can be able to the presence of the following measures: Reorient or relocate the receiving antenna. Increase the separation...
Instructions
Page 3
...model ONLY) About this manual 1 Precautions 1 Before operation 2 About discs 2 Names of parts and controls 3 Preparations 4 Connections 4 Using the remote control unit 7 Basic playback 8 Turning the player on travel or otherwise for Parental Lock...........32 Appendix B: Table of languages and their abbreviations ......... the plug from the wall outlet, then consult your dealer immediately. • Audio/video cable (Yellow/White/Red) (× 1) • Remote control unit (× 1) • R6P(SUM-3)/AA(15F) battery (× 2) • AC power plug adaptor (× 1) (for each...
...model ONLY) About this manual 1 Precautions 1 Before operation 2 About discs 2 Names of parts and controls 3 Preparations 4 Connections 4 Using the remote control unit 7 Basic playback 8 Turning the player on travel or otherwise for Parental Lock...........32 Appendix B: Table of languages and their abbreviations ......... the plug from the wall outlet, then consult your dealer immediately. • Audio/video cable (Yellow/White/Red) (× 1) • Remote control unit (× 1) • R6P(SUM-3)/AA(15F) battery (× 2) • AC power plug adaptor (× 1) (for each...
Instructions
Page 5
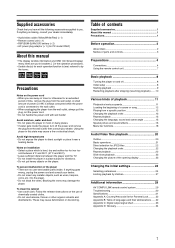
..., 15, 18) _ ¢/NEXT button (11, 12, 21) + 8 button (9, 11, 21) ¡ ¡/SLOW+ button (11) REPEAT button (15) £ VFP - Remote sensor (7) = QUICK PLAYBACK button (11) Display window 12 3 4 Remote control unit $ 1 OPEN/ STANDBY/ON CLOSE DISPLAY 2 % 1 2 3 4 5 6 3 7 8 9 10 0 +10 4 5 6 RETURN TITLE/GROUP CANCEL ^ OP MENU TH/LUISMTBNAIML ENU & * ( ENTER 7 8 SET UP...
..., 15, 18) _ ¢/NEXT button (11, 12, 21) + 8 button (9, 11, 21) ¡ ¡/SLOW+ button (11) REPEAT button (15) £ VFP - Remote sensor (7) = QUICK PLAYBACK button (11) Display window 12 3 4 Remote control unit $ 1 OPEN/ STANDBY/ON CLOSE DISPLAY 2 % 1 2 3 4 5 6 3 7 8 9 10 0 +10 4 5 6 RETURN TITLE/GROUP CANCEL ^ OP MENU TH/LUISMTBNAIML ENU & * ( ENTER 7 8 SET UP...

Instructions
Page 6
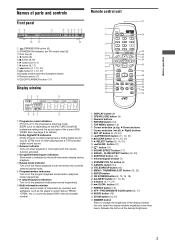
...White Red TV IN VIDEO LEFT AUDIO RIGHT Set the VIDEO SIGNAL SELECTOR to "480i." Audio cable (not supplied) 480p 480i REMOTE VISDEELOESCITGONRAL COMPAUV LINK Red VIDEO Y COMPONENT S-VIDEO PB PR VIDEO OUT LEFT PDCIGMI/TSATLROEUATM RIGHT AUDIO OUT COAXIAL Red White 4 ...Audio/video cable (supplied) 480p 480i REMOTE VISDEELOESCITGONRAL COMPAUV LINK Yellow VIDEO Y COMPONENT S-VIDEO PB PR VIDEO OUT LEFT PDCIGMI/TSATLROEUATM RIGHT AUDIO OUT COAXIAL Red White B ...
...White Red TV IN VIDEO LEFT AUDIO RIGHT Set the VIDEO SIGNAL SELECTOR to "480i." Audio cable (not supplied) 480p 480i REMOTE VISDEELOESCITGONRAL COMPAUV LINK Red VIDEO Y COMPONENT S-VIDEO PB PR VIDEO OUT LEFT PDCIGMI/TSATLROEUATM RIGHT AUDIO OUT COAXIAL Red White 4 ...Audio/video cable (supplied) 480p 480i REMOTE VISDEELOESCITGONRAL COMPAUV LINK Yellow VIDEO Y COMPONENT S-VIDEO PB PR VIDEO OUT LEFT PDCIGMI/TSATLROEUATM RIGHT AUDIO OUT COAXIAL Red White B ...
Instructions
Page 7
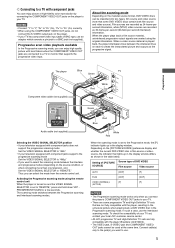
... in the display window. Thus you can enjoy high quality picture with less flickers when the COMPONENT VIDEO OUT jacks are created using the remote control unit When the player is turned on the [PICTURE SOURCE] preference display and whether the current DVD VIDEO disc is played back,...a BNC jack (not supplied). In such a case, use the Interlaced scanning mode. When the scanning mode is set to your local JVC customer service center. • All JVC progressive TV and High-Definition TV sets are fully compatible with the player (Example: AV-61S902). • The VIDEO jack, S-VIDEO ...
... in the display window. Thus you can enjoy high quality picture with less flickers when the COMPONENT VIDEO OUT jacks are created using the remote control unit When the player is turned on the [PICTURE SOURCE] preference display and whether the current DVD VIDEO disc is played back,...a BNC jack (not supplied). In such a case, use the Interlaced scanning mode. When the scanning mode is set to your local JVC customer service center. • All JVC progressive TV and High-Definition TV sets are fully compatible with the player (Example: AV-61S902). • The VIDEO jack, S-VIDEO ...
Instructions
Page 8
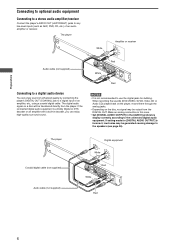
... Coaxial digital cable (not supplied) Audio cable (not supplied) IN DIGITAL White Digital equipment IN LEFT DVD RIGHT 480p 480i REMOTE VISDEELOESCITGONRAL COMPAUV LINK White Red VIDEO Y COMPONENT S-VIDEO PB PR VIDEO OUT LEFT PDCIGMI/TSATLROEUATM RIGHT AUDIO OUT COAXIAL Red ...the connected digital audio equipment. The player Audio cable (not supplied) White Amplifier or receiver IN LEFT AUDIO RIGHT 480p 480i REMOTE VISDEELOESCITGONRAL COMPAUV LINK White Red VIDEO Y COMPONENT S-VIDEO PB PR VIDEO OUT LEFT PDCIGMI/TSATLROEUATM RIGHT AUDIO OUT COAXIAL Red ...
... Coaxial digital cable (not supplied) Audio cable (not supplied) IN DIGITAL White Digital equipment IN LEFT DVD RIGHT 480p 480i REMOTE VISDEELOESCITGONRAL COMPAUV LINK White Red VIDEO Y COMPONENT S-VIDEO PB PR VIDEO OUT LEFT PDCIGMI/TSATLROEUATM RIGHT AUDIO OUT COAXIAL Red ...the connected digital audio equipment. The player Audio cable (not supplied) White Amplifier or receiver IN LEFT AUDIO RIGHT 480p 480i REMOTE VISDEELOESCITGONRAL COMPAUV LINK White Red VIDEO Y COMPONENT S-VIDEO PB PR VIDEO OUT LEFT PDCIGMI/TSATLROEUATM RIGHT AUDIO OUT COAXIAL Red ...

Instructions
Page 9
...a new one. If you are not going to the polarity markings ("+" and "-") inside the compartment. If the functions of the remote control unit toward the remote sensor as directly as this may damage the cord and cause fire, electric shock, or other accidents. if you operate it from a... diagonal position, the operating range (approx. 5 m) may leak. • Remove the batteries from the remote control unit if it is damaged, consult a dealer and have been made, connect the AC power plug to use . before cleaning the player. - Then...
...a new one. If you are not going to the polarity markings ("+" and "-") inside the compartment. If the functions of the remote control unit toward the remote sensor as directly as this may damage the cord and cause fire, electric shock, or other accidents. if you operate it from a... diagonal position, the operating range (approx. 5 m) may leak. • Remove the batteries from the remote control unit if it is damaged, consult a dealer and have been made, connect the AC power plug to use . before cleaning the player. - Then...

Instructions
Page 10
... options 2 Press 5/∞ to select the desired monitor type. The second page is shown, in red during standby, goes off Press STANDBY/ON on the remote control unit or press STANDBY/ON on and off . from the AC power source as long as it is not displayed. Turning the player on...
... options 2 Press 5/∞ to select the desired monitor type. The second page is shown, in red during standby, goes off Press STANDBY/ON on the remote control unit or press STANDBY/ON on and off . from the AC power source as long as it is not displayed. Turning the player on...
Instructions
Page 11
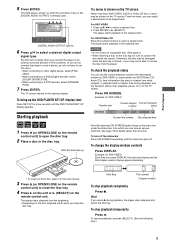
.../chapter number display appear alternately. • To insert an 8-cm disc, place it in the inner recess. 3 Press 0 (or OPEN/CLOSE on the remote control unit) to a DTS decoder, select [STREAM/ PCM]. 7 Press ENTER. For SVCD/Video CD Press the numeric buttons to the opening display. NOTES ...• Do not insert an unplayable disc. (See page 2.) • When inserting a disc on the remote control unit) to remove the disc from the player. Example: for DVD VIDEO Transfer rate Current chapter Current transport number status 8.5Mbps TITLE 33 CHAP...
.../chapter number display appear alternately. • To insert an 8-cm disc, place it in the inner recess. 3 Press 0 (or OPEN/CLOSE on the remote control unit) to a DTS decoder, select [STREAM/ PCM]. 7 Press ENTER. For SVCD/Video CD Press the numeric buttons to the opening display. NOTES ...• Do not insert an unplayable disc. (See page 2.) • When inserting a disc on the remote control unit) to remove the disc from the player. Example: for DVD VIDEO Transfer rate Current chapter Current transport number status 8.5Mbps TITLE 33 CHAP...

Instructions
Page 13
... play back in stereo linear PCM format. • Depending on a disc, the sound may not work with sound During playback, press QUICK PLAYBACK on the remote control unit. To play reverse slow motion, for an SVCD and Video CD. The disc is not muted, and the subtitle does not go off...
... play back in stereo linear PCM format. • Depending on a disc, the sound may not work with sound During playback, press QUICK PLAYBACK on the remote control unit. To play reverse slow motion, for an SVCD and Video CD. The disc is not muted, and the subtitle does not go off...
Instructions
Page 28
..., a 20 or 24 bit digital signal may be output. • When playing a DVD VIDEO or Audio CD disc with DTS, use the JVC original image as the opening display. ON SCREEN GUIDE The player can display "on-screen guide" icons or characters on -screen guide is happening to... initial settings To change and set the opening display" on page 23. To register a new image, see "How to set preferences" on the remote control unit brings up the PARENTAL LOCK display shown below. Setting options DOLBY SURROUND, STEREO [DOLBY SURROUND]: select when listening to multichannel surround audio with...
..., a 20 or 24 bit digital signal may be output. • When playing a DVD VIDEO or Audio CD disc with DTS, use the JVC original image as the opening display. ON SCREEN GUIDE The player can display "on-screen guide" icons or characters on -screen guide is happening to... initial settings To change and set the opening display" on page 23. To register a new image, see "How to set preferences" on the remote control unit brings up the PARENTAL LOCK display shown below. Setting options DOLBY SURROUND, STEREO [DOLBY SURROUND]: select when listening to multichannel surround audio with...
Instructions
Page 31
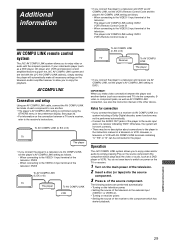
...COMPU LINK connection, see also the instruction manual of the television: The player's AV COMPU LINK setting: DVD3 VCR's Remote Control Code: A AV COMPU LINK remote control system The JVC AV COMPU LINK system allows you connect the player to a receiver via AV COMPU LINK in a system including a ...the television. 2 Insert a disc (or tape) into the source component. 3 Press 3 of the television: The player's AV COMPU LINK setting: DVD2 VCR's Remote Control Code: B - See page 26. • For information on the connection between the player and another . • The player's AV COMPU LINK setting...
...COMPU LINK connection, see also the instruction manual of the television: The player's AV COMPU LINK setting: DVD3 VCR's Remote Control Code: A AV COMPU LINK remote control system The JVC AV COMPU LINK system allows you connect the player to a receiver via AV COMPU LINK in a system including a ...the television. 2 Insert a disc (or tape) into the source component. 3 Press 3 of the television: The player's AV COMPU LINK setting: DVD2 VCR's Remote Control Code: B - See page 26. • For information on the connection between the player and another . • The player's AV COMPU LINK setting...
Instructions
Page 32
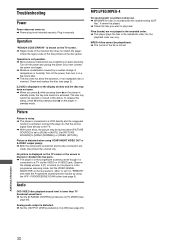
... displayed on the display window and the disc tray does not open. \ When you want to a VCR directly and the copyguard function is connected to "REMOTE" and make the Progressive scanning mode inactive by a sudden change of the inserted disc does not match the player. Picture is in standby mode, the...
... displayed on the display window and the disc tray does not open. \ When you want to a VCR directly and the copyguard function is connected to "REMOTE" and make the Progressive scanning mode inactive by a sudden change of the inserted disc does not match the player. Picture is in standby mode, the...


