Instructions
Page 2
... servicing to rain or moisture. F button! (XV-THM606/ XV-THM603/ XV-THM505/ XV-THM501/ XV-THM303/ XV-THM301) Disconnect the mains plug to the subwoofer is turned on. CAUTION (SP-PWM606/ SP-PWM603/ SP-PWM505/ SP-PWM501/ SP-PWM303/ SP-PWM301) The power supply to shut the power off completely...lamp goes off . The F button in any position does not disconnect the mains line. • When the system is on standby, the STANDBY lamp lights red. • When the system is turned on the subwoofer lights green when the power is linked to beam. 4. The power can be remote controlled. The POWER ON...
... servicing to rain or moisture. F button! (XV-THM606/ XV-THM603/ XV-THM505/ XV-THM501/ XV-THM303/ XV-THM301) Disconnect the mains plug to the subwoofer is turned on. CAUTION (SP-PWM606/ SP-PWM603/ SP-PWM505/ SP-PWM501/ SP-PWM303/ SP-PWM301) The power supply to shut the power off completely...lamp goes off . The F button in any position does not disconnect the mains line. • When the system is on standby, the STANDBY lamp lights red. • When the system is turned on the subwoofer lights green when the power is linked to beam. 4. The power can be remote controlled. The POWER ON...
Instructions
Page 4
...satellite (front, center, surround) speakers 10 Speaker layout 14 Connecting a TV 14 Connecting the powered subwoofer 15 Connecting to an analog component 15 Connecting to a digital component 15 Connecting the power cord 15... DBS tuner or CATV converter 16 Operating the VCR 17 Basic operations 18 Turning the system on/off 18 Selecting the source to play 19 Adjusting the volume [VOLUME 19 Listening...Random Playback 35 Repeat Playback 35 Tray lock 36 Sound and other settings 37 Setting DVD preferences 38 Using the setup menus 38 Menu description 38 Tuner operations 42 Manual ...
...satellite (front, center, surround) speakers 10 Speaker layout 14 Connecting a TV 14 Connecting the powered subwoofer 15 Connecting to an analog component 15 Connecting to a digital component 15 Connecting the power cord 15... DBS tuner or CATV converter 16 Operating the VCR 17 Basic operations 18 Turning the system on/off 18 Selecting the source to play 19 Adjusting the volume [VOLUME 19 Listening...Random Playback 35 Repeat Playback 35 Tray lock 36 Sound and other settings 37 Setting DVD preferences 38 Using the setup menus 38 Menu description 38 Tuner operations 42 Manual ...
Instructions
Page 8
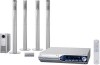
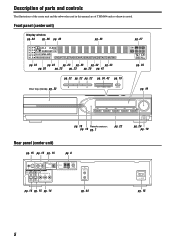
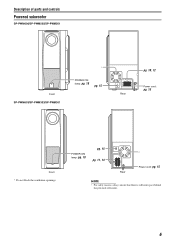
Front panel (center unit) Display window pg. 24 pg. 26 pg. 43 pg. 23 pg. 27 pg. 33 pg. 23 pg. 23 pg. 23 pg. 42 pg. 43 pg. 20 pg. 23 pg. 23 pg. 25 pg. 42 pg. 22 pg. 22 pg. 22 pg. 24, 42 pg. 19 Disc tray (inside): pg. 22 pg. 35 pg. 19 Rear panel (center unit) pg. 15 pg. 15 pg. 15 pg. 18 Remote sensor: pg. 18 pg. 7 pg. 22 pg. 8 pg. 24 pg. 19 pg. 14 pg. 15 pg. 14 pg. 44 pg. 15 5 Description of parts and controls The illustrations of the center unit and the subwoofer used in this manual are of TH-M606 unless otherwise noted.
Front panel (center unit) Display window pg. 24 pg. 26 pg. 43 pg. 23 pg. 27 pg. 33 pg. 23 pg. 23 pg. 23 pg. 42 pg. 43 pg. 20 pg. 23 pg. 23 pg. 25 pg. 42 pg. 22 pg. 22 pg. 22 pg. 24, 42 pg. 19 Disc tray (inside): pg. 22 pg. 35 pg. 19 Rear panel (center unit) pg. 15 pg. 15 pg. 15 pg. 18 Remote sensor: pg. 18 pg. 7 pg. 22 pg. 8 pg. 24 pg. 19 pg. 14 pg. 15 pg. 14 pg. 44 pg. 15 5 Description of parts and controls The illustrations of the center unit and the subwoofer used in this manual are of TH-M606 unless otherwise noted.
Instructions
Page 9
Description of parts and controls Powered subwoofer SP-PWM606/SP-PWM505/SP-PWM501 Front SP-PWM603/SP-PWM303/SP-PWM301 POWER ON lamp: pg. 18 pg. 15 Rear pg. 10, 12 Power cord: pg. 15 Front * Do not block the ventilation openings. POWER ON lamp: pg. 18 pg. 15 pg. 11, 13 Rear Power cord: pg. 15 NOTE • For safety reasons, always ensure that there is sufficient space behind the powered subwoofer. 6
Description of parts and controls Powered subwoofer SP-PWM606/SP-PWM505/SP-PWM501 Front SP-PWM603/SP-PWM303/SP-PWM301 POWER ON lamp: pg. 18 pg. 15 Rear pg. 10, 12 Power cord: pg. 15 Front * Do not block the ventilation openings. POWER ON lamp: pg. 18 pg. 15 pg. 11, 13 Rear Power cord: pg. 15 NOTE • For safety reasons, always ensure that there is sufficient space behind the powered subwoofer. 6

Instructions
Page 13
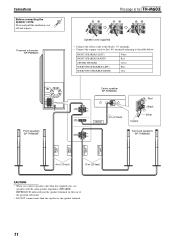
Powered subwoofer SP-PWM606 Speaker cord (supplied) • Connect the silver cords to the black (r) terminals. • Connect the copper cords to the (q) terminals referring to the ... other than the supplied ones, use speakers with the same speaker impedance (SPEAKER IMPEDANCE) indicated near the speaker terminals on the rear of the powered subwoofer. • DO NOT connect more than one speaker to one speaker terminal. 10 m (33 feet) Copper Red Black Silver Continued on next page 10 Connections...
Powered subwoofer SP-PWM606 Speaker cord (supplied) • Connect the silver cords to the black (r) terminals. • Connect the copper cords to the (q) terminals referring to the ... other than the supplied ones, use speakers with the same speaker impedance (SPEAKER IMPEDANCE) indicated near the speaker terminals on the rear of the powered subwoofer. • DO NOT connect more than one speaker to one speaker terminal. 10 m (33 feet) Copper Red Black Silver Continued on next page 10 Connections...
Instructions
Page 14
Powered subwoofer SP-PWM603 Front speakers SP-THM606F This page is for Speaker cord (supplied) • Connect the silver cords to the black (r) terminals. • Connect the ... other than the supplied ones, use speakers with the same speaker impedance (SPEAKER IMPEDANCE) indicated near the speaker terminals on the rear of the powered subwoofer. • DO NOT connect more than one speaker to one speaker terminal. 11 Twist and pull the insulation coat off and remove. Connections Before connecting...
Powered subwoofer SP-PWM603 Front speakers SP-THM606F This page is for Speaker cord (supplied) • Connect the silver cords to the black (r) terminals. • Connect the ... other than the supplied ones, use speakers with the same speaker impedance (SPEAKER IMPEDANCE) indicated near the speaker terminals on the rear of the powered subwoofer. • DO NOT connect more than one speaker to one speaker terminal. 11 Twist and pull the insulation coat off and remove. Connections Before connecting...
Instructions
Page 15
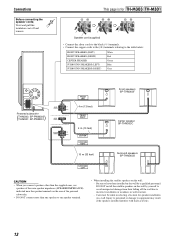
Powered subwoofer ( ) TH-M505: SP-PWM505 TH-M501: SP-PWM501 Front speakers ( ) TH-M505: SP-THM505F*1 TH-M501: SP-THM303F*2 This page is for Speaker cord (supplied) •... installation or weakness in wall structure. • Care must be taken in selecting a location for TH-M505. Injury to personnel or damage to have them installed on the wall by yourself to avoid unexpected... Twist and pull the insulation coat off the wall due to their speaker unit instead of the powered subwoofer. • DO NOT connect more than the supplied ones, use speakers of the same speaker impedance ...
Powered subwoofer ( ) TH-M505: SP-PWM505 TH-M501: SP-PWM501 Front speakers ( ) TH-M505: SP-THM505F*1 TH-M501: SP-THM303F*2 This page is for Speaker cord (supplied) •... installation or weakness in wall structure. • Care must be taken in selecting a location for TH-M505. Injury to personnel or damage to have them installed on the wall by yourself to avoid unexpected... Twist and pull the insulation coat off the wall due to their speaker unit instead of the powered subwoofer. • DO NOT connect more than the supplied ones, use speakers of the same speaker impedance ...
Instructions
Page 16
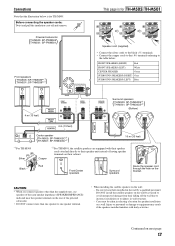
... table below: FRONT SPEAKERS (LEFT) FRONT SPEAKERS (RIGHT) CENTER SPEAKER SURROUND SPEAKERS (LEFT) SURROUND SPEAKERS (RIGHT) White Red Green Blue Gray Powered subwoofer ( ) TH-M303: SP-PWM303 TH-M301: SP-PWM301 4 m (13 feet) 4 m (13 feet) Front speakers SP-THM303F Center speaker SP-THM303C 10 m (33 feet)... the supplied ones, use speakers of the same speaker impedance (SPEAKER IMPEDANCE) indicated near the speaker terminals on the rear of the powered subwoofer. • DO NOT connect more than one speaker to one speaker terminal. • When installing the satellite speakers on the wall;...
... table below: FRONT SPEAKERS (LEFT) FRONT SPEAKERS (RIGHT) CENTER SPEAKER SURROUND SPEAKERS (LEFT) SURROUND SPEAKERS (RIGHT) White Red Green Blue Gray Powered subwoofer ( ) TH-M303: SP-PWM303 TH-M301: SP-PWM301 4 m (13 feet) 4 m (13 feet) Front speakers SP-THM303F Center speaker SP-THM303C 10 m (33 feet)... the supplied ones, use speakers of the same speaker impedance (SPEAKER IMPEDANCE) indicated near the speaker terminals on the rear of the powered subwoofer. • DO NOT connect more than one speaker to one speaker terminal. • When installing the satellite speakers on the wall;...
Instructions
Page 17
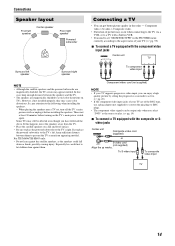
...'s right. Especially be affected even though you have followed the above. To S-video input To composite video input TV 14 If you select "DVD" as the speakers could fall down or break, possibly causing injury. Some TVs may occur when connecting to the TV via a VCR, or...the order - For TH-M606/TH-M603 only: • Do not lean against them to play. (A pg. 19) 7 To connect a TV equipped with the component video input jacks Center unit TV Surround left speaker Surround right speaker NOTE • Although the satellite speakers and the powered subwoofer are magnetically shielded, ...
...'s right. Especially be affected even though you have followed the above. To S-video input To composite video input TV 14 If you select "DVD" as the speakers could fall down or break, possibly causing injury. Some TVs may occur when connecting to the TV via a VCR, or...the order - For TH-M606/TH-M603 only: • Do not lean against them to play. (A pg. 19) 7 To connect a TV equipped with the component video input jacks Center unit TV Surround left speaker Surround right speaker NOTE • Although the satellite speakers and the powered subwoofer are magnetically shielded, ...
Instructions
Page 18
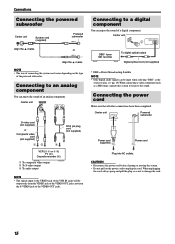
...Connecting to unplug the cord. When unplugging the cord, always grasp and pull the plug so as a DBS tuner, operate this system to listen to damage the cord. 15 Connecting the power cord Make sure that all other connections have been completed. Center unit...connecting a video component such as not to the sound. Center unit Powered subwoofer Power cord (supplied) Power cord Plug into AC outlets. Connections Connecting the powered subwoofer Center unit System cord (supplied) Align the 5 marks. Powered subwoofer or Align the 5 marks. NOTE • The way of the powered...
...Connecting to unplug the cord. When unplugging the cord, always grasp and pull the plug so as a DBS tuner, operate this system to listen to damage the cord. 15 Connecting the power cord Make sure that all other connections have been completed. Center unit...connecting a video component such as not to the sound. Center unit Powered subwoofer Power cord (supplied) Power cord Plug into AC outlets. Connections Connecting the powered subwoofer Center unit System cord (supplied) Align the 5 marks. Powered subwoofer or Align the 5 marks. NOTE • The way of the powered...
Instructions
Page 21
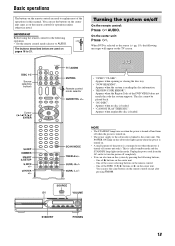
...the power is turned on. • The power supply to 21. You can also turn the power off (center unit only). Turning the system on pages 18 to the subwoofer is loaded. The buttons described below are used on /off On the remote control: Press F AUDIO. On the center unit: Press F. ... when no disc is loaded. • "CANNOT PLAY THIS DISC": Appears when unplayable disc is linked to explain most of the DVD VIDEO does not match the code the system supports. When DVD is turned on. • A small amount of the DISC (1-5) 3 buttons or 3 on the center unit same as the source ...
...the power is turned on. • The power supply to 21. You can also turn the power off (center unit only). Turning the system on pages 18 to the subwoofer is loaded. The buttons described below are used on /off On the remote control: Press F AUDIO. On the center unit: Press F. ... when no disc is loaded. • "CANNOT PLAY THIS DISC": Appears when unplayable disc is linked to explain most of the DVD VIDEO does not match the code the system supports. When DVD is turned on. • A small amount of the DISC (1-5) 3 buttons or 3 on the center unit same as the source ...

Instructions
Page 22
... the headphones. Headphone mode When using the headphones, the following : • Press MUTING again. • Press AUDIO VOL +/- (or turn the subwoofer's power off the sound temporarily [MUTING] Press MUTING. On the remote control: Press AUDIO VOL + or -. VCR: To select the source from ...the display window. Adjusting the brightness of the source selecting buttons (DVD, FM/AM, VCR or DBS). Basic operations See page 18 for a few seconds. In this case, "L/R ONLY" appears on the center unit, the system automatically cancels the surround mode (A pg. 26) currently selected, ...
... the headphones. Headphone mode When using the headphones, the following : • Press MUTING again. • Press AUDIO VOL +/- (or turn the subwoofer's power off the sound temporarily [MUTING] Press MUTING. On the remote control: Press AUDIO VOL + or -. VCR: To select the source from ...the display window. Adjusting the brightness of the source selecting buttons (DVD, FM/AM, VCR or DBS). Basic operations See page 18 for a few seconds. In this case, "L/R ONLY" appears on the center unit, the system automatically cancels the surround mode (A pg. 26) currently selected, ...

Instructions
Page 23
... Timer [SLEEP] The system turns off automatically when the specified period of the subwoofer and center/surround speakers [SUBWFR, CENTER, SURR L/R] Press S.WFR +/- to adjust the surround right speaker. to adjust the subwoofer. You can get better...JVC customer service center. • All JVC progressive TVs and High-Definition TVs are some progressive TVs and High-Definition TVs that the center unit is displayed. Basic operations See page 18 for 2 seconds. Press SLEEP. Each time you press ENTER, this system, resulting in an unnatural picture when playing back a DVD...
... Timer [SLEEP] The system turns off automatically when the specified period of the subwoofer and center/surround speakers [SUBWFR, CENTER, SURR L/R] Press S.WFR +/- to adjust the surround right speaker. to adjust the subwoofer. You can get better...JVC customer service center. • All JVC progressive TVs and High-Definition TVs are some progressive TVs and High-Definition TVs that the center unit is displayed. Basic operations See page 18 for 2 seconds. Press SLEEP. Each time you press ENTER, this system, resulting in an unnatural picture when playing back a DVD...

Instructions
Page 24
...• When you listen to the sound. 2 Press and hold SMART S.SETUP. three times, set the subwoofer's output level (LEVEL) manually. (A pg. 20 or 39) • In step 2, "SW ERROR".... 21 When "FAILED !" In such a case, follow the instructions that "COMPLETED !" The system detects your position where you change the positioning of the speakers or listener, or replace the supplied... speakers with other ones, perform Smart Surround Setup again. 7 While DVD is selected as "FAILED !" appears on the TV screen, then press SMART S.SETUP. NOTE &#...
...• When you listen to the sound. 2 Press and hold SMART S.SETUP. three times, set the subwoofer's output level (LEVEL) manually. (A pg. 20 or 39) • In step 2, "SW ERROR".... 21 When "FAILED !" In such a case, follow the instructions that "COMPLETED !" The system detects your position where you change the positioning of the speakers or listener, or replace the supplied... speakers with other ones, perform Smart Surround Setup again. 7 While DVD is selected as "FAILED !" appears on the TV screen, then press SMART S.SETUP. NOTE &#...

Instructions
Page 42
... depends on how DVDs are recorded on a disc, you can select which files to play. SETTING) 7 Level menu (LEVEL) CENTER SPEAKER/SURROUND RIGHT SPEAKER/ SURROUND LEFT SPEAKER/SUBWOOFER While monitoring the test tone, adjust the center and surround speakers volume as much as the surround mode. (A pg. 26) 39 TEST ... the beginning) NOTE • Before you turn on the test tone, be sure to select AUTO SURR as that of the front speakers. This system recognizes the source type (video or film) of the current disc according to the disc information. • If the playback picture is unclear or...
... depends on how DVDs are recorded on a disc, you can select which files to play. SETTING) 7 Level menu (LEVEL) CENTER SPEAKER/SURROUND RIGHT SPEAKER/ SURROUND LEFT SPEAKER/SUBWOOFER While monitoring the test tone, adjust the center and surround speakers volume as much as the surround mode. (A pg. 26) 39 TEST ... the beginning) NOTE • Before you turn on the test tone, be sure to select AUTO SURR as that of the front speakers. This system recognizes the source type (video or film) of the current disc according to the disc information. • If the playback picture is unclear or...

Instructions
Page 43
...the changes you cannot select an item other family members. • This setting takes effect only for DVDs containing the Parental Lock level information - Setting DVD preferences 7 Distance menu (DISTANCE) Example: Center speaker Subwoofer Front left Front right 3.0 m 2.7 m 2.4 m 2.1 m Surround left Surround right In this case... Lock setting mode after entering your resident. (A pg. 41) SET LEVEL Select this when you set the distance of a DVD VIDEO containing violent scenes that is not suitable for your password. SETTING menu. : Other setting menu (OTHERS) 7 RESUME You...
...the changes you cannot select an item other family members. • This setting takes effect only for DVDs containing the Parental Lock level information - Setting DVD preferences 7 Distance menu (DISTANCE) Example: Center speaker Subwoofer Front left Front right 3.0 m 2.7 m 2.4 m 2.1 m Surround left Surround right In this case... Lock setting mode after entering your resident. (A pg. 41) SET LEVEL Select this when you set the distance of a DVD VIDEO containing violent scenes that is not suitable for your password. SETTING menu. : Other setting menu (OTHERS) 7 RESUME You...

Instructions
Page 49
...Corresponding to Linear PCM, Dolby Digital, and DTS Digital Surround (with sampling frequency - 32 kHz, 44.1 kHz, 48 kHz) Video section Video System: NTSC Horizontal Resolution: 500 lines Signal-to-Noise Ratio: 64 dB Video output level Composite: 1.0 V(p-p)/75 C S-video-Y: 1.0 V(p-p)/75 C...(W M H M D): 400 mm M 85 mm M 380 mm (15-3/4 inches M 3-3/8 inches M 15 inches) Mass: 4.3 kg (9.5 lbs) 7 Subwoofer (SP-PWM606) Amplifier section Front/Center/Surround: Subwoofer: 140 W per channel, RMS at 4 C (Front) at 1 kHz, with 10 % total harmonic distortion. 300 W, RMS at 4 C at 100 ...
...Corresponding to Linear PCM, Dolby Digital, and DTS Digital Surround (with sampling frequency - 32 kHz, 44.1 kHz, 48 kHz) Video section Video System: NTSC Horizontal Resolution: 500 lines Signal-to-Noise Ratio: 64 dB Video output level Composite: 1.0 V(p-p)/75 C S-video-Y: 1.0 V(p-p)/75 C...(W M H M D): 400 mm M 85 mm M 380 mm (15-3/4 inches M 3-3/8 inches M 15 inches) Mass: 4.3 kg (9.5 lbs) 7 Subwoofer (SP-PWM606) Amplifier section Front/Center/Surround: Subwoofer: 140 W per channel, RMS at 4 C (Front) at 1 kHz, with 10 % total harmonic distortion. 300 W, RMS at 4 C at 100 ...


