
Instructions
Page 4
...FM and AM antennas 7 Connecting the satellite (front, center, surround) speakers ..... 8 Speaker layout 12 Connecting a TV 12 Connecting the powered subwoofer 13 Connecting to an analog component 13 Connecting to a digital component 13 Connecting the power cord 13 Operating external components with the remote control ... [MUTING 17 Adjusting the brightness of the indications [DIMMER] .......17 Sleep Timer [SLEEP 18 Adjusting the output level of the subwoofer and speakers ..18 Adjusting the treble sound [TREBLE 18 Adjusting the bass sound [BASS 18 Changing the scan mode 18 Optimizing ...
...FM and AM antennas 7 Connecting the satellite (front, center, surround) speakers ..... 8 Speaker layout 12 Connecting a TV 12 Connecting the powered subwoofer 13 Connecting to an analog component 13 Connecting to a digital component 13 Connecting the power cord 13 Operating external components with the remote control ... [MUTING 17 Adjusting the brightness of the indications [DIMMER] .......17 Sleep Timer [SLEEP 18 Adjusting the output level of the subwoofer and speakers ..18 Adjusting the treble sound [TREBLE 18 Adjusting the bass sound [BASS 18 Changing the scan mode 18 Optimizing ...

Instructions
Page 8
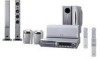
Description of parts and controls Powered subwoofer SP-PWC7/SP-PWC5 Note that there is for SP-PWC5. Front SP-PWC6/SP-PWC4/SP-PWC3 POWER ON lamp: pg. 16 pg. 13 pg. 11 3Ω 16Ω Rear Power cord: pg. 13 pg. 13 Front pg. 11 POWER ON lamp: pg. 16 CAUTION: SPEAKER IMPEDANCE 4Ω 16Ω Rear NOTE • For safety reasons, always ensure that the illustration below is sufficient space behind the powered subwoofer. * Do not block the ventilation openings. Power cord: pg. 13 5
Description of parts and controls Powered subwoofer SP-PWC7/SP-PWC5 Note that there is for SP-PWC5. Front SP-PWC6/SP-PWC4/SP-PWC3 POWER ON lamp: pg. 16 pg. 13 pg. 11 3Ω 16Ω Rear Power cord: pg. 13 pg. 13 Front pg. 11 POWER ON lamp: pg. 16 CAUTION: SPEAKER IMPEDANCE 4Ω 16Ω Rear NOTE • For safety reasons, always ensure that the illustration below is sufficient space behind the powered subwoofer. * Do not block the ventilation openings. Power cord: pg. 13 5

Instructions
Page 14
...buildup. (For TH-C7, TH-C6 and TH-C5) • When holding a speaker, always grasp the lower portion. • Do not lean against them. 11 Powered subwoofer TH-C7: SP-PWC7 TH-C6: SP-PWC6 TH-C5: SP-PWC5 TH-C4: SP-PWC4 TH-C3: SP-PWC3 Front speakers TH-C7: SP-THC7F TH-C6: SP-THC6F TH-C5: SP-THC5F TH-C4: SP...-THC4F TH-C3: SP-THC3F Speaker cord • Connect the black cords to...
...buildup. (For TH-C7, TH-C6 and TH-C5) • When holding a speaker, always grasp the lower portion. • Do not lean against them. 11 Powered subwoofer TH-C7: SP-PWC7 TH-C6: SP-PWC6 TH-C5: SP-PWC5 TH-C4: SP-PWC4 TH-C3: SP-PWC3 Front speakers TH-C7: SP-THC7F TH-C6: SP-THC6F TH-C5: SP-THC5F TH-C4: SP...-THC4F TH-C3: SP-THC3F Speaker cord • Connect the black cords to...

Instructions
Page 15
If this , do not place the speaker nearby the TV or monitor. • Be sure to place the powered subwoofer to play. (A pg. 17) 7 To connect a TV equipped with the composite or Svideo jacks Center unit Composite video cord (supplied) or S-video cord (not supplied...on a flat and level surface. • The front and center speakers are not magnetically shielded. If you place the powered subwoofer to the TV's left speaker Center speaker Front right speaker Powered subwoofer Connecting a TV • You can be affected even though you select "DVD" as the source to the TV's right.
If this , do not place the speaker nearby the TV or monitor. • Be sure to place the powered subwoofer to play. (A pg. 17) 7 To connect a TV equipped with the composite or Svideo jacks Center unit Composite video cord (supplied) or S-video cord (not supplied...on a flat and level surface. • The front and center speakers are not magnetically shielded. If you place the powered subwoofer to the TV's left speaker Center speaker Front right speaker Powered subwoofer Connecting a TV • You can be affected even though you select "DVD" as the source to the TV's right.

Instructions
Page 16
...enjoy the sound of an analog component. Connecting to unplug the cord. Center unit Powered subwoofer Power cord (Supplied) Power cord Plug into AC outlets. Connecting the powered subwoofer Center unit System cord (supplied) Powered subwoofer Connecting to the sound. or Align the 5 marks. DBS* tuner MD player To... digital audio signals can be output only from the VIDEO jack of the VIDEO OUT jacks, not from the S-VIDEO jack of the powered subwoofer. When unplugging the cord, always grasp and pull the plug so as a DBS tuner, operate this system to listen to a digital component...
...enjoy the sound of an analog component. Connecting to unplug the cord. Center unit Powered subwoofer Power cord (Supplied) Power cord Plug into AC outlets. Connecting the powered subwoofer Center unit System cord (supplied) Powered subwoofer Connecting to the sound. or Align the 5 marks. DBS* tuner MD player To... digital audio signals can be output only from the VIDEO jack of the VIDEO OUT jacks, not from the S-VIDEO jack of the powered subwoofer. When unplugging the cord, always grasp and pull the plug so as a DBS tuner, operate this system to listen to a digital component...

Instructions
Page 19
... (1-5) 3 buttons or 3 on the center unit You can use the same buttons on . • The power supply to the subwoofer is turned on the remote control. The POWER ON lamp on the subwoofer lights green when the power is turned off On the remote control: Press AUDIO. SOURCE DISC 1 DISC 2 DISC 3 DISC...
... (1-5) 3 buttons or 3 on the center unit You can use the same buttons on . • The power supply to the subwoofer is turned on the remote control. The POWER ON lamp on the subwoofer lights green when the power is turned off On the remote control: Press AUDIO. SOURCE DISC 1 DISC 2 DISC 3 DISC...

Instructions
Page 20
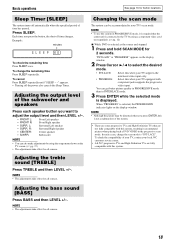
...; • Before connecting or putting on the center unit, the system automatically cancels the surround mode (A pg. 24) currently selected, deactivates the speakers, turns the subwoofer's power off the sound temporarily [MUTING] Press MUTING. Adjusting the volume [VOLUME] CAUTION • Always set at its high level, the sudden blast of your...
...; • Before connecting or putting on the center unit, the system automatically cancels the surround mode (A pg. 24) currently selected, deactivates the speakers, turns the subwoofer's power off the sound temporarily [MUTING] Press MUTING. Adjusting the volume [VOLUME] CAUTION • Always set at its high level, the sudden blast of your...
Instructions
Page 21
... menu shown on the display window. When "PROGRESS" is displayed. R: Surround Right speaker • CENTER: Center speaker • S.WFR: Subwoofer NOTE • You can be distorted when you press ENTER, this is selected as the source and stopped 1 Press and hold SCAN MODE ... INT-LACE: Select this when your TV supports the interlaced video input only. • PROGRESS: Select this when your local JVC customer service center. • All JVC progressive TVs and High-Definition TVs are not fully compatible with this system. 18 L: Surround Left speaker • SURR. NOTE...
... menu shown on the display window. When "PROGRESS" is displayed. R: Surround Right speaker • CENTER: Center speaker • S.WFR: Subwoofer NOTE • You can be distorted when you press ENTER, this is selected as the source and stopped 1 Press and hold SCAN MODE ... INT-LACE: Select this when your TV supports the interlaced video input only. • PROGRESS: Select this when your local JVC customer service center. • All JVC progressive TVs and High-Definition TVs are not fully compatible with this system. 18 L: Surround Left speaker • SURR. NOTE...

Instructions
Page 22
three times, set the subwoofer's output level (LEVEL) manually. (A pg. 18) • In step 2, "SW ERROR" appears on the display window. 3 Clap your hands over your clapping sound through the ... sound correctly. SETUP. appears on the TV screen, then press SMART S. SETUP. "SETTING" appears on the display window if the center unit and the powered subwoofer are not connected correctly by using the supplied system cord. "COMPLETED !" appears on the TV screen. • When the system detects the clapping sound as...
three times, set the subwoofer's output level (LEVEL) manually. (A pg. 18) • In step 2, "SW ERROR" appears on the display window. 3 Clap your hands over your clapping sound through the ... sound correctly. SETUP. appears on the TV screen, then press SMART S. SETUP. "SETTING" appears on the display window if the center unit and the powered subwoofer are not connected correctly by using the supplied system cord. "COMPLETED !" appears on the TV screen. • When the system detects the clapping sound as...

Instructions
Page 40
...: s Front left speaker s Center speaker s Front right speaker s Surround right speaker s Surround left speaker s (back to the beginning) 7 Delay menu (DELAY) Example: Center speaker 1 ms Subwoofer Front left 0 ms Front right 0 ms Surround left and right edges of the pictures will not be shown on how DVDs are recorded on the...
...: s Front left speaker s Center speaker s Front right speaker s Surround right speaker s Surround left speaker s (back to the beginning) 7 Delay menu (DELAY) Example: Center speaker 1 ms Subwoofer Front left 0 ms Front right 0 ms Surround left and right edges of the pictures will not be shown on how DVDs are recorded on the...

Instructions
Page 41
Setting DVD preferences 7 Subwoofer menu (SUBWOOFER) LEVEL You can set the output level of the cross over frequency levels according to the bass sound quality from the front/center/surround speakers. : Other setting menu (OTHERS) 7 RESUME You can activate or deactivate Resume Playback function. (A pg. 29) 7 ON SCREEN GUIDE You can activate or deactivate the on-screen guide icons. (A pg. 20) 38 CROSS OVER The signals below the preset frequency level will be sent to +6 dB range. Select one of the subwoofer in the -6 dB to and be reproduced by the subwoofer.
Setting DVD preferences 7 Subwoofer menu (SUBWOOFER) LEVEL You can set the output level of the cross over frequency levels according to the bass sound quality from the front/center/surround speakers. : Other setting menu (OTHERS) 7 RESUME You can activate or deactivate Resume Playback function. (A pg. 29) 7 ON SCREEN GUIDE You can activate or deactivate the on-screen guide icons. (A pg. 20) 38 CROSS OVER The signals below the preset frequency level will be sent to +6 dB range. Select one of the subwoofer in the -6 dB to and be reproduced by the subwoofer.

Instructions
Page 46
...mm M 481 mm M 459 mm (10-7/16 inches M 18-15/16 inches M 18-1/8 inches) Mass: 16.5 kg (37 lbs) 7 Subwoofer (SP-PWC6) Amplifier section Front/Center/Surround: Subwoofer: 167 W per channel, RMS at 3 C at 1 kHz, with 10 % total harmonic distortion. 167 W, RMS at 3 C at 100 ... Dimensions (W M H M D): 400 mm M 85 mm M 399 mm (15-3/4 inches M 3-3/8 inches M 15-3/4 inches) Mass: 4.2 kg (9.3 lbs) 7 Subwoofer (SP-PWC7) Amplifier section Front/Center/Surround: Subwoofer: 167 W per channel, RMS at 3 C at 1 kHz, with 10 % total harmonic distortion. 167 W, RMS at 3 C at 100 Hz, with 10 %...
...mm M 481 mm M 459 mm (10-7/16 inches M 18-15/16 inches M 18-1/8 inches) Mass: 16.5 kg (37 lbs) 7 Subwoofer (SP-PWC6) Amplifier section Front/Center/Surround: Subwoofer: 167 W per channel, RMS at 3 C at 1 kHz, with 10 % total harmonic distortion. 167 W, RMS at 3 C at 100 ... Dimensions (W M H M D): 400 mm M 85 mm M 399 mm (15-3/4 inches M 3-3/8 inches M 15-3/4 inches) Mass: 4.2 kg (9.3 lbs) 7 Subwoofer (SP-PWC7) Amplifier section Front/Center/Surround: Subwoofer: 167 W per channel, RMS at 3 C at 1 kHz, with 10 % total harmonic distortion. 167 W, RMS at 3 C at 100 Hz, with 10 %...

Instructions
Page 47
...-PWC3) Amplifier section Front: Center/Surround: Subwoofer: 140W per channel, RMS at 4 C at 1 kHz, with 10 % total harmonic distortion. 130W per channel, RMS at 4 C at 1 kHz, with 10 % total harmonic distortion. Speaker ...
...-PWC3) Amplifier section Front: Center/Surround: Subwoofer: 140W per channel, RMS at 4 C at 1 kHz, with 10 % total harmonic distortion. 130W per channel, RMS at 4 C at 1 kHz, with 10 % total harmonic distortion. Speaker ...


