

SR-TS1U VCR Instruction Manual (1812KB)
Page 4
Quick stops, excessive force, and uneven surfaces may result in the manual. Use a damp cloth for the various procedures are covered by the manufacturer or have fallen into this product through the use this product from the ... damaged in fire, electric shock or other products (including amplifiers) that produce heat. Unauthorized substitutions may result in any way. HOW TO USE THIS INSTRUCTION MANUAL ● All major sections and subsections are required, be sure the service technician has used replacement parts specified by the operating instructions as radiators, heat...
Quick stops, excessive force, and uneven surfaces may result in the manual. Use a damp cloth for the various procedures are covered by the manufacturer or have fallen into this product through the use this product from the ... damaged in fire, electric shock or other products (including amplifiers) that produce heat. Unauthorized substitutions may result in any way. HOW TO USE THIS INSTRUCTION MANUAL ● All major sections and subsections are required, be sure the service technician has used replacement parts specified by the operating instructions as radiators, heat...

SR-TS1U VCR Instruction Manual (1812KB)
Page 5
... 10 Semi-Auto 11 Manual 12 Tuner 13 Set Receivable...Recording 37 EN 5 Recording Features 38 Record One Program While Watching Another ....... 38 Display Elapsed Recording Time 38 Display Tape Remaining Time 38 Record Safety 39 S-VHS (Super VHS), S-VHS ET and VHS 40 Super VHS ET 41 Stereo And SAP (Second Audio Program 42 To Record SAP Programs 42 T IMER RECORDING...JVC VCRs 59 T ROUBLESHOOTING 60 Power 60 Tape Transport 60 Playback 60 Recording 60 Timer Recording 61 Other Problems 62 Q UESTIONS AND ANSWERS 63 Playback 63 Recording 63 Timer Recording...
... 10 Semi-Auto 11 Manual 12 Tuner 13 Set Receivable...Recording 37 EN 5 Recording Features 38 Record One Program While Watching Another ....... 38 Display Elapsed Recording Time 38 Display Tape Remaining Time 38 Record Safety 39 S-VHS (Super VHS), S-VHS ET and VHS 40 Super VHS ET 41 Stereo And SAP (Second Audio Program 42 To Record SAP Programs 42 T IMER RECORDING...JVC VCRs 59 T ROUBLESHOOTING 60 Power 60 Tape Transport 60 Playback 60 Recording 60 Timer Recording 61 Other Problems 62 Q UESTIONS AND ANSWERS 63 Playback 63 Recording 63 Timer Recording...

SR-TS1U VCR Instruction Manual (1812KB)
Page 6
... . AV Connection ● To Connect To A TV With AV Input Terminals . . . S-VIDEO Connection ● If you have . You can record one show while watching another (੬ pg. 38). ● For full identification of the VCR's rear panel, refer to the Index (REAR VIEW ...AV cables to connect your VCR to your TV, you can now perform simple playback (੬ pg. 22) or simple recording (੬ pg. 23). a- Wait for broadcasting in your TV in the illustration. This will ensure that you must ... is connected and when the AC is first connected to the TV Instruction Manual.
... . AV Connection ● To Connect To A TV With AV Input Terminals . . . S-VIDEO Connection ● If you have . You can record one show while watching another (੬ pg. 38). ● For full identification of the VCR's rear panel, refer to the Index (REAR VIEW ...AV cables to connect your VCR to your TV, you can now perform simple playback (੬ pg. 22) or simple recording (੬ pg. 23). a- Wait for broadcasting in your TV in the illustration. This will ensure that you must ... is connected and when the AC is first connected to the TV Instruction Manual.
SR-TS1U VCR Instruction Manual (1812KB)
Page 8
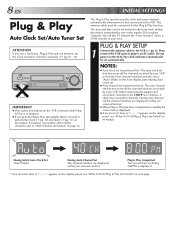
... Channel Set The channel numbers are displayed as they are receivable by one of the regular TV broadcast channels. set the clock and tuner channels manually. (੬ pg.10 - 14) JOG SHATTLE IMPORTANT ● Don't press any buttons on next page. INITIAL SETTINGS The Plug & Play function sets the clock and...
... Channel Set The channel numbers are displayed as they are receivable by one of the regular TV broadcast channels. set the clock and tuner channels manually. (੬ pg.10 - 14) JOG SHATTLE IMPORTANT ● Don't press any buttons on next page. INITIAL SETTINGS The Plug & Play function sets the clock and...

SR-TS1U VCR Instruction Manual (1812KB)
Page 9
... so please also perform the "Set Receivable Channels" procedure (੬ pg. 13). Last-Function Memory When the AC is connected correctly, perform the Manual Clock Set procedure (੬ pg. 12). Then power on the front display panel, you may not be a Host PBS signal available in your ...Plug & Play function will be automatically reactivated and "Auto" will be displayed on the hour (except for the following functions are kept in memory. a- Recording Safety Mode (੬ pg. 39) If Plug & Play is not performed but the antenna cable is removed from the VCR, Plug & Play will ...
... so please also perform the "Set Receivable Channels" procedure (੬ pg. 13). Last-Function Memory When the AC is connected correctly, perform the Manual Clock Set procedure (੬ pg. 12). Then power on the front display panel, you may not be a Host PBS signal available in your ...Plug & Play function will be automatically reactivated and "Auto" will be displayed on the hour (except for the following functions are kept in memory. a- Recording Safety Mode (੬ pg. 39) If Plug & Play is not performed but the antenna cable is removed from the VCR, Plug & Play will ...

SR-TS1U VCR Instruction Manual (1812KB)
Page 10
... (OK) PRESS (MENU) TO END 4 ACCESS CLOCK SET SCREEN Move the highlight bar (arrow) at the Initial Set screen to perform the Semi-Auto or Manual clock setting procedure. POWER MENU OK JOG SHATTLE CH POWER 1 2 3 2 4 5 6 7 8 9 0 4 1 MENU 3 OK SHUTTLE PLUS INITIAL... SETTINGS (cont.) Perform clock setting only if the clock has not been set the clock manually. (੬ pg. 12) Preparation TURN ON THE VCR 1 Press POWER. Each procedure starts from step 5. INITIAL SET =CLOCK SET GUIDE CHANNEL SET CABLE BOX ...
... (OK) PRESS (MENU) TO END 4 ACCESS CLOCK SET SCREEN Move the highlight bar (arrow) at the Initial Set screen to perform the Semi-Auto or Manual clock setting procedure. POWER MENU OK JOG SHATTLE CH POWER 1 2 3 2 4 5 6 7 8 9 0 4 1 MENU 3 OK SHUTTLE PLUS INITIAL... SETTINGS (cont.) Perform clock setting only if the clock has not been set the clock manually. (੬ pg. 12) Preparation TURN ON THE VCR 1 Press POWER. Each procedure starts from step 5. INITIAL SET =CLOCK SET GUIDE CHANNEL SET CABLE BOX ...

SR-TS1U VCR Instruction Manual (1812KB)
Page 11
... end of October at 2:00 AM, the clock is changed. To select the D.S.T. SELECT HOST CHANNEL 6 You can change the Host Channel/D.S.T. /Time Zone setting manually. 5 SET AUTO CLOCK TO ON At the Clock Set screen, press OK or SHUTTLE CLOCK SET PLUS # repeatedly to move the highlight bar to "AUTO...
... end of October at 2:00 AM, the clock is changed. To select the D.S.T. SELECT HOST CHANNEL 6 You can change the Host Channel/D.S.T. /Time Zone setting manually. 5 SET AUTO CLOCK TO ON At the Clock Set screen, press OK or SHUTTLE CLOCK SET PLUS # repeatedly to move the highlight bar to "AUTO...

SR-TS1U VCR Instruction Manual (1812KB)
Page 12
...5∞ HOST CH : AUTO (CATV) D.S.T. : AUTO or SHUTTLE PLUS %fi to select "AUTO" or the desired time zone. INITIAL SETTINGS (cont.) Manual 5 SET TIME Press CH 5∞ or SHUTTLE PLUS %fi until the desired year appears, then press OK or SHUTTLE PLUS # twice. The current time ... function, you . START CLOCK 9 Press MENU and normal screen appears. 12 EN 8 SELECT TIME ZONE You can select the time zone automatically or manually. RETURN TO NORMAL SCREEN 9 Press MENU. SET YEAR 7 Press CH 5∞ or SHUTTLE PLUS %fi until the desired CLOCK SET time appears,...
...5∞ HOST CH : AUTO (CATV) D.S.T. : AUTO or SHUTTLE PLUS %fi to select "AUTO" or the desired time zone. INITIAL SETTINGS (cont.) Manual 5 SET TIME Press CH 5∞ or SHUTTLE PLUS %fi until the desired year appears, then press OK or SHUTTLE PLUS # twice. The current time ... function, you . START CLOCK 9 Press MENU and normal screen appears. 12 EN 8 SELECT TIME ZONE You can select the time zone automatically or manually. RETURN TO NORMAL SCREEN 9 Press MENU. SET YEAR 7 Press CH 5∞ or SHUTTLE PLUS %fi until the desired CLOCK SET time appears,...

SR-TS1U VCR Instruction Manual (1812KB)
Page 13
... CH POWER 1 2 3 2 4 5 6 7 8 9 0 4 CH 1 MENU 3 OK SHUTTLE PLUS EN 13 Set Receivable Channels TURN ON THE VCR 1 Press POWER. TUNER SET BAND CATV =AUTO CHANNEL SET MANUAL CHANNEL SET SELECT WITH (5,∞) AND (OK) PRESS (MENU) TO END AUTO CHANNEL SET SCANNING... The selected band will be displayed on the right side...
... CH POWER 1 2 3 2 4 5 6 7 8 9 0 4 CH 1 MENU 3 OK SHUTTLE PLUS EN 13 Set Receivable Channels TURN ON THE VCR 1 Press POWER. TUNER SET BAND CATV =AUTO CHANNEL SET MANUAL CHANNEL SET SELECT WITH (5,∞) AND (OK) PRESS (MENU) TO END AUTO CHANNEL SET SCANNING... The selected band will be displayed on the right side...

SR-TS1U VCR Instruction Manual (1812KB)
Page 14
...to "ADD" the channel. Repeat for each channel PRESS NUMBER KEY (0-9) OR (5,∞), THEN (OK) PRESS (MENU) TO END you want to "MANUAL CHANNEL SET" by pressing CH5∞ or SHUTTLE PLUS %fi, then press OK or SHUTTLE PLUS #. Input the channel number using the NUMBER keys or... by pressing CH5∞ or SHUTTLE PLUS %fi, then press OK or SHUTTLE PLUS #. 3 ACCESS MANUAL CHANNEL SET SCREEN Move the highlight bar (arrow) to skip. RETURN TO NORMAL SCREEN 5 Press MENU. ACCESS TUNER SET SCREEN 2 Move the highlight ...
...to "ADD" the channel. Repeat for each channel PRESS NUMBER KEY (0-9) OR (5,∞), THEN (OK) PRESS (MENU) TO END you want to "MANUAL CHANNEL SET" by pressing CH5∞ or SHUTTLE PLUS %fi, then press OK or SHUTTLE PLUS #. Input the channel number using the NUMBER keys or... by pressing CH5∞ or SHUTTLE PLUS %fi, then press OK or SHUTTLE PLUS #. 3 ACCESS MANUAL CHANNEL SET SCREEN Move the highlight bar (arrow) to skip. RETURN TO NORMAL SCREEN 5 Press MENU. ACCESS TUNER SET SCREEN 2 Move the highlight ...
SR-TS1U VCR Instruction Manual (1812KB)
Page 15
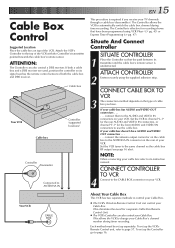
... Unit can control your Cable Box. If both a cable box and a DBS receiver are used, position the controller so its instruction manual. The Controller is unobstructed. Situate And Connect Controller SITUATE CONTROLLER 1 Place the Controller so that have AUDIO and VIDEO OUT connectors connect the... output connector on the rear of your VCR. CONNECT CONTROLLER TO VCR 4 Connect to change your Cable Box's channel number during timer-recording. ATTENTION: The Controller can also control your Cable Box. This allows the VCR to the CABLE BOX connector on your VCR. Cable...
... Unit can control your Cable Box. If both a cable box and a DBS receiver are used, position the controller so its instruction manual. The Controller is unobstructed. Situate And Connect Controller SITUATE CONTROLLER 1 Place the Controller so that have AUDIO and VIDEO OUT connectors connect the... output connector on the rear of your VCR. CONNECT CONTROLLER TO VCR 4 Connect to change your Cable Box's channel number during timer-recording. ATTENTION: The Controller can also control your Cable Box. This allows the VCR to the CABLE BOX connector on your VCR. Cable...

SR-TS1U VCR Instruction Manual (1812KB)
Page 17
... backup expires because of cable box, then try all the other numbers between 1 and 25, you press MENU after going through the Controller during timer recording. ● If your cable box is complete. PRESS NUMBER KEY (0-9) ● If the cable box's channel changes to 9, THEN (OK) TO TEST PRESS ...change the cable box channel through all the code numbers listed for about 5 seconds, then the Clock Set screen will appear; perform the manual clock setting procedure on and tuned to the proper channel before the scheduled start of exchanging your current cable box with one that is ...
... backup expires because of cable box, then try all the other numbers between 1 and 25, you press MENU after going through the Controller during timer recording. ● If your cable box is complete. PRESS NUMBER KEY (0-9) ● If the cable box's channel changes to 9, THEN (OK) TO TEST PRESS ...change the cable box channel through all the code numbers listed for about 5 seconds, then the Clock Set screen will appear; perform the manual clock setting procedure on and tuned to the proper channel before the scheduled start of exchanging your current cable box with one that is ...
SR-TS1U VCR Instruction Manual (1812KB)
Page 18
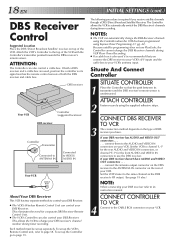
... unobstructed. To set up separately. INITIAL SETTINGS (cont.) The following procedure is also used , position the controller so its instruction manual. If your DBS receiver has AUDIO and VIDEO OUT connectors connect them to the CABLE BOX connector on your VCR. Attach the ...be set up the VCR's Remote Control unit, refer to your DBS receiver refer to automatically switch the DBS Receiver's channels during timer recording. Situate And Connect Controller SITUATE CONTROLLER 1 Place the Controller so that you receive satellite channels through a DBS (Direct Broadcast Satellite) ...
... unobstructed. To set up separately. INITIAL SETTINGS (cont.) The following procedure is also used , position the controller so its instruction manual. If your DBS receiver has AUDIO and VIDEO OUT connectors connect them to the CABLE BOX connector on your VCR. Attach the ...be set up the VCR's Remote Control unit, refer to your DBS receiver refer to automatically switch the DBS Receiver's channels during timer recording. Situate And Connect Controller SITUATE CONTROLLER 1 Place the Controller so that you receive satellite channels through a DBS (Direct Broadcast Satellite) ...

SR-TS1U VCR Instruction Manual (1812KB)
Page 24
...-speed search. START SEARCH 1 While the tape is stopped, press SHUTTLE PLUS ™ or £ (@ or #). 2 ACCESS DISTANT CODE To access a recording 2-9 index codes away, press SHUTTLE PLUS ™ or £ (@ or #) repeatedly until an optimum picture and sound quality are placed on the VCR's... modes. Press briefly for fine adjust, or press and hold FF or REW. Playback begins automatically when the desired recording is engaged. ADJUST MANUAL TRACKING 2 Press CH 5 (+) or ∞ (-) on the VCR's front panel simultaneously to cancel the automatic tracking mode and enable...
...-speed search. START SEARCH 1 While the tape is stopped, press SHUTTLE PLUS ™ or £ (@ or #). 2 ACCESS DISTANT CODE To access a recording 2-9 index codes away, press SHUTTLE PLUS ™ or £ (@ or #) repeatedly until an optimum picture and sound quality are placed on the VCR's... modes. Press briefly for fine adjust, or press and hold FF or REW. Playback begins automatically when the desired recording is engaged. ADJUST MANUAL TRACKING 2 Press CH 5 (+) or ∞ (-) on the VCR's front panel simultaneously to cancel the automatic tracking mode and enable...
SR-TS1U VCR Instruction Manual (1812KB)
Page 33
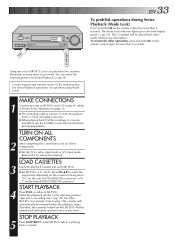
... front display panel (੬ pg. 66). nately without any interruption. Refer to the TV instruction manual. 3 4 LOAD CASSETTES Insert the playback cassette into each SR-TS1U. ● Set SR-TS1U-2 to mono 3.5 mm mini-plug connector. ● When playing back S-VHS recordings, it is playing back a cassette. When the playback reaches to the returning position (tape end...
... front display panel (੬ pg. 66). nately without any interruption. Refer to the TV instruction manual. 3 4 LOAD CASSETTES Insert the playback cassette into each SR-TS1U. ● Set SR-TS1U-2 to mono 3.5 mm mini-plug connector. ● When playing back S-VHS recordings, it is playing back a cassette. When the playback reaches to the returning position (tape end...

SR-TS1U VCR Instruction Manual (1812KB)
Page 35
... "F-1" for more than 5 seconds. If the playback equipment has a superimpose/OSD disable feature, set it is recording. The picture will be continued onto cassettes loaded on two SR-TS1U alternately. SET RECORDING VCR'S INPUT MODE 3 Set to "OFF" (੬ pg. 30). NOTE: If you do not want ... turn on all the components. ● Set the TV to the TV instruction manual. EN 35 REC CH STOP/EJECT 5 START RECORDING Press REC on either of SR-TS1U, a long recording will be rewound when the recording stops. ● Replace the cassette after rewound if you want to continue to ...
... "F-1" for more than 5 seconds. If the playback equipment has a superimpose/OSD disable feature, set it is recording. The picture will be continued onto cassettes loaded on two SR-TS1U alternately. SET RECORDING VCR'S INPUT MODE 3 Set to "OFF" (੬ pg. 30). NOTE: If you do not want ... turn on all the components. ● Set the TV to the TV instruction manual. EN 35 REC CH STOP/EJECT 5 START RECORDING Press REC on either of SR-TS1U, a long recording will be rewound when the recording stops. ● Replace the cassette after rewound if you want to continue to ...

SR-TS1U VCR Instruction Manual (1812KB)
Page 50
... engaged, then set the Auto SP→EP Timer mode to "ON" or "OFF". NOTES: ● If you set the tape speed manually during ITR (Instant Timer Recording), and the feature will work with the following tapes: T(ST)-30, T(ST)-60, T(ST)-90, and T(ST)-120. FUNCTION 1 VIDEO... CALIBRATION ON PICTURE CONTROL AUTO AUTO TIMER OFF = AUTO SP=EP TIMER ON VIDEO STABILIZER OFF 2ND AUDIO RECORD OFF NEXT PAGE SELECT WITH (5,∞) AND (OK) PRESS (MENU) TO END RETURN TO NORMAL SCREEN 4 Press MENU. ACCESS FUNCTION SET 1 SCREEN 2...
... engaged, then set the Auto SP→EP Timer mode to "ON" or "OFF". NOTES: ● If you set the tape speed manually during ITR (Instant Timer Recording), and the feature will work with the following tapes: T(ST)-30, T(ST)-60, T(ST)-90, and T(ST)-120. FUNCTION 1 VIDEO... CALIBRATION ON PICTURE CONTROL AUTO AUTO TIMER OFF = AUTO SP=EP TIMER ON VIDEO STABILIZER OFF 2ND AUDIO RECORD OFF NEXT PAGE SELECT WITH (5,∞) AND (OK) PRESS (MENU) TO END RETURN TO NORMAL SCREEN 4 Press MENU. ACCESS FUNCTION SET 1 SCREEN 2...

SR-TS1U VCR Instruction Manual (1812KB)
Page 52
... safety tab in the same way if the system has a timer and is executed; the tape speed selected in step 1 will apply to timer-record a satellite program. * Some satellite receivers output signals even if the power is off. If this is the case, perform "Express Timer Programming" ... , Auto Satellite Prog Recording will start recording when the satellite receiver's power is turned on. ● If you have connected the satellite receiver to the VCR's S VIDEO IN connector, set to "ON". ● For timer programming of the satellite receiver, refer to the instruction manual of the program. &#...
... safety tab in the same way if the system has a timer and is executed; the tape speed selected in step 1 will apply to timer-record a satellite program. * Some satellite receivers output signals even if the power is off. If this is the case, perform "Express Timer Programming" ... , Auto Satellite Prog Recording will start recording when the satellite receiver's power is turned on. ● If you have connected the satellite receiver to the VCR's S VIDEO IN connector, set to "ON". ● For timer programming of the satellite receiver, refer to the instruction manual of the program. &#...

SR-TS1U VCR Instruction Manual (1812KB)
Page 55
...NORMAL SCREEN 8 Press MENU. 9 START PLAYER Set the camcorder to its record mode. ● If you are using a Master Edit Control-equipped JVC camcorder, it can put the recorder automatically into Record mode. (Refer to camcorder's instruction manual.) NOTES: ● If you use an...finished editing (੬ steps 4 - 6 on page 26, then select "EDIT." NOTE: When you finish dubbing the tapes. S-VIDEO: When editing S-VHS recording PREVIOUS PAGE AUDIO MONITOR HI-FI S-VHS MODE ON = REAR AUX INPUT S-VIDEO 1 2 3 2 4 5 6 7 8 9 0 4 CH 1 MENU 3 OK SHUTTLE PLUS SELECT...
...NORMAL SCREEN 8 Press MENU. 9 START PLAYER Set the camcorder to its record mode. ● If you are using a Master Edit Control-equipped JVC camcorder, it can put the recorder automatically into Record mode. (Refer to camcorder's instruction manual.) NOTES: ● If you use an...finished editing (੬ steps 4 - 6 on page 26, then select "EDIT." NOTE: When you finish dubbing the tapes. S-VIDEO: When editing S-VHS recording PREVIOUS PAGE AUDIO MONITOR HI-FI S-VHS MODE ON = REAR AUX INPUT S-VIDEO 1 2 3 2 4 5 6 7 8 9 0 4 CH 1 MENU 3 OK SHUTTLE PLUS SELECT...
SR-TS1U VCR Instruction Manual (1812KB)
Page 60
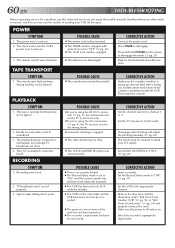
...recorder's appropriate input mode. The clock works, but the picture won't appear. 2. POSSIBLE CAUSE ● The cassette was set to channel 3 or 4. Tape-to "HI-FI" (੬ pg. 26). CORRECTIVE ACTION Make sure the cassette's window is facing up, the rear label side is facing you the trouble of sending your JVC... video heads may be dirty. ● The AUDIO MONITOR option was inserted incorrectly. Disengage Auto Tracking and adjust the tracking manually (੬ pg. 24). The heads must be heard. Consult your VCR off for a problem, use this can repair the trouble yourself.
...recorder's appropriate input mode. The clock works, but the picture won't appear. 2. POSSIBLE CAUSE ● The cassette was set to channel 3 or 4. Tape-to "HI-FI" (੬ pg. 26). CORRECTIVE ACTION Make sure the cassette's window is facing up, the rear label side is facing you the trouble of sending your JVC... video heads may be dirty. ● The AUDIO MONITOR option was inserted incorrectly. Disengage Auto Tracking and adjust the tracking manually (੬ pg. 24). The heads must be heard. Consult your VCR off for a problem, use this can repair the trouble yourself.
