
Instruction Manual
Page 2
... LES LIMITES DE BRUITS RADIOELECTRIQUES APPLICABLES AUX APPAREILS NUMIRIQUES DE CLASSE B PRESCRITES DANS LA NORME SUR LE MATERIEL BROUILLEUR; Consult the dealer or an experienced radio/TV technician for a Class B digital device, pursuant to constitute a risk of important operating and maintenance (servicing) instructions in the literature accompanying the appliance. CAUTION Changes or modifications not approved by one...
... LES LIMITES DE BRUITS RADIOELECTRIQUES APPLICABLES AUX APPAREILS NUMIRIQUES DE CLASSE B PRESCRITES DANS LA NORME SUR LE MATERIEL BROUILLEUR; Consult the dealer or an experienced radio/TV technician for a Class B digital device, pursuant to constitute a risk of important operating and maintenance (servicing) instructions in the literature accompanying the appliance. CAUTION Changes or modifications not approved by one...
Instruction Manual
Page 5
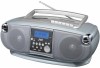
... the power cord when there is turned on batteries.) To save power and for safety when not using the unit for purchasing this JVC product. When the unit is in a badly ventilated place. 1 CONTENTS FEATURES 1 SAFETY PRECAUTIONS 1 HANDLING PRECAUTIONS 2 POWER SUPPLY 3 NAMES OF PARTS AND CONTROLS 4 REMOTE CONTROL UNIT 5 TURNING THE UNIT ON/OFF 6 SETTING THE CLOCK 7 ADJUSTING THE SOUND 8 PLAYING COMPACT DISCS 9 RADIO RECEPTION 16 CASSETTE PLAYBACK 18 RECORDING 19 MAINTENANCE 20 TROUBLESHOOTING 21 SPECIFICATIONS 22 FEATURES 1 Portable system incorporating CD player...
... the power cord when there is turned on batteries.) To save power and for safety when not using the unit for purchasing this JVC product. When the unit is in a badly ventilated place. 1 CONTENTS FEATURES 1 SAFETY PRECAUTIONS 1 HANDLING PRECAUTIONS 2 POWER SUPPLY 3 NAMES OF PARTS AND CONTROLS 4 REMOTE CONTROL UNIT 5 TURNING THE UNIT ON/OFF 6 SETTING THE CLOCK 7 ADJUSTING THE SOUND 8 PLAYING COMPACT DISCS 9 RADIO RECEPTION 16 CASSETTE PLAYBACK 18 RECORDING 19 MAINTENANCE 20 TROUBLESHOOTING 21 SPECIFICATIONS 22 FEATURES 1 Portable system incorporating CD player...
Instruction Manual
Page 6
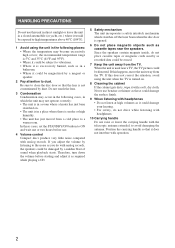
..., in which switches off the laser beam when the disc door is opened. 6 Do not place magnetic objects such as recorded data could be distorted. If you do with operation. 2 Never use benzine or thinner as these cases, set the STANDBY/ON button to high temperatures above 40°C (104°F). 1 Avoid using the unit when the TV is turned on...
..., in which switches off the laser beam when the disc door is opened. 6 Do not place magnetic objects such as recorded data could be distorted. If you do with operation. 2 Never use benzine or thinner as these cases, set the STANDBY/ON button to high temperatures above 40°C (104°F). 1 Avoid using the unit when the TV is turned on...

Instruction Manual
Page 7
...)-size batteries 3 Replace the cover. 3 However, remove the batteries when using the unit for a longer service life) to the unit. CAUTIONS: • When not using the power cord. 2 Insert eight R20 (SUM-1)/D (13D)-size batteries (not supplied). Checking batteries When the tape speed or output sound level decreases, or CD playback becomes intermittent, replace all batteries with the ª and · terminals positioned correctly. 1 4 6 3 8 7 2 5 CAUTIONS WHEN USING BATTERIES: When batteries are...
...)-size batteries 3 Replace the cover. 3 However, remove the batteries when using the unit for a longer service life) to the unit. CAUTIONS: • When not using the power cord. 2 Insert eight R20 (SUM-1)/D (13D)-size batteries (not supplied). Checking batteries When the tape speed or output sound level decreases, or CD playback becomes intermittent, replace all batteries with the ª and · terminals positioned correctly. 1 4 6 3 8 7 2 5 CAUTIONS WHEN USING BATTERIES: When batteries are...

Instruction Manual
Page 8
The speaker output is switched off with headphones connected. 25 25 AC IN Ó (AC input) jack 26 Battery compartment cover 4 NAMES OF PARTS AND CONTROLS Top and front sides 1 2 3 4 5 6 7 8 9 10 11 12 13 14 21 1 CD door 2 STANDBY/ON button 3 STANDBY indicator 4 CLOCK button 5 DISPLAY window 6 USB 6 button 7 CD 6 button 8 TUNER/BAND button 9 CASSETTE holder 10 TAPE button 11 EQ button 12 REMOTE SENSOR section 13 HBS button Rear side 15 16 17 18...
The speaker output is switched off with headphones connected. 25 25 AC IN Ó (AC input) jack 26 Battery compartment cover 4 NAMES OF PARTS AND CONTROLS Top and front sides 1 2 3 4 5 6 7 8 9 10 11 12 13 14 21 1 CD door 2 STANDBY/ON button 3 STANDBY indicator 4 CLOCK button 5 DISPLAY window 6 USB 6 button 7 CD 6 button 8 TUNER/BAND button 9 CASSETTE holder 10 TAPE button 11 EQ button 12 REMOTE SENSOR section 13 HBS button Rear side 15 16 17 18...
Instruction Manual
Page 9
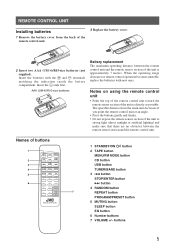
... strong light (direct sunlight or artificial lighting) and make sure that there are no obstacles between the remote control unit and the remote sensor section of the unit is approximately 7 meters. Notes on using the remote control unit • Point the top of the remote control unit toward the remote sensor section of buttons 1 STANDBY/ ON / TAPE MENU/ FM MODE TUNER/ 2 CD USB BAND STOP/ 3 ENTER PROGRAM/ 4 RANDOM REPEAT PRESET 5 MUTING...
... strong light (direct sunlight or artificial lighting) and make sure that there are no obstacles between the remote control unit and the remote sensor section of the unit is approximately 7 meters. Notes on using the remote control unit • Point the top of the remote control unit toward the remote sensor section of buttons 1 STANDBY/ ON / TAPE MENU/ FM MODE TUNER/ 2 CD USB BAND STOP/ 3 ENTER PROGRAM/ 4 RANDOM REPEAT PRESET 5 MUTING...
Instruction Manual
Page 10
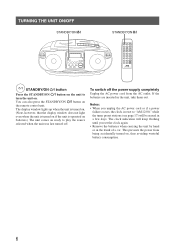
... / TAPE MENU/ FM MODE TUNER/ CD USB BAND STOP/ ENTER RANDOM REPEAT PROGRAM/ PRESET MUTING SLEEP EQ 1 2 3 4 5 6 7 8 9 0 VOL REMOTE CONTROL UNIT STANDBY/ON button Press the STANDBY/ON button on the unit to "AM 12:00," while the tuner preset stations (see page 17) will be erased in the unit, take them out. To switch off . Notes: • When you set the clock again. • Remove the batteries...
... / TAPE MENU/ FM MODE TUNER/ CD USB BAND STOP/ ENTER RANDOM REPEAT PROGRAM/ PRESET MUTING SLEEP EQ 1 2 3 4 5 6 7 8 9 0 VOL REMOTE CONTROL UNIT STANDBY/ON button Press the STANDBY/ON button on the unit to "AM 12:00," while the tuner preset stations (see page 17) will be erased in the unit, take them out. To switch off . Notes: • When you set the clock again. • Remove the batteries...
Instruction Manual
Page 11
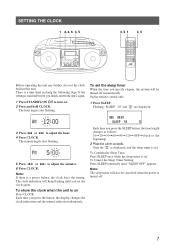
... before you press the button, the display changes the clock indication and the normal indication alternately. If the setting is turned off automatically. SETTING THE CLOCK 1 2, 4, 6 3, 5 3, 5 1 3, 5 STANDBY/ ON / TAPE MENU/ FM MODE TUNER/ CD USB BAND STOP/ ENTER PROGRAM/ RANDOM REPEAT PRESET MUTING SLEEP EQ 1 2 3 4 5 6 7 8 9 0 VOL REMOTE CONTROL UNIT Before operating the unit any further, first set the clock built in doing the following steps. The hour digits start from step...
... before you press the button, the display changes the clock indication and the normal indication alternately. If the setting is turned off automatically. SETTING THE CLOCK 1 2, 4, 6 3, 5 3, 5 1 3, 5 STANDBY/ ON / TAPE MENU/ FM MODE TUNER/ CD USB BAND STOP/ ENTER PROGRAM/ RANDOM REPEAT PRESET MUTING SLEEP EQ 1 2 3 4 5 6 7 8 9 0 VOL REMOTE CONTROL UNIT Before operating the unit any further, first set the clock built in doing the following steps. The hour digits start from step...
Instruction Manual
Page 12
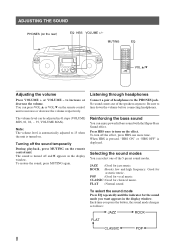
.../ ON / TAPE MENU/ FM MODE TUNER/ CD USB BAND STOP/ ENTER RANDOM REPEAT PROGRAM/ PRESET MUTING SLEEP EQ 1 2 3 4 5 6 7 8 9 0 VOL REMOTE CONTROL UNIT VOL 5/∞ Adjusting the volume Press VOLUME + or VOLUME - To restore the sound, press MUTING again. No sound comes out of the 5 preset sound modes. JAZZ : Good for vocal music. POP : Good for jazz music. Each time you want appears in the display window. ADJUSTING THE SOUND PHONES (on the remote control unit. to turn on...
.../ ON / TAPE MENU/ FM MODE TUNER/ CD USB BAND STOP/ ENTER RANDOM REPEAT PROGRAM/ PRESET MUTING SLEEP EQ 1 2 3 4 5 6 7 8 9 0 VOL REMOTE CONTROL UNIT VOL 5/∞ Adjusting the volume Press VOLUME + or VOLUME - To restore the sound, press MUTING again. No sound comes out of the 5 preset sound modes. JAZZ : Good for vocal music. POP : Good for jazz music. Each time you want appears in the display window. ADJUSTING THE SOUND PHONES (on the remote control unit. to turn on...
Instruction Manual
Page 13
... playing a CD-R or CD-RW You can play back finalized CD-R or CD-RW recorded in music CD format or in MP3 or WMA format. (If a CD-RW has been recorded in its storage case and replacing it .) • You can recognize the total of 999 tracks and of CD-RW is 32 (without the extension code) for files, and 30 for the disc format. - When making MP3/WMA discs, use thinner...
... playing a CD-R or CD-RW You can play back finalized CD-R or CD-RW recorded in music CD format or in MP3 or WMA format. (If a CD-RW has been recorded in its storage case and replacing it .) • You can recognize the total of 999 tracks and of CD-RW is 32 (without the extension code) for files, and 30 for the disc format. - When making MP3/WMA discs, use thinner...
Instruction Manual
Page 14
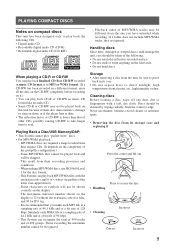
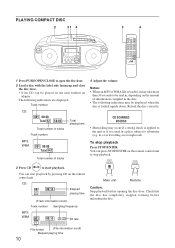
...; 8-cm CD can start playback. You can be played on the unit without an adapter. Reload the disc correctly. PLAYING COMPACT DISC 2 31 4 3 4 STANDBY/ ON / TAPE MENU/ FM MODE TUNER/ CD USB BAND STOP/ ENTER PROGRAM/ RANDOM REPEAT PRESET MUTING SLEEP EQ 1 2 3 4 5 6 7 8 9 0 VOL REMOTE CONTROL UNIT 1 Press PUSH OPEN/CLOSE to be read in, depending on the remote control unit. Check that the disc has completely stopped rotating before opening the disc door.
...; 8-cm CD can start playback. You can be played on the unit without an adapter. Reload the disc correctly. PLAYING COMPACT DISC 2 31 4 3 4 STANDBY/ ON / TAPE MENU/ FM MODE TUNER/ CD USB BAND STOP/ ENTER PROGRAM/ RANDOM REPEAT PRESET MUTING SLEEP EQ 1 2 3 4 5 6 7 8 9 0 VOL REMOTE CONTROL UNIT 1 Press PUSH OPEN/CLOSE to be read in, depending on the remote control unit. Check that the disc has completely stopped rotating before opening the disc door.
Instruction Manual
Page 16
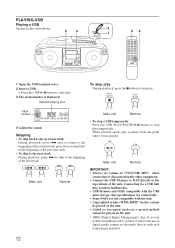
... electronic devices with the unit. • Copyrighted tracks (WMA-DRM* tracks) cannot be played on the unit. • Coded or encrypted tracks in the order shown 2 4 2 1 24 STANDBY/ ON / TAPE MENU/ FM MODE TUNER/ CD USB BAND STOP/ ENTER PROGRAM/ RANDOM REPEAT PRESET MUTING SLEEP EQ 1 2 3 4 5 6 7 8 9 0 VOL REMOTE CONTROL UNIT 1 Open the USB terminal cover. 2 Insert a USB. • Press the USB 6 button to start play. 3 The track number is displayed.
... electronic devices with the unit. • Copyrighted tracks (WMA-DRM* tracks) cannot be played on the unit. • Coded or encrypted tracks in the order shown 2 4 2 1 24 STANDBY/ ON / TAPE MENU/ FM MODE TUNER/ CD USB BAND STOP/ ENTER PROGRAM/ RANDOM REPEAT PRESET MUTING SLEEP EQ 1 2 3 4 5 6 7 8 9 0 VOL REMOTE CONTROL UNIT 1 Open the USB terminal cover. 2 Insert a USB. • Press the USB 6 button to start play. 3 The track number is displayed.

Instruction Manual
Page 17
... Remote Each time you press the button, the repeat mode changes in the following order: To cancel random playback, press the button again so that the RANDOM indicator lights up in random order. Repeat/Random playback (for CD mode or USB mode) REPEAT REPEAT RAN DOM STANDBY/ ON / TAPE MENU/ FM MODE TUNER/ CD USB BAND STOP/ ENTER RANDOM REPEAT PROGRAM/ PRESET MUTING SLEEP EQ 1 2 3 4 5 6 7 8 9 0 VOL REMOTE CONTROL UNIT Repeat playback Press REPEAT during playback. In case of an audio CD...
... Remote Each time you press the button, the repeat mode changes in the following order: To cancel random playback, press the button again so that the RANDOM indicator lights up in random order. Repeat/Random playback (for CD mode or USB mode) REPEAT REPEAT RAN DOM STANDBY/ ON / TAPE MENU/ FM MODE TUNER/ CD USB BAND STOP/ ENTER RANDOM REPEAT PROGRAM/ PRESET MUTING SLEEP EQ 1 2 3 4 5 6 7 8 9 0 VOL REMOTE CONTROL UNIT Repeat playback Press REPEAT during playback. In case of an audio CD...
Instruction Manual
Page 18
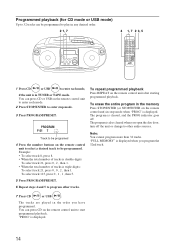
... total number of tracks is double-digits: To select track 21, press 0 , 2 , then 1. • When the total number of tracks is displayed. 14 The program is also cleared when you have programmed. Programmed playback (for CD mode or USB mode) Up to 32 tracks can be programmed to play in any desired order. 2 1, 7 4 1, 7 2 3, 5 STANDBY/ ON / TAPE MENU/ FM MODE TUNER/ CD USB BAND STOP/ ENTER RANDOM REPEAT PROGRAM/ PRESET MUTING SLEEP EQ 1 2 3 4 5 6 7 8 9 0 VOL REMOTE CONTROL UNIT 1 Press CD...
... total number of tracks is double-digits: To select track 21, press 0 , 2 , then 1. • When the total number of tracks is displayed. 14 The program is also cleared when you have programmed. Programmed playback (for CD mode or USB mode) Up to 32 tracks can be programmed to play in any desired order. 2 1, 7 4 1, 7 2 3, 5 STANDBY/ ON / TAPE MENU/ FM MODE TUNER/ CD USB BAND STOP/ ENTER RANDOM REPEAT PROGRAM/ PRESET MUTING SLEEP EQ 1 2 3 4 5 6 7 8 9 0 VOL REMOTE CONTROL UNIT 1 Press CD...

Instruction Manual
Page 20
...; for a better reception. Changing the FM reception mode When an FM stereo broadcast is tuned in. Select either mode for more than 1 second. RADIO RECEPTION Tuning in a station 21 3 2 123 STANDBY/ ON / TAPE MENU/ FM MODE TUNER/ CD USB BAND STOP/ ENTER RANDOM REPEAT PROGRAM/ PRESET MUTING SLEEP EQ 1 2 3 4 5 6 7 8 9 0 VOL REMOTE CONTROL UNIT 1 Press TUNER/BAND to show MONO indicator in the display window. Press the button again to select...
...; for a better reception. Changing the FM reception mode When an FM stereo broadcast is tuned in. Select either mode for more than 1 second. RADIO RECEPTION Tuning in a station 21 3 2 123 STANDBY/ ON / TAPE MENU/ FM MODE TUNER/ CD USB BAND STOP/ ENTER RANDOM REPEAT PROGRAM/ PRESET MUTING SLEEP EQ 1 2 3 4 5 6 7 8 9 0 VOL REMOTE CONTROL UNIT 1 Press TUNER/BAND to show MONO indicator in the display window. Press the button again to select...
Instruction Manual
Page 21
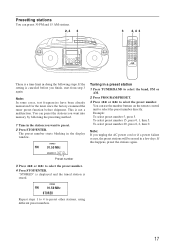
... can use the number buttons on the remote control unit to select the preset number. If this happens, preset the stations again. 3 Press 4 or ¢ to preset other stations, using different preset numbers. 17 You can preset the stations you want to preset. 2 Press STOP/ENTER. Presetting stations You can preset 30 FM and 15 AM stations. 2, 4 3 3 2, 4 3 STANDBY/ ON / TAPE MENU/ FM MODE TUNER/ CD USB BAND STOP/ ENTER RANDOM REPEAT PROGRAM/ PRESET MUTING SLEEP EQ 1 2 3 4 5 6 7 8 9 0 VOL REMOTE CONTROL UNIT...
... can use the number buttons on the remote control unit to select the preset number. If this happens, preset the stations again. 3 Press 4 or ¢ to preset other stations, using different preset numbers. 17 You can preset the stations you want to preset. 2 Press STOP/ENTER. Presetting stations You can preset 30 FM and 15 AM stations. 2, 4 3 3 2, 4 3 STANDBY/ ON / TAPE MENU/ FM MODE TUNER/ CD USB BAND STOP/ ENTER RANDOM REPEAT PROGRAM/ PRESET MUTING SLEEP EQ 1 2 3 4 5 6 7 8 9 0 VOL REMOTE CONTROL UNIT...
Instruction Manual
Page 22
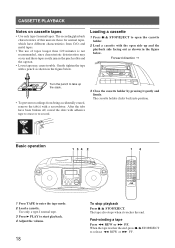
... broken off, reseal the slots with a screwdriver. Forward direction = Turn the pencil to erase or re-record. 3 Close the cassette holder by pressing it reaches the end. Use only a type-I normal tapes. The tape also stops when it gently and firmly. Basic operation 1 34 2 14 STANDBY/ ON / TAPE MENU/ FM MODE TUNER/ CD USB BAND STOP/ ENTER RANDOM REPEAT PROGRAM/ PRESET MUTING SLEEP EQ 1 2 3 4 5 6 7 8 9 0 VOL REMOTE CONTROL UNIT 1 Press TAPE...
... broken off, reseal the slots with a screwdriver. Forward direction = Turn the pencil to erase or re-record. 3 Close the cassette holder by pressing it reaches the end. Use only a type-I normal tapes. The tape also stops when it gently and firmly. Basic operation 1 34 2 14 STANDBY/ ON / TAPE MENU/ FM MODE TUNER/ CD USB BAND STOP/ ENTER RANDOM REPEAT PROGRAM/ PRESET MUTING SLEEP EQ 1 2 3 4 5 6 7 8 9 0 VOL REMOTE CONTROL UNIT 1 Press TAPE...
Instruction Manual
Page 23
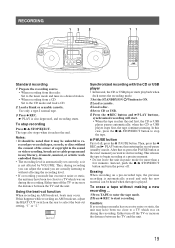
... REMOTE CONTROL UNIT Standard recording 1 Prepare the recording source. • When recording from the radio: Set to the tuner mode and tune in a desired station. • When recording from a CD: Set to start recording. Use only a type-I normal tape. 3 Press ¶ REC. 3 PLAY is also depressed, and recording starts. To stop the tape. 8 PAUSE button First of copyright in the sound or video recording, broadcast or cable program and in any literary, dramatic, musical, or artistic work embodied...
... REMOTE CONTROL UNIT Standard recording 1 Prepare the recording source. • When recording from the radio: Set to the tuner mode and tune in a desired station. • When recording from a CD: Set to start recording. Use only a type-I normal tape. 3 Press ¶ REC. 3 PLAY is also depressed, and recording starts. To stop the tape. 8 PAUSE button First of copyright in the sound or video recording, broadcast or cable program and in any literary, dramatic, musical, or artistic work embodied...

Instruction Manual
Page 25
... the headphones. Symptom Possible cause Action Power cannot be restored after you press a button, disconnect the power plug from the speakers. been broken off. • No cassette is not properly adjusted. No sound from the AC outlet, wait for service. Radio reception is poor and there is The antenna is loaded. • Load a cassette. The power cord is exposed • Try not to operate the unit under direct...
... the headphones. Symptom Possible cause Action Power cannot be restored after you press a button, disconnect the power plug from the speakers. been broken off. • No cassette is not properly adjusted. No sound from the AC outlet, wait for service. Radio reception is poor and there is The antenna is loaded. • Load a cassette. The power cord is exposed • Try not to operate the unit under direct...

Instruction Manual
Page 26
...)-size batteries × 8) : 10 W (at operation) 1.4 W (on standby) : 435 mm × 165 mm × 240 mm (17-3/16" × 6-1/2" × 9-1/2") (W/H/D) : Approx. 3.6 kg (8lbs) (without notice. 22 SPECIFICATIONS CD player CD capacity Signal-to change without batteries) : AC power cord × 1 Remote control unit × 1 Design and specifications are subject to -noise ratio Dynamic range : 1 CD : 60 dB : 60 dB Tuner FM tuning range AM tuning range Antennas : 87...
...)-size batteries × 8) : 10 W (at operation) 1.4 W (on standby) : 435 mm × 165 mm × 240 mm (17-3/16" × 6-1/2" × 9-1/2") (W/H/D) : Approx. 3.6 kg (8lbs) (without notice. 22 SPECIFICATIONS CD player CD capacity Signal-to change without batteries) : AC power cord × 1 Remote control unit × 1 Design and specifications are subject to -noise ratio Dynamic range : 1 CD : 60 dB : 60 dB Tuner FM tuning range AM tuning range Antennas : 87...


