

Instruction Manual
Page 1
and Serial No. Serial No. Retain this information for future reference. LVT2011-001A [J] which are located either on the rear, bottom or side of the cabinet. Model No. COMPACT COMPONENT SYSTEM NX-PN10 INSTRUCTIONS For customer use: Enter below the Model No.
and Serial No. Serial No. Retain this information for future reference. LVT2011-001A [J] which are located either on the rear, bottom or side of the cabinet. Model No. COMPACT COMPONENT SYSTEM NX-PN10 INSTRUCTIONS For customer use: Enter below the Model No.

Instruction Manual
Page 2
...interference to part 15 of the following measures: Reorient or relocate the receiving antenna. This equipment has been tested and found to comply with the instructions, may cause harmful interference to correct the interference by one or more of the FCC Rules. L'alimentation peut être télécommand&#... power off completely (the STANDBY lamp goes off and on, the user is no guarantee that to which can be determined by JVC could void the user's authority to rain or moisture. The power can be remote controlled. Do not remove screws, covers or cabinet. 2.
...interference to part 15 of the following measures: Reorient or relocate the receiving antenna. This equipment has been tested and found to comply with the instructions, may cause harmful interference to correct the interference by one or more of the FCC Rules. L'alimentation peut être télécommand&#... power off completely (the STANDBY lamp goes off and on, the user is no guarantee that to which can be determined by JVC could void the user's authority to rain or moisture. The power can be remote controlled. Do not remove screws, covers or cabinet. 2.

Instruction Manual
Page 6
... ventilation openings or holes. If they are blocked by a newspaper or cloth, etc., the heat may not be able to get out. Please read all instructions carefully before operating any metallic object or liquid fall into the unit, unplug the AC power cord and consult your dealer before operation, to ensure... on the plug, not the AC power cord. Others • Should any further. Introduction Thank you are not going to operate the unit for purchasing a JVC product.
... ventilation openings or holes. If they are blocked by a newspaper or cloth, etc., the heat may not be able to get out. Please read all instructions carefully before operating any metallic object or liquid fall into the unit, unplug the AC power cord and consult your dealer before operation, to ensure... on the plug, not the AC power cord. Others • Should any further. Introduction Thank you are not going to operate the unit for purchasing a JVC product.
Instruction Manual
Page 9
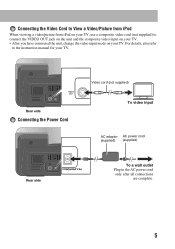
... your TV. • After you have connected the unit, change the video input mode on your TV, use a composite video cord (not supplied) to the instruction manual for your TV. Rear side Connecting the Power Cord Rear side Video cord (not supplied) To video input AC adaptor AC power cord (supplied...
... your TV. • After you have connected the unit, change the video input mode on your TV, use a composite video cord (not supplied) to the instruction manual for your TV. Rear side Connecting the Power Cord Rear side Video cord (not supplied) To video input AC adaptor AC power cord (supplied...

Instruction Manual
Page 17
... or damage the terminal of the dock when you connect iPod. About the battery charge of iPod The battery of the battery charging, see the instruction manual for iPod. 13 You can have 2 iPod devices connected at the same time. • For details of iPod is always charged through the unit...
... or damage the terminal of the dock when you connect iPod. About the battery charge of iPod The battery of the battery charging, see the instruction manual for iPod. 13 You can have 2 iPod devices connected at the same time. • For details of iPod is always charged through the unit...

Instruction Manual
Page 18
...setting on the menu/screen. - MENU*2 Selects an item on iPod. Press: Selects an item. - For details of the setting, see the instruction manual for iPod. Starts playback/pauses. Goes back to the beginning of iPod counterclockwise/clockwise. *1 Not available for iPhone and iPod touch. *2 ...Not equipped with iPhone and iPod touch. Operations For details, also refer to the instruction manual for iPod. • For iPhone and iPod touch Operate iPhone or iPod touch itself in the following cases: - when dragging the ...
...setting on the menu/screen. - MENU*2 Selects an item on iPod. Press: Selects an item. - For details of the setting, see the instruction manual for iPod. Starts playback/pauses. Goes back to the beginning of iPod counterclockwise/clockwise. *1 Not available for iPhone and iPod touch. *2 ...Not equipped with iPhone and iPod touch. Operations For details, also refer to the instruction manual for iPod. • For iPhone and iPod touch Operate iPhone or iPod touch itself in the following cases: - when dragging the ...

Instruction Manual
Page 20
...iPod. You might drop it down or it . • When you connect iPod to the dock, make sure the terminal on operating iPod, see the instruction manual for iPod. • Turn off the unit when disconnecting iPod. • Remove iPod from the use it might cause damage to these terminals. ...iPod. It might cause damage to the connector part. • Sound distortion may occur when playing back audio sources with iPod connected. NOTES: • JVC is fully inserted into iPod. • Always set the volume to the minimum level when connecting or disconnecting iPod. • Do not carry the unit...
...iPod. You might drop it down or it . • When you connect iPod to the dock, make sure the terminal on operating iPod, see the instruction manual for iPod. • Turn off the unit when disconnecting iPod. • Remove iPod from the use it might cause damage to these terminals. ...iPod. It might cause damage to the connector part. • Sound distortion may occur when playing back audio sources with iPod connected. NOTES: • JVC is fully inserted into iPod. • Always set the volume to the minimum level when connecting or disconnecting iPod. • Do not carry the unit...

Instruction Manual
Page 23
... Back from the connected equipment if the incoming signal is on standby when connecting or disconnecting other equipment with the equipment. Hold down to the instruction manual supplied with analog audio output jacks, such as the source. 2 Start playing the equipment. FM AUDIO IN To Adjust the Sound Input Level from...
... Back from the connected equipment if the incoming signal is on standby when connecting or disconnecting other equipment with the equipment. Hold down to the instruction manual supplied with analog audio output jacks, such as the source. 2 Start playing the equipment. FM AUDIO IN To Adjust the Sound Input Level from...

Instruction Manual
Page 27
... Sensor is turned on the unit is not properly extended and positioned (P.4). The unit is incorrect or loose (P.4). Radio Operations Hard to listen to the instruction manual for Power turns on your unit, check this list for a possible solution before you turned more than 10 minutes. If you have occurred. The...
... Sensor is turned on the unit is not properly extended and positioned (P.4). The unit is incorrect or loose (P.4). Radio Operations Hard to listen to the instruction manual for Power turns on your unit, check this list for a possible solution before you turned more than 10 minutes. If you have occurred. The...