Instructions
Page 6
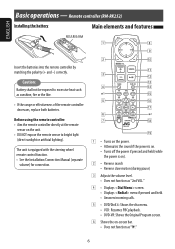
...sunlight or artificial lighting). ENGLISH Basic operations - The unit is equipped with the steering wheel remote control function. • See the Installation/Connection Manual (separate volume) for connection. 1 • Turns on the power. • Attenuates the sound if the power is on. • ...8226; Displays screen. • Displays menu if pressed and held. • Answers incoming calls. 5 • DVD/DivX 6: Shows the disc menu. • VCD: Resumes PBC playback. • DVD-VR: Shows the Original Program screen. 6 Shows the on the unit. • DO NOT expose the remote sensor...
...sunlight or artificial lighting). ENGLISH Basic operations - The unit is equipped with the steering wheel remote control function. • See the Installation/Connection Manual (separate volume) for connection. 1 • Turns on the power. • Attenuates the sound if the power is on. • ...8226; Displays screen. • Displays menu if pressed and held. • Answers incoming calls. 5 • DVD/DivX 6: Shows the disc menu. • VCD: Resumes PBC playback. • DVD-VR: Shows the Original Program screen. 6 Shows the on the unit. • DO NOT expose the remote sensor...
Instructions
Page 7
DVD-VR: Selects the program/Playlist. Press and hold : Manual Search For satellite tuner operations: • 5 / ∞: Selects the categories. • 4 / ¢: - HD Radio: Selects a multicast channel. • 4 / ¢: Functions to search for audio player operation) p • Forward search • Forward slow motion (during... u • Makes selection/settings Skips back or forward by five minutes for DivX/MPEG1/MPEG2 Changes discs for audio player operation). Selects a channel if pressed. r "TUNER"/"SAT"/"HD Radio": Selects the bands. "Bluetooth AUDIO": Starts playback/...
DVD-VR: Selects the program/Playlist. Press and hold : Manual Search For satellite tuner operations: • 5 / ∞: Selects the categories. • 4 / ¢: - HD Radio: Selects a multicast channel. • 4 / ¢: Functions to search for audio player operation) p • Forward search • Forward slow motion (during... u • Makes selection/settings Skips back or forward by five minutes for DivX/MPEG1/MPEG2 Changes discs for audio player operation). Selects a channel if pressed. r "TUNER"/"SAT"/"HD Radio": Selects the bands. "Bluetooth AUDIO": Starts playback/...
Instructions
Page 8
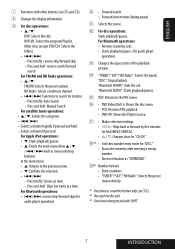
... screen and set the clock. • Non-available items will be shaded on the power. Return to the preceding menu page Indication language: In this manual, English indications are used for purpose of explanation. Moves to the succeeding menu page Ÿ Display screen. ! ENGLISH Before operating the unit You can select...
... screen and set the clock. • Non-available items will be shaded on the power. Return to the preceding menu page Indication language: In this manual, English indications are used for purpose of explanation. Moves to the succeeding menu page Ÿ Display screen. ! ENGLISH Before operating the unit You can select...
Instructions
Page 10
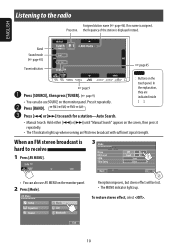
...; page 45) Tuner indicators ☞ page 45 ☞ page 9 ~ Press [SOURCE], then press [TUNER]. (☞ page 9) • You can also use SOURCE on the monitor panel. 2 Press [Mode]. Press it repeatedly. • The ST indicator lights up . To restore stereo effect, select . 10 If no name is displayed instead. When... sufficient signal strength. Press [4] or [¢] to the radio Assigned station name (☞ page 46). In the explanation, they are indicated inside [ ]. • Manual Search: Hold either [4]or [¢] until "Manual Search" appears on the touch panel.
...; page 45) Tuner indicators ☞ page 45 ☞ page 9 ~ Press [SOURCE], then press [TUNER]. (☞ page 9) • You can also use SOURCE on the monitor panel. 2 Press [Mode]. Press it repeatedly. • The ST indicator lights up . To restore stereo effect, select . 10 If no name is displayed instead. When... sufficient signal strength. Press [4] or [¢] to the radio Assigned station name (☞ page 46). In the explanation, they are indicated inside [ ]. • Manual Search: Hold either [4]or [¢] until "Manual Search" appears on the touch panel.

Instructions
Page 12
Selecting a preset station On the remote: 1 2 or Hold On the unit: • To select directly on the touch panel 2 Tune in to a station you want to preset. 3 Select a preset number. • To select from the Preset List 1 2 [Hold] The station selected in step 2 is now stored in preset number 4. 12 ENGLISH Manual presetting Ex.: Storing FM station of 92.5 MHz into preset number 4 of the FM1 band. 1 Display the Preset List.
Selecting a preset station On the remote: 1 2 or Hold On the unit: • To select directly on the touch panel 2 Tune in to a station you want to preset. 3 Select a preset number. • To select from the Preset List 1 2 [Hold] The station selected in step 2 is now stored in preset number 4. 12 ENGLISH Manual presetting Ex.: Storing FM station of 92.5 MHz into preset number 4 of the FM1 band. 1 Display the Preset List.
Instructions
Page 30
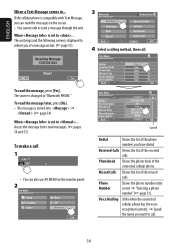
...; You can read the message, press [Yes]. To read messages. (☞ pages 54 and 55) To make a call . 30 To read the messages on the monitor panel. 2 Cancel Redial Shows the list of the missed calls. Received Calls Shows the list of the connected cellular phone. If the cellular phone is...
...; You can read the message, press [Yes]. To read messages. (☞ pages 54 and 55) To make a call . 30 To read the messages on the monitor panel. 2 Cancel Redial Shows the list of the missed calls. Received Calls Shows the list of the connected cellular phone. If the cellular phone is...
Instructions
Page 48
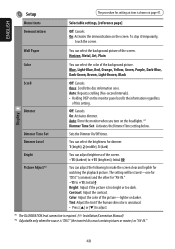
... You can adjust the following to +15 (brightest); Auto: Repeats scrolling (five-second intervals). • Holding DISP on the screen. Auto: Dims the monitor when you turn on page 47. Dimmer Level You can select the brightness for dimmer. 1 (bright), 2 (middle), 3 (dark) Bright You can ...one for "DISC" (common) and the other for "AV-IN." -15 to adjust. *1 The ILLUMINATION lead connection is required. (☞ Installation/Connection Manual) *2 Adjustable only when the source is "DISC" (the inserted disc must contain pictures or movies) or "AV-IN." 48 Initial 0 Bright: Adjust ...
... You can adjust the following to +15 (brightest); Auto: Repeats scrolling (five-second intervals). • Holding DISP on the screen. Auto: Dims the monitor when you turn on page 47. Dimmer Level You can select the brightness for dimmer. 1 (bright), 2 (middle), 3 (dark) Bright You can ...one for "DISC" (common) and the other for "AV-IN." -15 to adjust. *1 The ILLUMINATION lead connection is required. (☞ Installation/Connection Manual) *2 Adjustable only when the source is "DISC" (the inserted disc must contain pictures or movies) or "AV-IN." 48 Initial 0 Bright: Adjust ...
Instructions
Page 52
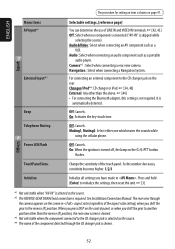
...[34, 40] External: Any other than the above. ☞ [44] • For connecting the Bluetooth adapter, this setting is selected as a portable audio player. Off: Cancels. Press and hold [Enter] to the CD changer jack on page 47. Camera*2 : Select when connecting a rear view camera. On: When the...camera appears on the screen in . Muting1, Muting2: Select either one which mutes the sounds while using the cellular phone. See Installation/Connection Manual. Audio&Video: Select when connecting an AV component such as the source. *4 The name of the aspect ratio setting) when you shift ...
...[34, 40] External: Any other than the above. ☞ [44] • For connecting the Bluetooth adapter, this setting is selected as a portable audio player. Off: Cancels. Press and hold [Enter] to the CD changer jack on page 47. Camera*2 : Select when connecting a rear view camera. On: When the...camera appears on the screen in . Muting1, Muting2: Select either one which mutes the sounds while using the cellular phone. See Installation/Connection Manual. Audio&Video: Select when connecting an AV component such as the source. *4 The name of the aspect ratio setting) when you shift ...
Instructions
Page 55
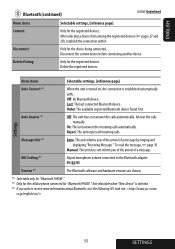
...device before connecting another device. Order: The available registered Bluetooth device found first. On: The unit answers the incoming calls automatically. Manual: The unit does not inform you of the arrival of a message by ringing and displaying "Receiving Message." Last: The last ... for the device being connected. MIC Setting *5 Adjust microphone volume connected to receive more information about Bluetooth, visit the following JVC web site: 55 SSEETTTININGGSS Reject: The unit rejects all incoming calls. Not selectable when "New Device" is established automatically with...
...device before connecting another device. Order: The available registered Bluetooth device found first. On: The unit answers the incoming calls automatically. Manual: The unit does not inform you of the arrival of a message by ringing and displaying "Receiving Message." Last: The last ... for the device being connected. MIC Setting *5 Adjust microphone volume connected to receive more information about Bluetooth, visit the following JVC web site: 55 SSEETTTININGGSS Reject: The unit rejects all incoming calls. Not selectable when "New Device" is established automatically with...
Instructions
Page 57
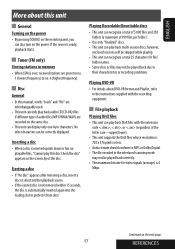
Disc General • In this manual, words "track" and "file" are interchangeably used. • This unit can only ...discs. • This unit can play this unit General Turning on the power • By pressing SOURCE on the monitor panel, you can also turn on the next page 57 REFERENCES Eject the disc. however, unclosed sessions will be ...-session discs; No other characters can be played back due to their characteristics or recording conditions. ENGLISH More about DVD-VR format and Playlist, refer to the instructions supplied with the extension code , , or (regardless of the ...
Disc General • In this manual, words "track" and "file" are interchangeably used. • This unit can only ...discs. • This unit can play this unit General Turning on the power • By pressing SOURCE on the monitor panel, you can also turn on the next page 57 REFERENCES Eject the disc. however, unclosed sessions will be ...-session discs; No other characters can be played back due to their characteristics or recording conditions. ENGLISH More about DVD-VR format and Playlist, refer to the instructions supplied with the extension code , , or (regardless of the ...
Instructions
Page 64
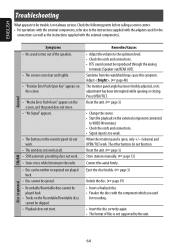
... angle has been forcibly adjusted, or its adjustment has been interrupted while opening or closing. When the monitor panel is not always serious. ENGLISH Troubleshooting What appears to be trouble is open, only +/- (volume) and OPEN/TILT work . • Static ... played back. • Disc cannot be ejected. • Recordable/Rewritable discs cannot be played back. • Tracks on the monitor panel do not function. Reset the unit. (☞ page 3) Store stations manually. (☞ page 12) Connect the aerial firmly. Eject the disc forcibly. (☞ page 3) Unlock the disc. (☞ ...
... angle has been forcibly adjusted, or its adjustment has been interrupted while opening or closing. When the monitor panel is not always serious. ENGLISH Troubleshooting What appears to be trouble is open, only +/- (volume) and OPEN/TILT work . • Static ... played back. • Disc cannot be ejected. • Recordable/Rewritable discs cannot be played back. • Tracks on the monitor panel do not function. Reset the unit. (☞ page 3) Store stations manually. (☞ page 12) Connect the aerial firmly. Eject the disc forcibly. (☞ page 3) Unlock the disc. (☞ ...
Instructions
Page 65
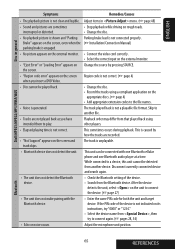
...file. • Tracks are not played back as you insert a DVD Video. This sometimes occurs during playback. This is not correct. ... not make pairing with one Bluetooth cellular phone and one Bluetooth audio player at a time. Disconnect currently connected device and search again. •... appears on the screen, even when the (☞ Installation/Connection Manual) parking brake is not connected properly. Change the source by how... picture appears on the external monitor. • Connect the video cord correctly. • Select the correct input on the external monitor. • "Eject Error"...
...file. • Tracks are not played back as you insert a DVD Video. This sometimes occurs during playback. This is not correct. ... not make pairing with one Bluetooth cellular phone and one Bluetooth audio player at a time. Disconnect currently connected device and search again. •... appears on the screen, even when the (☞ Installation/Connection Manual) parking brake is not connected properly. Change the source by how... picture appears on the external monitor. • Connect the video cord correctly. • Select the correct input on the external monitor. • "Eject Error"...
